This is the multi-page printable view of this section. Click here to print.
Advanced
1 - Scheduling and Autoscaling
GameServers are provisioned impacts how to autoscale fleets up and down (or if you would even want to)Cluster Autoscaler
Kubernetes has a cluster node autoscaler that works with a wide variety of cloud providers.
The default scheduling strategy (Packed) is designed to work with the Kubernetes autoscaler out of the box.
The autoscaler will automatically add Nodes to the cluster when GameServers don’t have room to be scheduled on the
clusters, and then scale down when there are empty Nodes with no GameServers running on them.
This means that scaling Fleets up and down can be used to control the size of the cluster, as the cluster autoscaler
will adjust the size of the cluster to match the resource needs of one or more Fleets running on it.
To enable and configure autoscaling on your cloud provider, check their connector implementation, or their cloud specific documentation.
Google Kubernetes Engine
Amazon Elastic Kubernetes Service
Azure Kubernetes Service
Fleet Autoscaling
Fleet autoscaling is the only type of autoscaling that exists in Code Blind. It is currently available as a buffer autoscaling strategy or as a webhook driven strategy, such that you can provide your own autoscaling logic.
Have a look at the Create a Fleet Autoscaler quickstart, the Create a Webhook Fleet Autoscaler quickstart, and the Fleet Autoscaler Specification for details.
Autoscaling Concepts
To facilitate autoscaling, we need to combine several concepts and functionality, as described below.
Allocation Scheduling
Allocation scheduling refers to the order in which GameServers, and specifically their backing Pods are chosen
from across the Kubernetes cluster within a given Fleet when allocation occurs.
Pod Scheduling
Each GameServer is backed by a Kubernetes Pod. Pod scheduling
refers to the strategy that is in place that determines which node in the Kubernetes cluster the Pod is assigned to,
when it is created.
Fleet Scale Down Strategy
Fleet Scale Down strategy refers to the order in which the GameServers that belong to a Fleet are deleted,
when Fleets are shrunk in size.
Fleet Scheduling
There are two scheduling strategies for Fleets - each designed for different types of Kubernetes Environments.
Packed
apiVersion: "agones.dev/v1"
kind: Fleet
metadata:
  name: simple-game-server
spec:
  replicas: 100
  scheduling: Packed
  template:
    spec:
      ports:
      - containerPort: 7654
      template:
        spec:
          containers:
          - name: simple-game-server
            image: us-docker.pkg.dev/codeblind/examples/simple-server:0.27
This is the default Fleet scheduling strategy. It is designed for dynamic Kubernetes environments, wherein you wish to scale up and down as load increases or decreases, such as in a Cloud environment where you are paying for the infrastructure you use.
It attempts to pack as much as possible into the smallest set of nodes, to make scaling infrastructure down as easy as possible.
This affects the Cluster autoscaler, Allocation Scheduling, Pod Scheduling and Fleet Scale Down Scheduling.
Cluster Autoscaler
When using the “Packed” strategy, Code Blind will ensure that the Cluster Autoscaler doesn’t attempt to evict and move GameServer Pods onto new Nodes during
gameplay.
If a gameserver can tolerate being evicted
(generally in combination with setting an appropriate graceful termination period on the gameserver pod) and you
want the Cluster Autoscaler to compact your cluster by evicting game servers when it would allow the Cluster
Autoscaler to reduce the number of nodes in the cluster, Controlling Disruption describes
how to choose the .eviction setting appropriate for your GameServer or Fleet.
Allocation Scheduling Strategy
Under the “Packed” strategy, allocation will prioritise allocating GameServers to nodes that are running on
Nodes that already have allocated GameServers running on them.
Pod Scheduling Strategy
Under the “Packed” strategy, Pods will be scheduled using the PodAffinity
with a preferredDuringSchedulingIgnoredDuringExecution affinity with hostname
topology. This attempts to group together GameServer Pods within as few nodes in the cluster as it can.
Note
The default Kubernetes scheduler doesn’t do a perfect job of packing, but it’s a good enough job for what we need - at least at this stage.Fleet Scale Down Strategy
With the “Packed” strategy, Fleets will remove Ready GameServers from Nodes with the least number of Ready and
Allocated GameServers on them. Attempting to empty Nodes so that they can be safely removed.
Distributed
apiVersion: "agones.dev/v1"
kind: Fleet
metadata:
  name: simple-game-server
spec:
  replicas: 100
  scheduling: Distributed
  template:
    spec:
      ports:
      - containerPort: 7654
      template:
        spec:
          containers:
          - name: simple-game-server
            image: us-docker.pkg.dev/codeblind/examples/simple-server:0.27
This Fleet scheduling strategy is designed for static Kubernetes environments, such as when you are running Kubernetes on bare metal, and the cluster size rarely changes, if at all.
This attempts to distribute the load across the entire cluster as much as possible, to take advantage of the static size of the cluster.
Note
Distributed scheduling does not set
a PodAffinity
on GameServer Pods, and instead assumes that the default scheduler for your cluster will distribute the
GameServer Pods across the cluster by default.
If your default scheduler does not do this, you may wish to set your own PodAffinity to spread the load across the
cluster, or update the default scheduler to provide this functionality.
This affects Allocation Scheduling, Pod Scheduling and Fleet Scale Down Scheduling.
Cluster Autoscaler
Since this strategy is not aimed at clusters that autoscale, this strategy does nothing for the cluster autoscaler.
Allocation Scheduling Strategy
Under the “Distributed” strategy, allocation will prioritise allocating GameServers to nodes that have the least
number of allocated GameServers on them.
Pod Scheduling Strategy
Under the “Distributed” strategy, Pod scheduling is provided by the default Kubernetes scheduler, which will attempt
to distribute the GameServer Pods across as many nodes as possible.
Fleet Scale Down Strategy
With the “Distributed” strategy, Fleets will remove Ready GameServers from Nodes with at random, to ensure
a distributed load is maintained.
2 - High Availability Code Blind
High Availability for Code Blind Controller
The agones-controller responsibility is split up into agones-controller, which enacts the Code Blind control loop, and agones-extensions, which acts as a service endpoint for webhooks and the allocation extension API. Splitting these responsibilities allows the agones-extensions pod to be horizontally scaled, making the Code Blind control plane highly available and more resiliant to disruption.
Multiple agones-controller pods enabled, with a primary controller selected via leader election. Having multiple agones-controller minimizes downtime of the service from pod disruptions such as deployment updates, autoscaler evictions, and crashes.
Extension Pod Configrations
The agones-extensions binary has a similar helm configuration to agones-controller, see here. If you previously overrode agones.controller.* settings, you may need to override the same agones.extensions.* setting.
To change controller.numWorkers to 200 from 100 values and through the use of helm --set, add the follow to the helm command:
extensions values! ...
--set agones.controller.numWorkers=200
...
An important configuration to note is the PodDisruptionBudget fields, agones.extensions.pdb.minAvailable and agones.extensions.pdb.maxUnavailable. Currently, the agones.extensions.pdb.minAvailable field is set to 1.
Deployment Considerations
Leader election will automatically be enabled and agones.controller.replicas is > 1. agones.controller.replicas defaults to 2.
The default configuration now deploys 2 agones-controller pods and 2 agones-extensions pods, replacing the previous single agones-controller pod setup. For example:
NAME                                 READY   STATUS    RESTARTS   AGE
agones-allocator-78c6b8c79-h9nqc     1/1     Running   0          23h
agones-allocator-78c6b8c79-l2bzp     1/1     Running   0          23h
agones-allocator-78c6b8c79-rw75j     1/1     Running   0          23h
agones-controller-fbf944f4-vs9xx     1/1     Running   0          23h
agones-controller-fbf944f4-sjk3t     1/1     Running   0          23h
agones-extensions-5648fc7dcf-hm6lk   1/1     Running   0          23h
agones-extensions-5648fc7dcf-qbc6h   1/1     Running   0          23h
agones-ping-5b9647874-2rrl6          1/1     Running   0          27h
agones-ping-5b9647874-rksgg          1/1     Running   0          27h
The number of replicas for agones-extensions can be set using helm variable agones.extensions.replicas, but the default is 2.
We expect the aggregate memory consumption of the pods will be slightly higher than the previous singleton pod, but as the responsibilities are now split across the pods, the aggregate CPU consumption should also be similar.
Feature Design
Please see HA Code Blind.
3 - Controlling Disruption
Disruption in Kubernetes
A Pod in Kubernetes may be disrupted for involuntary reasons, e.g. hardware failure, or voluntary reasons, such as when nodes are drained for upgrades.
By default, Code Blind assumes your game server should never be disrupted voluntarily and configures the Pod appropriately - but this isn’t always the ideal setting. Here we discuss how Code Blind allows you to control the two most significant sources of voluntary Pod evictions, node upgrades and Cluster Autoscaler, using the eviction API on the GameServer object.
Benefits of Allowing Voluntary Disruption
It’s not always easy to write your game server in a way that allows for disruption, but it can have major benefits:
- Compaction of your cluster using Cluster Autoscaler can lead to considerable cost savings for your infrastructure.
- Allowing automated node upgrades can save you management toil, and lowers the time it takes to patch security vulnerabilites.
Considerations
When discussing game server pod disruption, it’s important to keep two factors in mind:
TERMsignal: Is your game server tolerant of graceful termination? If you wish to support voluntary disruption, your game server must handle theTERMsignal (even if it runs to completion after receivingTERM).- Termination Grace Period: After receiving
TERM, how long does your game server need to run? If you run to completion after receivingTERM, this is equivalent to the session length - if not, you can think of this as the cleanup time. In general, we bucket the grace period into “less than 10 minutes”, “10 minutes to an hour”, and “greater than an hour”. (See below if you are curious about grace period considerations.)
eviction API
The eviction API is specified as part of the GameServerSpec, like:
apiVersion: "agones.dev/v1"
kind: GameServer
metadata:
  name: "simple-game-server"
spec:
  eviction:
    safe: Always
  template:
    [...]
You can set eviction.safe based on your game server’s tolerance for disruption and session length, based on the following diagram:
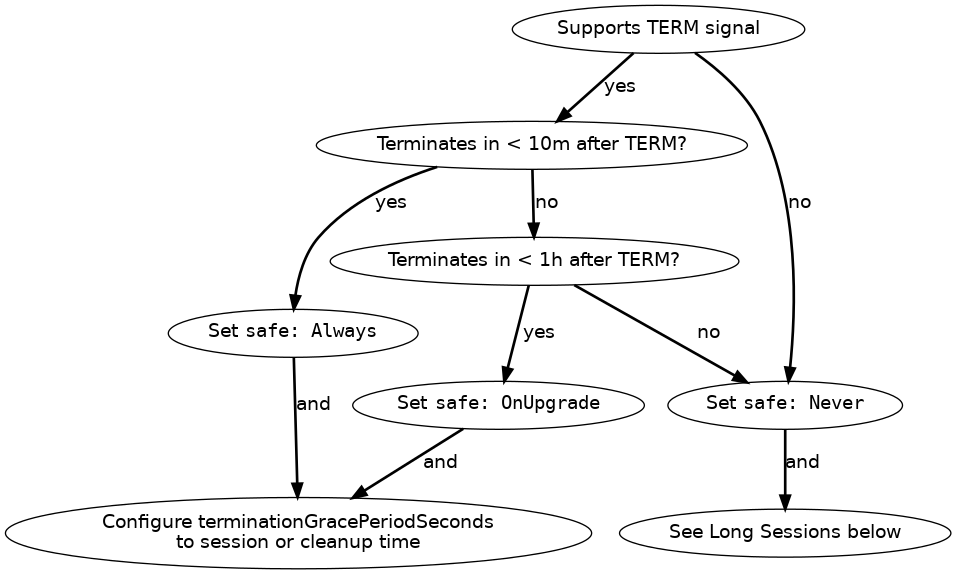
In words:
- Does the game server support
TERMand terminate within ten minutes?- Yes to both: Set
safe: Always, and set terminationGracePeriodSeconds to the session length or cleanup time. - No to either: Does the game server support
TERMand terminate within an hour?- Yes to both: Set
safe: OnUpgrade, and configure terminationGracePeriodSeconds to the session length or cleanup time. - No to either: Set
safe: Never. If your game server does not terminate within an hour, see below.
- Yes to both: Set
- Yes to both: Set
Note
To maintain backward compatibility with Code Blind prior to the introduction ofeviction API, if your game server previously configured the cluster-autoscaler.kubernetes.io/safe-to-evict: true annotation, we assume eviction.safe: Always is intended.Note
GKE Autopilot supports onlyNever and Always, not OnUpgrade.What’s special about ten minutes and one hour?
Ten minutes: Cluster Autoscaler respects ten minutes of graceful termination on scale-down. On some cloud products, you can configure
--max-graceful-termination-secto change this, but it is not advised: Cluster Autoscaler is currently only capable of scaling down one node at a time, and larger graceful termination windows slow this down farther (see autoscaler#5079). If the ten minute limit does not apply to you, generally you should choose betweensafe: Always(for sessions less than an hour), or see below.One hour: On many cloud products,
PodDisruptionBudgetcan only block node upgrade evictions for a certain period of time - on GKE this is 1h. After that, the PDB is ignored, or the node upgrade fails with an error. ControllingPoddisruption for longer than one hour requires cluster configuration changes outside of Code Blind - see below.
Considerations for long sessions
Outside of Cluster Autoscaler, the main source of disruption for long sessions is node upgrade. On some cloud products, such as GKE Standard, node upgrades are entirely within your control. On others, such as GKE Autopilot, node upgrade is automatic. Typical node upgrades use an eviction based, rolling recreate strategy, and may not honor PodDisruptionBudget for longer than an hour. See Best Practices for information specific to your cloud product.
Implementation / Under the hood
Each option uses a slightly different permutation of:
- the
safe-to-evictannotation to block Cluster Autoscaler based eviction, and - the
agones.dev/safe-to-evictlabel selector to select theagones-gameserver-safe-to-evict-falsePodDisruptionBudget. This blocks Cluster Autoscaler and (for a limited time) disruption from node upgrades.- Note that PDBs do influence pod preemption as well, but it’s not guaranteed.
As a quick reference:
| evictions.safe setting | safe-to-evict pod annotation | agones.dev/safe-to-evict label |
|---|---|---|
Never (default) | false | false (matches PDB) |
OnUpdate | false | true (does not match PDB) |
Always | true | true (does not match PDB) |
Further Reading
4 - Limiting CPU & Memory
As a short description:
- CPU
Requestsare limits that are applied when there is CPU congestion, and as such can burst above their set limits. - CPU
Limitsare hard limits on how much CPU time the particular container gets access to.
This is useful for game servers, not just as a mechanism to distribute compute resources evenly, but also as a way to advice the Kubernetes scheduler how many game server processes it is able to fit into a given node in the cluster.
It’s worth reading the Managing Compute Resources for Containers Kubernetes documentation for more details on “requests” and “limits” to both CPU and Memory, and how to configure them.
GameServers
Since the GameServer specification provides a full PodSpecTemplate,
we can take advantage of both resource limits and requests in our GameServer configurations.
For example, to set a CPU limit on our GameServer configuration of 250m/0.25 of a CPU,
we could do so as followed:
apiVersion: "agones.dev/v1"
kind: GameServer
metadata:
  name: "simple-game-server"
spec:
  ports:
  - name: default
    containerPort: 7654
  template:
    spec:
      containers:
      - name: simple-game-server
        image: us-docker.pkg.dev/codeblind/examples/simple-server:0.27
        resources:
          limits:
            cpu: "250m" #this is our limit here
If you do not set a limit or request, the default is set by Kubernetes at a 100m CPU request.
SDK GameServer sidecar
You may also want to tweak the CPU request or limits on the SDK GameServer sidecar process that spins up alongside
each game server container.
You can do this through the Helm configuration when installing Code Blind.
By default, this is set to having a CPU request value of 30m, with no hard CPU limit. This ensures that the sidecar always has enough CPU to function, but it is configurable in case a lower, or higher value is required on your clusters, or if you desire hard limit.
5 - Out of Cluster Dev Server
This section builds upon the topics discussed in local SDK Server, Local Game Server, and GameServer allocation (discussed here, here, and here).
Having a firm understanding of those concepts will be necessary for running an “out of cluster” local server.
Running an “out of cluster” dev server combines the best parts of local debugging and being a part of a cluster. A developer will be able to run a custom server binary on their local machine, even within an IDE with breakpoints. The server would also be allocatable within a cluster, allowing integration with the project’s full stack for handling game server lifetime.
For each run, the only manual steps required by the developer is to manually run the local SDK Server and to run their custom gameplay binary (each can easily be reused/restarted).
All other state progression will be automatically handled by the custom gameplay server (calling the SDK API), the SDK Server (handling the SDK calls), the cluster GameServer Controller (progressing specific states), and the cluster’s allocation system (whether be through GameServerAllocation or via the Allocator Service) – just as it would when running in a pod in a cluster!
Out of cluster development is a fantastic option during early prototyping, as it can (optionally) all be run on a single machine with tools such as Minikube.
The name “out of cluster” is to contrast InClusterConfig which is used in the internal golang kubeconfig API.
Prerequisite steps
To be able to run an “out of cluster” local game server, one needs to first complete a few prerequisite steps.
Cluster created
First, a cluster must have been created that the developer has access to through commands like kubectl.
This cluster could be running on a provider or locally (e.g. on Minikube).
See Create Kubernetes Cluster for more details on how to create a cluster, if not already done so.
Code Blind GameServer resource created
Out of cluster dev servers make use of local dev servers.
Follow the instructions there to create a GameServer resource for use with a local game server.
Note that the metadata:annotations:agones.dev/dev-address should be updated to point to the local machine, more details below around port forwarding.
SDK Server available
An “out of cluster” dev server requires the need to also run the SDK Server locally.
When a GameServer runs normally in a prod-like environment, the Code Blind cluster controller will handle initializing the containers which contain the SDK Server and the game server binary.
The game server binary will be able to connect over gRPC to the SDK Server running in the sidecar container.
When the game server binary makes SDK calls (e.g. SDK.Ready()), those get sent to the SDK Server via gRPC and the SDK Server as able to modify the GameServer resource in the cluster.
When the GameServer resource gets modified (either by the Code Blind cluster controller, by the Code Blind Allocation Service, or by the K8s API), the SDK Server is monitoring and sends update events over gRPC to the SDK API, resulting in a callback in the game server binary logic.
The goal of an “out of cluster” dev server is to keep all this prod-like functionality, even in a debuggable context.
To do so, the developer must run the SDK Server locally such that the (also local) game server binary can connect via gRPC.
Instructions for downloading and running the SDK Server can be found here.
However, instead of using --local or --file, the SDK Server will need to be run in “out of cluster” mode by providing a kubeconfig file to connect to the cluster. This section is focusing on getting the SDK Server ready to run locally, more detail about running it can be found below.
Game server binary available
When running Code Blind normally, the game server binary is inside a prebuilt docker image which is loaded into a container in a GameServer’s pod.
This can either be a custom, developer-created, docker image and contained binary or a sample image/binary from an external source.
This document will use the sample simple-game-server, which follows suit from various other documentation pages (e.g. Quickstart: Create a Game Server).
The simple-game-server can be run from the docker image us-docker.pkg.dev/codeblind/examples/simple-server:0.27.
The game server binary can either be run within a docker container or run locally, so long as all ports are published/forward – more on this below.
Alternatively, the simple-game-server can also be run from source code; see examples/simple-game-server/main.go. More details about running from source can be found here.
Disclaimer: Code Blind is run and tested with the version of Go specified by the GO_VERSION variable in the project’s build Dockerfile. Other versions are not supported, but may still work.
If a developer has their own game server logic, written in the language of their choice, that would be perfectly fine. A custom game server can be similarly run within a docker container, run directly on commandline, or run via an IDE/debugger.
Forwarded Ports
As the game server binary will be run on the developer’s machine and a requesting client will attempt to connect to the game server via the GameServer’s metadata:annotations:agones.dev/dev-address and spec:ports:hostPort fields, the developer needs to ensure that connection can take place.
If the game server binary and the arbitrary connecting client logic are both on the same network, then connecting should work without any extra steps. However, if the developer has a more complicated network configuration or if they are attempting to connect over the public internet, extra steps may be required.
Obviously, this document does not know what every developer’s specific network configuration is, how their custom game client(s) work, their development environment, and/or various other factors. The developer will need to figure out which steps are necessary for their specific configuration.
If attempting to connect via the internet, the developer needs to set the GameServer’s metadata:annotations:agones.dev/dev-address field to their public IP.
This can be found by going to whatsmyip.org or whatismyip.com in a web browser.
The GameServer’s spec:ports:hostPort/spec:ports:containerPort should be set to whichever port the game server binary’s logic will bind to – the port used by simple-game-server is 7654 (by default).
The local network’s router must also be configured to forward this port to the desired machine; allowing inbound external requests (from the internet) to be directed to the machine on the network that is running the game server.
If the SDK Server is run on the same machine as the game server binary, no extra steps are necessary for the two to connect.
By default, the SDK API (in the game server binary) will attempt to gRPC connect to the SDK Server on localhost on the port 9357.
If the SDK Server is run on another machine, or if the SDK Server is set to use different ports (e.g. via commandline arguments), the developer will need to also take appropriate steps to ensure that the game server can connect to the SDK Server.
As discussed further below running the SDK Server with --address 0.0.0.0 can be quite helpful with various setups.
If the developer is running the SDK Server or the game server binary within docker container(s), then publishing ports and/or connecting to a docker network may be necessary. Again, these configurations can vary quite dramatically and the developer will need to find the necessary steps for their specific setup.
Running “out of cluster” local game server
Now that all prerequisite steps have been completed, the developer should have:
- a cluster with a configured
GameServerresource. - the SDK Server ready to run.
- a game server binary ready to run.
Optional GameServer state monitoring
A helpful (optional) step to see progress when running is to watch the GameServer resource.
This can be done with the command:
kubectl get --watch -n default gs my-local-server
It may be necessary to replace default and my-local-server with whichever namespace/name values are used by the dev GameServer created above).
With this command running, the terminal will automatically show updates to the GameServer’s state – however, this is not necessary to proceed.
Running SDK Server locally
The first step is to run the SDK Server, making it available for the (later run) game server binary to connect. Here is a sample command to run the SDK Server, with each argument discussed after.
./sdk-server.linux.amd64 \
  --gameserver-name my-local-server \
  --pod-namespace default \
  --kubeconfig "$HOME/.kube/config" \
  --address 0.0.0.0 \
  --graceful-termination false
--gameserver-nameis a necessary arg, passed instead of theGAMESERVER_NAMEenviroment variable.- It is set to the name of the dev
GameServerk8s resource. - It tells the SDK Sever which resource to read/write to on the k8s cluster.
- This example value of
my-local-servermatches to the instructions for setting up a Local Game Server.
- It is set to the name of the dev
--pod-namespaceis a necessary arg, passed instead of thePOD_NAMESPACEenviroment variable.- It is set set to the namespace which the dev
GameServerresides in. - It tells the SDK Sever which namespace to look under for the
GameServerto read/write to on the k8s cluster. - This example value of
defaultis used as most instructions in this documentation assumesGameServersto be created in thedefaultnamespace.
- It is set set to the namespace which the dev
--kubeconfigtells the SDK Server how to connect to the k8s cluster.- This actually does not trigger any special flow (unlike
--localor--file). The SDK Server will run just as it would when created in a sidecar container in a k8s cluster. - Passing this argument simply provides where to connect along with the credentials to do so.
- This example value of
"$HOME/.kube/config"is the default location for k8s authentication information. This requires the developer be logged in viakubectland have the desired cluster selected viakubectl config use-context.
- This actually does not trigger any special flow (unlike
--addressspecifies the binding IP address for the SDK Server’s SDK API.- By default, the binding address is
localhost. This may be difficult for some development setups. - Overriding this value changes which IP address(es) the server will bind to for receiving gRPC/REST SDK API calls.
- This example value of
0.0.0.0sets the SDK Server to receive API calls that are sent to any IP address (that reach the machine).
- By default, the binding address is
--graceful-terminationset to false will disable some smooth state transitions when exiting.- By default, the SDK Server will wait until the
GameServerhas reached theShutdownstate before exiting (“graceful termination”). - This will cause the SDK Server to hang (waiting on state update) when attempting to terminate (e.g. with
^C). - When running binaries in a development context, quickly exiting and restarting the SDK Server is handy.
- By default, the SDK Server will wait until the
This can easily be terminated with ^C and restarted as necessary.
Note that terminating the SDK Server while the game server binary (discussed in the next section) is using it may result in failure to update/watch GameServer state and may result in a runtime error in the game server binary.
Running game server binary locally
Now that the SDK Server is running locally with k8s credentials, the game server binary can run in an integrated fashion.
The game server binary’s SDK calls will reach the local SDK Server, which will then interact with the GameServer resource on the k8s cluster.
Again, this document will make use of simple-game-server via its docker image, but running directly or use of a custom game server binary is just as applicable.
Run the game server binary with the command:
docker run --rm --network="host" us-docker.pkg.dev/codeblind/examples/simple-server:0.27
The --rm flag will nicely autoclean up the docker container after exiting.
The --network="host" flag will tell the docker container to use the host’s network stack directly; this allows calls to localhost to reach the SDK Server.
The commands and flags used will likely differ if running a custom game server binary.
If the earlier kubectl get --watch command was run, it will now show the GameServer progressed to the RequestReady state, which will automatically be progressed to the Ready state by the Code Blind controller on the cluster.
The GameServer state can further be modified by SDK calls, gRPC/REST calls, allocation via either GameServerAllocation or Allocator Service, K8s API calls, etc.
These changes will be shown by the kubectl get --watch command.
These changes will also be picked up by the game server binary, if there is a listener registered through the SDK API.
This means that this GameServer can be allocated just as it would be when running completely on k8s, but it can be locally debugged.
If the server crashes or is killed by the developer, it can easily be restarted.
This can be done without restarting the SDK Server or any other manual intevention with the GameServer resource.
Naturally, this may have implications on any connected clients, but that is project specific and left to the developer to handle.
6 - Allocator Service
To allocate a game server, Code Blind provides a gRPC and REST service with mTLS authentication, called agones-allocator that can be used instead of
GameServerAllocations.
Both gRPC and REST are accessible through a Kubernetes service that can be externalized using a load balancer. By default, gRPC and REST are served from the same port. However, either service can be disabled or the services can be served from separate ports using the helm configuration.
Warning
If gRPC and REST are served using the same port, then an http multi-plexer is used along with an experimental gRPC server which has noticeably worse performance than using the standard gRPC server.
If you require a fully compatible or feature compatible gRPC server implementation, you must separate the gRPC port from the REST port or disable the REST service.
For requests to either service to succeed, a client certificate must be provided that is in the authorization list of the allocator service. The remainder of this article describes how to manually make a successful allocation request using the API.
The guide assumes you have command line tools installed for jq, go and openssl.
GameServerAllocation vs Allocator Service
There are several reasons you may prefer to use the Allocator Service over the GameServerAllocation custom resource
definition, depending on your architecture and requirements:
- A requirement to do multi-cluster allocation.
- Want to create Allocations from outside the Code Blind Kubernetes cluster.
- Prefer SSL based authentication over Kubernetes RBAC.
- Prefer a gRPC or REST based API over an integration with the Kubernetes API.
Find the external IP
The service is hosted under the same namespace as the Code Blind controller. To find the external IP of your allocator service, replace agones-system namespace with the namespace to which Code Blind is deployed and execute the following command:
kubectl get service agones-allocator -n agones-system
The output of the command should look like:
NAME                        TYPE           CLUSTER-IP      EXTERNAL-IP     PORT(S)            AGE
agones-allocator            LoadBalancer   10.55.251.73    34.82.195.204   443:30250/TCP      7d22h
Server TLS certificate
If the agones-allocator service is installed as a LoadBalancer using a reserved IP, a valid self-signed server TLS certificate is generated using the IP provided. Otherwise, the server TLS certificate should be replaced. If you installed Code Blind using helm, you can easily reconfigure the allocator service with a preset IP address by setting the agones.allocator.service.loadBalancerIP parameter to the address that was automatically assigned to the service and helm upgrade:
EXTERNAL_IP=$(kubectl get services agones-allocator -n agones-system -o jsonpath='{.status.loadBalancer.ingress[0].ip}')
helm upgrade my-release agones/agones -n agones-system --wait \
   --set agones.allocator.service.loadBalancerIP=${EXTERNAL_IP} \
   ...
Warning
The parameter used to automatically replace the certificate changed in Code Blind 1.18.0. If you are using an older version of Code Blind you should pass the parameteragones.allocator.http.loadBalancerIP instead. If you need your script to work
with both older and newer versions of Code Blind, you can pass both parameters as
only one of them will effect the helm chart templates.Another approach is to replace the default server TLS certificate with a certificate with CN and subjectAltName. There are multiple approaches to generate a certificate. Code Blind recommends using cert-manager.io solution for cluster level certificate management.
In order to use the cert-manager solution, first install cert-manager on the cluster.
Then, configure an Issuer/ClusterIssuer resource and
last configure a Certificate resource to manage allocator-tls Secret.
Make sure to configure the Certificate based on your system’s requirements, including the validity duration.
Here is an example of using a self-signed ClusterIssuer for configuring allocator-tls Secret:
#!/bin/bash
# Create a self-signed ClusterIssuer
cat <<EOF | kubectl apply -f -
apiVersion: cert-manager.io/v1
kind: ClusterIssuer
metadata:
  name: selfsigned
spec:
  selfSigned: {}
EOF

EXTERNAL_IP=$(kubectl get services agones-allocator -n agones-system -o jsonpath='{.status.loadBalancer.ingress[0].ip}')

# for EKS use hostname
# HOST_NAME=$(kubectl get services agones-allocator -n agones-system -o jsonpath='{.status.loadBalancer.ingress[0].hostname}')

# Create a Certificate with IP for the allocator-tls secret
cat <<EOF | kubectl apply -f -
apiVersion: cert-manager.io/v1
kind: Certificate
metadata:
  name: allocator-tls
  namespace: agones-system
spec:
  commonName: ${EXTERNAL_IP}
  ipAddresses:
    - ${EXTERNAL_IP}
  secretName: allocator-tls
  issuerRef:
    name: selfsigned
    kind: ClusterIssuer
EOF

# Wait for the allocator-tls Secret
sleep 1
TLS_CA_VALUE=$(kubectl get secret allocator-tls -n agones-system -ojsonpath='{.data.ca\.crt}')

# Add ca.crt to the allocator-tls-ca Secret
kubectl get secret allocator-tls-ca -o json -n agones-system | jq '.data["tls-ca.crt"]="'${TLS_CA_VALUE}'"' | kubectl apply -f -
echo $TLS_CA_VALUE | base64 -d > ca.crt
# In case of MacOS
# echo $TLS_CA_VALUE | base64 -D > ca.crt
Bring Your Own Certificates (advanced)
If you would like to completely manage the tls secrets outside of helm, you can create them in the namespace where agones is going to be installed, and then set the helm value agones.allocator.disableSecretCreation to true. This method will also work with the cert-manager method, as long as your certificate and secret are created ahead of time, and you populate the allocator-tls-ca and allocator-client-ca yourself.
Client Certificate
Because agones-allocator uses an mTLS authentication mechanism, a client must provide a certificate that is accepted by the server.
If Code Blind is installed using Helm, you can leverage a default client secret, allocator-client.default, created in the game server namespace and allowlisted in allocator-client-ca Kubernetes secret. You can extract and use that secret for client side authentication, by following the allocation example.
Otherwise, here is an example of generating a client certificate using openssl.
#!/bin/bash

EXTERNAL_IP=$(kubectl get services agones-allocator -n agones-system -o jsonpath='{.status.loadBalancer.ingress[0].ip}')

openssl req -x509 -nodes -days 365 -newkey rsa:2048 -keyout client.key -out client.crt -addext 'subjectAltName=IP:'${EXTERNAL_IP}''

CERT_FILE_VALUE=$(cat client.crt | base64 -w 0)

# In case of MacOS
# CERT_FILE_VALUE=$(cat client.crt | base64)

# allowlist client certificate
kubectl get secret allocator-client-ca -o json -n agones-system | jq '.data["client_trial.crt"]="'${CERT_FILE_VALUE}'"' | kubectl apply -f -
The last command creates a new entry in the secret data map for allocator-client-ca for the client CA. This is for the agones-allocator service to accept the newly generated client certificate.
Send allocation request
After setting up agones-allocator with server certificate and allowlisting the client certificate, the service can be used to allocate game servers. Make sure you have a fleet with ready game servers in the game server namespace.
Set the environment variables and store the client secrets before allocating using gRPC or REST APIs:
NAMESPACE=default # replace with any namespace
EXTERNAL_IP=$(kubectl get services agones-allocator -n agones-system -o jsonpath='{.status.loadBalancer.ingress[0].ip}')
KEY_FILE=client.key
CERT_FILE=client.crt
TLS_CA_FILE=ca.crt

# allocator-client.default secret is created only when using helm installation. Otherwise generate the client certificate and replace the following.
# In case of MacOS replace "base64 -d" with "base64 -D"
kubectl get secret allocator-client.default -n "${NAMESPACE}" -ojsonpath="{.data.tls\.crt}" | base64 -d > "${CERT_FILE}"
kubectl get secret allocator-client.default -n "${NAMESPACE}" -ojsonpath="{.data.tls\.key}" | base64 -d > "${KEY_FILE}"
kubectl get secret allocator-tls-ca -n agones-system -ojsonpath="{.data.tls-ca\.crt}" | base64 -d > "${TLS_CA_FILE}"
Using gRPC
To start, take a look at the allocation gRPC client examples in
golang and
C# languages. In the following, the
golang gRPC client example is used to allocate a Game Server in the default namespace.
#!/bin/bash

go run examples/allocator-client/main.go --ip ${EXTERNAL_IP} \
    --port 443 \
    --namespace ${NAMESPACE} \
    --key ${KEY_FILE} \
    --cert ${CERT_FILE} \
    --cacert ${TLS_CA_FILE}
Using REST
#!/bin/bash

curl --key ${KEY_FILE} \
     --cert ${CERT_FILE} \
     --cacert ${TLS_CA_FILE} \
     -H "Content-Type: application/json" \
     --data '{"namespace":"'${NAMESPACE}'"}' \
     https://${EXTERNAL_IP}/gameserverallocation \
     -X POST
You should expect to see the following output:
{"gameServerName":"game-server-name","ports":[{"name":"default","port":7463}],"address":"1.2.3.4","nodeName":"node-name"}
Sending Data to the Game Server
The service accepts a metadata field, which can be used to apply labels and annotations to the allocated GameServer. The old metaPatch fields is now deprecated, but can still be used for compatibility. If both metadata and metaPatch fields are set, metaPatch is ignored.
Secrets Explained
agones-allocator has a dependency on three Kubernetes secrets:
allocator-tls- stores the server certificate.allocator-client-ca- stores the allocation authorized client CA for mTLS to allowlist client certificates.allocator-tls-ca(optional) - storesallocator-tlsCA.
The separation of CA secret from the private secret is for the security reason to avoid reading the private secret, while retrieving the allocator CA that is used by the allocation client to validate the server. It is optional to set or maintain the allocator-tls-ca secret.
Troubleshooting
If you encounter problems, explore the following potential root causes:
Check server certificate - Using openssl you can get the certificate chain for the server.
EXTERNAL_IP=$(kubectl get services agones-allocator -n agones-system -o jsonpath='{.status.loadBalancer.ingress[0].ip}') openssl s_client -connect ${EXTERNAL_IP}:443- Inspect the server certificate by storing the certificate returned, under
Server certificateand validating usingopenssl x509 -in tls.crt -text -noout. - Make sure the certificate is not expired and the Subject Alternative Name is set.
- If the issuer is
CN = allocation-ca, the certificate is generated using Code Blind helm installation.
- Inspect the server certificate by storing the certificate returned, under
Check client certificate
- You may get an error such as
rpc error: code = Unavailable desc = all SubConns are in TransientFailure, latest connection error: connection closed, make sure your client certificate is allowlisted by being added toallocator-client-ca.
kubectl get secret allocator-client-ca -o json -n agones-system- If the server certificate is not accepted by the client, you may get an error such as
rpc error: code = Unavailable desc = all SubConns are in TransientFailure, latest connection error: connection error: desc = "transport: authentication handshake failed: x509: certificate signed by unknown authority", depending on the client. In this case, verify that the TLS CA file matches the server certificate.
kubectl get secret allocator-tls -n agones-system -ojsonpath="{.data.tls\.crt}" | base64 -d > tls.crt openssl verify -verbose -CAfile ca.crt tls.crt tls.crt: OK- You may get an error such as
Make sure the service is up and running.
kubectl get pod -n agones-system | grep agones-allocator
agones-allocator-59b4f6b5c6-86j62      1/1     Running     0          6m36s
agones-allocator-59b4f6b5c6-kbqrq      1/1     Running     0          6m45s
agones-allocator-59b4f6b5c6-trbkl      1/1     Running     0          6m28s
kubectl get service agones-allocator -n agones-system agones-allocator LoadBalancer 10.55.248.14 34.82.195.204 443:32468/TCP 6d23h
API Reference
The AllocationService API is located as a gRPC service here. Additionally, the REST API is available as a Swagger API.
7 - Multi-cluster Allocation
There may be different types of clusters, such as on-premise, and Google Kubernetes Engine (GKE), used by a game to help with the cost-saving and availability. For this purpose, Code Blind provides a mechanism to define priorities on the clusters. Priorities are defined on GameServerAllocationPolicy agones CRD. A matchmaker can enable the multi-cluster rules on a request and target agones-allocator endpoint in any of the clusters and get resources allocated on the cluster with the highest priority. If the cluster with the highest priority is overloaded, the allocation request is redirected to the cluster with the next highest priority.
The remainder of this article describes how to enable multi-cluster allocation.
Define Cluster Priority
GameServerAllocationPolicy is the CRD defined by Code Blind for setting multi-cluster allocation rules. In addition to cluster priority, it describes the connection information for the target cluster, including the game server namespace, agones-allocator endpoint and client K8s secrets name for redirecting the allocation request. Game servers will be allocated from clusters with the lowest priority number. If there are no available game servers available in clusters with the lowest priority number, they will be allocated from clusters with the next lowest priority number. For clusters with the same priority, the cluster is chosen with a probability relative to its weight.
Here is an example of setting the priority for a cluster and it’s connection rules. One such resource should be defined per cluster.
In the following example the policy is defined for cluster B in cluster A.
cat <<EOF | kubectl apply -f -
apiVersion: multicluster.agones.dev/v1
kind: GameServerAllocationPolicy
metadata:
  name: allocator-cluster-b
  namespace: cluster-a-ns
spec:
  connectionInfo:
    allocationEndpoints:
    - 34.82.195.204
    clusterName: "clusterB"
    namespace: cluster-b-ns
    secretName: allocator-client-to-cluster-b
    serverCa: c2VydmVyQ0E=
  priority: 1
  weight: 100
EOF
To define the local cluster priority a GameServerAllocationPolicy should be defined without an allocationEndpoints field. If the local cluster priority is not defined, the allocation from the local cluster happens only if allocation from other clusters with the existing allocation rules is unsuccessful.
Allocation requests with multi-cluster allocation enabled but with only the local cluster available (e.g. in development) must have a local cluster priority defined, or the request fails with the error “no multi-cluster allocation policy is specified”.
The namespace field in connectionInfo is the namespace that the game servers will be allocated in, and must be a namespace in the target cluster that has been previously defined as allowed to host game servers. The Namespace specified in the allocation request (below) is used to refer to the namespace that the GameServerAllocationPolicy itself is located in.
serverCa is the server TLS CA public certificate, set only if the remote server certificate is not signed by a public CA (e.g. self-signed). If this field is not specified, the certificate can also be specified in a field named ca.crt of the client secret (the secret referred to in the secretName field).
Establish trust
To accept allocation requests from other clusters, agones-allocator for cluster B should be configured to accept the client’s certificate from cluster A and the cluster A’s client should be configured to accept the server TLS certificate, if it is not signed by a public Certificate Authority (CA).
Follow the steps to configure the agones allocator gRPC service. The client certificate pair in the mentioned document is stored as a K8s secret. Here are the secrets to set:
1.Client certificate to talk to other clusters:
cat <<EOF | kubectl apply -f -
apiVersion: v1
kind: Secret
metadata:
  name: allocator-client-to-cluster-b
  namespace: cluster-a-ns
type: Opaque
data:
  tls.crt: <REDACTED>
  tls.key: <REDACTED>
  ca.crt: <REDACTED>
EOF
The certificates are base 64 string of the certificate file e.g. cat ${CERT_FILE} | base64 -w 0
Code Blind recommends using cert-manager.io solution for generating client certificates.
2.Add client CA to the list of authorized client certificates by agones-allocator in the targeted cluster.
cat <<EOF | kubectl apply -f -
apiVersion: v1
kind: Secret
metadata:
  name: allocator-client-ca
  namespace: agones-system
type: Opaque
data:
  client1.crt: <REDACTED>
  client2.crt: <REDACTED>
  …
  clientN.crt: <REDACTED>
EOF
Allocate multi-cluster
To enable multi-cluster allocation, set multiClusterSetting.enabled to true in
allocation.proto and send allocation requests. For more information visit agones-allocator. In the following, using
allocator-client sample, a multi-cluster allocation request is sent to the agones-allocator service. If the allocation succeeds, the AllocationResponse will contain a
Source field which indicates the endpoint of the remote agones-allocator.
Set the environment variables and store the client secrets before allocating using gRPC or REST APIs
#!/bin/bash

NAMESPACE=default # replace with any namespace
EXTERNAL_IP=$(kubectl get services agones-allocator -n agones-system -o jsonpath='{.status.loadBalancer.ingress[0].ip}')
KEY_FILE=client.key
CERT_FILE=client.crt
TLS_CA_FILE=ca.crt

# allocator-client.default secret is created only when using helm installation. Otherwise generate the client certificate and replace the following.
# In case of MacOS replace "base64 -d" with "base64 -D"
kubectl get secret allocator-client.default -n "${NAMESPACE}" -ojsonpath="{.data.tls\.crt}" | base64 -d > "${CERT_FILE}"
kubectl get secret allocator-client.default -n "${NAMESPACE}" -ojsonpath="{.data.tls\.key}" | base64 -d > "${KEY_FILE}"
kubectl get secret allocator-tls-ca -n agones-system -ojsonpath="{.data.tls-ca\.crt}" | base64 -d > "${TLS_CA_FILE}"
#!/bin/bash

go run examples/allocator-client/main.go --ip ${EXTERNAL_IP} \
    --namespace ${NAMESPACE} \
    --key ${KEY_FILE} \
    --cert ${CERT_FILE} \
    --cacert ${TLS_CA_FILE} \
    --multicluster true
If using REST use
#!/bin/bash

curl --key ${KEY_FILE} \
     --cert ${CERT_FILE} \
     --cacert ${TLS_CA_FILE} \
     -H "Content-Type: application/json" \
     --data '{"namespace":"'${NAMESPACE}'", "multiClusterSetting":{"enabled":true}}' \
     https://${EXTERNAL_IP}/gameserverallocation \
     -X POST
Troubleshooting
If you encounter problems, explore the following potential root causes:
Make sure single cluster allocation works for each cluster using this troubleshooting.
For each cluster, make sure there is a
GameServerAllocationPolicyresource defined in the game server cluster.Inspect the
.spec.connectionInfoforGameServerAllocationPolicyfor each cluster. Use the cluster connection information in that field to verify that single cluster allocation works. Use the information to verify the connection:
POLICY_NAME=<policy-name>
POLICY_NAMESPACE=<policy-namespace>

NAMESPACE=$(kubectl get gameserverallocationpolicy ${POLICY_NAME} -n ${POLICY_NAMESPACE} -ojsonpath={.spec.connectionInfo.namespace})
EXTERNAL_IP=$(kubectl get gameserverallocationpolicy ${POLICY_NAME} -n ${POLICY_NAMESPACE} -ojsonpath={.spec.connectionInfo.allocationEndpoints\[0\]})
CLIENT_SECRET_NAME=$(kubectl get gameserverallocationpolicy ${POLICY_NAME} -n ${POLICY_NAMESPACE} -ojsonpath={.spec.connectionInfo.secretName})

KEY_FILE=client.key
CERT_FILE=client.crt
TLS_CA_FILE=ca.crt

# In case of MacOS replace "base64 -d" with "base64 -D"
kubectl get secret "${CLIENT_SECRET_NAME}" -n "${POLICY_NAMESPACE}" -ojsonpath="{.data.tls\.crt}" | base64 -d > "${CERT_FILE}"
kubectl get secret "${CLIENT_SECRET_NAME}" -n "${POLICY_NAMESPACE}" -ojsonpath="{.data.tls\.key}" | base64 -d > "${KEY_FILE}"
kubectl get secret "${CLIENT_SECRET_NAME}" -n "${POLICY_NAMESPACE}" -ojsonpath="{.data.ca\.crt}" | base64 -d > "${TLS_CA_FILE}"
#!/bin/bash

go run examples/allocator-client/main.go --ip ${EXTERNAL_IP} \
    --port 443 \
    --namespace ${NAMESPACE} \
    --key ${KEY_FILE} \
    --cert ${CERT_FILE} \
    --cacert ${TLS_CA_FILE}
8 - GameServer Pod Service Accounts
GameServer Pod.Default Settings
By default, Code Blind sets up service accounts and sets them appropriately for the Pods that are created for GameServers.
Since Code Blind provides GameServer Pods with a sidecar container that needs access to Code Blind Custom Resource Definitions,
Pods are configured with a service account with extra RBAC permissions to ensure that it can read and modify the resources it needs.
Since service accounts apply to all containers in a Pod, Code Blind will automatically overwrite the mounted key for the
service account in the container that is running the dedicated game server in the backing Pod. This is done
since game server containers are exposed publicly, and generally don’t require the extra permissions to access aspects
of the Kubernetes API.
Bringing your own Service Account
If needed, you can provide your own service account on the Pod specification in the GameServer configuration.
Warning
If you bring your own Service Account, it’s your responsibility to ensure it matches all the RBAC permissions
the GameServer Pod usually acquires from Code Blind by default, otherwise GameServers can fail.
The default RBAC permissions for can be found in the installation YAML on GitHub and can be used for a reference.
For example:
apiVersion: "agones.dev/v1"
kind: GameServer
metadata:
  generateName: "simple-game-server-"
spec:
  ports:
  - name: default
    containerPort: 7654
  template:
    spec:
      serviceAccountName: my-special-service-account # a custom service account
      containers:
      - name: simple-game-server
        image: us-docker.pkg.dev/codeblind/examples/simple-server:0.27
If a service account is configured, the mounted key is not overwritten, as it assumed that you want to have full control of the service account and underlying RBAC permissions.