Agones, is derived from the Greek word agōn which roughly translates to “contest”, “competition at games” and “gathering”
(source).
What is Code Blind?
Code Blind is an open source platform, for deploying, hosting, scaling, and orchestrating dedicated game servers for
large scale multiplayer games, built on top of the industry standard, distributed system platform Kubernetes.
Code Blind replaces bespoke or proprietary cluster management and game server scaling solutions with an open source solution that
can be utilized and communally developed - so that you can focus on the important aspects of building a multiplayer game,
rather than developing the infrastructure to support it.
Built with both Cloud and on-premises infrastructure in mind, Code Blind can adjust its strategies as needed
for Fleet management, autoscaling, and more to ensure the resources being used to host dedicated game servers are
cost optimal for the environment that they are in.
Why Code Blind?
Some of Code Blind’ advantages:
Lower development and operational costs for hosting, scaling and orchestrating multiplayer game servers.
Any game server that can run on Linux can be hosted and orchestrated on Code Blind - in any language, or set of dependencies.
Run Code Blind anywhere Kubernetes can run - in the cloud, on premise, on your local machine or anywhere else you need it.
Game services and your game servers can be on the same foundational platform - simplifying your tooling and your operations knowledge.
By extending Kubernetes, Code Blind allows you to take advantage of the thousands of developers that have worked on the features of Kubernetes, and the ecosystem of tools that surround it.
Code Blind is free, open source and developed entirely in the public. Help shape its future by getting involved with the community.
Major Features
Code Blind incorporates these abilities:
Code Blind extends Kubernetes, such that it gets native abilities to create, run, manage and scale dedicated game server processes within
Kubernetes clusters using standard Kubernetes tooling and APIs.
Run and update Fleets of Game Servers, without worrying about having Game Servers shutdown that have active players
on them.
Deploy game servers inside a Docker container, with any combination of dependencies or binaries.
Integrated game server SDK for game server lifecycle managements, including health checking, state management, configuration and more.
Autoscaling capabilities to ensure players always have a game server available to play on.
Out of the box metrics and log aggregation to track and visualise what is happening across all your game server sessions.
Modular architecture that can be tailored to your specific multiplayer game mechanics.
Game server scheduling and allocation strategies to ensure cost optimisation across cloud and on-premise environments.
Review our Prerequisite Knowledge. Especially if the above
sounds fantastic, but you aren’t yet familiar with technology like Kubernetes or terms such as “Game Servers”.
Have a look at our installation guides, for setting up a Kubernetes cluster
and installing Code Blind on it.
Go through our Quickstart Guides to take you through setting up a simple game server on Code Blind.
2 - Prerequisite Knowledge
Foundational knowledge you should know before starting working with Code Blind.
Code Blind is built on top of the foundation of multiple open source projects, as well as utilising
several architectural patterns across both distributed and multiplayer game systems – which can
make it complicated to get started with, if they are things you are not familiar with or have
experience with already.
To make getting started easier to break down and digest, this guide was written to outline what concepts and
technology that the documentation assumes that you have knowledge of, and the
depth of that knowledge, as well as providing resource to help fill those knowledge gaps.
Docker and Containerisation
Docker and containerisation is the technological foundation of Code Blind, so if you aren’t familiar,
we recommend you have knowledge in the following areas before getting started with Code Blind:
Containers as a concept
Running Docker containers
Building your own container
Registries as a concept
Pushing and pulling containers from a registry
Resources
The following resources are great for learning these concepts:
Kubernetes builds on top of Docker to run containers at scale, on lots of machines.
If you have yet to learn about Kubernetes, we recommend that you have knowledge in the following
areas before getting started with Code Blind:
Kubernetes as a concept - you should take the basics tutorial
Code Blind creates a backing Pod with the appropriate configuration parameters for
each GameServer that is configured in a cluster. They both have the same name.
Code Blind is a platform for dedicated game servers for multiplayer games. If “dedicated game servers” is a term that is not
something you are familiar with, we recommend checking out some of the resources below, before getting started with
Code Blind:
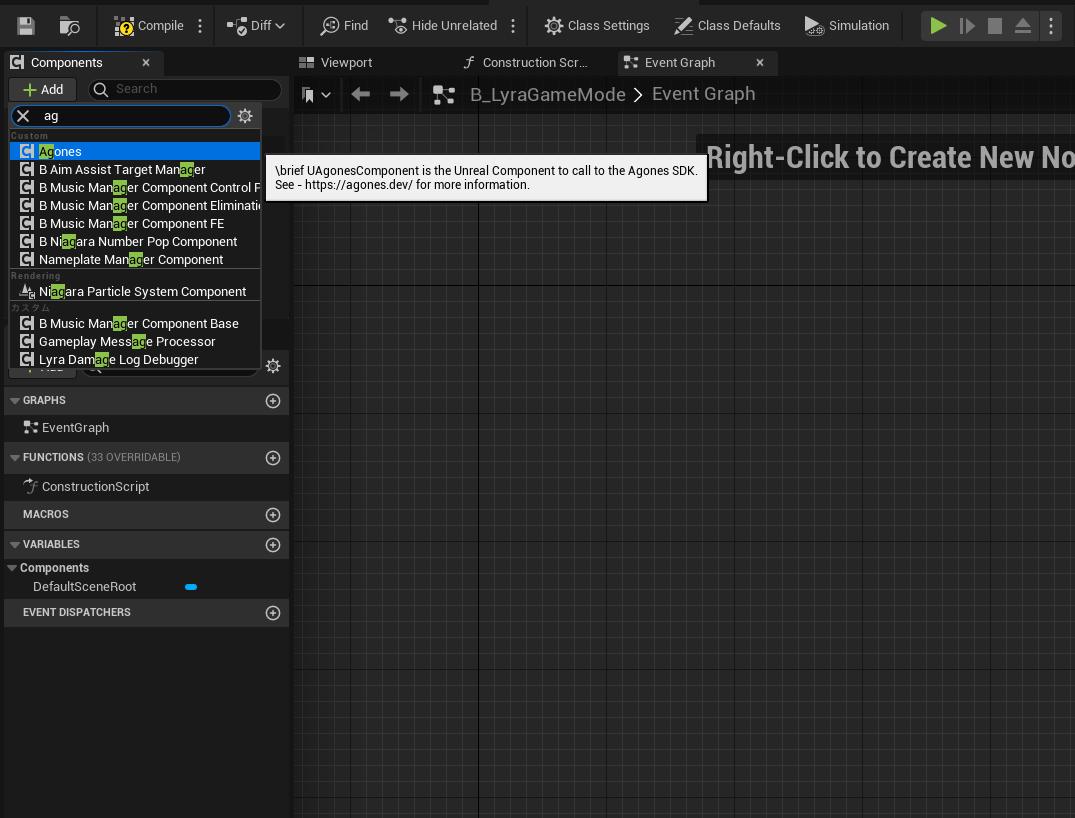
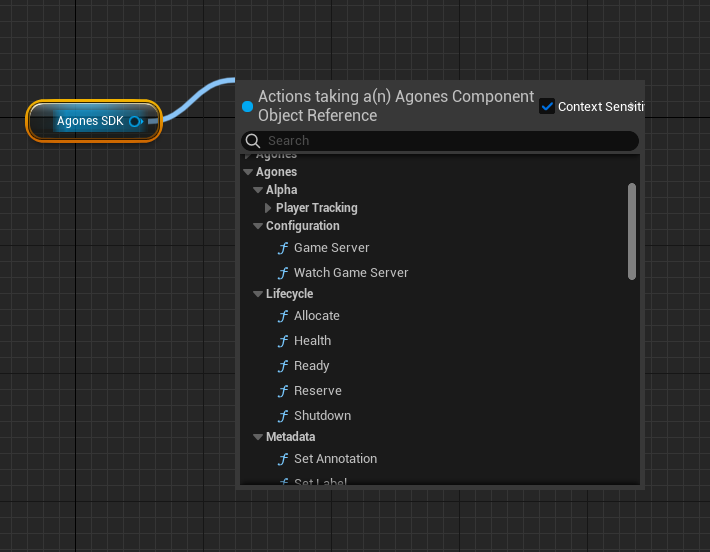
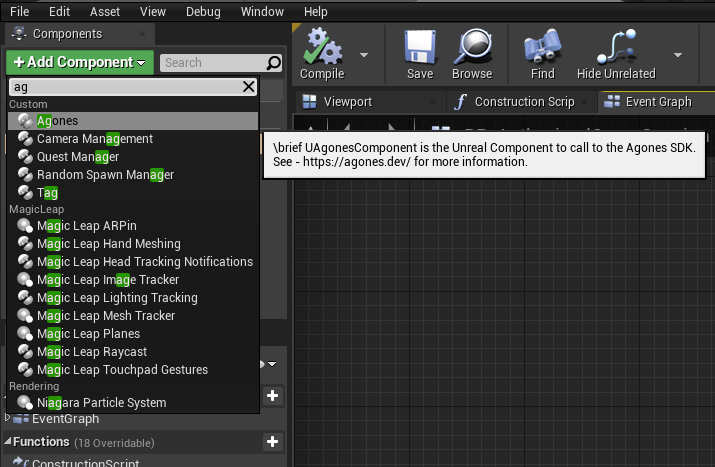
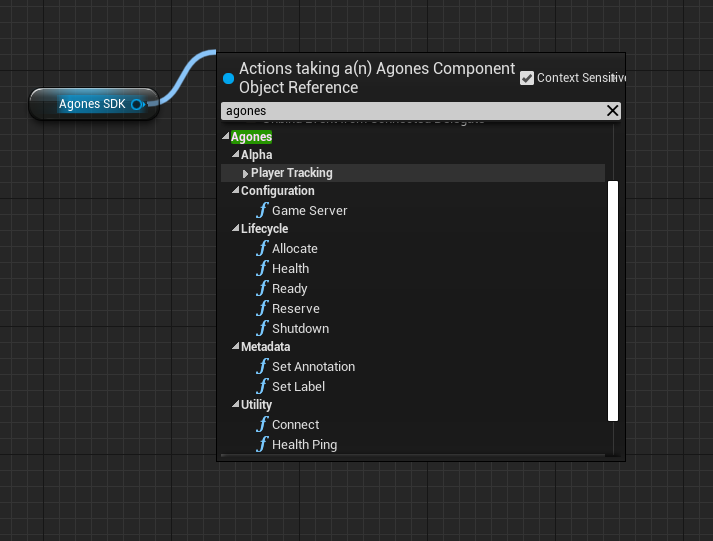
If you are building a multiplayer game, you will eventually need to understand how your
game engine will integrate with Code Blind.
There are multiple possible solutions, but the engines that have out of the box SDK’s for Code Blind are:
Firewall access for the range of ports that Game Servers can be connected to in the cluster.
Game Servers must have the game server SDK integrated, to manage Game Server state, health checking, etc.
Warning
This release has been tested against Kubernetes versions 1.26, 1.27, 1.28 on GKE. Other versions may work, but are unsupported. It is also likely that not all of these versions are supported by other cloud providers.
Supported Container Architectures
The following container operating systems and architectures can be utilised with Code Blind:
For all the platforms in Alpha, we would appreciate testing and bug reports on any issue found.
Code Blind and Kubernetes Supported Versions
Code Blind will support 3 releases of Kubernetes, targeting the newest version as being the latest available version in the GKE Rapid channel. However, we will ensure that at least one of the 3 versions chosen for each Code Blind release is supported by each of the major cloud providers (EKS and AKS). The vendored version of client-go will be aligned with the middle of the three supported Kubernetes versions. When a new version of Code Blind supports new versions of Kubernetes, it is explicitly called out in the release notes.
The following table lists recent Code Blind versions and their corresponding required Kubernetes versions:
Code Blind version
Kubernetes version(s)
1.38
1.26, 1.27, 1.28
1.37
1.26, 1.27, 1.28
1.36
1.26, 1.27, 1.28
1.35
1.25, 1.26, 1.27
1.34
1.25, 1.26, 1.27
1.33
1.25, 1.26, 1.27
1.32
1.24, 1.25, 1.26
1.31
1.24, 1.25, 1.26
1.30
1.23, 1.24, 1.25
1.29
1.24
1.28
1.23
1.27
1.23
1.26
1.23
1.25
1.22
1.24
1.22
1.23
1.22
1.22
1.21
1.21
1.21
Best Practices
For detailed guides on best practices running Code Blind in production, see Best Practices.
3.1 - Create Kubernetes Cluster
Instructions for creating a Kubernetes cluster to install Code Blind on.
If you are not an existing GCP user, you may be able to enroll for a $300 US Free Trial credit.
Choosing a shell
To complete this quickstart, we can use either Google Cloud Shell or a local shell.
Google Cloud Shell is a shell environment for managing resources hosted on Google Cloud Platform (GCP). Cloud Shell comes preinstalled with the gcloud and kubectl command-line tools. gcloud provides the primary command-line interface for GCP, and kubectl provides the command-line interface for running commands against Kubernetes clusters.
If you prefer using your local shell, you must install the gcloud and kubectl command-line tools in your environment.
Cloud shell
To launch Cloud Shell, perform the following steps:
Initialize some default configuration by running the following command.
When asked Do you want to configure a default Compute Region and Zone? (Y/n)?, enter Y and choose a zone in your geographical region of choice.
gcloud init
Install the kubectl command-line tool by running the following command:
gcloud components install kubectl
Choosing a Regional or Zonal Cluster
You will need to pick a geographical region or zone where you want to deploy your cluster, and whether to
create a regional or zonal cluster.
We recommend using a Regional cluster, as the zonal GKE control plane can go down temporarily to adjust for cluster resizing,
automatic upgrades and
repairs.
After choosing a cluster type, choose a region or zone. The region you chose is COMPUTE_REGION below.
(Note that if you chose a zone, replace --region=[COMPUTE_REGION] with --zone=[COMPUTE_ZONE] in commands below.)
Choosing a Release Channel and Optional Version
We recommend using the regular release channel, which offers a balance between stability and freshness.
If you’d like to read more, see our guide on Release Channels.
The release channel you chose is RELEASE_CHANNEL below.
(Optional) During cluster creation, to set a specific available version in the release channel, use the --cluster-version=[VERSION] flag, e.g. --cluster-version=1.27. Be sure to choose a version supported by Code Blind. (If you rely on release channels, the latest Code Blind release should be supported by the default versions of all channels.)
Choosing a GKE cluster mode
A cluster consists of at least one control plane machine and multiple worker machines called nodes. In Google Kubernetes Engine, nodes are Compute Engine virtual machine instances that run the Kubernetes processes necessary to make them part of the cluster.
Code Blind supports both GKE Standard mode and GKE Autopilot mode.
Code Blind GameServer and Fleet manifests that work on Standard are compatible
on Autopilot with some constraints, described in the following section. We recommend
running GKE Autopilot clusters, if you meet the constraints.
You can’t convert existing Standard clusters to Autopilot; create new Autopilot
clusters instead.
Code Blind on GKE Autopilot
Autopilot is GKE’s fully-managed mode. GKE configures, maintains, scales, and
upgrades nodes for you, which can reduce your maintenance and operating
overhead. You only pay for the resources requested by your running Pods, and
you don’t pay for unused node capacity or Kubernetes system workloads.
This section describes the Code Blind-specific considerations in Autopilot
clusters. For a general comparison between Autopilot and Standard, refer to
Choose a GKE mode of operation.
Autopilot nodes are, by default, optimized for most workloads. If some of your
workloads have broad compute requirements such as Arm architecture or a minimum
CPU platform, you can also choose a
compute class
that meets that requirement. However, if you have specialized hardware needs
that require fine-grained control over machine configuration, consider using
GKE Standard.
Code Blind on Autopilot has pre-configured opinionated constraints. Evaluate
whether these constraints impact your workloads:
Operating system: No Windows containers.
Resource requests: Autopilot has pre-determined
minimum Pod resource requests.
If your game servers require less than those minimums, use GKE Standard.
Scheduling strategy:Packed is supported, which is the Code Blind default. Distributed is not
supported.
Host port policy:Dynamic is supported, which is the Code Blind default.
Static and Passthrough are not supported.
Seccomp profile: Code Blind sets the seccomp profile to Unconfined to
avoid unexpected container creation delays that might occur because
Autopilot enables the
RuntimeDefault seccomp profile.
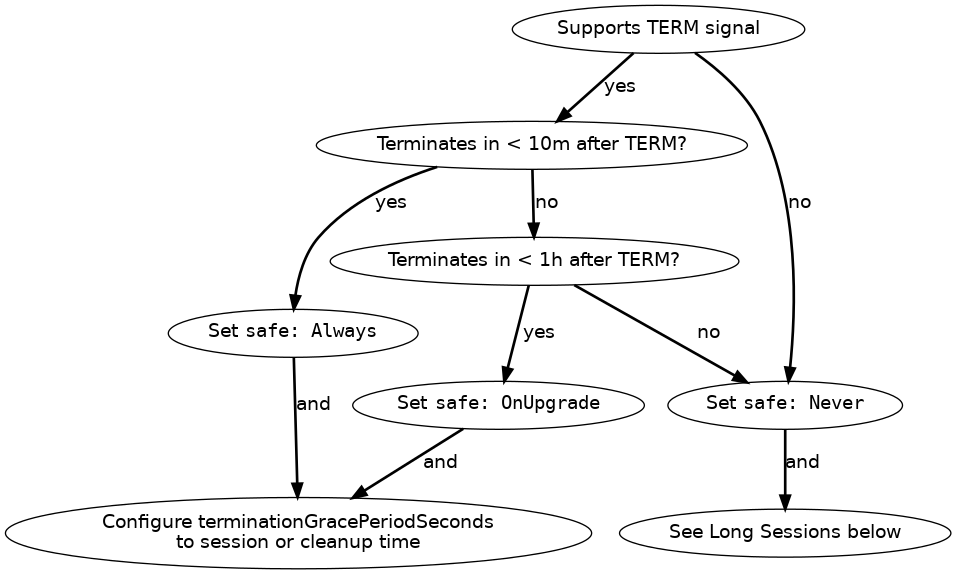
Pod disruption policy:eviction.safe: Never is supported, which is the Code Blind
default. eviction.safe: Always is supported. eviction.safe: OnUpgrade is
not supported. If your game sessions exceed one hour, refer to
Considerations for long sessions.
Choosing a GCP network
By default, gcloud and the Cloud Console use the VPC named default for all new resources. If you
plan to create a dual-stack IPv4/IPv6 cluster cluster, special considerations need to
be made. Dual-stack clusters require a dual-stack subnet, which are only supported in
custom mode VPC networks. For a new dual-stack cluster, you can either:
create a new custom mode VPC,
or if you wish to continue using the default network, you must switch it to custom mode.
After switching a network to custom mode, you will need to manually manage subnets within the default VPC.
Once you have a custom mode VPC, you will need to choose whether to use an existing subnet or create a
new one - read VPC-native guide on creating a dual-stack cluster, but don’t create the cluster
just yet - we’ll create the cluster later in this guide. To use the network and/or subnetwork you just created,
you’ll need to add --network and --subnetwork, and for GKE Standard, possibly --stack-type and
--ipv6-access-type, depending on whether you created the subnet simultaneously with the cluster.
Creating the firewall
We need a firewall to allow UDP traffic to nodes tagged as game-server via ports 7000-8000. These firewall rules apply to cluster nodes you will create in the
next section.
gcloud compute firewall-rules create game-server-firewall \
  --allow udp:7000-8000 \
  --target-tags game-server \
  --description "Firewall to allow game server udp traffic"
--tags: Defines the tags that will be attached to new nodes in the cluster. This is to grant access through ports via the firewall created above.
--scopes: Defines the Oauth scopes required by the nodes.
--num-nodes: The number of nodes to be created in each of the cluster’s zones. Default: 4. Depending on the needs of your game, this parameter should be adjusted.
--enable-image-streaming: Use Image streaming to pull container images, which leads to significant improvements in initialization times. Limitations apply to enable this feature.
--machine-type: The type of machine to use for nodes. Default: e2-standard-4. Depending on the needs of your game, you may wish to have smaller or larger machines.
(Optional) Creating a dedicated node pool
Create a dedicated node pool
for the Code Blind resources to be installed in. If you skip this step, the Code Blind controllers will
share the default node pool with your game servers, which is fine for experimentation but not
recommended for a production deployment.
--node-taints: The Kubernetes taints to automatically apply to nodes in this node pool.
--node-labels: The Kubernetes labels to automatically apply to nodes in this node pool.
--num-nodes: The number of nodes per cluster zone. For regional clusters, --num-nodes=1 creates one node in 3 separate zones in the region, giving you faster recovery time in the event of a node failure.
--machine-type: The type of machine to use for nodes. Default: e2-standard-4. Depending on the needs of your game, you may wish to have smaller or larger machines.
(Optional) Creating a metrics node pool
Create a node pool for Metrics if you want to monitor the
Code Blind system using Prometheus with Grafana or Cloud Logging and Monitoring.
--node-taints: The Kubernetes taints to automatically apply to nodes in this node pool.
--node-labels: The Kubernetes labels to automatically apply to nodes in this node pool.
--num-nodes: The number of nodes per cluster zone. For regional clusters, --num-nodes=1 creates one node in 3 separate zones in the region, giving you faster recovery time in the event of a node failure.
--machine-type: The type of machine to use for nodes. Default: e2-standard-4. Depending on the needs of your game, you may wish to have smaller or larger machines.
(Optional) Creating a node pool for Windows
If you run game servers on Windows, you
need to create a dedicated node pool for those servers. Windows Server 2019 (WINDOWS_LTSC_CONTAINERD) is the recommended image for Windows
game servers.
Warning
Running GameServers on Windows nodes is currently Alpha. Feel free to file feedback
through Github issues.
--image-type: The image type of the instances in the node pool - WINDOWS_LTSC_CONTAINERD in this case.
--machine-type: The type of machine to use for nodes. Default: e2-standard-4. Depending on the needs of your game, you may wish to have smaller or larger machines.
--num-nodes: The number of nodes per cluster zone. For regional clusters, --num-nodes=1 creates one node in 3 separate zones in the region, giving you faster recovery time in the event of a node failure.
Create an Autopilot mode cluster for Code Blind
Note
These installation instructions apply to Code Blind 1.30+
Choose a Release Channel (Autopilot clusters must be on a Release Channel).
--autoprovisioning-network-tags: Defines the tags that will be attached to new nodes in the cluster. This is to grant access through ports via the firewall created above.
Setting up cluster credentials
gcloud container clusters create configurates credentials for kubectl automatically. If you ever lose those, run:
For Code Blind to work correctly, we need to allow UDP traffic to pass through to our EKS cluster worker nodes. To achieve this, we must update the workers’ nodepool SG (Security Group) with the proper rule. A simple way to do that is:
Log in to the AWS Management Console
Go to the VPC Dashboard and select Security Groups
Find the Security Group for the workers nodepool, which will be named something like eksctl-[cluster-name]-nodegroup-[cluster-name]-workers/SG
Select Inbound Rules
Edit Rules to add a new Custom UDP Rule with a 7000-8000 port range and an appropriate Source CIDR range (0.0.0.0/0 allows all traffic)
You can use either Azure Cloud Shell or install the Azure CLI on your local shell in order to install AKS in your own Azure subscription. Cloud Shell comes preinstalled with az and kubectl utilities whereas you need to install them locally if you want to use your local shell. If you use Windows 10, you can use the WIndows Subsystem for Windows as well.
Creating the AKS cluster
If you are using Azure CLI from your local shell, you need to log in to your Azure account by executing the az login command and following the login procedure.
Here are the steps you need to follow to create a new AKS cluster (additional instructions and clarifications are listed here):
# Declare necessary variables, modify them according to your needsAKS_RESOURCE_GROUP=akstestrg # Name of the resource group your AKS cluster will be created inAKS_NAME=akstest # Name of your AKS clusterAKS_LOCATION=westeurope # Azure region in which you'll deploy your AKS cluster# Create the Resource Group where your AKS resource will be installedaz group create --name $AKS_RESOURCE_GROUP --location $AKS_LOCATION# Create the AKS cluster - this might take some time. Type 'az aks create -h' to see all available options# The following command will create a four Node AKS cluster. Node size is Standard A1 v1 and Kubernetes version is 1.28.0. Plus, SSH keys will be generated for you, use --ssh-key-value to provide your valuesaz aks create --resource-group $AKS_RESOURCE_GROUP --name $AKS_NAME --node-count 4 --generate-ssh-keys --node-vm-size Standard_A4_v2 --kubernetes-version 1.28.0 --enable-node-public-ip
# Install kubectlsudo az aks install-cli
# Get credentials for your new AKS clusteraz aks get-credentials --resource-group $AKS_RESOURCE_GROUP --name $AKS_NAME
For Code Blind to work correctly, we need to allow UDP traffic to pass through to our AKS cluster. To achieve this, we must update the NSG (Network Security Group) with the proper rule. A simple way to do that is:
Find the resource group where the AKS(Azure Kubernetes Service) resources are kept, which should have a name like MC_resourceGroupName_AKSName_westeurope. Alternative, you can type az resource show --namespace Microsoft.ContainerService --resource-type managedClusters -g $AKS_RESOURCE_GROUP -n $AKS_NAME -o json | jq .properties.nodeResourceGroup
Find the Network Security Group object, which should have a name like aks-agentpool-********-nsg (ie. aks-agentpool-55978144-nsg for dns-name-prefix agones)
Select Inbound Security Rules
Select Add to create a new Rule with UDP as the protocol and 7000-8000 as the Destination Port Ranges. Pick a proper name and leave everything else at their default values
Alternatively, you can use the following command, after modifying the RESOURCE_GROUP_WITH_AKS_RESOURCES and NSG_NAME values:
Kubernetes version prior to 1.18.19, 1.19.11 and 1.20.7
To find a resource’s public IP, search for Virtual Machine Scale Sets -> click on the set name(inside MC_resourceGroupName_AKSName_westeurope group) -> click Instances -> click on the instance name -> view Public IP address.
Follow these steps to create a Minikube cluster for your Code Blind install.
Installing Minikube
First, install Minikube, which may also require you to install
a virtualisation solution, such as VirtualBox as well.
Starting Minikube
Minikube will need to be started with the supported version of Kubernetes that is supported with Code Blind, via the
--kubernetes-version command line flag.
Optionally, we also recommend starting with an agones profile, using -p to keep this cluster separate from any other
clusters you may have running with Minikube.
Check the official minikube start reference for more options that
may be required for your platform of choice.
Note
You may need to increase the --cpu or --memory values for your minikube instance, depending on what resources are
available on the host and/or how many GameServers you wish to run locally.
Depending on your Operating System, you may also need to change the --driver
(driver list) to enable GameServer connectivity with or without
some workarounds listed below.
Known working drivers
Other operating systems and drivers may work, but at this stage have not been verified to work with UDP connections
via Code Blind exposed ports.
If you have successfully tested with other platforms and drivers, please click “edit this page” in the top right hand
side and submit a pull request to let us know.
Local connection workarounds
Depending on your operating system and virtualization platform that you are using with Minikube, it may not be
possible to connect directly to a GameServer hosted on Code Blind as you would on a cloud hosted Kubernetes cluster.
If you are unable to do so, the following workarounds are available, and may work on your platform:
minikube ip
Rather than using the published IP of a GameServer to connect, run minikube ip -p agones to get the local IP for
the minikube node, and connect to that address.
Create a service
This would only be for local development, but if none of the other workarounds work, creating a Service for the
GameServer you wish to connect to is a valid solution, to tunnel traffic to the appropriate GameServer container.
Use the following yaml:
apiVersion:v1kind:Servicemetadata:name:agones-gameserverspec:type:LoadBalancerselector:agones.dev/gameserver:${GAMESERVER_NAME}ports:- protocol:UDPport:7000# local porttargetPort:${GAMESERVER_CONTAINER_PORT}
Where ${GAMESERVER_NAME} is replaced with the GameServer you wish to connect to, and ${GAMESERVER_CONTAINER_PORT}
is replaced with the container port GameServer exposes for connection.
Running minikube service list -p agones will show you the IP and port to connect to locally in the URL field.
To connect to a different GameServer, run kubectl edit service agones-gameserver and edit the ${GAMESERVER_NAME}
value to point to the new GameServer instance and/or the ${GAMESERVER_CONTAINER_PORT} value as appropriate.
Warning
minikube tunnel (docs)
does not support UDP (Github Issue) on some combination of
operating system, platforms and drivers, but is required when using the Service workaround.
Use a different driver
If you cannot connect through the Serviceor use other workarounds, you may want to try a different
minikube driver, and if that doesn’t work, connection via UDP may not
be possible with minikube, and you may want to try either a
different local Kubernetes tool or use a cloud hosted Kubernetes cluster.
Install Code Blind in your existing Kubernetes cluster.
If you have not yet created a cluster, follow the instructions
for the environment where you will be running Code Blind.
3.2.1 - Install Code Blind using YAML
We can install Code Blind to the cluster using an install.yaml file.
Installing Code Blind
Warning
Installing Code Blind with the install.yaml file will use pre-generated, well known TLS
certificates stored in this repository for securing Kubernetes webhooks communication.
For production workloads, we strongly recommend using the
helm installation which allows you to generate
new, unique certificates or provide your own certificates. Alternatively,
you can use helm template as described below
to generate a custom yaml installation file with unique certificates.
Installing Code Blind using the pre-generated install.yaml file is the quickest,
simplest way to get Code Blind up and running in your Kubernetes cluster:
You can also find the install.yaml in the latest agones-install zip from the releases archive.
Customizing your install
To change the configurable parameters
in the install.yaml file, you can use helm template to generate a custom file locally
without needing to use helm to install Code Blind into your cluster.
The following example sets the featureGates and generateTLS helm parameters
and creates a customized install-custom.yaml file (note that the pull
command was introduced in Helm version 3):
We recommend installing Code Blind in its own namespaces, such as agones-system as shown above.
If you want to use a different namespace, you can use the helm --namespace parameter to specify.
When running in production, Code Blind should be scheduled on a dedicated pool of nodes, distinct from where Game Servers are scheduled for better isolation and resiliency. By default Code Blind prefers to be scheduled on nodes labeled with agones.dev/agones-system=true and tolerates node taint agones.dev/agones-system=true:NoExecute. If no dedicated nodes are available, Code Blind will
run on regular nodes, but that’s not recommended for production use. For instructions on setting up a dedicated node
pool for Code Blind, see the Code Blind installation instructions for your preferred environment.
The command deploys Code Blind on the Kubernetes cluster with the default configuration. The configuration section lists the parameters that can be configured during installation.
Tip
List all releases using helm list --all-namespaces
Namespaces
By default Code Blind is configured to work with game servers deployed in the default namespace. If you are planning to use another namespace you can configure Code Blind via the parameter gameservers.namespaces.
By default, agones.rbacEnabled is set to true. This enables RBAC support in Code Blind and must be true if RBAC is enabled in your cluster.
The chart will take care of creating the required service accounts and roles for Code Blind.
If you have RBAC disabled, or to put it another way, ABAC enabled, you should set this value to false.
Configuration
The following tables lists the configurable parameters of the Code Blind chart and their default values.
General
Parameter
Description
Default
agones.featureGates
A URL query encoded string of Flags to enable/disable e.g. Example=true&OtherThing=false. Any value accepted by strconv.ParseBool(string) can be used as a boolean value
``
agones.rbacEnabled
Creates RBAC resources. Must be set for any cluster configured with RBAC
true
agones.registerWebhooks
Registers the webhooks used for the admission controller
true
agones.registerApiService
Registers the apiservice(s) used for the Kubernetes API extension
true
agones.registerServiceAccounts
Attempts to create service accounts for the controllers
true
agones.createPriorityClass
Attempts to create priority classes for the controllers
true
agones.priorityClassName
Name of the priority classes to create
agones-system
agones.requireDedicatedNodes
Forces Code Blind system components to be scheduled on dedicated nodes, only applies to the GKE Standard without node auto-provisioning
false
Custom Resource Definitions
Parameter
Description
Default
agones.crds.install
Install the CRDs with this chart. Useful to disable if you want to subchart (since crd-install hook is broken), so you can copy the CRDs into your own chart.
true
agones.crds.cleanupOnDelete
Run the pre-delete hook to delete all GameServers and their backing Pods when deleting the helm chart, so that all CRDs can be removed on chart deletion
true
agones.crds.cleanupJobTTL
The number of seconds for Kubernetes to delete the associated Job and Pods of the pre-delete hook after it completes, regardless if the Job is successful or not. Set to 0 to disable cleaning up the Job or the associated Pods.
60
Metrics
Parameter
Description
Default
agones.metrics.prometheusServiceDiscovery
Adds annotations for Prometheus ServiceDiscovery (and also Strackdriver)
true
agones.metrics.prometheusEnabled
Enables controller metrics on port 8080 and path /metrics
true
agones.metrics.stackdriverEnabled
Enables Stackdriver exporter of controller metrics
false
agones.metrics.stackdriverProjectID
This overrides the default gcp project id for use with stackdriver
``
agones.metrics.stackdriverLabels
A set of default labels to add to all stackdriver metrics generated in form of key value pair (key=value,key2=value2). By default metadata are automatically added using Kubernetes API and GCP metadata enpoint.
``
agones.metrics.serviceMonitor.interval
Default scraping interval for ServiceMonitor
30s
Service Accounts
Parameter
Description
Default
agones.serviceaccount.controller.name
Service account name for the controller
agones-controller
agones.serviceaccount.controller.annotations
Annotations added to the Code Blind controller service account
{}
agones.serviceaccount.sdk.name
Service account name for the sdk
agones-sdk
agones.serviceaccount.sdk.annotations
A map of namespaces to maps of Annotations added to the Code Blind SDK service account for the specified namespaces
{}
agones.serviceaccount.allocator.name
Service account name for the allocator
agones-allocator
agones.serviceaccount.allocator.annotations
Annotations added to the Code Blind allocator service account
{}
Container Images
Parameter
Description
Default
agones.image.registry
Global image registry for all the Code Blind system images
us-docker.pkg.dev/agones-images/release
agones.image.tag
Global image tag for all images
1.38.0
agones.image.controller.name
Image name for the controller
agones-controller
agones.image.controller.pullPolicy
Image pull policy for the controller
IfNotPresent
agones.image.controller.pullSecret
Image pull secret for the controller, allocator, sdk and ping image. Should be created both in agones-system and default namespaces
The number of replicas to run in the agones-controller deployment.
2
agones.controller.pdb.minAvailable
Description of the number of pods from that set that must still be available after the eviction, even in the absence of the evicted pod. Can be either an absolute number or a percentage. Mutually Exclusive with maxUnavailable
1
agones.controller.pdb.maxUnavailable
Description of the number of pods from that set that can be unavailable after the eviction. It can be either an absolute number or a percentage Mutually Exclusive with minAvailable
``
agones.controller.http.port
Port to use for liveness probe service and metrics
8080
agones.controller.healthCheck.initialDelaySeconds
Initial delay before performing the first probe (in seconds)
3
agones.controller.healthCheck.periodSeconds
Seconds between every liveness probe (in seconds)
3
agones.controller.healthCheck.failureThreshold
Number of times before giving up (in seconds)
3
agones.controller.healthCheck.timeoutSeconds
Number of seconds after which the probe times out (in seconds)
Set to true to enable the creation of a PodDisruptionBudget for the ping deployment
false
agones.ping.pdb.minAvailable
Description of the number of pods from that set that must still be available after the eviction, even in the absence of the evicted pod. Can be either an absolute number or a percentage. Mutually Exclusive with maxUnavailable
1
agones.ping.pdb.maxUnavailable
Description of the number of pods from that set that can be unavailable after the eviction. It can be either an absolute number or a percentage Mutually Exclusive with minAvailable
``
agones.ping.topologySpreadConstraints
Ensures better resource utilization and high availability by evenly distributing Pods in the agones-system namespace
{}
Allocator Service
Parameter
Description
Default
agones.allocator.apiServerQPS
Maximum sustained queries per second that an allocator should be making against API Server
400
agones.allocator.apiServerQPSBurst
Maximum burst queries per second that an allocator should be making against API Server
500
agones.allocator.remoteAllocationTimeout
Remote allocation call timeout.
10s
agones.allocator.totalRemoteAllocationTimeout
Total remote allocation timeout including retries.
30s
agones.allocator.logLevel
Code Blind Allocator Log level. Log only entries with that severity and above
The appProtocol to set on the Service for the gRPC allocation port. If left blank, no value is set.
``
agones.allocator.service.grpc.nodePort
If the ServiceType is set to “NodePort”, this is the NodePort that the allocator gRPC service is exposed on.
30000-32767
agones.allocator.service.grpc.targetPort
The port that is used by the allocator pod to listen for gRPC requests. Note that the allocator server cannot bind to low numbered ports.
8443
agones.allocator.generateClientTLS
Set to true to generate client TLS certificates or false to provide certificates in certs/allocator/allocator-client.default/*
true
agones.allocator.generateTLS
Set to true to generate TLS certificates or false to provide your own certificates
true
agones.allocator.disableMTLS
Turns off client cert authentication for incoming connections to the allocator.
false
agones.allocator.disableTLS
Turns off TLS security for incoming connections to the allocator.
false
agones.allocator.disableSecretCreation
Disables the creation of any allocator secrets. If true, you MUST provide the allocator-tls, allocator-tls-ca, and allocator-client-ca secrets before installation.
false
agones.allocator.tlsCert
Custom TLS certificate provided as a string
``
agones.allocator.tlsKey
Custom TLS private key provided as a string
``
agones.allocator.clientCAs
A map of secret key names to allowed client CA certificates provided as strings
Set to true to enable the creation of a PodDisruptionBudget for the allocator deployment
false
agones.allocator.pdb.minAvailable
Description of the number of pods from that set that must still be available after the eviction, even in the absence of the evicted pod. Can be either an absolute number or a percentage. Mutually Exclusive with maxUnavailable
1
agones.allocator.pdb.maxUnavailable
Description of the number of pods from that set that can be unavailable after the eviction. It can be either an absolute number or a percentage. Mutually Exclusive with minAvailable
``
agones.allocator.topologySpreadConstraints
Ensures better resource utilization and high availability by evenly distributing Pods in the agones-system namespace
{}
Extensions
Parameter
Description
Default
agones.extensions.http.port
Port to use for liveness probe service and metrics
8080
agones.extensions.healthCheck.initialDelaySeconds
Initial delay before performing the first probe (in seconds)
3
agones.extensions.healthCheck.periodSeconds
Seconds between every liveness probe (in seconds)
3
agones.extensions.healthCheck.failureThreshold
Number of times before giving up (in seconds)
3
agones.extensions.healthCheck.timeoutSeconds
Number of seconds after which the probe times out (in seconds)
Disable ca-bundle so it can be injected by cert-manager
false
agones.extensions.mutatingWebhook.annotations
Annotations added to the Code Blind mutating webhook
{}
agones.extensions.mutatingWebhook.disableCaBundle
Disable ca-bundle so it can be injected by cert-manager
false
agones.extensions.allocationBatchWaitTime
Wait time between each allocation batch when performing allocations in controller mode
500ms
agones.extensions.pdb.minAvailable
Description of the number of pods from that set that must still be available after the eviction, even in the absence of the evicted pod. Can be either an absolute number or a percentage. Mutually Exclusive with maxUnavailable
1
agones.extensions.pdb.maxUnavailable
Description of the number of pods from that set that can be unavailable after the eviction. It can be either an absolute number or a percentage Mutually Exclusive with minAvailable
``
agones.extensions.replicas
The number of replicas to run in the deployment
2
agones.extensions.topologySpreadConstraints
Ensures better resource utilization and high availability by evenly distributing Pods in the agones-system namespace
{}
GameServers
Parameter
Description
Default
gameservers.namespaces
a list of namespaces you are planning to use to deploy game servers
The above command will deploy Code Blind controllers to agones-system namespace. Additionally Code Blind will use a dynamic GameServers’ port allocation range of 1000-5000.
Alternatively, a YAML file that specifies the values for the parameters can be provided while installing the chart. For example,
This test would create a GameServer resource and delete it afterwards.
Tip
In order to use helm test command described in this section you need to set helm.installTests helm parameter to true.
Check the Code Blind installation by running the following command:
helm test my-release -n agones-system
You should see a successful output similar to this :
NAME: my-release
LAST DEPLOYED: Wed Mar 29 06:13:23 2023
NAMESPACE: agones-system
STATUS: deployed
REVISION: 4
TEST SUITE:     my-release-test
Last Started:   Wed Mar 29 06:17:52 2023
Last Completed: Wed Mar 29 06:18:10 2023
Phase:          Succeeded
Controller TLS Certificates
By default agones chart generates tls certificates used by the admission controller, while this is handy, it requires the agones controller to restart on each helm upgrade command.
Manual
For most use cases the controller would have required a restart anyway (eg: controller image updated). However if you really need to avoid restarts we suggest that you turn off tls automatic generation (agones.controller.generateTLS to false) and provide your own certificates (certs/server.crt,certs/server.key).
Tip
You can use our script located at
cert.sh to generate them.
Cert-Manager
Another approach is to use cert-manager.io solution for cluster level certificate management.
In order to use the cert-manager solution, first install cert-manager on the cluster.
Then, configure an Issuer/ClusterIssuer resource and
last configure a Certificate resource to manage controller Secret.
Make sure to configure the Certificate based on your system’s requirements, including the validity duration.
Here is an example of using a self-signed ClusterIssuer for configuring controller Secret where secret name is my-release-cert or {{ template "agones.fullname" . }}-cert:
#!/bin/bash
# Create a self-signed ClusterIssuercat <<EOF | kubectl apply -f -
apiVersion: cert-manager.io/v1
kind: ClusterIssuer
metadata:
name: selfsigned
spec:
selfSigned: {}
EOF# Create a Certificate with IP for the my-release-cert )cat <<EOF | kubectl apply -f -
apiVersion: cert-manager.io/v1
kind: Certificate
metadata:
name: my-release-agones-cert
namespace: agones-system
spec:
dnsNames:
- agones-controller-service.agones-system.svc
secretName: my-release-agones-cert
issuerRef:
name: selfsigned
kind: ClusterIssuer
EOF
After the certificates are generated, we will want to inject caBundle into the controller and extensions webhook and disable the controller and extensions secret creation through the following values.yaml file.:
In order to reuse the existing load balancer IP on upgrade or install the agones-allocator service as a LoadBalancer using a reserved static IP, a user can specify the load balancer’s IP with the agones.allocator.http.loadBalancerIP helm configuration parameter value. By setting the loadBalancerIP value:
The LoadBalancer is created with the specified IP, if supported by the cloud provider.
A self-signed server TLS certificate is generated for the IP, used by the agones-allocator service.
If you are not an existing GCP user, you may be able to enroll for a $300 US Free Trial credit.
Choosing a shell
To complete this quickstart, we can use either Google Cloud Shell or a local shell.
Google Cloud Shell is a shell environment for managing resources hosted on Google Cloud Platform (GCP). Cloud Shell comes preinstalled with the gcloud and kubectl command-line tools. gcloud provides the primary command-line interface for GCP, and kubectl provides the command-line interface for running commands against Kubernetes clusters.
If you prefer using your local shell, you must install the gcloud and kubectl command-line tools in your environment.
Cloud shell
To launch Cloud Shell, perform the following steps:
From the top-right corner of the console, click the
Activate Google Cloud Shell button:
A Cloud Shell session opens inside a frame at the bottom of the console. Use this shell to run gcloud and kubectl commands.
Set a compute zone in your geographical region with the following command. The compute zone will be something like us-west1-a. A full list can be found here.
gcloud config set compute/zone [COMPUTE_ZONE]
Local shell
To install gcloud and kubectl, perform the following steps:
Copy this file into a local directory where you will execute the terraform commands.
The GKE cluster created from the example configuration will contain 3 Node Pools:
"default" node pool with "game-server" tag, containing 4 nodes.
"agones-system" node pool for Code Blind Controller.
"agones-metrics" for monitoring and metrics collecting purpose.
Configurable parameters:
project - your Google Cloud Project ID (required)
name - the name of the GKE cluster (default is “agones-terraform-example”)
agones_version - the version of agones to install (an empty string, which is the default, is the latest version from the Helm repository)
machine_type - machine type for hosting game servers (default is “e2-standard-4”)
node_count - count of game server nodes for the default node pool (default is “4”)
enable_image_streaming - whether or not to enable image streaming for the "default" node pool (default is true)
zone - (Deprecated, use location) the name of the zone you want your cluster to be
created in (default is “us-west1-c”)
network - the name of the VPC network you want your cluster and firewall rules to be connected to (default is “default”)
subnetwork - the name of the subnetwork in which the cluster’s instances are launched. (required when using non default network)
log_level - possible values: Fatal, Error, Warn, Info, Debug (default is “info”)
feature_gates - a list of alpha and beta version features to enable. For example, “PlayerTracking=true&ContainerPortAllocation=true”
gameserver_minPort - the lower bound of the port range which gameservers will listen on (default is “7000”)
gameserver_maxPort - the upper bound of the port range which gameservers will listen on (default is “8000”)
gameserver_namespaces - a list of namespaces which will be used to run gameservers (default is ["default"]). For example ["default", "xbox-gameservers", "mobile-gameservers"]
force_update - whether or not to force the replacement/update of resource (default is true, false may be required to prevent immutability errors when updating the configuration)
location - the name of the location you want your cluster to be created in (default is “us-west1-c”)
autoscale - whether you want to enable autoscale for the gameserver nodepool (default is false)
min_node_count - the minimum number of nodes for a nodepool when autoscale is enabled (default is “1”)
max_node_count - the maximum number of nodes for a nodepool when autoscale is enabled (default is “5”)
Warning
On the lines that read source = "git::https://github.com/googleforgames/agones.git//install/terraform/modules/gke/?ref=main"
make sure to change ?ref=main to match your targeted Code Blind release, as Terraform modules can change between
releases.
For example, if you are targeting release-1.38.0, then you will want to have
source = "git::https://github.com/googleforgames/agones.git//install/terraform/modules/gke/?ref=release-1.38.0"
as your source.
Creating the cluster
In the directory where you created module.tf, run:
terraform init
This will cause terraform to clone the Code Blind repository and use the ./install/terraform folder as the starting point of
the Code Blind submodule, which contains all necessary Terraform configuration files.
Next, make sure that you can authenticate using gcloud:
gcloud auth application-default login
Option 1: Creating the cluster in the default VPC
To create your GKE cluster in the default VPC just specify the project variable.
3.3.2 - Installing Code Blind on AWS Elastic Kubernetes Service using Terraform
You can use Terraform to provision an EKS cluster and install Code Blind on it.
Installation
You can use Terraform to provision your Amazon EKS (Elastic Kubernetes Service) cluster and install Code Blind on it using the Helm Terraform provider.
By editing modules.tf you can change the parameters that you need to. For instance, the - machine_type variable.
Configurable parameters:
cluster_name - the name of the EKS cluster (default is “agones-terraform-example”)
agones_version - the version of agones to install (an empty string, which is the default, is the latest version from the Helm repository)
machine_type - EC2 instance type for hosting game servers (default is “t2.large”)
region - the location of the cluster (default is “us-west-2”)
node_count - count of game server nodes for the default node pool (default is “4”)
log_level - possible values: Fatal, Error, Warn, Info, Debug (default is “info”)
feature_gates - a list of alpha and beta version features to enable. For example, “PlayerTracking=true&ContainerPortAllocation=true”
gameserver_minPort - the lower bound of the port range which gameservers will listen on (default is “7000”)
gameserver_maxPort - the upper bound of the port range which gameservers will listen on (default is “8000”)
gameserver_namespaces - a list of namespaces which will be used to run gameservers (default is ["default"]). For example ["default", "xbox-gameservers", "mobile-gameservers"]
force_update - whether or not to force the replacement/update of resource (default is true, false may be required to prevent immutability errors when updating the configuration)
Now you can create an EKS cluster and deploy Code Blind on EKS:
terraform apply [-var agones_version="1.38.0"]
After deploying the cluster with Code Blind, you can get or update your kubeconfig by using:
There is an issue with the AWS Terraform provider:
https://github.com/terraform-providers/terraform-provider-aws/issues/9101
Due to this issue you should remove helm release first (as stated above),
otherwise terraform destroy will timeout and never succeed.
Remove all created resources manually in that case, namely: 3 Auto Scaling groups, EKS cluster, and a VPC with all dependent resources.
3.3.3 - Installing Code Blind on Azure Kubernetes Service using Terraform
You can use Terraform to provision an AKS cluster and install Code Blind on it.
Once you created all resources on AKS you can get the credentials so that you can use kubectl to configure your cluster:
az aks get-credentials --resource-group agonesRG --name test-cluster
Check that you have access to the Kubernetes cluster:
kubectl get nodes
Configurable parameters:
log_level - possible values: Fatal, Error, Warn, Info, Debug (default is “info”)
cluster_name - the name of the AKS cluster (default is “agones-terraform-example”)
agones_version - the version of agones to install (an empty string, which is the default, is the latest version from the Helm repository)
machine_type - node machine type for hosting game servers (default is “Standard_D2_v2”)
disk_size - disk size of the node
region - the location of the cluster
node_count - count of game server nodes for the default node pool (default is “4”)
feature_gates - a list of alpha and beta version features to enable. For example, “PlayerTracking=true&ContainerPortAllocation=true”
gameserver_minPort - the lower bound of the port range which gameservers will listen on (default is “7000”)
gameserver_maxPort - the upper bound of the port range which gameservers will listen on (default is “8000”)
gameserver_namespaces - a list of namespaces which will be used to run gameservers (default is ["default"]). For example ["default", "xbox-gameservers", "mobile-gameservers"]
force_update - whether or not to force the replacement/update of resource (default is true, false may be required to prevent immutability errors when updating the configuration)
Uninstall the Code Blind and delete AKS cluster
Run next command to delete all Terraform provisioned resources:
terraform destroy
Reference
Details on how you can authenticate your AKS terraform provider using official instructions.
Strategies and techniques for managing Code Blind and Kubernetes upgrades in a safe manner.
Note
Whichever approach you take to upgrading Code Blind, make sure to test it in your development environment
before applying it to production.
Upgrading Code Blind
The following are strategies for safely upgrading Code Blind from one version to another. They may require adjustment to
your particular game architecture but should provide a solid foundation for updating Code Blind safely.
The recommended approach is to use multiple clusters, such that the upgrade can be tested
gradually with production load and easily rolled back if the need arises.
Warning
Changing Feature Gates within your Code Blind install
can constitute an “upgrade” as it may create or remove functionality
in the Code Blind installation that may not be forward or backward compatible with installed resources in an existing
installation.
Upgrading Code Blind: Multiple Clusters
We essentially want to transition our GameServer allocations from a cluster with the old version of Code Blind,
to a cluster with the upgraded version of Code Blind while ensuring nothing surprising
happens during this process.
This also allows easy rollback to the previous infrastructure that we already know to be working in production, with
minimal interruptions to player experience.
The following are steps to implement this:
Create a new cluster of the same size or smaller as the current cluster.
Install the new version of Code Blind on the new cluster.
Deploy the same set of Fleets, GameServers and FleetAutoscalers from the old cluster into the new cluster.
With your matchmaker, start sending a small percentage of your matched players’ game sessions to the new cluster.
Assuming everything is working successfully on the new cluster, slowly increase the percentage of matched sessions to the new cluster, until you reach 100%.
Once you are comfortable with the stability of the new cluster with the new Code Blind version, shut down the old cluster.
Congratulations - you have now upgraded to a new version of Code Blind! 👍
Upgrading Code Blind: Single Cluster
If you are upgrading a single cluster, we recommend creating a maintenance window, in which your game goes offline
for the period of your upgrade, as there will be a short period in which Code Blind will be non-responsive during the upgrade.
Installation with install.yaml
If you installed Code Blind with install.yaml, then you will need to delete
the previous installation of Code Blind before upgrading to the new version, as we need to remove all of Code Blind before installing
the new version.
Start your maintenance window.
Delete the current set of Fleets, GameServers and FleetAutoscalers in your cluster.
Make sure to delete the same version of Code Blind that was previously installed, for example:
kubectl delete -f https://raw.githubusercontent.com/googleforgames/agones/<old-release-version>/install/yaml/install.yaml
Deploy the same set of Fleets, GameServers and FleetAutoscalers back into the cluster.
Run any other tests to ensure the Code Blind installation is working as expected.
Close your maintenance window.
Congratulations - you have now upgraded to a new version of Code Blind! 👍
Installation with Helm
Helm features capabilities for upgrading to newer versions of Code Blind without having to uninstall Code Blind completely.
For details on how to use Helm for upgrades, see the helm upgrade documentation.
Given the above, the steps for upgrade are simpler:
Start your maintenance window.
Delete the current set of Fleets, GameServers and FleetAutoscalers in your cluster.
Run helm upgrade with the appropriate arguments, such a --version, for your specific upgrade
Deploy the same set of Fleets, GameServers and FleetAutoscalers back into the cluster.
Run any other tests to ensure the Code Blind installation is working as expected.
Close your maintenance window.
Congratulations - you have now upgraded to a new version of Code Blind! 👍
Upgrading Kubernetes
The following are strategies for safely upgrading the underlying Kubernetes cluster from one version to another.
They may require adjustment to your particular game architecture but should provide a solid foundation for updating your cluster safely.
The recommended approach is to use multiple clusters, such that the upgrade can be tested
gradually with production load and easily rolled back if the need arises.
Code Blind has multiple supported Kubernetes versions for each version. You can stick with a minor Kubernetes version until it is not supported by Code Blind, but it is recommended to do supported minor (e.g. 1.12.1 ➡ 1.13.2) Kubernetes version upgrades at the same time as a matching Code Blind upgrades.
Patch upgrades (e.g. 1.12.1 ➡ 1.12.3) within the same minor version of Kubernetes can be done at any time.
We essentially want to transition our GameServer allocations from a cluster with the old version of Kubernetes,
to a cluster with the upgraded version of Kubernetes while ensuring nothing surprising
happens during this process.
This also allows easy rollback to the previous infrastructure that we already know to be working in production, with
minimal interruptions to player experience.
The following are steps to implement this:
Create a new cluster of the same size or smaller as the current cluster, with the new version of Kubernetes
Install the same version of Code Blind on the new cluster, as you have on the previous cluster.
Deploy the same set of Fleets and/or GameServers from the old cluster into the new cluster.
With your matchmaker, start sending a small percentage of your matched players’ game sessions to the new cluster.
Assuming everything is working successfully on the new cluster, slowly increase the percentage of matched sessions to the new cluster, until you reach 100%.
Once you are comfortable with the stability of the new cluster with the new Kubernetes version, shut down the old cluster.
Congratulations - you have now upgraded to a new version of Kubernetes! 👍
Single Cluster
If you are upgrading a single cluster, we recommend creating a maintenance window, in which your game goes offline
for the period of your upgrade, as there will be a short period in which Code Blind will be non-responsive during the node
upgrades.
Start your maintenance window.
Scale your Fleets down to 0 and/or delete your GameServers. This is a good safety measure so there aren’t race conditions
between the Code Blind controller being recreated and GameServers being deleted doesn’t occur, and GameServers can end up stuck in erroneous states.
Start and complete your control plane upgrade(s).
Start and complete your node upgrades.
Scale your Fleets back up and/or recreate your GameServers.
Run any other tests to ensure the Code Blind installation is still working as expected.
Close your maintenance window.
Congratulations - you have now upgraded to a new version of Kubernetes! 👍
4 - Getting Started
Quickstarts for getting up and running with Code Blind
4.1 - Quickstart: Create a Game Server
This guide covers how you can quickly get started using Code Blind to create GameServers.
Prerequisites
The following prerequisites are required to create a GameServer:
A Kubernetes cluster with the UDP port range 7000-8000 open on each node.
Code Blind controller installed in the targeted cluster
kubectl properly configured
Netcat which is already installed on most Linux/macOS distributions, for windows you can use WSL.
If you don’t have a Kubernetes cluster you can follow these instructions to create a cluster on Google Kubernetes Engine (GKE), Minikube or Azure Kubernetes Service (AKS), and install Code Blind.
For the purpose of this guide we’re going to use the
simple-game-server
example as the GameServer container. This example is a very simple UDP server written in Go. Don’t hesitate to look at the code of this example for more information.
Objectives
Create a GameServer in Kubernetes using Code Blind custom resource.
Get information about the GameServer such as IP address, port and state.
Connect to the GameServer.
1. Create a GameServer
Let’s create a GameServer using the following command :
You should see a successful output similar to this :
gameserver.agones.dev/simple-game-server-4ss4j created
This has created a GameServer record inside Kubernetes, which has also created a backing Pod to run our simple udp game server code in.
If you want to see all your running GameServers you can run:
kubectl get gameservers
It should look something like this:
NAME STATE ADDRESS PORT NODE AGE
simple-game-server-7pjrq Ready 35.233.183.43 7190 agones 3m
You can also see the Pod that got created by running kubectl get pods, the Pod will be prefixed by simple-game-server.
NAME READY STATUS RESTARTS AGE
simple-game-server-7pjrq 2/2 Running 0 5m
As you can see above it says READY: 2/2 this means there are two containers running in this Pod, this is because Code Blind injected the SDK sidecar for readiness
and health checking of your Game Server.
Let’s wait for the GameServer state to become Ready. You can use the watch
tool to see the state change. If your operating system does not have watch,
manually run kubectl describe gameserver until the state changes.
watch kubectl describe gameserver
Name: simple-game-server-7pjrq
Namespace: default
Labels: <none>
Annotations: agones.dev/sdk-version: 0.9.0-764fa53
API Version: agones.dev/v1
Kind: GameServer
Metadata:
Creation Timestamp: 2019-02-27T15:06:20Z
Finalizers:
agones.dev
Generate Name: simple-game-server-
Generation: 1
Resource Version: 30377
Self Link: /apis/agones.dev/v1/namespaces/default/gameservers/simple-game-server-7pjrq
UID: 3d7ac3e1-3aa1-11e9-a4f5-42010a8a0019
Spec:
Container: simple-game-server
Health:
Failure Threshold: 3
Initial Delay Seconds: 5
Period Seconds: 5
Ports:
Container Port: 7654
Host Port: 7190
Name: default
Port Policy: Dynamic
Protocol: UDP
Scheduling: Packed
Template:
Metadata:
Creation Timestamp: <nil>
Spec:
Containers:
Image: us-docker.pkg.dev/codeblind/examples/simple-server:0.27
Name: simple-game-server
Resources:
Limits:
Cpu: 20m
Memory: 32Mi
Requests:
Cpu: 20m
Memory: 32Mi
Status:
Address: 35.233.183.43
Node Name: agones
Ports:
Name: default
Port: 7190
State: Ready
Events:
Type Reason Age From Message
---- ------ ---- ---- -------
Normal PortAllocation 34s gameserver-controller Port allocated
Normal Creating 34s gameserver-controller Pod simple-game-server-7pjrq created
Normal Scheduled 34s gameserver-controller Address and port populated
Normal Ready 27s gameserver-controller SDK.Ready() executed
If you look towards the bottom, you can see there is a Status > State value. We are waiting for it to move to Ready, which means that the game server is ready to accept connections.
You might also be interested to see the Events section, which outlines when various lifecycle events of the GameServer occur. We can also see when the GameServer is ready on the event stream as well - at which time the Status > Address and Status > Ports > Port have also been populated, letting us know what IP and port our client can now connect to!
Let’s retrieve the IP address and the allocated port of your Game Server :
kubectl get gs
This should output your Game Server IP address and ports, eg:
NAME STATE ADDRESS PORT NODE AGE
simple-game-server-7pjrq Ready 35.233.183.43 7190 agones 4m
Note
If you have Code Blind installed on minikube, or other local Kubernetes tooling, and you are having issues connecting
to the GameServer, please check the
Minikube local connection workarounds.
3. Connect to the GameServer
Note
If you have Code Blind installed on Google Kubernetes Engine, and are using
Cloud Shell for your terminal, UDP is blocked. For this step, we recommend
SSH’ing into a running VM in your project, such as a Kubernetes node.
You can click the ‘SSH’ button on the Google Compute Engine Instances
page to do this.
Run toolbox on GKE Node to run docker container with tools and then nc command would be available.
You can now communicate with the Game Server :
Note
If you do not have netcat installed
(i.e. you get a response of nc: command not found),
you can install netcat by running sudo apt install netcat.
If you are on Windows, you can alternatively install netcat on
WSL,
or download a version of netcat for Windows from nmap.org.
nc -u {IP} {PORT}
Hello World !
ACK: Hello World !
EXIT
You can finally type EXIT which tells the SDK to run the Shutdown command, and therefore shuts down the GameServer.
If you run kubectl describe gameserver again - either the GameServer will be gone completely, or it will be in Shutdown state, on the way to being deleted.
Next Step
If you want to use your own GameServer container make sure you have properly integrated the Code Blind SDK.
4.2 - Quickstart: Create a Game Server Fleet
This guide covers how you can quickly get started using Code Blind to create a Fleet of warm GameServers ready for you to allocate out of and play on!
Prerequisites
The following prerequisites are required to create a GameServer:
A Kubernetes cluster with the UDP port range 7000-8000 open on each node.
Code Blind controller installed in the targeted cluster
kubectl properly configured
Netcat which is already installed on most Linux/macOS distributions, for windows you can use WSL.
If you don’t have a Kubernetes cluster you can follow these instructions to create a cluster on Google Kubernetes Engine (GKE), Minikube or Azure Kubernetes Service (AKS), and install Code Blind.
For the purpose of this guide we’re going to use the
simple-game-server
example as the GameServer container. This example is a very simple UDP server written in Go. Don’t hesitate to look at the code of this example for more information.
While not required, you may wish to go through the Create a Game Server quickstart before this one.
Objectives
Create a Fleet in Kubernetes using an Code Blind custom resource.
Scale the Fleet up from its initial configuration.
Request a GameServer allocation from the Fleet to play on.
Connect to the allocated GameServer.
Deploy a new GameServer configuration to the Fleet.
You should see a successful output similar to this :
fleet.agones.dev/simple-game-server created
This has created a Fleet record inside Kubernetes, which in turn creates two warm GameServers
that are available to be allocated for a game session.
kubectl get fleet
It should look something like this:
NAME SCHEDULING DESIRED CURRENT ALLOCATED READY AGE
simple-game-server Packed 2 3 0 2 9m
You can also see the GameServers that have been created by the Fleet by running kubectl get gameservers,
the GameServer will be prefixed by simple-game-server.
NAME STATE ADDRESS PORT NODE AGE
simple-game-server-llg4x-rx6rc Ready 192.168.122.205 7752 minikube 9m
simple-game-server-llg4x-v6g2r Ready 192.168.122.205 7623 minikube 9m
The game servers deployed from a Fleet resource will be deployed in the same namespace. The above example omits specifying a namespace, which implies both the Fleet and the associated GameServer resources will be deployed to the default namespace.
2. Fetch the Fleet status
Let’s wait for the two GameServers to become ready.
watch kubectl describe fleet simple-game-server
Name: simple-game-server
Namespace: default
Labels: <none>
Annotations: kubectl.kubernetes.io/last-applied-configuration={"apiVersion":"agones.dev/v1","kind":"Fleet","metadata":{"annotations":{},"name":"simple-game-server","namespace":"default"},"spec":{"replicas":2,...
API Version: agones.dev/v1
Kind: Fleet
Metadata:
Cluster Name:
Creation Timestamp: 2018-07-01T18:55:35Z
Generation: 1
Resource Version: 24685
Self Link: /apis/agones.dev/v1/namespaces/default/fleets/simple-game-server
UID: 56710a91-7d60-11e8-b2dd-08002703ef08
Spec:
Replicas: 2
Strategy:
Rolling Update:
Max Surge: 25%
Max Unavailable: 25%
Type: RollingUpdate
Template:
Metadata:
Creation Timestamp: <nil>
Spec:
Health:
Ports:
Container Port: 7654
Name: default
Port Policy: Dynamic
Template:
Metadata:
Creation Timestamp: <nil>
Spec:
Containers:
Image: us-docker.pkg.dev/codeblind/examples/simple-server:0.27
Name: simple-game-server
Resources:
Status:
Allocated Replicas: 0
Ready Replicas: 2
Replicas: 2
Events:
Type Reason Age From Message
---- ------ ---- ---- -------
Normal CreatingGameServerSet 13s fleet-controller Created GameServerSet simple-game-server-wlqnd
If you look towards the bottom, you can see there is a section of Status > Ready Replicas which will tell you
how many GameServers are currently in a Ready state. After a short period, there should be 2 Ready Replicas.
3. Scale up the Fleet
Let’s scale up the Fleet from 2 replicates to 5.
Run kubectl scale fleet simple-game-server --replicas=5 to change Replicas count from 2 to 5.
If we now run kubectl get gameservers we should see 5 GameServers prefixed by simple-game-server.
NAME STATE ADDRESS PORT NODE AGE
simple-game-server-sdhzn-kcmh6 Ready 192.168.122.205 7191 minikube 52m
simple-game-server-sdhzn-pdpk5 Ready 192.168.122.205 7752 minikube 53m
simple-game-server-sdhzn-r4d6x Ready 192.168.122.205 7623 minikube 52m
simple-game-server-sdhzn-wng5k Ready 192.168.122.205 7709 minikube 53m
simple-game-server-sdhzn-wnhsw Ready 192.168.122.205 7478 minikube 52m
4. Allocate a Game Server from the Fleet
Since we have a fleet of warm gameservers, we need a way to request one of them for usage, and mark that it has
players accessing it (and therefore, it should not be deleted until they are finished with it).
Note
In production, you would likely do the following through a Kubernetes API call, but we can also
do this through kubectl as well, and ask it to return the response in yaml so that we can see what has happened.
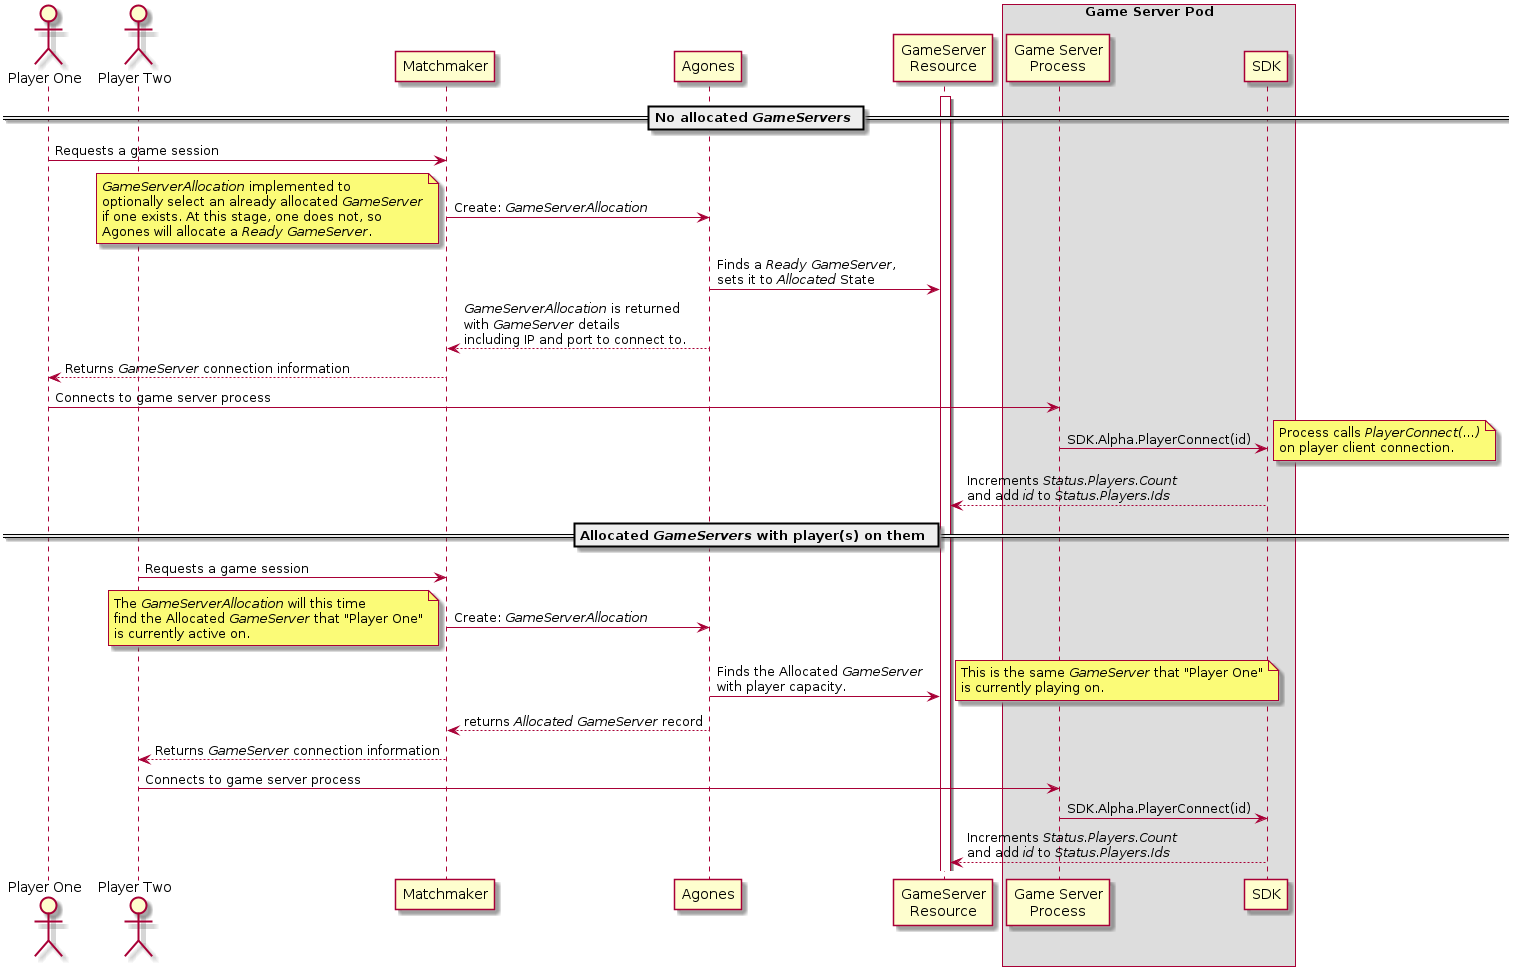
We can do the allocation of a GameServer for usage through a GameServerAllocation, which will both
return to us the details of a GameServer (assuming one is available), and also move it to the Allocated state,
which demarcates that it has players on it, and should not be removed until SDK.Shutdown() is called, or it is manually deleted.
It is worth noting that there is nothing specific that ties a GameServerAllocation to a fleet.
A GameServerAllocation uses a label selector
to determine what group of GameServers it will attempt to allocate out of. That being said, a Fleet and GameServerAllocation
are often used in conjunction.
This example uses the label selector to specifically target the simple-game-server fleet that we just created.
If you look at the status section, there are several things to take note of. The state value will tell if
a GameServer was allocated or not. If a GameServer could not be found, this will be set to UnAllocated.
If there are too many concurrent requests overwhelmed the system, state will be set to
Contention even though there are available GameServers.
However, we see that the status.state value was set to Allocated.
This means you have been successfully allocated a GameServer out of the fleet, and you can now connect your players to it!
You can see various immutable details of the GameServer in the status - the address, ports and the name
of the GameServer, in case you want to use it to retrieve more details.
We can also check to see how many GameServers you have Allocated vs Ready with the following command
(“gs” is shorthand for “gameserver”).
kubectl get gs
This will get you a list of all the current GameServers and their Status.State.
NAME STATE ADDRESS PORT NODE AGE
simple-game-server-sdhzn-kcmh6 Ready 192.168.122.205 7191 minikube 52m
simple-game-server-sdhzn-pdpk5 Ready 192.168.122.205 7752 minikube 53m
simple-game-server-sdhzn-r4d6x Allocated 192.168.122.205 7623 minikube 52m
simple-game-server-sdhzn-wng5k Ready 192.168.122.205 7709 minikube 53m
simple-game-server-sdhzn-wnhsw Ready 192.168.122.205 7478 minikube 52m
Note
GameServerAllocations are create only and not stored for performance reasons, so you won’t be able to list
them after they have been created - but you can see their effects on GameServers
A handy trick for checking to see how many GameServers you have Allocated vs Ready, run the following:
kubectl get gs
This will get you a list of all the current GameServers and their Status > State.
NAME STATE ADDRESS PORT NODE AGE
simple-game-server-tfqn7-c9tqz Ready 192.168.39.150 7136 minikube 52m
simple-game-server-tfqn7-g8fhq Allocated 192.168.39.150 7148 minikube 53m
simple-game-server-tfqn7-p8wnl Ready 192.168.39.150 7453 minikube 52m
simple-game-server-tfqn7-t6bwp Ready 192.168.39.150 7228 minikube 53m
simple-game-server-tfqn7-wkb7b Ready 192.168.39.150 7226 minikube 52m
5. Scale down the Fleet
Not only can we scale our fleet up, but we can scale it down as well.
The nice thing about Code Blind is that it is smart enough to know when GameServers have been moved to Allocated
and will automatically leave them running on scale down – as we assume that players are playing on this game server,
and we shouldn’t disconnect them!
Let’s scale down our Fleet to 0 (yep! you can do that!), and watch what happens.
Run kubectl scale fleet simple-game-server --replicas=0 to change Replicas count from 5 to 0.
It may take a moment for all the GameServers to shut down, so let’s watch them all and see what happens:
watch kubectl get gs
Eventually, one by one they will be removed from the list, and you should simply see:
NAME STATUS ADDRESS PORT NODE AGE
simple-game-server-tfqn7-g8fhq Allocated 192.168.39.150 7148 minikube 55m
That lone AllocatedGameServer is left all alone, but still running!
If you would like, try editing the Fleet configuration replicas field and watch the list of GameServers
grow and shrink.
6. Connect to the GameServer
Since we’ve only got one allocation, we’ll just grab the details of the IP and port of the
only allocated GameServer:
This should output your Game Server IP address and port. (eg 10.130.65.208:7936)
You can now communicate with the GameServer:
nc -u {IP} {PORT}
Hello World !
ACK: Hello World !
EXIT
You can finally type EXIT which tells the SDK to run the Shutdown command, and therefore shuts down the GameServer.
If you run kubectl describe gs | grep State again - either the GameServer will be replaced with a new, ReadyGameServer
, or it will be in Shutdown state, on the way to being deleted.
Since we are running a Fleet, Code Blind will always do it’s best to ensure there are always the configured number
of GameServers in the pool in either a Ready or Allocated state.
7. Deploy a new version of the GameServer on the Fleet
We can also change the configuration of the GameServer of the running Fleet, and have the changes
roll out, without interrupting the currently AllocatedGameServers.
Let’s take this for a spin! Run kubectl scale fleet simple-game-server --replicas=5 to return Replicas count back to 5.
We should now have four ReadyGameServers and one Allocated.
We can check this by running kubectl get gs.
NAME STATE ADDRESS PORT NODE AGE
simple-game-server-tfqn7-c9tz7 Ready 192.168.39.150 7136 minikube 5m
simple-game-server-tfqn7-g8fhq Allocated 192.168.39.150 7148 minikube 5m
simple-game-server-tfqn7-n0wnl Ready 192.168.39.150 7453 minikube 5m
simple-game-server-tfqn7-hiiwp Ready 192.168.39.150 7228 minikube 5m
simple-game-server-tfqn7-w8z7b Ready 192.168.39.150 7226 minikube 5m
In production, we’d likely be changing a containers > image configuration to update our Fleet
to run a new game server process, but to make this example simple, change containerPort from 7654
to 6000.
Run kubectl edit fleet simple-game-server, and make the necessary changes, and then save and exit your editor.
This will start the deployment of a new set of GameServers running
with a Container Port of 6000.
Warning
This will make it such that you can no longer connect to the simple-game-server game server.
Run kubectl describe gs | grep "Container Port"
until you can see that there is
one with a containerPort of 7654, which is the AllocatedGameServer, and four instances with a containerPort of 6000 which
is the new configuration. You can also run kubectl get gs and look at the Age column to see that one GameServer is much
older than the other four.
You have now deployed a new version of your game!
Next Steps
Have a look at the GameServerAllocation specification, and see
how the extra functionality can enable smoke testing, server information communication, and more.
You can now create a fleet autoscaler to automatically resize your fleet based on the actual usage.
See Create a Fleet Autoscaler.
Have a look at the GameServer Integration Patterns,
to give you a set of examples on how all the pieces fit together with your matchmaker and other systems.
Or if you want to try to use your own GameServer container make sure you have properly integrated the Code Blind SDK.
This guide covers how you can quickly get started using Code Blind to create a Fleet Autoscaler to manage your fleet size automatically, based on actual load.
Prerequisites
It is assumed that you have followed the instructions to Create a Game Server Fleet
and you have a running fleet of game servers.
Objectives
Create a Fleet Autoscaler in Kubernetes using Code Blind custom resource.
Watch the Fleet scale up when allocating GameServers
Watch the Fleet scale down when shutting down allocated GameServers
Edit the autoscaler specification to apply live changes
1. Create a Fleet Autoscaler
Let’s create a Fleet Autoscaler using the following command :
You can see the status (able to scale, not limited), the last time the fleet was scaled (nil for never)
and the current and desired fleet size.
The autoscaler works by changing the desired size, and the fleet creates/deletes game server instances
to achieve that number. The convergence is achieved in time, which is usually measured in seconds.
3. Allocate a Game Server from the Fleet
If you’re interested in more details for game server allocation, you should consult the Create a Game Server Fleet page.
In here we are only interested in triggering allocations to see the autoscaler in action.
Spec:
Fleet Name: simple-game-server
Policy:
Buffer:
Buffer Size: 2
Max Replicas: 10
Min Replicas: 2
Type: Buffer
Status:
Able To Scale: true
Current Replicas: 3
Desired Replicas: 3
Last Scale Time: 2018-10-02T16:00:02Z
Scaling Limited: false
Events:
Type Reason Age From Message
---- ------ ---- ---- -------
Normal AutoScalingFleet 2m fleetautoscaler-controller Scaling fleet simple-game-server from 2 to 3
You can see that the fleet size has increased, the autoscaler having compensated for the allocated instance.
Last Scale Time has been updated, and a scaling event has been logged.
Double-check the actual number of game server instances and status by running
kubectl get gs
This will get you a list of all the current GameServers and their Status > State.
NAME STATE ADDRESS PORT NODE AGE
simple-game-server-mzhrl-hz8wk Allocated 10.30.64.99 7131 minikube 5m
simple-game-server-mzhrl-k6jg5 Ready 10.30.64.100 7243 minikube 5m
simple-game-server-mzhrl-n2sk2 Ready 10.30.64.168 7658 minikube 5m
5. Shut the allocated instance down
Since we’ve only got one allocation, we’ll just grab the details of the IP and port of the
only allocated GameServer:
Spec:
Fleet Name: simple-game-server
Policy:
Buffer:
Buffer Size: 2
Max Replicas: 10
Min Replicas: 2
Type: Buffer
Status:
Able To Scale: true
Current Replicas: 3
Desired Replicas: 2
Last Scale Time: 2018-10-02T16:09:02Z
Scaling Limited: false
Events:
Type Reason Age From Message
---- ------ ---- ---- -------
Normal AutoScalingFleet 9m fleetautoscaler-controller Scaling fleet simple-game-server from 2 to 3
Normal AutoScalingFleet 45s fleetautoscaler-controller Scaling fleet simple-game-server from 3 to 2
You can see that the fleet size has decreased, the autoscaler adjusting to game server instance being de-allocated,
the Last Scale Time and the events have been updated. Note that simple-game-server game server instance you just closed earlier
might stay a bit in ‘Unhealthy’ state (and its pod in ‘Terminating’ until it gets removed.
Double-check the actual number of game server instances and status by running
kubectl get gs
This will get you a list of all the current GameServers and their Status > State.
NAME STATE ADDRESS PORT NODE AGE
simple-game-server-mzhrl-k6jg5 Ready 10.30.64.100 7243 minikube 5m
simple-game-server-mzhrl-t7944 Ready 10.30.64.168 7561 minikube 5m
7. Change autoscaling parameters
We can also change the configuration of the FleetAutoscaler of the running Fleet, and have the changes
applied live, without interruptions of service.
Run kubectl edit fleetautoscaler simple-game-server-autoscaler and set the bufferSize field to 5.
Let’s look at the list of game servers again. Run watch kubectl get gs
until you can see that are 5 ready server instances:
If you want to update a Fleet which has RollingUpdate replacement strategy and is controlled by a FleetAutoscaler:
With kubectl apply: you should omit replicas parameter in a Fleet Spec before re-applying the Fleet configuration.
With kubectl edit: you should not change the replicas parameter in the Fleet Spec when updating other field parameters.
If you follow the rules above, then the maxSurge and maxUnavailable parameters will be used as the RollingUpdate strategy updates your Fleet.
Otherwise the Fleet would be scaled according to Fleet replicas parameter first and only after a certain amount of time it would be rescaled to fit FleetAutoscalerBufferSize parameter.
You could also check the behaviour of the Fleet with Fleetautoscaler on a test Fleet to preview what would occur in your production environment.
If you want to use your own GameServer container make sure you have properly integrated the Code Blind SDK.
4.4 - Quickstart: Create a Fleet Autoscaler with Webhook Policy
This guide covers how you can create a webhook fleet autoscaler policy.
In some cases, your game servers may need to use custom logic for scaling your fleet that is more complex than what
can be expressed using the Buffer policy in the fleetautoscaler. This guide shows how you can extend Code Blind
with an autoscaler webhook to implement a custom autoscaling policy.
When you use an autoscaler webhook the logic computing the number of target replicas is delegated to an external
HTTP/S endpoint, such as one provided by a Kubernetes deployment and service in the same cluster (as shown in the
examples below). The fleetautoscaler will send a request to the webhook autoscaler’s /scale endpoint every sync
period (currently 30s) with a JSON body, and scale the target fleet based on the data that is returned.
In this step we would deploy an example webhook that will control the size of the fleet based on allocated gameservers
portion in a fleet. You can see the source code for this example webhook server
here.
The fleetautoscaler would trigger this endpoint every 30 seconds. More details could be found
also here.
We need to create a pod which will handle HTTP requests with json payload
FleetAutoscaleReview and return back it
with FleetAutoscaleResponse populated.
The Scale flag and Replicas values returned in the FleetAutoscaleResponse tells the FleetAutoscaler what target size the backing Fleet should be scaled up or down to. If Scale is false - no scaling occurs.
Run next command to create a service and a Webhook pod in a cluster:
You can see the status (able to scale, not limited), the last time the fleet was scaled (nil for never), current and desired fleet size.
The autoscaler makes a query to a webhoook service deployed on step 1 and on response changing the target Replica size, and the fleet creates/deletes game server instances
to achieve that number. The convergence is achieved in time, which is usually measured in seconds.
5. Allocate Game Servers from the Fleet to trigger scale up
If you’re interested in more details for game server allocation, you should consult the Create a Game Server Fleet page.
Here we only interested in triggering allocations to see the autoscaler in action.
Spec:
Fleet Name: simple-game-server
Policy:
Type: Webhook
Webhook:
Service:
Name: autoscaler-webhook-service
Namespace: default
Path: scale
URL:
Status:
Able To Scale: true
Current Replicas: 4
Desired Replicas: 4
Last Scale Time: 2018-12-22T12:53:47Z
Scaling Limited: false
Events:
Type Reason Age From Message
---- ------ ---- ---- -------
Normal AutoScalingFleet 35s fleetautoscaler-controller Scaling fleet simple-game-server from 2 to 4
You can see that the fleet size has increased in particular case doubled to 4 gameservers (based on our custom logic in our webhook), the autoscaler having compensated for the two allocated instances.
Last Scale Time has been updated and a scaling event has been logged.
Double-check the actual number of game server instances and status by running:
kubectl get gs -n default
This will get you a list of all the current GameServers and their Status > State.
NAME STATE ADDRESS PORT NODE AGE
simple-game-server-dmkp4-8pkk2 Ready 35.247.13.175 7386 minikube 5m
simple-game-server-dmkp4-b7x87 Allocated 35.247.13.175 7219 minikube 5m
simple-game-server-dmkp4-r4qtt Allocated 35.247.13.175 7220 minikube 5m
simple-game-server-dmkp4-rsr6n Ready 35.247.13.175 7297 minikube 5m
7. Check downscaling using Webhook Autoscaler policy
Based on our custom webhook deployed earlier, if the fraction of allocated replicas in whole Replicas count would be less than threshold (0.3) then the fleet would scale down by scaleFactor, in our example by 2.
Note that the example webhook server has a limitation that it would not decrease fleet replica count under minReplicasCount, which is equal to 2.
We need to run EXIT command on one gameserver (Use IP address and port of the allocated gameserver from the previous step) in order to decrease the number of allocated gameservers in a fleet (<0.3).
nc -u 35.247.13.175 7220
EXIT
Server would be in shutdown state.
Wait about 30 seconds.
Then you should see scaling down event in the output of next command:
Normal AutoScalingFleet 11m fleetautoscaler-controller Scaling fleet simple-game-server from 2 to 4
Normal AutoScalingFleet 1m fleetautoscaler-controller Scaling fleet simple-game-server from 4 to 2
And get gameservers command output:
kubectl get gs -n default
NAME STATUS ADDRESS PORT NODE AGE
simple-game-server-884fg-6q5sk Ready 35.247.117.202 7373 minikube 5m
simple-game-server-884fg-b7l58 Allocated 35.247.117.202 7766 minikube 5m
8. Cleanup
You can delete the autoscaler service and associated resources with the following commands.
Chapter 2 Configuring HTTPS fleetautoscaler webhook with CA Bundle
Objectives
Using TLS and a certificate authority (CA) bundle we can establish trusted communication between Fleetautoscaler and
an HTTPS server running the autoscaling webhook that controls the size of the fleet (Replicas count). The certificate of the
autoscaling webhook must be signed by the CA provided in fleetautoscaler yaml configuration file. Using TLS eliminates
the possibility of a man-in-the-middle attack between the fleetautoscaler and the autoscaling webhook.
This will start an interactive script that will ask you for various bits of information. Fill it out as you see fit.
Every webhook that you wish to install a trusted certificate will need to go through this process. First, just like with the root CA step, you’ll need to create a private key (different from the root CA):
openssl genrsa -out webhook.key 2048
Next create configuration file cert.conf for the certificate signing request:
Generate the certificate signing request, use valid hostname which in this case will be autoscaler-tls-service.default.svc as Common Name (eg, fully qualified host name) as well as DNS.1 in the alt_names section of the config file.
You need to put Base64-encoded string into caBundle field in your fleetautoscaler yaml configuration:
base64 -i ./rootCA.pem
Copy the output of the command above and replace the caBundle field in your text editor (say vim) with the new value:
wget https://raw.githubusercontent.com/googleforgames/agones/release-1.38.0/examples/webhookfleetautoscalertls.yaml
vim ./webhookfleetautoscalertls.yaml
3. Deploy a Webhook service for autoscaling
Run next command to create a service and a Webhook pod in a cluster:
Let’s create a Fleet Autoscaler using the following command (caBundle should be set properly on Step 2):
kubectl apply -f ./webhookfleetautoscalertls.yaml
5. See the fleet and autoscaler status.
In order to track the list of gameservers which run in your fleet you can run this command in a separate terminal tab:
watch "kubectl get gs -n default"
6. Allocate two Game Servers from the Fleet to trigger scale up
If you’re interested in more details for game server allocation, you should consult the Create a Game Server Fleet page.
Here we only interested in triggering allocations to see the autoscaler in action.
for i in {0..1};do kubectl create -f https://raw.githubusercontent.com/googleforgames/agones/release-1.38.0/examples/simple-game-server/gameserverallocation.yaml -o yaml ;done
7. Check new Autoscaler and Fleet status
Now let’s wait a few seconds to allow the autoscaler to detect the change in the fleet and check again its status
Spec:
Fleet Name: simple-game-server
Policy:
Type: Webhook
Webhook:
Ca Bundle: LS0tLS1CRUdJTiBDRVJUSUZJQ0FURS0tLS0tCk1JSUN1RENDQWFBQ0NRQ29kcEFNbTlTd0pqQU5CZ2txaGtpRzl3MEJBUXNGQURBZU1Rc3dDUVlEVlFRR0V3SlYKVXpFUE1BMEdBMVVFQ3d3R1FXZHZibVZ6TUI0WERURTVNREV3TkRFeE5URTBORm9YRFRJeE1UQXlOREV4TlRFMApORm93SGpFTE1Ba0dBMVVFQmhNQ1ZWTXhEekFOQmdOVkJBc01Ca0ZuYjI1bGN6Q0NBU0l3RFFZSktvWklodmNOCkFRRUJCUUFEZ2dFUEFEQ0NBUW9DZ2dFQkFOQ0h5dndDOTZwZDlTdkFhMUIvRWg2ekcxeDBLS1dPaVhtNzhJcngKKzZ5WHd5YVpsMVo1cVExbUZoOThMSGVZUmQwWVgzRTJnelZ5bFpvUlUra1ZESzRUc0VzV0tNUFVpdVo0MUVrdApwbythbEN6alAyaXZzRGZaOGEvdnByL3dZZ2FrWGtWalBUaGpKUk9xTnFIdWROMjZVcUFJYnNOTVpoUkxkOVFFCnFLSjRPNmFHNVMxTVNqZFRGVHFlbHJiZitDcXNKaHltZEIzZmxGRUVvdXExSmoxS0RoQjRXWlNTbS9VSnpCNkcKNHUzY3BlQm1jTFVRR202ZlFHb2JFQSt5SlpMaEVXcXBrd3ZVZ2dCNmRzWE8xZFNIZXhhZmlDOUVUWGxVdFRhZwo1U2JOeTVoYWRWUVV3Z253U0J2djR2R0t1UUxXcWdXc0JyazB5Wll4Sk5Bb0V5RUNBd0VBQVRBTkJna3Foa2lHCjl3MEJBUXNGQUFPQ0FRRUFRMkgzaWJRcWYzQTNES2l1eGJISURkbll6TlZ2Z0dhRFpwaVZyM25ocm55dmxlNVgKR09hRm0rMjdRRjRWV29FMzZDTGhYZHpEWlM4bEpIY09YUW5KOU83Y2pPYzkxVmh1S2NmSHgwS09hU1oweVNrVAp2bEtXazlBNFdoNGE0QXFZSlc3Z3BUVHR1UFpydnc4VGsvbjFaWEZOYVdBeDd5RU5OdVdiODhoNGRBRDVaTzRzCkc5SHJIdlpuTTNXQzFBUXA0Q3laRjVyQ1I2dkVFOWRkUmlKb3IzM3pLZTRoRkJvN0JFTklZZXNzZVlxRStkcDMKK0g4TW5LODRXeDFUZ1N5Vkp5OHlMbXFpdTJ1aThjaDFIZnh0OFpjcHg3dXA2SEZLRlRsTjlBeXZUaXYxYTBYLwpEVTk1eTEwdi9oTlc0WHpuMDJHNGhrcjhzaUduSEcrUEprT3hBdz09Ci0tLS0tRU5EIENFUlRJRklDQVRFLS0tLS0K
Service: <nil>
URL: https://autoscaler-tls-service.default.svc:8000/scale
Events:
Type Reason Age From Message
---- ------ ---- ---- -------
Normal AutoScalingFleet 5s fleetautoscaler-controller Scaling fleet simple-game-server from 2 to 4
You can see that the fleet size has increased in particular case doubled to 4 gameservers (based on our custom logic in our webhook), the autoscaler having compensated for the two allocated instances.
Last Scale Time has been updated and a scaling event has been logged.
Double-check the actual number of game server instances and status by running:
kubectl get gs -n default
This will get you a list of all the current GameServers and their Status > State.
NAME STATE ADDRESS PORT NODE AGE
simple-game-server-njmr7-2t4nx Ready 35.203.159.68 7330 minikube 1m
simple-game-server-njmr7-65rp6 Allocated 35.203.159.68 7294 minikube 4m
8. Cleanup
You can delete the autoscaler service and associated resources with the following commands.
Note that secure communication has been established and we can trust that communication between the fleetautoscaler and
the autoscaling webhook. If you need to run the autoscaling webhook outside of the Kubernetes cluster, you can use
another root certificate authority as long as you put it into the caBundle parameter in fleetautoscaler configuration
(in pem format, base64-encoded).
Troubleshooting Guide
If you run into problems with the configuration of your fleetautoscaler and webhook service the easiest way to debug
them is to run:
and inspect the events at the bottom of the output.
Common error messages.
If you have configured the wrong service Path for the FleetAutoscaler you will see a message like
Error calculating desired fleet size on FleetAutoscaler simple-fleet-r7fdv-autoscaler. Error: bad status code 404 from the server: https://autoscaler-tls-service.default.svc:8000/scale
If you are using a hostname other than autoscaler-tls-service.default.svc as the
Common Name (eg, fully qualified host name) when creating a certificate using openssl tool you will see a
message like
Post https://autoscaler-tls-service.default.svc:8000/scale: x509: certificate is not valid for any names, but wanted to match autoscaler-tls-service.default.svc
If you see errors like the following in autoscaler-webhook-tls pod logs:
http: TLS handshake error from 10.48.3.125:33374: remote error: tls: bad certificate
Then there could be an issue with your ./rootCA.pem.
You can repeat the process from step 2, in order to fix your certificates setup.
If you want to use your own GameServer container make sure you have properly integrated the Code Blind SDK.
4.5 - Quickstart: Edit a Game Server
The following guide is for developers without Docker or Kubernetes experience, that want to use the simple-game-server example as a starting point for a custom game server.
This guide addresses Google Kubernetes Engine and Minikube. We would welcome a Pull Request to expand this to include other platforms as well.
To install on GKE, follow the install instructions (if you haven’t already) at
Setting up a Google Kubernetes Engine (GKE) cluster.
Also complete the “Enabling creation of RBAC resources” and “Installing Code Blind” sets of instructions on the same page.
To install locally on Minikube, read Setting up a Minikube cluster.
Also complete the “Enabling creation of RBAC resources” and “Installing Code Blind” sets of instructions on the same page.
Note: Review Authentication Methods
for additional information regarding use of gcloud as a Docker credential helper
and advanced authentication methods to the Google Container Registry.
You can finally type EXIT which tells the SDK to run the Shutdown command, and therefore shuts down the GameServer.
If you run kubectl describe gameserver again - either the GameServer will be gone completely, or it will be in Shutdown state, on the way to being deleted.
This page provides a description of the various stages that Code Blind features can be in, and the relative maturity and support level expected for each level.
Supported Versions
Code Blind versions are expressed as x.y.z, where x is the major version, y is the minor version, and z is the patch version
following Semantic Versioning terminology.
Code Blind Features
A feature within Code Blind can be in Alpha, Beta or Stable stage.
Feature Gates
Alpha and Beta features can be enabled or disabled through the agones.featureGates configuration option
that can be found in the Helm configuration documentation.
Might be buggy. Enabling the feature may expose bugs.
Support for this feature may be dropped at any time without notice.
The API may change in incompatible ways in a later software release without notice.
Recommended for use only in short-lived testing clusters, due to increased risk of bugs and lack of long-term support.
Note
Please do try Alpha features and give feedback on them. This is important to ensure less breaking changes
through the Beta period.
Beta
A Beta feature means:
Enabled by default, but able to be disabled through a feature gate.
The feature is well tested. Enabling the feature is considered safe.
Support for the overall feature will not be dropped, though details may change.
The schema and/or semantics of objects may change in incompatible ways in a subsequent beta or stable releases. When
this happens, we will provide instructions for migrating to the next version. This may require deleting, editing,
and re-creating API objects. The editing process may require some thought. This may require downtime for
applications that rely on the feature.
Recommended for only non-business-critical uses because of potential for incompatible changes in subsequent releases.
If you have multiple clusters that can be upgraded independently, you may be able to relax this restriction.
Note
Note: Please do try Beta features and give feedback on them! After they exit beta, it may not be practical for us
to make more changes.
Stable
A Stable feature means:
The feature is enabled and the corresponding feature gate no longer exists.
Stable versions of features will appear in released software for many subsequent versions.
Feature Stage Indicators
There are a variety of features with Code Blind, how can we determine what stage each feature is in?
Below are indicators for each type of functionality that can be used to determine the feature stage for a given aspect
of Code Blind.
Custom Resource Definitions (CRDs)
This refers to Kubernetes resource for Code Blind, such as GameServer, Fleet and GameServerAllocation.
New CRDs
For new resources, the stage of the resource will be indicated by the apiVersion of the resource.
For example: apiVersion: "agones.dev/v1" is a stable resource, apiVersion: "agones.dev/v1beta1" is a beta
stage resource, and apiVersion: "agones.dev/v1alpha1" is an alpha stage resource.
New CRD attributes
When alpha and beta attributes are added to an existing stable Code Blind CRD, we will follow the Kubernetes Adding
Unstable Features to Stable Versions
Guide to optimise on the least amount of breaking changes for users as attributes progress through feature stages.
alpha and beta attributes will be added to the existing CRD as optional and documented with their feature stage.
Attempting to populate these alpha and beta attributes on an Code Blind CRD will return a validation error if their
accompanying Feature Flag is not enabled.
alpha and beta attributes can be subject to change of name and structure, and will result in breaking changes
before moving to a stable stage. These changes will be outlined in release notes and feature documentation.
Code Blind Game Server SDK
Any alpha or beta Game Server SDK functionality will be a subpackage of the sdk package. For example
, functionality found in a sdk.alphav1 package should be considered at the alpha feature stage.
Only experimental functionality will be found in any alpha and beta SDK packages, and as such may change as
development occurs.
As SDK features move to through feature stages towards stable, the previous version of the SDK API
will remain for at least one release to enable easy migration to the more stable feature stage (i.e. from alpha -> beta, beta -> stable)
Any other SDK functionality not marked as alpha or beta is assumed to be stable.
REST & gRPC APIs
REST and gRPC API will have versioned paths where appropriate to indicate their feature stage.
For example, a REST API with a prefix of v1alpha1 is an alpha stage feature:
http://api.example.com/v1alpha1/exampleaction.
Similar to the SDK, any alpha or beta gRPC functionality will be a subpackage of the main API package.
For example, functionality found in a api.alphav1 package should be considered at the alpha feature stage.
5.2 - Best Practices
Best practices for running Code Blind in production.
Overview
Running Code Blind in production takes consideration, from planning your launch to figuring
out the best course of action for cluster and Code Blind upgrades. On this page, we’ve collected
some general best practices. We also have cloud specific pages for:
If you are interested in submitting best practices for your cloud prodiver / on-prem, please contribute!
Separation of Code Blind from GameServer nodes
When running in production, Code Blind should be scheduled on a dedicated pool of nodes, distinct from where Game Servers
are scheduled for better isolation and resiliency. By default Code Blind prefers to be scheduled on nodes labeled with
agones.dev/agones-system=true and tolerates the node taint agones.dev/agones-system=true:NoExecute.
If no dedicated nodes are available, Code Blind will run on regular nodes. See taints and tolerations
for more information about Kubernetes taints and tolerations.
If you are collecting Metrics using our standard Prometheus installation, see
the installation guide for instructions on configuring a separate node pool for the agones.dev/agones-metrics=true taint.
Code Blind supports Multi-cluster Allocation, allowing you to allocate from a set of clusters, versus a single point of potential failure. There are several other options for multi-cluster allocation:
Anthos Service Mesh can be used to route allocation traffic to different clusters based on arbitrary criteria. See Global Multiplayer Demo for an example where the match maker influences which cluster the allocation is routed to.
You should consider spreading your game servers in two ways:
Across geographic fault domains (GCP regions, AWS availability zones, separate datacenters, etc.): This is desirable for geographic fault isolation, but also for optimizing client latency to the game server.
Within a fault domain: Kubernetes Clusters are single points of failure. A single misconfigured RBAC rule, an overloaded Kubernetes Control Plane, etc. can prevent new game server allocations, or worse, disrupt existing sessions. Running multiple clusters within a fault domain also allows for easier upgrades.
5.2.1 - Google Kubernetes Engine Best Practices
Best practices for running Code Blind on Google Kubernetes Engine (GKE).
We recommned using Release Channels for all GKE clusters. Using Release Channels has several advantages:
Google automatically manages the version and upgrade cadence for your Kubernetes Control Plane and its nodes.
Clusters on a Release Channel are allowed to use the No minor upgrades and No minor or node upgradesscope of maintenance exclusions - in other words, enrolling a cluster in a Release Channel gives you more control over node upgrades.
Clusters enrolled in rapid channel have access to the newest Kubernetes version first. Code Blind strives to support the newest release in rapid channel to allow you to test the newest Kubernetes soon after it’s available in GKE.
Note
GKE Autopilot clusters must be on Release Channels.
What channel should I use?
We recommend the regular channel, which offers a balance between stability and freshness. See this guide for more discussion.
If you need to disallow minor version upgrades for more than 6 months, consider choosing the freshest Kubernetes version possible: Choosing the freshest version on rapid or regular will extend the amount of time before your cluster reaches end of life.
What versions are available on a given channel?
You can query the versions available across different channels using gcloud:
You can also find some externally supported SDKs in our
Third Party Content.
The SDKs are relatively thin wrappers around gRPC generated clients,
or an implementation of the REST API (exposed via grpc-gateway),
where gRPC client generation and compilation isn’t well supported.
They connect to a small process that Code Blind coordinates to run alongside the Game Server
in a Kubernetes Pod.
This means that more languages can be supported in the future with minimal effort
(but pull requests are welcome! 😊 ).
There is also local development tooling for working against the SDK locally,
without having to spin up an entire Kubernetes infrastructure.
Connecting to the SDK Server
Starting with Code Blind 1.1.0, the port that the SDK Server listens on for incoming gRPC or HTTP requests is
configurable. This provides flexibility in cases where the default port conflicts with a port that is needed
by the game server.
Code Blind will automatically set the following environment variables on all game server containers:
AGONES_SDK_GRPC_PORT: The port where the gRPC server is listening (defaults to 9357)
AGONES_SDK_HTTP_PORT: The port where the grpc-gateway is listening (defaults to 9358)
The SDKs will automatically discover and connect to the gRPC port specified in the environment variable.
If your game server requires using a REST client, it is advised to use the port from the environment variable,
otherwise your game server will not be able to contact the SDK server if it is configured to use a non-default port.
Function Reference
While each of the SDKs are canonical to their languages, they all have the following
functions that implement the core responsibilities of the SDK.
For language specific documentation, have a look at the respective source (linked above),
and the
examples.
Calling any of state changing functions mentioned below does not guarantee that GameServer Custom Resource object would actually change its state right after the call. For instance, it could be moved to the Shutdown state elsewhere (for example, when a fleet scales down), which leads to no changes in GameServer object. You can verify the result of this call by waiting for the desired state in a callback to WatchGameServer() function.
Functions which changes GameServer state or settings are:
Ready()
Shutdown()
SetLabel()
SetAnnotation()
Allocate()
Reserve()
Alpha().SetCapacity()
Alpha().PlayerConnect()
Alpha().PlayerDisconnect()
Alpha().SetCounterCount()
Alpha().IncrementCounter()
Alpha().DecrementCounter()
Alpha().SetCounterCapacity()
Alpha().AppendListValue()
Alpha().DeleteListValue()
Alpha().SetListCapacity()
Lifecycle Management
Ready()
This tells Code Blind that the Game Server is ready to take player connections.
Once a Game Server has specified that it is Ready, then the Kubernetes
GameServer record will be moved to the Ready state, and the details
for its public address and connection port will be populated.
While Code Blind prefers that Shutdown() is run once a game has completed to delete the GameServer instance,
if you want or need to move an AllocatedGameServer back to Ready to be reused, you can call this SDK method again to do
this.
Health()
This sends a single ping to designate that the Game Server is alive and
healthy. Failure to send pings within the configured thresholds will result
in the GameServer being marked as Unhealthy.
See the
gameserver.yaml for all health checking
configurations.
Reserve(seconds)
With some matchmaking scenarios and systems it is important to be able to ensure that a GameServer is unable to be deleted,
but doesn’t trigger a FleetAutoscaler scale up. This is where Reserve(seconds) is useful.
Reserve(seconds) will move the GameServer into the Reserved state for the specified number of seconds (0 is forever), and then it will be
moved back to Ready state. While in Reserved state, the GameServer will not be deleted on scale down or Fleet update,
and also it could not be Allocated using GameServerAllocation.
This is often used when a game server process must register itself with an external system, such as a matchmaker,
that requires it to designate itself as available for a game session for a certain period. Once a game session has started,
it should call SDK.Allocate() to designate that players are currently active on it.
Calling other state changing SDK commands such as Ready or Allocate will turn off the timer to reset the GameServer back
to the Ready state or to promote it to an Allocated state accordingly.
Allocate()
With some matchmakers and game matching strategies, it can be important for game servers to mark themselves as Allocated.
For those scenarios, this SDK functionality exists.
There is a chance that GameServer does not actually become Allocated after this call. Please refer to the general note in Function Reference above.
The agones.dev/last-allocated annotation will be set on the GameServer to an RFC3339 formatted timestamp of the time of allocation, even if the GameServer was already in an Allocated state.
Note that if using SDK.Allocate() in combination with GameServerAllocations, it’s possible for the agones.dev/last-allocated timestamp to move backwards if clocks are not synchronized between the Code Blind controller and the GameServer pod.
Note
Using a GameServerAllocation is preferred in all other scenarios,
as it gives Code Blind control over how packed GameServers are scheduled within a cluster, whereas with Allocate() you
relinquish control to an external service which likely doesn’t have as much information as Code Blind.
Shutdown()
This tells Code Blind to shut down the currently running game server. The GameServer state will be set Shutdown and the
backing Pod will be Terminated.
It’s worth reading the Termination of Pods
Kubernetes documentation, to understand the termination process, and the related configuration options.
As a rule of thumb, implement a graceful shutdown in your game sever process when it receives the TERM signal
from Kubernetes when the backing Pod goes into Termination state.
Be aware that if you use a variation of System.exit(0) after calling SDK.Shutdown(), your game server container may
restart for a brief period, inline with our Health Checking policies.
If the SDK server receives a TERM signal before calling SDK.Shutdown(),
the SDK server will stay alive for the period of the terminationGracePeriodSeconds until SDK.Shutdown() has been called.
Configuration Retrieval
GameServer()
This returns most of the backing GameServer configuration and Status. This can be useful
for instances where you may want to know Health check configuration, or the IP and Port
the GameServer is currently allocated to.
Since the GameServer contains an entire PodTemplate
the returned object is limited to that configuration that was deemed useful. If there are
areas that you feel are missing, please file an issue or pull request.
The easiest way to see what is exposed, is to check
the
sdk.proto, specifically at
the message GameServer.
For language specific documentation, have a look at the respective source (linked above),
and the
examples.
WatchGameServer(function(gameserver){…})
This executes the passed in callback with the current GameServer details whenever the underlying GameServer configuration is updated.
This can be useful to track GameServer > Status > State changes, metadata changes, such as labels and annotations, and more.
In combination with this SDK, manipulating Annotations and
Labels can also be a useful way to communicate information through to running game server processes from outside those processes.
This is especially useful when combined with GameServerAllocationapplied metadata.
Since the GameServer contains an entire PodTemplate
the returned object is limited to that configuration that was deemed useful. If there are
areas that you feel are missing, please file an issue or pull request.
The easiest way to see what is exposed, is to check
the
sdk.proto, specifically at
the message GameServer.
For language specific documentation, have a look at the respective source (linked above),
and the
examples.
Metadata Management
SetLabel(key, value)
This will set a Label value on the backing GameServer
record that is stored in Kubernetes.
To maintain isolation, the key value is automatically prefixed with the value “agones.dev/sdk-”. This is done for
two main reasons:
The prefix allows the developer to always know if they are accessing or reading a value that could have come, or
may be changed by the client SDK. Much like private vs public scope in a programming language, the Code Blind
SDK only gives you access to write to part of the set of labels and annotations that exist on a GameServer.
The prefix allows for a smaller attack surface if the GameServer container gets compromised. Since the
game container is generally externally exposed, and the Code Blind project doesn’t control the binary that is
run within it, limiting exposure if the game server becomes compromised is worth the extra
development friction that comes with having this prefix in place.
Warning
There are limits on the characters that be used for label keys and values. Details are here.
You will need to take them into account when combined with the label prefix above.
Setting GameServer labels can be useful if you want information from your running game server process to be
observable or searchable through the Kubernetes API.
SetAnnotation(key, value)
This will set an Annotation value
on the backing GameServer record that is stored in Kubernetes.
To maintain isolation, the key value is automatically prefixed with “agones.dev/sdk-” for the same reasons as
in SetLabel(…) above. The isolation is also important as Code Blind uses annotations on the
GameServer as part of its internal processing.
Setting GameServer annotations can be useful if you want information from your running game server process to be
observable through the Kubernetes API.
Counters And Lists
Warning
The Counters And Lists feature is currently Alpha,
not enabled by default, and may change in the future.
Use the FeatureGate CountsAndLists
to enable and test this feature.
The SDK batches mutation operations every 1 second for performance reasons. However, changes made and subsequently
retrieved through the SDK will be atomically accurate through the SDK, as those values are tracked within the
SDK Server sidecar process.
Since the Code Blind SDK server batches the update operations of
GameServer.Status.Counters and GameServer.Status.Lists
asynchronously, this means that if you update
GameServer.status values
through both the SDK and the Allocation/Kubernetes API, the batch processing may silently truncate some of those values
to the capacity of that Counter or List.
Counters
All functions will return an error if the specified key is not predefined in the
GameServer.Spec.Counters resource configuration.
Note: For Counters, the default setting for the capacity is preset to 1000. It is recommended to avoid configuring the capacity to max(int64), as doing so could cause problems with JSON Patch operations.
Alpha().GetCounterCount(key)
This function retrieves either the GameServer.Status.Counters[key].Count or the SDK awaiting-batch
value for a given key, whichever is most up to date.
Alpha().SetCounterCount(key, amount)
This function sets the value of GameServer.Status.Counters[key].Count for the given key to the
passed in amount. This operation overwrites any previous values and the new value cannot exceed the Counter’s capacity.
Alpha().IncrementCounter(key, amount)
This function increments GameServer.Status.Counters[key].Count for the given key by the passed in
non-negative amount. The function returns an error if the Counter is already at capacity (at time of operation),
indicating no increment will occur.
Alpha().DecrementCounter(key, amount)
This function decreases GameServer.Status.Counters[key].Count for the given key by the passed in
non-negative amount. It returns an error if the Counter’s count is already at zero.
Alpha().SetCounterCapacity(key, amount)
This function sets the maximum GameServer.Status.Counters[key].Capacity for the given key by the
passed in non-negative amount. A capacity value of 0 indicates no capacity limit.
The capacity value is required to be between 0 and 1000.
Alpha().GetListCapacity(key)
This function retrieves either the GameServer.Status.Lists[key].Capacity or the SDK
awaiting-batch value for the given key, whichever is most up to date.
Alpha().GetListValues(key)
This function retrieves either the GameServer.Status.Lists[key].Values or the SDK
awaiting-batch values array for the given key, whichever is most up to date.
Alpha().ListContains(key, value)
Convenience function, which returns if the specific string value exists in the results
of Alpha().GetListValues(key).
Counters and Lists will eventually replace the Alpha functionality of Player Tracking, which will subsequently be
removed from Code Blind. If you are currently using this Alpha feature, we would love for you to test (and ideally migrate
to!) this new functionality to ensure it will meet all your needs.
Alpha().PlayerConnect(playerID)
This function increases the SDK’s stored player count by one, and appends this playerID to
GameServer.Status.Players.IDs.
PlayerConnect() returns true and adds the playerID to the list of playerIDs if this playerID was not already in the
list of connected playerIDs.
If the playerID exists within the list of connected playerIDs, PlayerConnect() will return false, and the list of
connected playerIDs will be left unchanged.
An error will be returned if the playerID was not already in the list of connected playerIDs but the player capacity for
the server has been reached. The playerID will not be added to the list of playerIDs.
Note
Do not use this method if you are manually managing GameServer.Status.Players.IDs and GameServer.Status.Players.Count
through the Kubernetes API, as indeterminate results will occur.
Alpha().PlayerDisconnect(playerID)
This function decreases the SDK’s stored player count by one, and removes the playerID from
GameServer.Status.Players.IDs.
GameServer.Status.Players.Count and GameServer.Status.Players.IDs are then set to
update the player count and id list a second from now,
unless there is already an update pending, in which case the update joins that batch operation.
PlayerDisconnect() will return true and remove the supplied playerID from the list of connected playerIDs if the
playerID value exists within the list.
If the playerID was not in the list of connected playerIDs, the call will return false, and the connected playerID list
will be left unchanged.
Note
Do not use this method if you are manually managing GameServer.Status.Players.IDs and GameServer.Status.Players.Count
through the Kubernetes API, as indeterminate results will occur.
This function retrieves the current player capacity. This is always accurate from what has been set through this SDK,
even if the value has yet to be updated on the GameServer status resource.
Note
If GameServer.Status.Players.Capacity is set manually through the Kubernetes API, use SDK.GameServer() or
SDK.WatchGameServer() instead to view this value.
Alpha().GetPlayerCount()
This function retrieves the current player count.
This is always accurate from what has been set through this SDK, even if the value has yet to be updated on the
GameServer status resource.
Note
If GameServer.Status.Players.IDs is set manually through the Kubernetes API, use SDK.GameServer()
or SDK.WatchGameServer() instead to retrieve the current player count.
Alpha().IsPlayerConnected(playerID)
This function returns if the playerID is currently connected to the GameServer. This is always accurate from what has
been set through this SDK,
even if the value has yet to be updated on the GameServer status resource.
Note
If GameServer.Status.Players.IDs is set manually through the Kubernetes API, use SDK.GameServer()
or SDK.WatchGameServer() instead to determine connected status.
Alpha().GetConnectedPlayers()
This function returns the list of the currently connected player ids. This is always accurate from what has been set
through this SDK, even if the value has yet to be updated on the GameServer status resource.
Note
If GameServer.Status.Players.IDs is set manually through the Kubernetes API, use SDK.GameServer()
or SDK.WatchGameServer() instead to list the connected players.
Writing your own SDK
If there isn’t an SDK for the language and platform you are looking for, you have several options:
gRPC Client Generation
If client generation is well supported by gRPC, then generate client(s) from
the proto files found in the
proto/sdk,
directory and look at the current
sdks to see how the wrappers are
implemented to make interaction with the SDK server simpler for the user.
REST API Implementation
If client generation is not well supported by gRPC, or if there are other complicating factors, implement the SDK through
the REST HTTP+JSON interface. This could be written by hand, or potentially generated from
the
Swagger/OpenAPI Specifications.
Finally, if you build something that would be usable by the community, please submit a pull request!
SDK Conformance Test
There is a tool SDK server Conformance checker which will run Local SDK server and record all requests your client is performing.
In order to check that SDK is working properly you should write simple SDK test client which would use all methods of your SDK.
Also to test that SDK client is receiving valid Gameserver data, your binary should set the same Label value as creation timestamp which you will receive as a result of GameServer() call and Annotation value same as gameserver UID received by Watch gameserver callback.
Complete list of endpoints which should be called by your test client is the following:
If you wish to build the binaries from source
the make target build-agones-sdk-binary will compile the necessary binaries
for all supported operating systems (64 bit windows, linux and osx).
You can find the binaries in the bin folder in
`cmd/sdk-server`
once compilation is complete.
Unreal is a game engine that is used by anyone from hobbyists all the way through to huge AAA Game Stuidos.
With this in mind there is a vast amount to learn to run a production game using Unreal, even before you get to learning how it integrates with Code Blind. If you want to kick the tires with a starter project you will probably be fine with one of the starter projects out of the box.
However as your Unreal/Code Blind project gets more advanced you will want to understand more about the engine itself and how it can be used to integrate with this project. There will be different ways of interacting via in Play In Editor (PIE) versus running as an actual dedicated game server packaged into a container.
There are few helpful links for latest Unreal Engine 5:
This is a SDK inspired by the REST API to the Code Blind sidecars that allows engineers to communicate with the sidecar from either C++ or Blueprints.
Getting the Code
Easiest way to get this code is to clone the repository and drop the entire plugin folder into your own Plugins folder. This runs the plugin as a Project plugin rather than an engine plugin.
We could however turn this into a marketplace plugin that can be retrived from the marketplace directly into the UE editor.
voidAPlatformGameSession::PostLogin(APlayerController*NewPlayer){// Empty brances are for callbacks on success and errror.
AgonesSDK->PlayerConnect("netspeak-player",{},{});}
Using Blueprints (UE5)
Add Component to your Blueprint GameMode
This will automatically call /health every 10 seconds and once /gameserver calls are succesful it will call /ready.
Accessing other functionality of Code Blind can be done via adding a node in Blueprints.
Using Blueprints (UE4)
Add Component to your Blueprint GameMode
This will automatically call /health every 10 seconds and once /gameserver calls are succesful it will call /ready.
Accessing other functionality of Code Blind can be done via adding a node in Blueprints.
Configuration Options
A number of options can be altered via config files in Unreal these are supplied via Game configuration eg. DefaultGame.ini.
Within the Unreal GameMode and GameSession exist a number of useful existing
funtions that can be used to fit in with making calls out to Code Blind.
A few examples are:
RegisterServer to call SetLabel, SetPlayerCapacity
PostLogin to call PlayerConnect
NotifyLogout to call PlayerDisconnect
5.3.2 - Unity Game Server Client SDK
This is the Unity version of the Code Blind Game Server Client SDK.
Check the Client SDK Documentation for more details on each of the SDK functions and how to run the SDK locally.
SDK Functionality
Area
Action
Implemented
Lifecycle
Ready
✔️
Lifecycle
Health
✔️
Lifecycle
Reserve
✔️
Lifecycle
Allocate
✔️
Lifecycle
Shutdown
✔️
Configuration
GameServer
✔️
Configuration
Watch
✔️
Metadata
SetAnnotation
✔️
Metadata
SetLabel
✔️
Counters
GetCounterCount
❌
Counters
SetCounterCount
❌
Counters
IncrementCounter
❌
Counters
DecrementCounter
❌
Counters
SetCounterCapacity
❌
Counters
GetCounterCapacity
❌
Lists
AppendListValue
❌
Lists
DeleteListValue
❌
Lists
SetListCapacity
❌
Lists
GetListCapacity
❌
Lists
ListContains
❌
Lists
GetListLength
❌
Lists
GetListValues
❌
Player Tracking
GetConnectedPlayers
✔️
Player Tracking
GetPlayerCapacity
✔️
Player Tracking
GetPlayerCount
✔️
Player Tracking
IsPlayerConnected
✔️
Player Tracking
PlayerConnect
✔️
Player Tracking
PlayerDisconnect
✔️
Player Tracking
SetPlayerCapacity
✔️
Additional methods have been added for ease of use:
Connect
Installation
The client SDK code can be manually downloaded and added to your project hierarchy.
It can also be imported into your project via the Unity Package Manager (UPM). To do that, open your project’s manifest.json file, and add the following line to the dependencies section:
To connect to the SDK server, either local or when running on Code Blind, run the async Connect() method.
This will wait for up to 30 seconds if the SDK server has not yet started and the connection cannot be made,
and will return false if there was an issue connecting.
Similarly SetAnnotation(string key, string value) and SetLabel(string key, string value) are async methods that perform an action.
And there is no need to call Health(), it is automatically called.
To watch when
the backing GameServer configuration changes
call WatchGameServer(callback), where the delegate function callback will be executed every time the GameServer
configuration changes.
This method increases the SDK’s stored player count by one, and appends this playerID to GameServer.Status.Players.IDs.
Returns true and adds the playerID to the list of playerIDs if the playerIDs was not already in the list of connected playerIDs.
boolok=awaitagones.PlayerConnect(playerId);
Alpha: PlayerDisconnect
This function decreases the SDK’s stored player count by one, and removes the playerID from GameServer.Status.Players.IDs.
Will return true and remove the supplied playerID from the list of connected playerIDs if the playerID value exists within the list.
boolok=awaitagones.PlayerDisconnect(playerId);
Alpha: SetPlayerCapacity
Update the GameServer.Status.Players.Capacity value with a new capacity.
This function retrieves the current player capacity GameServer.Status.Players.Capacity.
This is always accurate from what has been set through this SDK, even if the value has yet to be updated on the GameServer status resource.
longcapacity=awaitagones.GetPlayerCapacity();
Alpha: GetPlayerCount
Returns the current player count
longcount=awaitagones.GetPlayerCount();
Alpha: IsPlayerConnected
This returns if the playerID is currently connected to the GameServer.
This is always accurate, even if the value hasn’t been updated to the GameServer status yet.
If CMake cannot find gRPC with find_package(), it downloads and builds gRPC.
There are some extra prerequisites for OpenSSL on Windows, see documentation:
Perl
NASM
Note that OpenSSL is not used in Code Blind SDK, but it is required to have a successful build of gRPC.
Options
Following options are available:
AGONES_THIRDPARTY_INSTALL_PATH (default is CMAKE_INSTALL_PREFIX) - installation path for Code Blind prerequisites (used only if gRPC and Protobuf are not found by find_package)
AGONES_ZLIB_STATIC (default is ON) - use static version of zlib for gRPC
(Windows only):
AGONES_BUILD_THIRDPARTY_DEBUG (default is OFF) - build both debug and release versions of SDK’s prerequisites. Option is not used if you already have built gRPC.
AGONES_OPENSSL_CONFIG_STRING (default is VC-WIN64A) - arguments to configure OpenSSL build (documentation). Used only if OpenSSL and gRPC is built by Code Blind.
CMAKE_INSTALL_PREFIX may be skipped if it is OK to install Code Blind SDK to a default location (usually /usr/local or c:/Program Files/Code Blind).
CMake option -Wno-dev is specified to suppress CMP0048 deprecation warning for gRPC build.
If AGONES_ZLIB_STATIC is set to OFF, ensure that you have installed zlib. For Windows, it’s enough to copy zlib.dll near to gameserver executable. For Linux/Mac usually no actions are needed.
Usage
Using SDK
In CMake-based projects it’s enough to specify a folder where SDK is installed with CMAKE_PREFIX_PATH and use find_package(agones CONFIG REQUIRED) command. For example:
cpp-simple.
It may be useful to disable some protobuf warnings in your project.
Usage
The C++ SDK is specifically designed to be as simple as possible, and deliberately doesn’t include any kind
of singleton management, or threading/asynchronous processing to allow developers to manage these aspects as they deem
appropriate for their system.
We may consider these types of features in the future, depending on demand.
To begin working with the SDK, create an instance of it:
agones::SDK*sdk=newagones::SDK();
To connect to the SDK server, either local or when running on Code Blind, run the sdk->Connect() method.
This will block for up to 30 seconds if the SDK server has not yet started and the connection cannot be made,
and will return false if there was an issue connecting.
boolok=sdk->Connect();
To send a health check call sdk->Health(). This is a synchronous request that will
return false if it has failed in any way. Read GameServer Health Checking for more
details on the game server health checking strategy.
boolok=sdk->Health();
To mark the game server as ready to receive player connections, call sdk->Ready().
This will return a grpc::Status object, from which we can call status.ok() to determine
if the function completed successfully.
To mark the game server as allocated, call sdk->Allocate().
This will return a grpc::Status object, from which we can call status.ok() to determine
if the function completed successfully.
To mark the game server as reserved, call
sdk->Reserve(seconds). This will return a grpc::Status object, from which we can call status.ok() to determine
if the function completed successfully.
To mark that the game session is completed and the game server should be shut down call sdk->Shutdown().
This will return a grpc::Status object, from which we can call status.ok() to determine
if the function completed successfully.
To set a Label on the backing GameServer call
sdk->SetLabel(key, value).
This will return a grpc::Status object, from which we can call status.ok() to determine
if the function completed successfully.
To set an Annotation on the backing GameServer call
sdk->SetAnnotation(key, value).
This will return a grpc::Status object, from which we can call status.ok() to determine
if the function completed successfully.
To get the details on the backing GameServer call sdk->GameServer(&gameserver),
passing in a agones::dev::sdk::GameServer* to push the results of the GameServer configuration into.
This function will return a grpc::Status object, from which we can call status.ok() to determine
if the function completed successfully.
To get updates on the backing GameServer as they happen,
call sdk->WatchGameServer([](const agones::dev::sdk::GameServer& gameserver){...}).
This will call the passed in std::function
synchronously (this is a blocking function, so you may want to run it in its own thread) whenever the backing GameServer
is updated.
Install the latest version using the Package Manager: Install-Package AgonesSDK
Install the latest version using the .NET CLI: dotnet add package AgonesSDK
To select a specific version, append --version, for example: --version 1.8.0 to either commands.
Prerequisites
.Net Standard 2.0 compliant framework.
Usage
Reference the SDK in your project & create a new instance of the SDK wrapper:
Initialization
To use the AgonesSDK, you will need to import the namespace by adding using Code Blind; at the beginning of your relevant files.
varagones=newAgonesSDK();
Connection
To connect to the SDK server, either locally or when running on Code Blind, run the ConnectAsync() method.
This will wait for up to 30 seconds if the SDK server has not yet started and the connection cannot be made,
and will return false if there was an issue connecting.
To mark that the game session is completed and the game server should be shut down call ShutdownAsync().
varstatus=awaitagones.ShutdownAsync();
SetAnnotation & SetLabel
Similarly SetAnnotation(string key, string value) and SetLabel(string key, string value) are async methods that perform an action & return a Status object.
WatchGameServer
To watch when
the backing GameServer configuration changes
call WatchGameServer(callback), where the delegate function callback of type Action<GameServer> will be executed every time the GameServer
configuration changes.
This process is non-blocking internally.
This method increases the SDK’s stored player count by one, and appends this playerID to GameServer.Status.Players.IDs.
Returns true and adds the playerID to the list of playerIDs if the playerIDs was not already in the list of connected playerIDs.
This function decreases the SDK’s stored player count by one, and removes the playerID from GameServer.Status.Players.IDs.
Will return true and remove the supplied playerID from the list of connected playerIDs if the playerID value exists within the list.
This function retrieves the current player capacity GameServer.Status.Players.Capacity.
This is always accurate from what has been set through this SDK, even if the value has yet to be updated on the GameServer status resource.
This returns if the playerID is currently connected to the GameServer.
This is always accurate, even if the value hasn’t been updated to the GameServer status yet.
All requests other than ConnectAsync will wait for up to 15 seconds before giving up, time to wait can also be set in the constructor.
Default host & port are localhost:9357
Methods that do not return a data object such as GameServer will return a gRPC Grpc.Core.Status object. To check the state of the request, check Status.StatusCode & Status.Detail.
Ex:
if(status.StatusCode==StatusCode.OK)//do stuff
5.3.6 - Node.js Game Server Client SDK
This is the Node.js version of the Code Blind Game Server Client SDK.
Check the Client SDK Documentation for more details on each of the SDK functions and how to run the SDK locally.
SDK Functionality
Area
Action
Implemented
Lifecycle
Ready
✔️
Lifecycle
Health
✔️
Lifecycle
Reserve
✔️
Lifecycle
Allocate
✔️
Lifecycle
Shutdown
✔️
Configuration
GetGameServer
✔️
Configuration
WatchGameServer
✔️
Metadata
SetAnnotation
✔️
Metadata
SetLabel
✔️
Counters
GetCounterCount
❌
Counters
SetCounterCount
❌
Counters
IncrementCounter
❌
Counters
DecrementCounter
❌
Counters
SetCounterCapacity
❌
Counters
GetCounterCapacity
❌
Lists
AppendListValue
❌
Lists
DeleteListValue
❌
Lists
SetListCapacity
❌
Lists
GetListCapacity
❌
Lists
ListContains
❌
Lists
GetListLength
❌
Lists
GetListValues
❌
Player Tracking
GetConnectedPlayers
✔️
Player Tracking
GetPlayerCapacity
✔️
Player Tracking
GetPlayerCount
✔️
Player Tracking
IsPlayerConnected
✔️
Player Tracking
PlayerConnect
✔️
Player Tracking
PlayerDisconnect
✔️
Player Tracking
SetPlayerCapacity
✔️
Prerequisites
Node.js >= 10.13.0
Usage
Add the agones dependency to your project:
npm install @google-cloud/agones-sdk
If you need to download the source, rather than install from NPM, you can find it on
GitHub.
To begin working with the SDK, create an instance of it.
To connect to the SDK server, either local or when running on Code Blind, run the async method sdk.connect(), which will
resolve once connected or reject on error or if no connection can be made after 30 seconds.
awaitagonesSDK.connect();
To send a health check ping call health(errorCallback). The error callback is optional and if provided will receive an error whenever emitted from the health check stream.
To mark the game server as ready to receive player connections, call the async method ready(). The result will be an empty object in this case.
letresult=awaitagonesSDK.ready();
Similarly shutdown(), allocate(), setAnnotation(key, value) and setLabel(key, value) are async methods that perform an action and return an empty result.
To get updates on the backing GameServer as they happen, call watchGameServer(callback, errorCallback). The callback will be called with a parameter matching the result of getGameServer(). The error callback is optional and if provided will receive an error whenever emitted from the watch stream.
Add this crate to dependencies section in your Cargo.toml.
Also note that the SDK is async only, so you will need an async runtime to execute the futures exposed by the SDK. It is recommended to use tokio as the SDK already depends on tokio due to its choice of gRPC library, tonic.
To begin working with the SDK, create an instance of it.
usestd::time::Duration;#[tokio::main]asyncfnmain(){letmutsdk=agones::Sdk::new(None/* default port */,None/* keep_alive */).await.expect("failed to connect to SDK server");}
This will stream updates and endlessly until the stream is closed, so it is recommended to push this into its own async task.
let_watch={// We need to clone the SDK as we are moving it to another task
letmutwatch_client=sdk.clone();// We use a simple oneshot to signal to the task when we want it to shutdown
// and stop watching the gameserver update stream
let(tx,mutrx)=tokio::sync::oneshot::channel::<()>();tokio::task::spawn(asyncmove{println!("Starting to watch GameServer updates...");matchwatch_client.watch_gameserver().await{Err(e)=>eprintln!("Failed to watch for GameServer updates: {}",e),Ok(mutstream)=>loop{tokio::select!{// We've received a new update, or the stream is shutting down
gs=stream.message()=>{matchgs{Ok(Some(gs))=>{println!("GameServer Update, name: {}",gs.object_meta.unwrap().name);println!("GameServer Update, state: {}",gs.status.unwrap().state);}Ok(None)=>{println!("Server closed the GameServer watch stream");break;}Err(e)=>{eprintln!("GameServer Update stream encountered an error: {}",e);}}}// The watch is being dropped so we're going to shutdown the task
// and the watch stream
_=&mutrx=>{println!("Shutting down GameServer watch loop");break;}}},}});tx};
This is the REST version of the Code Blind Game Server Client SDK.
Check the Client SDK Documentation for more details on each of the SDK functions and how to run the SDK locally.
SDK Functionality
Area
Action
Implemented
Lifecycle
Ready
✔️
Lifecycle
Health
✔️
Lifecycle
Reserve
✔️
Lifecycle
Allocate
✔️
Lifecycle
Shutdown
✔️
Configuration
GetGameServer
✔️
Configuration
WatchGameServer
✔️
Metadata
SetAnnotation
✔️
Metadata
SetLabel
✔️
Counters
GetCounter
✔️
Counters
UpdateCounter
✔️
Lists
GetList
✔️
Lists
UpdateList
✔️
Lists
AddListValue
✔️
Lists
RemoveListValue
✔️
Player Tracking
GetPlayerCapacity
✔️
Player Tracking
SetPlayerCapacity
✔️
Player Tracking
PlayerConnect
✔️
Player Tracking
GetConnectedPlayers
✔️
Player Tracking
IsPlayerConnected
✔️
Player Tracking
GetPlayerCount
✔️
Player Tracking
PlayerDisconnect
✔️
The REST API can be accessed from http://localhost:${AGONES_SDK_HTTP_PORT}/ from the game server process.
AGONES_SDK_HTTP_PORT is an environment variable automatically set for the game server process by Code Blind to
support binding the REST API to a dynamic port. It is advised to use the environment variable rather than a
hard coded port; otherwise your game server will not be able to contact the SDK server if it is configured to
use a non-default port.
Generally the REST interface gets used if gRPC isn’t well supported for a given language or platform.
Warning
The SDK Server sidecar process may startup after your game server binary. So your REST SDK API calls should
contain some retry logic to take this into account.
Generating clients
While you can hand write REST integrations, we also have a set
of
generated OpenAPI/Swagger definitions available.
This means you can use OpenAPI/Swagger tooling to generate clients as well, if you need them.
For example, to create a cpp client for the stable sdk endpoints (to be run in the agones home directory):
Call when the GameServer is ready to accept connections
Path: /ready
Method: POST
Body: {}
Example
curl -d "{}" -H "Content-Type: application/json" -X POST http://localhost:${AGONES_SDK_HTTP_PORT}/ready
Health
Send a Empty every d Duration to declare that this GameServer is healthy
Path: /health
Method: POST
Body: {}
Example
curl -d "{}" -H "Content-Type: application/json" -X POST http://localhost:${AGONES_SDK_HTTP_PORT}/health
Reserve
Move Gameserver into a Reserved state for a certain amount of seconds for the future allocation.
Path: /reserve
Method: POST
Body: {"seconds": "5"}
Example
curl -d '{"seconds": "5"}' -H "Content-Type: application/json" -X POST http://localhost:${AGONES_SDK_HTTP_PORT}/reserve
Allocate
With some matchmakers and game matching strategies, it can be important for game servers to mark themselves as Allocated.
For those scenarios, this SDK functionality exists.
Note
Using a GameServerAllocation is preferred in all other scenarios,
as it gives Code Blind control over how packed GameServers are scheduled within a cluster, whereas with Allocate() you
relinquish control to an external service which likely doesn’t have as much information as Code Blind.
Example
curl -d "{}" -H "Content-Type: application/json" -X POST http://localhost:${AGONES_SDK_HTTP_PORT}/allocate
Shutdown
Call when the GameServer session is over and it’s time to shut down
Path: /shutdown
Method: POST
Body: {}
Example
curl -d "{}" -H "Content-Type: application/json" -X POST http://localhost:${AGONES_SDK_HTTP_PORT}/shutdown
Configuration Retrieval
GameServer
Call when you want to retrieve the backing GameServer configuration details
Path: /gameserver
Method: GET
curl -H "Content-Type: application/json" -X GET http://localhost:${AGONES_SDK_HTTP_PORT}/gameserver
Call this when you want to get updates of when the backing GameServer configuration is updated.
These updates will come as newline delimited JSON, send on each update. To that end, you will
want to keep the http connection open, and read lines from the result stream and and process as they
come in.
curl -H "Content-Type: application/json" -X GET http://localhost:${AGONES_SDK_HTTP_PORT}/watch/gameserver
The Watch GameServer stream is also exposed as a WebSocket endpoint on the same URL and port as the HTTP watch/gameserver API. This endpoint is provided as a convienence for streaming data to clients such as Unreal that support WebSocket but not HTTP streaming, and HTTP streaming should be used instead if possible.
An example command that uses the WebSocket endpoint instead of streaming over HTTP is:
The data returned from this endpoint is delimited by the boundaries of a WebSocket payload as defined by RFC 6455, section 5.2. When reading from this endpoint, if your WebSocket client does not automatically handle frame reassembly (e.g. Unreal), make sure to read to the end of the WebSocket payload (as defined by the FIN bit) before attempting to parse the data returned. This is transparent in most clients.
Metadata Management
Set Label
Apply a Label with the prefix “agones.dev/sdk-” to the backing GameServer metadata.
See the SDK SetLabel documentation for restrictions.
This function updates the list’s properties with the key players, such as its capacity and values, returns the updated list details. This will overwrite all existing List.Values with the update list request values. Use addValue or removeValue for modifying the List.Values field.
curl -d '{"count": 5}' -H "Content-Type: application/json" -X PUT http://localhost:${AGONES_SDK_HTTP_PORT}/alpha/player/capacity
Alpha: GetPlayerCapacity
This function retrieves the current player capacity. This is always accurate from what has been set through this SDK,
even if the value has yet to be updated on the GameServer status resource.
Example
curl -d '{}' -H "Content-Type: application/json" -X GET http://localhost:${AGONES_SDK_HTTP_PORT}/alpha/player/capacity
Response:
{"count":"5"}
Alpha: GetPlayerCount
This function retrieves the current player count.
This is always accurate from what has been set through this SDK, even if the value has yet to be updated on the GameServer status resource.
Example
curl -H "Content-Type: application/json" -X GET http://localhost:${AGONES_SDK_HTTP_PORT}/alpha/player/count
Response:
{"count":"2"}
Alpha: IsPlayerConnected
This function returns if the playerID is currently connected to the GameServer. This is always accurate from what has
been set through this SDK,
even if the value has yet to be updated on the GameServer status resource.
Example
curl -H "Content-Type: application/json" -X GET http://localhost:${AGONES_SDK_HTTP_PORT}/alpha/player/connected/uzh7i
Response:
{"bool":true}
Alpha: GetConnectedPlayers
This function returns the list of the currently connected player ids. This is always accurate from what has been set
through this SDK, even if the value has yet to be updated on the GameServer status resource.
Example
curl -H "Content-Type: application/json" -X GET http://localhost:${AGONES_SDK_HTTP_PORT}/alpha/player/connected
Response:
{"list":["uzh7i","3zh7i"]}
5.3.9 - Local Development
Working against the SDK without having to run a full kubernetes stack
When the game server is running on Code Blind, the SDK communicates over TCP to a small
gRPC server that Code Blind coordinated to run in a container in the same network
namespace as it - usually referred to in Kubernetes terms as a “sidecar”.
Therefore, when developing locally, we also need a process for the SDK to connect to!
To do this, we can run the same binary (the SDK Server) that runs inside Code Blind, but pass in a flag
to run it in “local mode”. Local mode means that the sidecar binary
will not try to connect to anything, and will just send log messages to stdout and persist local state in memory so
that you can see exactly what the SDK in your game server is doing, and can
confirm everything works.
Running the SDK Server
To run the SDK Server, you will need a copy of the binary.
This can either be done by downloading a prebuilt binary or running from source code.
This guide will focus on running from the prebuilt binary, but details about running from source code can be found below.
To run the prebuilt binary, for the latest release, you will need to download
agonessdk-server-1.38.0.zip
, and unzip it.
You will find the executables for the SDK server, for each type of operating system.
MacOS
sdk-server.darwin.amd64
sdk-server.darwin.arm64
Linux
sdk-server.linux.amd64
sdk-server.linux.arm64
Windows
sdk-server.windows.amd64.exe
Running In “Local Mode”
To run in local mode, pass the flag --local to the executable.
For example:
./sdk-server.linux.amd64 --local
You should see output similar to the following:
{"ctlConf":{"Address":"localhost","IsLocal":true,"LocalFile":"","Delay":0,"Timeout":0,"Test":"","GRPCPort":9357,"HTTPPort":9358},"message":"Starting sdk sidecar","severity":"info","source":"main","time":"2019-10-30T21:44:37.973139+03:00","version":"1.1.0"}
{"grpcEndpoint":"localhost:9357","message":"Starting SDKServer grpc service...","severity":"info","source":"main","time":"2019-10-30T21:44:37.974585+03:00"}
{"httpEndpoint":"localhost:9358","message":"Starting SDKServer grpc-gateway...","severity":"info","source":"main","time":"2019-10-30T21:44:37.975086+03:00"}
{"message":"Ready request has been received!","severity":"info","time":"2019-10-30T21:45:47.031989+03:00"}
{"message":"gameserver update received","severity":"info","time":"2019-10-30T21:45:47.03225+03:00"}
{"message":"Shutdown request has been received!","severity":"info","time":"2019-10-30T21:46:18.179341+03:00"}
{"message":"gameserver update received","severity":"info","time":"2019-10-30T21:46:18.179459+03:00"}
Enabling Feature Gates
For development and testing purposes, you might want to enable specific features gates in the local SDK Server.
To do this, you can either set the FEATURE_GATES environment variable or use the --feature-gates command line parameter like so, with the same format as utilised when configuring it on a Helm install.
Providing your own GameServer configuration for local development
By default, the local sdk-server will create a default GameServer configuration that is used for GameServer()
and WatchGameServer() SDK calls. If you wish to provide your own configuration, as either yaml or json, this
can be passed through as either --file or -f along with the --local flag.
If the GamerServer configuration file is changed while the local server is running,
this will be picked up by the local server, and will change the current active configuration, as well as sending out
events for WatchGameServer(). This is a useful way of testing functionality, such as changes of state from Ready to
Allocated in your game server code.
Note
File modification events can fire more than one for each save (for a variety of reasons),
but it’s best practice to ensure handlers that implement WatchGameServer() be idempotent regardless, as repeats can
happen when live as well.
Some SDK calls would change the GameServer state according to GameServer State Diagram. Also local SDK server would persist labels and annotations updates.
Here is a complete list of these commands: ready, allocate, setlabel, setannotation, shutdown, reserve.
For example call to Reserve() for 30 seconds would change the GameServer state to Reserve and if no call to Allocate() occurs it would return back to Ready state after this period.
Note
All state transitions are supported for local SDK server, however not all of them are valid in the real scenario. For instance, you cannot make a transition of a GameServer from Shutdown to a Ready state, but can do using local SDK server.
All changes to the GameServer state could be observed and retrieved using Watch() or GameServer() methods using GameServer SDK.
Once you have your game server process in a container, you may also want to test the container build locally as well.
Since the production agones-sdk binary has the --local mode built in, you can also use the production container image
locally as well!
Since the SDK and your game server container need to share a port on localhost, one of the easiest ways to do that
is to have them both run using the host network, like so:
In one shell run:
docker run --network=host --rm us-docker.pkg.dev/agones-images/release/agones-sdk:1.38.0 --local
You should see a similar output to what you would if you were running the binary directly, i.e. outside a container.
Then in another shell, start your game server container:
wget https://raw.githubusercontent.com/googleforgames/agones/release-1.38.0/examples/simple-game-server/gameserver.yaml
# required so that the `agones` user in the container can read the filechmod o+r gameserver.yaml
docker run --network=host --rm -v $(pwd)/gameserver.yaml:/tmp/gameserver.yaml us-docker.pkg.dev/agones-images/release/agones-sdk:1.38.0 --local -f /tmp/gameserver.yaml
If you run Docker on a OS that doesn’t run Docker natively or in a VM, such as on Windows or macOS, you may want to to run the ClientSDK and your game server container together with Docker Compose. To do so, create a docker-compose.yaml file setup with a network overlay shared between them:
version:'3'services:gameserver:build:.# <path to build context>ports:- "127.0.0.1:7777:7777/udp"sdk-server:image:"us-docker.pkg.dev/agones-images/release/agones-sdk:1.38.0"command:--local -f /gs_confignetwork_mode:service:gameserver# <shared network between sdk and game server>configs:- gs_configconfigs:gs_config:file:./gameserver.yaml
Run docker-compose
docker-compose up --build
Running from source code instead of prebuilt binary
If you wish to run from source rather than pre-built binaries, that is an available alternative.
You will need Go installed and will need to clone the Code Blind GitHub repo.
Disclaimer: Code Blind is run and tested with the version of Go specified by the GO_VERSION variable in the project’s build Dockerfile. Other versions are not supported, but may still work.
Your cloned repository is best switched to the latest specific release’s branch/tag. For example:
git clone https://github.com/googleforgames/agones.git
cd agones
git checkout release-1.38.0
With Go installed and the Code Blind repository cloned, the SDK Server can be run with the following command (from the Code Blind clone directory):
go run cmd/sdk-server/main.go --local
Commandline flags (e.g. --local) are exactly the same as command line flags when utilising a pre-built binary.
Next Steps:
Learn how to connect your local development game server binary into a running Code Blind Kubernetes cluster for even more live development options with an out of cluster dev server.
5.4 - Windows Gameservers
Run GameServers on Kubernetes nodes with the Windows operating system.
Warning
Running GameServers on Windows nodes is currently Alpha, and any feedback
would be appreciated.
Prerequisites
The following prerequisites are required to create a GameServer:
A Kubernetes cluster with the UDP port range 7000-8000 open on each node.
Code Blind controller installed in the targeted cluster
kubectl properly configured
Netcat which is already installed on most Linux/macOS distributions, for windows you can use WSL.
If you don’t have a Kubernetes cluster you can follow these instructions to create a cluster on Google Kubernetes Engine (GKE), Minikube or Azure Kubernetes Service (AKS), and install Code Blind.
For the purpose of this guide we’re going to use the
simple-game-server
example as the GameServer container. This example is a very simple UDP server written in Go. Don’t hesitate to look at the code of this example for more information.
Ensure that you have some nodes to your cluster that are running Windows.
Objectives
Create a GameServer on a Windows node.
Connect to the GameServer.
1. Create a GameServer
Note
Starting with version 0.3, the
simple-game-server example is compiled as a multi-arch docker image that will run on both Linux and Windows. To ensure that the game server runs on a Windows node, a nodeSelector of "kubernetes.io/os": windows must be added to the game server specification.
If you have Code Blind installed on Google Kubernetes Engine, and are using
Cloud Shell for your terminal, UDP is blocked. For this step, we recommend
SSH’ing into a running VM in your project, such as a Kubernetes node.
You can click the ‘SSH’ button on the Google Compute Engine Instances
page to do this.
Run toolbox on GKE Node to run docker container with tools and then nc command would be available.
You can now communicate with the Game Server:
Note
If you do not have netcat installed
(i.e. you get a response of nc: command not found),
you can install netcat by running sudo apt install netcat.
If you are on Windows, you can alternatively install netcat on
WSL,
or download a version of netcat for Windows from nmap.org.
nc -u {IP} {PORT}
Hello World !
ACK: Hello World !
EXIT
You can finally type EXIT which tells the SDK to run the Shutdown command, and therefore shuts down the GameServer.
If you run kubectl describe gameserver again - either the GameServer will be gone completely, or it will be in Shutdown state, on the way to being deleted.
If you want to use your own GameServer container make sure you have properly integrated the Code Blind SDK.
5.5 - Fleet Updates
Common patterns and approaches for updating Fleets with newer and/or different versions of your GameServer configuration.
Rolling Update Strategy
When Fleets are edited and updated, the default strategy of Code Blind is to roll the new version of the GameServer
out to the entire Fleet, in a step by step increment and decrement by adding a chunk of the new version and removing
a chunk of the current set of GameServers.
This is done while ensuring that AllocatedGameServers are not deleted
until they are specifically shutdown through the game servers SDK, as they are expected to have players on them.
You can see this in the Fleet.Spec.Strategyreference, with controls for how
much of the Fleet is incremented and decremented at one time:
So when a Fleet is edited (any field other than replicas, see note below), either through kubectledit/apply or via the Kubernetes API, this performs the following operations:
Adds the maxSurge number of GameServers to the Fleet.
Shutdown the maxUnavailable number of GameServers in the Fleet, skipping AllocatedGameServers.
Repeat above steps until all the previous GameServer configurations have been Shutdown and deleted.
By default, a Fleet will wait for new GameSevers to become Ready during a Rolling Update before continuing to shutdown additional GameServers, only counting GameServers that are Ready as being available when calculating the current maxUnavailable value which controls the rate at which GameServers are updated.
This ensures that a Fleet cannot accidentally have zero GameServers in the Ready state if something goes wrong during a Rolling Update or if GameServers have a long delay before moving to the Ready state.
Note
When Fleet update contains only changes to the replicas parameter, then new GameServers will be created/deleted straight away,
which means in that case maxSurge and maxUnavailable parameters for a RollingUpdate will not be used.
The RollingUpdate strategy takes place when you update spec parameters other than replicas.
If you are using a Fleet which is scaled by a FleetAutoscaler, read the Fleetautoscaler guide for more details on how RollingUpdates with FleetAutoscalers need to be implemented.
You could also check the behaviour of the Fleet with a RollingUpdate strategy on a test Fleet to preview your upcoming updates.
Use kubectl describe fleet to track scaling events in a Fleet.
Recreate Strategy
This is an optimal Fleet update strategy if you want to replace all GameServers that are not Allocated
with a new version as quickly as possible.
You can see this in the Fleet.Spec.Strategyreference:
strategy:type:Recreate
So when a Fleet is edited, either through kubectledit/apply or via the Kubernetes API, this performs the following operations:
Shutdown all GameServers in the Fleet that are not currently Allocated.
Create the same number of the new version of the GameServers that were previously deleted.
Repeat above steps until all the previous GameServer configurations have been Shutdown and deleted.
Two (or more) Fleets Strategy
If you want very fine-grained control over the rate that new versions of a GameServer configuration is rolled out, or
if you want to do some version of A/B testing or smoke test between different versions, running two (or more) Fleets at the same time is a
good solution for this.
To do this, create a second Fleet inside your cluster, starting with zero replicas. From there you can scale this newer Fleet
up and the older Fleet down as required by your specific rollout strategy.
This also allows you to rollback if issues arise with the newer version, as you can delete the newer Fleet
and scale up the old Fleet to its previous levels, resulting in minimal impact to the players.
Note
For GameServerAllocation, you will need to have at least a single shared label between the GameServers in each
Fleet.
GameServerAllocation Across Fleets
Since GameServerAllocation is powered by label selectors, it is possible to allocate across multiple fleets, and/or
give preference to particular sets of GameServers over others. You can see details of this in
the GameServerAllocationreference.
In a scenario where a new v2 version of a Fleet is being slowly scaled up in a separate Fleet from the previous v1
Fleet, we can specify that we prefer allocation to occur from the v2 Fleet, and if none are available, fallback to
the v1 Fleet, like so:
apiVersion:"allocation.agones.dev/v1"kind:GameServerAllocationspec:# Deprecated, use field selectors instead.required:matchLabels:game:my-awesome-game# Deprecated, use field selectors instead.preferred:- matchLabels:agones.dev/fleet:v2
In this example, all GameServers have the label game: my-awesome-game, so the Allocation will search across both
Fleets through that mechanism. The selectors label matching selector tells the allocation system to first search
all GameServers with the v2Fleet label, and if not found, search through the rest of the set.
The above GameServerAllocation can then be used while you scale up the v2 Fleet and scale down the original Fleet at
the rate that you deem fit for your specific rollout.
Notifying GameServers on Fleet Update/Downscale
Warning
The Allocated GameSever Overflow Notification feature is currently Beta,
and while it is enabled by default it may change in the future.
Use the Feature Gate FleetAllocationOverflow to disable this feature.
When AllocatedGameServers are utilised for a long time, such as a Lobby GameServer,
or a GameServer that is being reused multiple times in a row, it can be useful
to notify an AllocatedGameServer process when its backing Fleet has been updated.
When an update occurs, the AllocatedGameServer, may want to actively perform a graceful shutdown and release its
resources such that it can be replaced by a new version, or similar actions.
To do this, we provide the ability to apply a user-provided set of labels and/or annotations to the AllocatedGameServers when a Fleet update occurs that updates its GameServer template, or generally
causes the Fleet replica count to drop below the number of currently AllocatedGameServers.
This provides two useful capabilities:
The GameServerSDK.WatchGameServer()
command can be utilised to react to this annotation and/or label change to
indicate the Fleet system change, and the game server binary could execute code accordingly.
This can also be used to proactively update GameServer labels, to effect change in allocation strategy - such as
preferring the newer GameServers when allocating, but falling back to the older version if there aren’t enough
of the new ones yet spun up.
The labels and/or annotations are applied to GameServers in a Fleet in the order designated by their configured Fleet scheduling.
Example yaml configuration:
apiVersion:"agones.dev/v1"kind:Fleetmetadata:name:simple-game-serverspec:replicas:2allocationOverflow:# This specifies which annotations and/or labels are appliedlabels:mykey:myvalueversion:""# empty an existing label value, so it's no longer in the allocation selectionannotations:event:overflowtemplate:spec:ports:- name:defaultcontainerPort:7654template:spec:containers:- name:simple-game-serverimage:us-docker.pkg.dev/agones-images/examples/simple-game-server:0.27
This works the same across Fleet resizing and Rolling/Recreate Updates, in that the implementation responds to the
underlying GameServerSet’s replicas being shrunk to a value smaller than the number of AllocatedGameServers it controls. Therefore, this functionality works equally well with a rolling update as it does with an
update strategy that requires at least two Fleets.
5.6 - GameServer Health Checking
Health checking exists to track the overall healthy state of the GameServer, such that action can be taken when a something goes wrong or a GameServer drops into an Unhealthy state
Disabling Health Checking
By default, health checking is enabled, but it can be turned off by setting the spec.health.disabled property to
true.
SDK API
The Health() function on the SDK object needs to be called at an
interval less than the spec.health.periodSeconds
threshold time to be considered before it will be considered a failure.
The health check will also need to have not been called a consecutive number of times (spec.health.failureThreshold),
giving it a chance to heal if it there is an issue.
Health Failure Strategy
The following is the process for what happens to a GameServer when it is unhealthy.
If the GameServer container exits with an error before the GameServer moves to Ready then,
it is restarted as per the restartPolicy (which defaults to “Always”).
If the GameServer fails health checking at any point, then it doesn’t restart,
but moves to an Unhealthy state.
If the GameServer container exits while in Ready, Allocated or Reserved state, it will be restarted
as per the restartPolicy (which defaults to “Always”, since RestartPolicy is a Pod wide setting),
but will immediately move to an Unhealthy state.
If the SDK sidecar fails, then it will be restarted, assuming the RestartPolicy is Always/OnFailure.
Fleet Management of Unhealthy GameServers
If a GameServer moves into an Unhealthy state when it is not part of a Fleet, the GameServer will remain in the
Unhealthy state until explicitly deleted. This is useful for debugging UnhealthyGameServers, or if you are
creating your own GameServer management layer, you can explicitly choose what to do if a GameServer becomes
Unhealthy.
If a GameServer is part of a Fleet, the Fleet management system will delete any UnhealthyGameServers and
immediately replace them with a brand new GameServer to ensure it has the configured number of Replicas.
Configuration Reference
# Health checking for the running game serverhealth:# Disable health checking. defaults to false, but can be set to truedisabled:false# Number of seconds after the container has started before health check is initiated. Defaults to 5 secondsinitialDelaySeconds:5# If the `Health()` function doesn't get called at least once every period (seconds), then# the game server is not healthy. Defaults to 5periodSeconds:5# Minimum consecutive failures for the health probe to be considered failed after having succeeded.# Defaults to 3. Minimum value is 1failureThreshold:3
For a configuration that requires a health ping every 5 seconds, the example below sends a request every 2 seconds
to be sure that the GameServer is under the threshold.
voiddoHealth(agones::SDK*sdk){while(true){if(!sdk->Health()){std::cout<<"Health ping failed"<<std::endl;}else{std::cout<<"Health ping sent"<<std::endl;}std::this_thread::sleep_for(std::chrono::seconds(2));}}intmain(){agones::SDK*sdk=newagones::SDK();boolconnected=sdk->Connect();if(!connected){return-1;}std::threadhealth(doHealth,sdk);// ... run the game server code
}
To track your GameServer current player capacity, Code Blind gives you the ability to both set an initial capacity at
GameServer creation, as well be able to change it during the lifecycle of the GameServer through the Code Blind SDK.
To set the initial capacity, you can do so via GameServer.Spec.Players.InitialCapacity like so:
apiVersion:"agones.dev/v1"kind:GameServermetadata:name:"gs-example"spec:# ...players:# set this GameServer's initial player capacity to 10initialCapacity:10
From there, if you need to change the capacity of the GameSever as gameplay is in progress, you can also do so via
SDK.Alpha().SetPlayerCapacity(count)
The current player capacity is represented in GameServer.Status.Players.Capacity resource value.
We can see this in action, when we look at the Status section of a GameServer resource
, wherein the capacity has been set to 20:
Changing the capacity value here has no impact on players actually
connected to or trying to connect to your server, as that is not a responsibility of Code Blind.
This functionality is for tracking purposes only.
Connecting and Disconnecting Players
As players connect and disconnect from your game, the Player Tracking functions enable you to track which players
are currently connected.
It assumed that each player that connects has a unique token that identifies them as a player.
When a player connects to the game server binary,
calling SDK.Alpha().PlayerConnect(playerID)
with the unique player token will register them as connected, and store their player id.
Each of these playerIDs is stored on GameServer.Status.Players.IDs, and the current count of connected players
can be seen in GameServer.Status.Players.Count.
You can see this in action below in the GameServer Status section, where there are 4 players connected:
Calling PlayerConnect or PlayerDisconnect functions will not
connect or disconnect players, as that is not under the control of Code Blind.
This functionality is for tracking purposes only.
Checking Player Data
Not only is the connected player data stored on the GameServer resource, it is also stored in memory within the
SDK, so that it can be used from within the game server binary as a realtime, thread safe, registry of connected
players.
You can register a local game server with Code Blind. This means you can run an experimental build of your game server in the Code Blind environment without the need of packaging and deploying it to a fleet. This allows you to quickly iterate on your game server code while still being able to plugin to your Code Blind environment.
Register your server with Code Blind
To register your local game server you’ll need to know the IP address of the machine running it and the port. With that you’ll create a game server config like the one below.
apiVersion:"agones.dev/v1"kind:GameServermetadata:name:my-local-serverannotations:# Causes Code Blind to register your local game server at 192.1.1.2, replace with your server's IP address.agones.dev/dev-address:"192.1.1.2"spec:ports:- name:defaultportPolicy:StatichostPort:17654containerPort:17654# The following is ignored but required due to validation.template:spec:containers:- name:simple-game-serverimage:us-docker.pkg.dev/codeblind/examples/simple-server:0.27
Once you save this to a file make sure you have kubectl configured to point to your Code Blind cluster and then run kubectl apply -f dev-gameserver.yaml. This will register your server with Code Blind.
Local Game Servers has a few limitations:
PortPolicy must be Static.
The game server is not managed by Code Blind. Features like autoscaling, replication, etc are not available.
When you are finished working with your server, you can remove the registration with kubectl delete -f dev-gameserver.yaml
Check out the Allocator Service as a richer alternative to GameServerAllocation.
Learn how to connect your local development game server binary into a running Code Blind Kubernetes cluster for even more live development options with an out of cluster dev server.
5.9 - Latency Testing with Multiple Clusters
When running multiple Code Blind clusters around the world, you may need to have clients determine which cluster to connect to based on latency.
To make latency testing easier, Code Blind installs with a simple ping service with both HTTP and UDP services that can be called
for the purpose of timing how long the roundtrip takes for information to be returned from either of these services.
Installing
By default, Code Blind installs Kubernetes Services for
both HTTP and the UDP ping endpoints. These can be disabled entirely,
or disabled individually. See the Helm install guide for the parameters to
pass through,
as well as configuration options.
The ping services as all installed under the agones-system namespace.
HTTP Service
This exposes an endpoint that returns a simple text HTTP response on request to the root “/” path. By default this is ok, but
it can be configured via the agones.ping.http.response parameter.
This could be useful for providing clusters
with unique lookup names, such that clients are able to identify clusters from their responses.
To lookup the details of this service, run kubectl describe service agones-ping-http-service --namespace=agones-system
UDP Service
The UDP ping service is a rate limited UDP echo service that returns the udp packet that it receives to its designated
sender.
Since UDP sender details can be spoofed, this service is rate limited to 20 requests per second,
per sender address, per running instance (default is 2).
This rate limit can be raised or lowered via the Helm install parameter agones.ping.udp.rateLimit.
UDP packets are also limited to 1024 bytes in size.
To lookup the details of this service, run kubectl describe service agones-ping-udp-service --namespace=agones-system
Client side tooling
We deliberately didn’t provide any game client libraries, as all major languages and engines have capabilities
to send HTTP requests as well as UDP packets.
5.10 - Metrics
Code Blind controller exposes metrics via OpenCensus. OpenCensus is a single distribution of libraries that collect metrics and distributed traces from your services, we only use it for metrics but it will allow us to support multiple exporters in the future.
We choose to start with Prometheus as this is the most popular with Kubernetes but it is also compatible with Cloud Monitoring.
If you need another exporter, check the list of supported exporters. It should be pretty straightforward to register a new one. (GitHub PRs are more than welcome.)
We plan to support multiple exporters in the future via environment variables and helm flags.
Backend integrations
Prometheus
If you are running a Prometheus instance you just need to ensure that metrics and kubernetes service discovery are enabled. (helm chart values agones.metrics.prometheusEnabled and agones.metrics.prometheusServiceDiscovery). This will automatically add annotations required by Prometheus to discover Code Blind metrics and start collecting them. (see example)
If your Prometheus metrics collection agent requires that you scrape from the pods directly(such as with Google Cloud Managed Prometheus), then the metrics ports for the controller and allocator will both be named http and exposed on 8080. In the case of the allocator, the port name and number can be overriden with the agones.allocator.serviceMetrics.http.portName and agones.allocator.serviceMetrics.http.port helm chart values.
Prometheus Operator
If you have Prometheus operator installed in your cluster, just enable ServiceMonitor installation in values:
The distribution of gameserver allocation requests latencies
histogram
agones_gameservers_total
The total of gameservers per fleet and status
counter
agones_gameserver_player_connected_total
The total number of players connected to gameservers (Only available when player tracking is enabled)
gauge
agones_gameserver_player_capacity_total
The available capacity for players on gameservers (Only available when player tracking is enabled)
gauge
agones_fleets_replicas_count
The number of replicas per fleet (total, desired, ready, reserved, allocated)
gauge
agones_fleet_autoscalers_able_to_scale
The fleet autoscaler can access the fleet to scale
gauge
agones_fleet_autoscalers_buffer_limits
The limits of buffer based fleet autoscalers (min, max)
gauge
agones_fleet_autoscalers_buffer_size
The buffer size of fleet autoscalers (count or percentage)
gauge
agones_fleet_autoscalers_current_replicas_count
The current replicas count as seen by autoscalers
gauge
agones_fleet_autoscalers_desired_replicas_count
The desired replicas count as seen by autoscalers
gauge
agones_fleet_autoscalers_limited
The fleet autoscaler is outside the limits set by MinReplicas and MaxReplicas.
gauge
agones_gameservers_node_count
The distribution of gameservers per node
histogram
agones_nodes_count
The count of nodes empty and with gameservers
gauge
agones_gameservers_state_duration
The distribution of gameserver state duration in seconds. Note: this metric could have some missing samples by design. Do not use the _total counter as the real value for state changes.
histogram
agones_k8s_client_http_request_total
The total of HTTP requests to the Kubernetes API by status code
counter
agones_k8s_client_http_request_duration_seconds
The distribution of HTTP requests latencies to the Kubernetes API by status code
histogram
agones_k8s_client_cache_list_total
The total number of list operations for client-go caches
counter
agones_k8s_client_cache_list_duration_seconds
Duration of a Kubernetes list API call in seconds
histogram
agones_k8s_client_cache_list_items
Count of items in a list from the Kubernetes API
histogram
agones_k8s_client_cache_watches_total
The total number of watch operations for client-go caches
counter
agones_k8s_client_cache_last_resource_version
Last resource version from the Kubernetes API
gauge
agones_k8s_client_workqueue_depth
Current depth of the work queue
gauge
agones_k8s_client_workqueue_latency_seconds
How long an item stays in the work queue
histogram
agones_k8s_client_workqueue_items_total
Total number of items added to the work queue
counter
agones_k8s_client_workqueue_work_duration_seconds
How long processing an item from the work queue takes
How long unfinished work has been sitting in the workqueue in seconds
gauge
Dropping Metric Labels
When a Fleet or FleetAutoscaler is deleted from the system, Code Blind will automatically clear metrics that utilise
their name as a label from the exported metrics, so the metrics exported do not continuously grow in size over the
lifecycle of the Code Blind installation.
Dashboard
Grafana Dashboards
We provide a set of useful Grafana dashboards to monitor Code Blind workload, they are located under the
grafana folder:
Code Blind Autoscalers allows you to monitor your current autoscalers replicas request as well as fleet replicas allocation and readyness statuses. You can only select one autoscaler at the time using the provided dropdown.
Code Blind GameServers displays your current game servers workload status (allocations, game servers statuses, fleets replicas) with optional fleet name filtering.
Code Blind Controller API Server requests displays your current API server request rate, errors rate and request latencies with optional CustomResourceDefinition filtering by Types: fleets, gameserversets, gameservers, gameserverallocations.
Dashboard screenshots :
Note
You can import our dashboards by copying the json content from
each config map into your own instance of Grafana (+ > Create > Import > Or paste json) or follow the installation guide.
Installation
When operating a live multiplayer game you will need to observe performances, resource usage and availability to learn more about your system. This guide will explain how you can setup Prometheus and Grafana into your own Kubernetes cluster to monitor your Code Blind workload.
Before attemping this guide you should make sure you have kubectl and helm installed and configured to reach your kubernetes cluster.
Prometheus installation
Prometheus is an open source monitoring solution, we will use it to store Code Blind controller metrics and query back the data.
For resiliency it is recommended to run Prometheus on a dedicated node which is separate from nodes where Game Servers
are scheduled. If you use the above command, with our
prometheus.yaml to set up Prometheus, it will schedule Prometheus pods on nodes
tainted with agones.dev/agones-metrics=true:NoExecute and labeled with agones.dev/agones-metrics=true if available.
As an example, to set up a dedicated node pool for Prometheus on GKE, run the following command before installing Prometheus. Alternatively you can taint and label nodes manually.
By default we will disable the push gateway (we don’t need it for Code Blind) and other exporters.
The helm chart supports
nodeSelector,
affinity and toleration, you can use them to schedule Prometheus deployments on an isolated node(s) to have an homogeneous game servers workload.
This will install a Prometheus Server in your current cluster with Persistent Volume Claim (Deactivated for Minikube and Kind) for storing and querying time series, it will automatically start collecting metrics from Code Blind Controller.
Finally, to access Prometheus metrics, rules and alerts explorer use
On the landing page you can start exploring metrics by creating queries. You can also verify what targets Prometheus currently monitors (Header Status > Targets), you should see Code Blind controller pod in the kubernetes-pods section.
Note
Metrics will be first registered when you will start using Code Blind.
Now let’s install some Grafana dashboards.
Grafana installation
Grafana is a open source time series analytics platform which supports Prometheus data source. We can also easily import pre-built dashboards.
To install Grafana using a Managed Prometheus backend:
Complete the Before you begin. To align with the Code Blind Grafana installation, we’ll be installing in the metrics namespace, which you’ll need to create.
If your cluster has Workload Identity enabled, which is enabled on GKE Autopilot by default, follow Configure a service account for Workload Identity to ensure that you have appropriately authorized the default Kubernetes service account in the metrics namespace.
Install the Standalone Prometheus frontend UI in the metrics namespace - this will act as your authentication proxy for PromQL queries.
Install Grafana as above, using -f ./build/grafana-frontend.yaml instead of -f ./build/grafana.yaml.
You need to grant all the necessary permissions to the users (see Access Control Guide). The predefined role Monitoring Metric Writer contains those permissions. Use the following command to assign the role to your default service account.
Cloud Operations for GKE (including Cloud Monitoring) is enabled by default on GKE clusters, however you can follow this guide if it is currently disabled in your GKE cluster.
Before proceeding, ensure you have created a metrics node pool as mentioned in the Google Cloud installation guide.
The default metrics exporter installed with Code Blind is Prometheus. If you are using the Helm installation, you can install or upgrade Code Blind to use Cloud Monitoring, using the following chart parameters:
If you are using the YAML installation, follow the instructions on the page to change the above parameters by using helm to generate a custom YAML file locally.
With this configuration only the Cloud Monitoring exporter would be used instead of Prometheus exporter.
Using Cloud Monitoring with Workload Identity
If you would like to enable Cloud Monitoring in conjunction with Workload Identity, there are a few extra steps you need to follow:
When setting up the Google service account following the instructions for Authenticating to Google Cloud, create two IAM policy bindings, one for serviceAccount:PROJECT_ID.svc.id.goog[agones-system/agones-controller] and one for serviceAccount:PROJECT_ID.svc.id.goog[agones-system/agones-allocator].
Pass parameters to helm when installing Code Blind to add annotations to the agones-controller and agones-allocator Kubernetes service accounts:
To verify that metrics are being sent to Cloud Monitoring, create a Fleet or a Gameserver and look for the metrics to show up in the Cloud Monitoring dashboard. Navigate to the Metrics explorer and search for metrics with the prefix agones/. Select a metric and look for data to be plotted in the graph to the right.
An example of a custom dashboard is:
Currently there exists only manual way of configuring Cloud Monitoring Dashboard. So it is up to you to set an Alignment Period (minimal is 1 minute), GroupBy, Filter parameters and other graph settings.
Troubleshooting
If you can’t see Code Blind metrics you should have a look at the controller logs for connection errors. Also ensure that your cluster has the necessary credentials to interact with Cloud Monitoring. You can configure stackdriverProjectID manually, if the automatic discovery is not working.
Permissions problem example from controller logs:
Failed to export to Stackdriver: rpc error: code = PermissionDenied desc = Permission monitoring.metricDescriptors.create denied (or the resource may not exist).
If you receive this error, ensure your service account has the role or corresponding permissions mentioned above.
5.11 - Access Code Blind via the Kubernetes API
It’s likely that we will want to programmatically interact with Code Blind. Everything that can be done via the kubectl and yaml configurations can also be done via the Kubernetes API.
Installing Code Blind creates several Custom Resource Definitions (CRD),
which can be accessed and manipulated through the Kubernetes API.
At this time, we recommend interacting with Code Blind through the Go client that has been generated in this repository,
but other methods may also work as well.
Go Client
Kubernetes Go Client tooling generates a Client for Code Blind that we can use to interact with the Code Blind
installation on our Kubernetes cluster.
This client uses the same authentication mechanisms as the Kubernetes API.
If you plan to run your code in the same cluster as the Code Blind install, have a look at the
in cluster configuration
example from the Kubernetes Client.
If you plan to run your code outside the Kubernetes cluster as your Code Blind install,
look at the out of cluster configuration
example from the Kubernetes client.
Example
The following is an example of a in-cluster configuration, that creates a Clientset for Code Blind
and then creates a GameServer.
packagemainimport("fmt""context"agonesv1"agones.dev/agones/pkg/apis/agones/v1""agones.dev/agones/pkg/client/clientset/versioned""agones.dev/agones/pkg/util/runtime"corev1"k8s.io/api/core/v1"metav1"k8s.io/apimachinery/pkg/apis/meta/v1""k8s.io/client-go/kubernetes""k8s.io/client-go/rest")funcmain(){config,err:=rest.InClusterConfig()logger:=runtime.NewLoggerWithSource("main")iferr!=nil{logger.WithError(err).Fatal("Could not create in cluster config")}// Access to standard Kubernetes resources through the Kubernetes Clientset
// We don't actually need this for this example, but it's just here for
// illustrative purposes
kubeClient,err:=kubernetes.NewForConfig(config)iferr!=nil{logger.WithError(err).Fatal("Could not create the kubernetes clientset")}// Access to the Code Blind resources through the Code Blind Clientset
// Note that we reuse the same config as we used for the Kubernetes Clientset
agonesClient,err:=versioned.NewForConfig(config)iferr!=nil{logger.WithError(err).Fatal("Could not create the agones api clientset")}// Create a GameServer
gs:=&agonesv1.GameServer{ObjectMeta:metav1.ObjectMeta{GenerateName:"simple-game-server",Namespace:"default"},Spec:agonesv1.GameServerSpec{Container:"simple-game-server",Ports:[]agonesv1.GameServerPort{{ContainerPort:7654,HostPort:7654,Name:"gameport",PortPolicy:agonesv1.Static,Protocol:corev1.ProtocolUDP,}},Template:corev1.PodTemplateSpec{Spec:corev1.PodSpec{Containers:[]corev1.Container{{Name:"simple-game-server",Image:"us-docker.pkg.dev/codeblind/examples/simple-server:0.27"}},},},},}newGS,err:=agonesClient.AgonesV1().GameServers("default").Create(context.TODO(),gs,metav1.CreateOptions{})iferr!=nil{panic(err)}fmt.Printf("New game servers' name is: %s",newGS.ObjectMeta.Name)}
In order to create GS using provided example, you can run it as a Kubernetes Job:
{"message":"\u0026{0xc0001dde00 default}","severity":"info","source":"main","time":"2020-04-21T11:14:00.477576428Z"}
{"message":"New GameServer name is: helm-test-server-fxfgg","severity":"info","time":"2020-04-21T11:14:00.516024697Z"}
You have just created a GameServer using Kubernetes Go Client.
Best Practice: Using Informers and Listers
Almost all Kubernetes’ controllers and custom controllers utilise Informers and Listers
to reduce the load on the Kubernetes’s control plane.
Repetitive, direct access of the Kubernetes control plane API can significantly
reduce the performance of the cluster – and Informers and Listers help resolving that issue.
Informers and Listers reduce the load on the Kubernetes control plane
by creating, using and maintaining an eventually consistent an in-memory cache.
This can be watched and also queried with zero cost, since it will only read against
its in-memory model of the Kubernetes resources.
Informer’s role and Lister’s role are different.
An Informer is the mechanism for watching a Kubernetes object’s event,
such that when a Kubernetes object changes(e.g. CREATE,UPDATE,DELETE), the Informer is informed,
and can execute a callback with the relevant object as an argument.
This can be very useful for building event based systems against the Kubernetes API.
A Lister is the mechanism for querying Kubernetes object’s against the client side in-memory cache.
Since the Lister stores objects in an in-memory cache, queries against a come at practically no cost.
Of course, Code Blind itself also uses Informers and Listers in its codebase.
Example
The following is an example of Informers and Listers,
that show the GameServer’s name & status & IPs in the Kubernetes cluster.
packagemainimport("context""time""agones.dev/agones/pkg/client/clientset/versioned""agones.dev/agones/pkg/client/informers/externalversions""agones.dev/agones/pkg/util/runtime""k8s.io/apimachinery/pkg/labels""k8s.io/client-go/informers""k8s.io/client-go/kubernetes""k8s.io/client-go/tools/cache")funcmain(){config,err:=rest.InClusterConfig()logger:=runtime.NewLoggerWithSource("main")iferr!=nil{logger.WithError(err).Fatal("Could not create in cluster config")}kubeClient,err:=kubernetes.NewForConfig(config)agonesClient,err:=versioned.NewForConfig(config)iferr!=nil{logger.WithError(err).Fatal("Could not create the agones api clientset")}// Create InformerFactory which create the informer
informerFactory:=informers.NewSharedInformerFactory(kubeClient,time.Second*30)agonesInformerFactory:=externalversions.NewSharedInformerFactory(agonesClient,time.Second*30)// Create Pod informer by informerFactory
podInformer:=informerFactory.Core().V1().Pods()// Create GameServer informer by informerFactory
gameServers:=agonesInformerFactory.CodeBlind().V1().GameServers()gsInformer:=gameServers.Informer()// Add EventHandler to informer
// When the object's event happens, the function will be called
// For example, when the pod is added, 'AddFunc' will be called and put out the "Pod Added"
podInformer.Informer().AddEventHandler(cache.ResourceEventHandlerFuncs{AddFunc:func(newinterface{}){logger.Infof("Pod Added")},UpdateFunc:func(old,newinterface{}){logger.Infof("Pod Updated")},DeleteFunc:func(oldinterface{}){logger.Infof("Pod Deleted")},})gsInformer.AddEventHandler(cache.ResourceEventHandlerFuncs{AddFunc:func(newinterface{}){logger.Infof("GameServer Added")},UpdateFunc:func(old,newinterface{}){logger.Infof("GameServer Updated")},DeleteFunc:func(oldinterface{}){logger.Infof("GameServer Deleted")},})ctx:=context.Background()// Start Go routines for informer
informerFactory.Start(ctx.Done())agonesInformerFactory.Start(ctx.Done())// Wait until finish caching with List API
informerFactory.WaitForCacheSync(ctx.Done())agonesInformerFactory.WaitForCacheSync(ctx.Done())// Create Lister which can list objects from the in-memory-cache
podLister:=podInformer.Lister()gsLister:=gameServers.Lister()for{// Get List objects of Pods from Pod Lister
p:=podLister.Pods("default")// Get List objects of GameServers from GameServer Lister
gs,err:=gsLister.List(labels.Everything())iferr!=nil{panic(err)}// Show GameServer's name & status & IPs
for_,g:=rangegs{a,err:=p.Get(g.GetName())iferr!=nil{panic(err)}logger.Infof("------------------------------")logger.Infof("Name: %s",g.GetName())logger.Infof("Status: %s",g.Status.State)logger.Infof("External IP: %s",g.Status.Address)logger.Infof("Internal IP: %s",a.Status.PodIP)}time.Sleep(time.Second*25)}}
You can list GameServer’s name and status and IPs using Kubernetes Informers and Listers.
Direct Access to the REST API via Kubectl
If there isn’t a client written in your preferred language, it is always possible to communicate
directly with Kubernetes API to interact with Code Blind.
The Kubernetes API can be authenticated and exposed locally through the
kubectl proxy
For example:
kubectl proxy &
Starting to serve on 127.0.0.1:8001
List all Code Blind endpoints
curl http://localhost:8001/apis | grep agones -A 5 -B 5
The Kubernetes API Concepts
section may also provide the more details on the API conventions that are used in the Kubernetes API.
Next Steps
Learn how to use Allocator Service for single and multi-cluster Allocation.
5.12 - Troubleshooting
Troubleshooting guides and steps.
Something went wrong with my GameServer
If there is something going wrong with your GameServer, there are a few approaches to determining the cause:
Run with the local SDK server
A good first step for seeing what may be going wrong is replicating the issue locally. To do this you can take
advantage of the Code Blind local SDK server
, with the following troubleshooting steps:
Run your game server as a local binary against the local SDK server
Run your game server container against the local SDK server. It’s worth noting that running with
docker run --network=host ... can be an easy way to allow your game server container(s) access to the local SDK
server)
At each stage, keep an eye on the logs of your game server binary, and the local SDK server, and ensure there are no system
errors.
Run as a GameServer rather than a Fleet
A Fleet will automatically replace any unhealthy GameServer under its control - which can make it hard to catch
all the details to determine the cause.
To work around this, instantiate a single instance of your game server as a GameServer within your Code Blind cluster.
This GameServer will not be replaced if it moves to an Unhealthy state, giving you time to introspect what is
going wrong.
Introspect with Kubernetes tooling
There are many Kubernetes tools that will help with determining where things have potentially gone wrong for your
game server. Here are a few you may want to try.
kubectl describe
Depending on what is happening, you may want to run kubectl describe <gameserver name> to view the events
that are associated with that particular GameServer resource. This can give you insight into the lifecycle of the
GameServer and if anything has gone wrong.
For example, here we can see where the simple-game-server example has been moved to the Unhealthy state
due to a crash in the backing GameServer Pod container’s binary.
kubectl describe gs simple-game-server-zqppv
Name: simple-game-server-zqppv
Namespace: default
Labels: <none>
Annotations: agones.dev/sdk-version: 1.0.0-dce1546
API Version: agones.dev/v1
Kind: GameServer
Metadata:
Creation Timestamp: 2019-08-16T21:25:44Z
Finalizers:
agones.dev
Generate Name: simple-game-server-
Generation: 1
Resource Version: 1378575
Self Link: /apis/agones.dev/v1/namespaces/default/gameservers/simple-game-server-zqppv
UID: 6818adc7-c06c-11e9-8dbd-42010a8a0109
Spec:
Container: simple-game-server
Health:
Failure Threshold: 3
Initial Delay Seconds: 5
Period Seconds: 5
Ports:
Container Port: 7654
Host Port: 7058
Name: default
Port Policy: Dynamic
Protocol: UDP
Scheduling: Packed
Template:
Metadata:
Creation Timestamp: <nil>
Spec:
Containers:
Image: us-docker.pkg.dev/codeblind/examples/simple-server:0.27
Name: simple-game-server
Resources:
Limits:
Cpu: 20m
Memory: 32Mi
Requests:
Cpu: 20m
Memory: 32Mi
Status:
Address: 35.230.59.117
Node Name: gke-test-cluster-default-590db5e4-4s6r
Ports:
Name: default
Port: 7058
Reserved Until: <nil>
State: Unhealthy
Events:
Type Reason Age From Message
---- ------ ---- ---- -------
Normal PortAllocation 72s gameserver-controller Port allocated
Normal Creating 72s gameserver-controller Pod simple-game-server-zqppv created
Normal Scheduled 72s gameserver-controller Address and port populated
Normal RequestReady 67s gameserver-sidecar SDK state change
Normal Ready 66s gameserver-controller SDK.Ready() complete
Warning Unhealthy 34s health-controller Issue with Gameserver pod
The backing Pod has the same name as the GameServer - so it’s also worth looking at the
details and events for the Pod to see if there are any issues there, such as restarts due to binary crashes etc.
For example, you can see the restart count on the us-docker.pkg.dev/codeblind/examples/simple-server:0.27 container
is set to 1, due to the game server binary crash
kubectl describe pod simple-game-server-zqppv
Name: simple-game-server-zqppv
Namespace: default
Priority: 0
PriorityClassName: <none>
Node: gke-test-cluster-default-590db5e4-4s6r/10.138.0.23
Start Time: Fri, 16 Aug 2019 21:25:44 +0000
Labels: agones.dev/gameserver=simple-game-server-zqppv
agones.dev/role=gameserver
Annotations: agones.dev/container: simple-game-server
agones.dev/sdk-version: 1.0.0-dce1546
cluster-autoscaler.kubernetes.io/safe-to-evict: false
Status: Running
IP: 10.48.1.80
Controlled By: GameServer/simple-game-server-zqppv
Containers:
simple-game-server:
Container ID: docker://69eacd03cc89b0636b78abe47926b02183ba84d18fa20649ca443f5232511661
Image: us-docker.pkg.dev/codeblind/examples/simple-server:0.27
Image ID: docker-pullable://gcr.io/agones-images/simple-game-server@sha256:6a60eff5e68b88b5ce75ae98082d79cff36cda411a090f3495760e5c3b6c3575
Port: 7654/UDP
Host Port: 7058/UDP
State: Running
Started: Fri, 16 Aug 2019 21:26:22 +0000
Last State: Terminated
Reason: Completed
Exit Code: 0
Started: Fri, 16 Aug 2019 21:25:45 +0000
Finished: Fri, 16 Aug 2019 21:26:22 +0000
Ready: True
Restart Count: 1
Limits:
cpu: 20m
memory: 32Mi
Requests:
cpu: 20m
memory: 32Mi
Liveness: http-get http://:8080/gshealthz delay=5s timeout=1s period=5s #success=1 #failure=3
Environment: <none>
Mounts:
/var/run/secrets/kubernetes.io/serviceaccount from empty (ro)
agones-gameserver-sidecar:
Container ID: docker://f3c475c34d26232e19b60be65b03bc6ce41931f4c37e00770d3ab4a36281d31c
Image: gcr.io/agones-mark/agones-sdk:1.0.0-dce1546
Image ID: docker-pullable://gcr.io/agones-mark/agones-sdk@sha256:4b5693e95ee3023a2b2e2099d102bb6bac58d4ce0ac472e58a09cee6d160cd19
Port: <none>
Host Port: <none>
State: Running
Started: Fri, 16 Aug 2019 21:25:48 +0000
Ready: True
Restart Count: 0
Requests:
cpu: 30m
Liveness: http-get http://:8080/healthz delay=3s timeout=1s period=3s #success=1 #failure=3
Environment:
GAMESERVER_NAME: simple-game-server-zqppv
POD_NAMESPACE: default (v1:metadata.namespace)
Mounts:
/var/run/secrets/kubernetes.io/serviceaccount from agones-sdk-token-vr6qq (ro)
Conditions:
  Type              Status
  Initialized       True
  Ready             True
  ContainersReady   True
  PodScheduled      True
Volumes:
empty:
Type: EmptyDir (a temporary directory that shares a pod's lifetime)
Medium:
agones-sdk-token-vr6qq:
Type: Secret (a volume populated by a Secret)
SecretName: agones-sdk-token-vr6qq
Optional: false
QoS Class: Burstable
Node-Selectors: <none>
Tolerations: node.kubernetes.io/not-ready:NoExecute for 300s
node.kubernetes.io/unreachable:NoExecute for 300s
Events:
Type Reason Age From Message
---- ------ ---- ---- -------
Normal Scheduled 2m32s default-scheduler Successfully assigned default/simple-game-server-zqppv to gke-test-cluster-default-590db5e4-4s6r
Normal Pulling 2m31s kubelet, gke-test-cluster-default-590db5e4-4s6r pulling image "gcr.io/agones-mark/agones-sdk:1.0.0-dce1546"
Normal Started 2m28s kubelet, gke-test-cluster-default-590db5e4-4s6r Started container
Normal Pulled 2m28s kubelet, gke-test-cluster-default-590db5e4-4s6r Successfully pulled image "gcr.io/agones-mark/agones-sdk:1.0.0-dce1546"
Normal Created 2m28s kubelet, gke-test-cluster-default-590db5e4-4s6r Created container
Normal Created 114s (x2 over 2m31s) kubelet, gke-test-cluster-default-590db5e4-4s6r Created container
Normal Started 114s (x2 over 2m31s) kubelet, gke-test-cluster-default-590db5e4-4s6r Started container
Normal Pulled 114s (x2 over 2m31s) kubelet, gke-test-cluster-default-590db5e4-4s6r Container image "us-docker.pkg.dev/codeblind/examples/simple-server:0.27" already present on machine
Finally, you can also get the logs of your GameServerPod as well via kubectl logs <pod name> -c <game server container name>, for example:
2019/08/16 21:26:23 Creating SDK instance
2019/08/16 21:26:24 Starting Health Ping
2019/08/16 21:26:24 Starting UDP server, listening on port 7654
2019/08/16 21:26:24 Marking this server as ready
The above commands will only give the most recent container’s logs (so we won’t get the previous crash), but
you can use kubectl logs --previous=true simple-game-server-zqppv -c simple-game-server to get the previous instance of the containers logs, or
use your Kubernetes platform of choice’s logging aggregation tools to view the crash details.
kubectl events
The “Events” section that is seen at the bottom of a kubectl describe is backed an actual Event record in
Kubernetes, which can be queried - and is general persistent for an hour after it is created.
Therefore, even a GameServer or Pod resource is no longer available in the system, its Events may well be.
kubectl get events can be used to see all these events. This can also be grepped with the GameServer name to see
all events across both the GameServer and its backing Pod, like so:
kubectl get events | grep simple-game-server-v992s-jwpx2
2m47s       Normal   PortAllocation          gameserver/simple-game-server-v992s-jwpx2   Port allocated
2m47s       Normal   Creating                gameserver/simple-game-server-v992s-jwpx2   Pod simple-game-server-v992s-jwpx2 created
2m47s       Normal   Scheduled               pod/simple-game-server-v992s-jwpx2          Successfully assigned default/simple-game-server-v992s-jwpx2 to gke-test-cluster-default-77e7f57d-j1mp
2m47s       Normal   Scheduled               gameserver/simple-game-server-v992s-jwpx2   Address and port populated
2m46s       Normal   Pulled                  pod/simple-game-server-v992s-jwpx2          Container image "us-docker.pkg.dev/codeblind/examples/simple-server:0.27" already present on machine
2m46s       Normal   Created                 pod/simple-game-server-v992s-jwpx2          Created container simple-game-server
2m45s       Normal   Started                 pod/simple-game-server-v992s-jwpx2          Started container simple-game-server
2m45s       Normal   Pulled                  pod/simple-game-server-v992s-jwpx2          Container image "gcr.io/agones-images/agones-sdk:1.7.0" already present on machine
2m45s       Normal   Created                 pod/simple-game-server-v992s-jwpx2          Created container agones-gameserver-sidecar
2m45s       Normal   Started                 pod/simple-game-server-v992s-jwpx2          Started container agones-gameserver-sidecar
2m45s       Normal   RequestReady            gameserver/simple-game-server-v992s-jwpx2   SDK state change
2m45s       Normal   Ready                   gameserver/simple-game-server-v992s-jwpx2   SDK.Ready() complete
2m47s       Normal   SuccessfulCreate        gameserverset/simple-game-server-v992s      Created gameserver: simple-game-server-v992s-jwpx2
If something is going wrong, and you want to see the logs for Code Blind, there are potentially two places you will want to
check:
The controller: assuming you installed Code Blind in the agones-system namespace, you will find that there
is a single pod called agones-controller-<hash> (where hash is the unique code that Kubernetes generates)
that exists there, that you can get the logs from. This is the main
controller for Code Blind, and should be the first place to check when things go wrong.
To get the logs from this controller run: kubectl logs --namespace=agones-system agones-controller-<hash>
The SDK server sidecar: Code Blind runs a small gRPC + http server for the SDK in a container in the
same network namespace as the game server container to connect to via the SDK. The logs from this SDK server are also useful for tracking down issues, especially if you are having trouble with a
particular GameServer.
To find the Pod for the GameServer look for the pod with a name that is prefixed with the name of the
owning GameServer. For example if you have a GameServer named simple-game-server, it’s pod could potentially be named
simple-game-server-dnbwj.
To get the logs from that Pod, we need to specify that we want the logs from the agones-gameserver-sidecar
container. To do that, run the following: kubectl logs simple-game-server-dnbwj -c agones-gameserver-sidecar
Code Blind uses JSON structured logging, therefore errors will be visible through the "severity":"info" key and value.
Enable Debug Level Logging for the SDK Server
By default, the SDK Server binary is set to an Info level of logging.
You can use the sdkServer.logLevel to increase this to Debug levels, and see extra information about what is
happening with the SDK Server that runs alonside your game server container(s).
Enable Debug Level Logging for the Code Blind Controller
By default, the log level for the Code Blind controller is “info”. To get a more verbose log output, switch this to “debug”
via the agones.controller.logLevelHelm Configuration parameters
at installation.
The Feature Flag I enabled/disabled isn’t working as expected
It’s entirely possible that Alpha features may still have bugs in them (They are alpha after all 😃), but the first
thing to check is what the actual Feature Flags states
were passed to Code Blind are, and that they were set correctly.
The easiest way is to check the top info level log lines from the Code Blind controller.
For example:
$ kubectl logs -n agones-system agones-controller-7575dc59-7p2rg | head
{"filename":"/home/agones/logs/agones-controller-20220615_211540.log","message":"logging to file","numbackups":99,"severity":"info","source":"main","time":"2022-06-15T21:15:40.309349789Z"}{"logLevel":"info","message":"Setting LogLevel configuration","severity":"info","source":"main","time":"2022-06-15T21:15:40.309403296Z"}{"ctlConf":{"MinPort":7000,"MaxPort":8000,"SidecarImage":"gcr.io/agones-images/agones-sdk:1.23.0","SidecarCPURequest":"30m","SidecarCPULimit":"0","SidecarMemoryRequest":"0","SidecarMemoryLimit":"0","SdkServiceAccount":"agones-sdk","AlwaysPullSidecar":false,"PrometheusMetrics":true,"Stackdriver":false,"StackdriverLabels":"","KeyFile":"/home/agones/certs/server.key","CertFile":"/home/agones/certs/server.crt","KubeConfig":"","GCPProjectID":"","NumWorkers":100,"APIServerSustainedQPS":400,"APIServerBurstQPS":500,"LogDir":"/home/agones/logs","LogLevel":"info","LogSizeLimitMB":10000},"featureGates":"Example=true\u0026NodeExternalDNS=true\u0026PlayerAllocationFilter=false\u0026PlayerTracking=false","message":"starting gameServer operator...","severity":"info","source":"main","time":"2022-06-15T21:15:40.309528802Z","version":"1.23.0"}...
The ctlConf section has the full configuration for Code Blind as it was passed to the controller. Within that log line
there is a featureGates key, that has the full Feature Gate configuration as a URL Query String (\u0026
is JSON for &), so you can see if the Feature Gates are set as expected.
I uninstalled Code Blind before deleted all my GameServers and now they won’t delete
Code Blind GameServers use Finalizers
to manage garbage collection of the GameServers. This means that if the Code Blind controller
doesn’t remove the finalizer for you (i.e. if it has been uninstalled), it can be tricky to remove them all.
Thankfully, if we create a patch to remove the finalizers from all GameServers, we can delete them with impunity.
A quick one liner to do this:
kubectl get gameserver -o name | xargs -n1 -P1 -I{} kubectl patch {} --type=merge -p '{"metadata": {"finalizers": []}}'
Once this is done, you can kubectl delete gs --all and clean everything up (if it’s not gone already).
I’m getting Forbidden errors when trying to install Code Blind
Ensure that you are running Kubernetes 1.12 or later, which does not require any special
clusterrolebindings to install Code Blind.
If you want to install Code Blind on an older version of Kubernetes, you need to create a
clusterrolebinding to add your identity as a cluster admin, e.g.
On GKE, gcloud config get-value accounts will return a lowercase email address, so if
you are using a CamelCase email, you may need to type it in manually.
I’m getting stuck in “Terminating” when I uninstall Code Blind
If you try to uninstall the agones-system namespace before you have removed all of the components in the namespace you may
end up in a Terminating state.
kubectl get ns
NAME              STATUS        AGE
agones-system     Terminating   4d
Fixing this up requires us to bypass the finalizer in Kubernetes (article link), by manually changing the namespace details:
First get the current state of the namespace:
kubectl get namespace agones-system -o json >tmp.json
Edit the response tmp.json to remove the finalizer data, for example remove the following:
"spec":{"finalizers":["kubernetes"]},
Open a new terminal to proxy traffic:
kubectl proxy
Starting to serve on 127.0.0.1:8001
Now make an API call to send the altered namespace data:
curl -k -H "Content-Type: application/json" -X PUT --data-binary @tmp.json http://127.0.0.1:8001/api/v1/namespaces/agones-system/finalize
You may need to clean up any other Code Blind related resources you have in your cluster at this point.
6 - Common Integration Patterns
Common patterns and integrations of external systems, such as matchmakers, with GameServer starting, allocating and shutdown.
Note
These examples will use the GameServerAllocation resource for convenience, but these same patterns can be applied
when using the Allocation Service instead.
6.1 - Matchmaker requests a GameServer from a Fleet
This is the preferred workflow for a GameServer, in which an external matchmaker requests an allocation from one or more Fleets using a GameServerAllocation.
Sample GameServerAllocation
Since Code Blind will automatically add the label agones.dev/fleet to a GameServer of a given Fleet, we can use that
label selector to target a specific Fleet by name. In this instance, we are targeting the Fleetxonotic.
See all the commands the Client SDK provides - we only show a few here!
Check out the Allocator Service as a richer alternative to GameServerAllocation.
If you aren’t familiar with the term Pod, this should provide a reference.
6.2 - Matchmaker requires game server process registration
A scenario in which a Matchmaker requires a game server process to register themselves with the matchmaker, and the matchmaker decides which GameServer players are sent to.
In this scenario, the GameServer process will need to self Allocate when informed by the matchmaker that players
are being sent to them.
Warning
This does relinquish control over how GameServers are packed across the cluster to the external matchmaker. It is likely
it will not do as good a job at packing and scaling as Code Blind.
Next Steps:
Read the various references, including the
GameServer and Fleet
reference materials.
See all the commands the Client SDK provides - we only show a
few here!
If you aren’t familiar with the term Pod, this should
provide a reference.
6.3 - Canary Testing a new Fleet
Run a small Fleet for the new version of your GameServer to ensure it works correctly, before rolling it out to all your players.
To canary release/test a new Fleet,
we can run a small, fixed size Fleet of the new version of our GameServer, while also running the current stable
production version.
Allocations can then prefer to come from the canary Fleet, but if all GameServers are already allocated from the
canary Fleet, players will be allocated to the current stable Fleets.
Over time, if the monitoring of those playing on the canary Fleet is working as expected, the size of the canary
Fleet can be grown until you feel confident in its stability.
Once confidence has been achieved, the configuration for stable Fleet can be updated to match the canary (usually
triggering a rolling update). The
canary Fleet can then be deleted or updated to a new testing version of the game server process.
Sample GameServerAllocation
To ensure we don’t have to change the Allocation system every time we have a canary Fleet, in this example, we will
state that in our system, the label canary: "true" will be added to any canary Fleet in the cluster.
The above Allocation will then preferentially choose the Fleet that has GameServers with the label and key
value ofcanary:"true", if it exists, and has remaining Ready GameServers, and if not, will apply the
Allocation to the Fleet named “stable”.
Next Steps
Read about different Fleet update options and strategies that are
available.
6.4 - Reusing Allocated GameServers for more than one game session
After a GameServer has completed a player session, return it back to the pool of Ready GameServers for reuse.
Having a GameServer terminate after a single player session is better for packing and optimisation of
infrastructure usage, as well as safety to ensure the process returns to an absolute zero state.
However, depending on the GameServer startup time, or other factors there may be reasons you wish to reuse a
GameServer for n number of sessions before finally shutting it down.
The “magic trick” to this is knowing that the GameServer process can call
SDK.Ready() to return to a Ready
state after the GameServer has been allocated.
It is then up to the game developer to ensure that the game server process returns to a zero state once a game
session has been completed.
Next Steps
Have a look at all commands the Client SDK provides.
If you aren’t familiar with the term Pod, this shouldw
provide a reference.
6.5 - High Density GameServers
How to run multiple concurrent game sessions in a single GameServer process.
Depending on the setup and resource requirements of your game server process, sometimes it can be a more economical
use of resources to run multiple concurrent game sessions from within a single GameServer instance.
The tradeoff here is that this requires more management on behalf of the integrated game server process and external
systems, since it works around the common Kubernetes and/or Code Blind container lifecycle.
Utilising the new allocation gameServerState filter as well as the existing ability to edit the
GameServer labels at both allocation time, and from
within the game server process, via the SDK,
means Code Blind is able to atomically remove a GameServer from the list of potentially allocatable
GameServers at allocation time, and then return it back into the pool of allocatable GameServers if and when the
game server process deems that is has room to host another game session.
Info
To watch for Allocation events, there is the initial GameServer.status.state change from Ready to Allocated,
but it is also useful to know that the value of GameServer.metadata.annotations["agones.dev/last-allocated"] will
change as it is set by Code Blind with each allocation with the current timestamp, regardless of if there
is a state change or not.
Example GameServerAllocation
The below Allocation will first attempt to find a GameServer from the Fleetsimple-udp that is already
Allocated and also has the label agones.dev/sdk-gs-session-ready with the value of true.
The above condition indicates that the matching game server process behind the matched GameServer record is able to
accept another game session at this time.
If an Allocated GameServer does not exist with the desired labels, then use the next selector to allocate a Ready
GameServer from the simple-udpFleet.
Whichever condition is met, once allocation is made against a GameServer, its label of agones.dev/sdk-gs-session-ready
will be set to the value of false and it will no longer match the first selector, thereby removing it from any
future allocations with the below schema.
It will then be up to the game server process to decide on if and when it is appropriate to set the
agones.dev/sdk-gs-session-ready value back to true, thereby indicating that it can accept another concurrent
gameplay session.
apiVersion:"allocation.agones.dev/v1"kind:GameServerAllocationspec:selectors:- matchLabels:agones.dev/fleet:simple-udpagones.dev/sdk-gs-session-ready:"true"# this is importantgameServerState: Allocated # new state filter:allocate from Allocated servers- matchLabels:agones.dev/fleet:simple-udpgameServerState:Ready# Allocate out of the Ready Pool (which would be default, so backward compatible)metadata:labels:agones.dev/sdk-gs-session-ready:"false"# this removes it from the pool
Info
It’s important to note that the labels that the GameServer process use to add itself back into the pool of
allocatable instances, must start with the prefix agones.dev/sdk-, since only labels that have this prefix are
available to be [updated from the SDK][sdk].
Consistency
Code Blind, and Kubernetes itself are built as eventually consistent, self-healing systems. To that end, it is worth
noting that there may be minor delays between each of the operations in the above flow. For example, depending on the
cluster load, it may take up to a second for an SDK driven label change on a GameServer record to be
visible to the Code Blind allocation system. We recommend building your integrations with Code Blind with this in mind.
Next Steps
View the details about using the SDK to set
labels on the GameServer.
Using this approach, we are able to be able to make a request that is akin to: “Find me a GameServer that is already
allocated, with room for n number of players, and if one is not available, allocate me a ReadyGameServer”.
Common applications of this type of allocation are Lobby servers where players await matchmaking, or a
persistent world server where players connect and disconnect from a large map.
Example GameServerAllocation
The below allocation will attempt to find an already Allocated GameServer from the Fleet “lobby” with room for 10
to 15 players, and if it cannot find one, will allocate a Ready one from the same Fleet.
We recommend doing an extra check when players connect to a GameServer that there is the expected player capacity
on the GameServer as there can be a small delay between a player connecting and it being reported
to Code Blind.
Next Steps
Have a look at all commands the Client SDK provides.
To install on GKE, follow the install instructions (if you haven’t already) at
Setting up a Google Kubernetes Engine (GKE) cluster.
Also complete the “Installing Code Blind” instructions on the same page.
The game server sets up the Code Blind SDK, calls sdk.ready() to inform Code Blind that it is ready to serve traffic,
prints a message every 10 seconds, and then calls sdk.shutdown() after a minute to indicate that the gameserver
is going to exit.
You can follow along with the lifecycle of the gameserver by running
kubectl logs ${GAMESERVER_NAME} rust-simple -f
which should produce output similar to
Rust Game Server has started!
Creating SDK instance
Setting a label
Starting to watch GameServer updates...
Health ping sent
Setting an annotation
Marking server as ready...
...marked Ready
Getting GameServer details...
GameServer name: rust-simple-txsc6
Running for 0 seconds
GameServer Update, name: rust-simple-txsc6
GameServer Update, state: Scheduled
GameServer Update, name: rust-simple-txsc6
GameServer Update, state: Scheduled
GameServer Update, name: rust-simple-txsc6
GameServer Update, state: RequestReady
GameServer Update, name: rust-simple-txsc6
GameServer Update, state: Ready
Health ping sent
Health ping sent
Health ping sent
Health ping sent
Health ping sent
Running for 10 seconds
GameServer Update, name: rust-simple-txsc6
GameServer Update, state: Ready
...
Shutting down after 60 seconds...
...marked for Shutdown
Running for 60 seconds
Health ping sent
GameServer Update, name: rust-simple-txsc6
GameServer Update, state: Shutdown
GameServer Update, name: rust-simple-txsc6
GameServer Update, state: Shutdown
...
If everything goes as expected, the gameserver will exit automatically after about a minute.
In some cases, the gameserver goes into an unhealthy state, in which case it will be restarted indefinitely.
If this happens, you can manually remove it by running
kubectl delete gs ${GAMESERVER_NAME}
2. Build a simple gameserver
Change directories to your local agones/examples/rust-simple directory. To experiment with the SDK, open up main.rs
in your favorite editor and change the interval at which the gameserver calls sdk.health() from 2 seconds to 20
seconds by modifying the line in the thread assigned to let _health to be
thread::sleep(Duration::from_secs(20));
Next build a new docker image by running
cd examples/rust-simple
REPOSITORY=<your-repository> # e.g. gcr.io/agones-imagesmake build-image REPOSITORY=${REPOSITORY}
The multi-stage Dockerfile will pull down all of the dependencies needed to build the image. Note that it is normal
for this to take several minutes to complete.
Once the container has been built, push it to your repository
docker push ${REPOSITORY}/rust-simple-server:0.4
3. Run the customized gameserver
Now it is time to deploy your newly created gameserver container into your Code Blind cluster.
First, you need to edit examples/rust-simple/gameserver.yaml to point to your new image:
Again, follow along with the lifecycle of the gameserver by running
kubectl logs ${GAMESERVER_NAME} rust-simple -f
which should produce output similar to
Rust Game Server has started!
Creating SDK instance
Setting a label
Starting to watch GameServer updates...
Health ping sent
Setting an annotation
Marking server as ready...
...marked Ready
Getting GameServer details...
GameServer name: rust-simple-z6lz8
Running for 0 seconds
GameServer Update, name: rust-simple-z6lz8
GameServer Update, state: Scheduled
GameServer Update, name: rust-simple-z6lz8
GameServer Update, state: RequestReady
GameServer Update, name: rust-simple-z6lz8
GameServer Update, state: RequestReady
GameServer Update, name: rust-simple-z6lz8
GameServer Update, state: Ready
Running for 10 seconds
GameServer Update, name: rust-simple-z6lz8
GameServer Update, state: Ready
GameServer Update, name: rust-simple-z6lz8
GameServer Update, state: Unhealthy
Health ping sent
Running for 20 seconds
Running for 30 seconds
Health ping sent
Running for 40 seconds
GameServer Update, name: rust-simple-z6lz8
GameServer Update, state: Unhealthy
Running for 50 seconds
Health ping sent
Shutting down after 60 seconds...
...marked for Shutdown
Running for 60 seconds
Running for 70 seconds
GameServer Update, name: rust-simple-z6lz8
GameServer Update, state: Unhealthy
Health ping sent
Running for 80 seconds
Running for 90 seconds
Health ping sent
Rust Game Server finished.
with the slower healthcheck interval, the gameserver gets automatically marked an Unhealthy by Code Blind.
To finish, clean up the gameserver by manually removing it
kubectl delete gs ${GAMESERVER_NAME}
7.2 - Tutorial Build and Run a Simple Gameserver (node.js)
This tutorial describes how to use the Code Blind node.js SDK in a simple node.js gameserver.
Objectives
Run a simple gameserver
Understand how the simple gameserver uses the Code Blind node.js SDK
Build a customized version of the simple gameserver
To install on GKE, follow the install instructions (if you haven’t already) at
Setting up a Google Kubernetes Engine (GKE) cluster.
Also complete the “Installing Code Blind” instructions on the same page.
The game server sets up the Code Blind SDK, calls sdk.ready() to inform Code Blind that it is ready to serve traffic,
prints a message every 10 seconds, and then calls sdk.shutdown() after a minute to indicate that the gameserver
is going to exit.
You can follow along with the lifecycle of the gameserver by running
kubectl logs ${GAMESERVER_NAME} nodejs-simple -f
which should produce output similar to
> @ start /home/server/examples/nodejs-simple
> node src/index.js

node.js Game Server has started!
Setting a label
(node:20) [DEP0005] DeprecationWarning: Buffer() is deprecated due to security and usability issues. Please use the Buffer.alloc(), Buffer.allocUnsafe(), or Buffer.from() methods instead.
Setting an annotation
Marking server as ready...
...marked Ready
GameServer Update:
	name: nodejs-simple-9bw4g
	state: Scheduled
GameServer Update:
	name: nodejs-simple-9bw4g
	state: RequestReady
GameServer Update:
	name: nodejs-simple-9bw4g
	state: RequestReady
GameServer Update:
	name: nodejs-simple-9bw4g
	state: Ready
Health ping sent
Health ping sent
Health ping sent
Health ping sent
Health ping sent
Running for 10 seconds!
Health ping sent
Health ping sent
Health ping sent
Health ping sent
Running for 20 seconds!
Health ping sent
Health ping sent
Health ping sent
Health ping sent
Health ping sent
GameServer Update:
	name: nodejs-simple-9bw4g
	state: Ready
Running for 30 seconds!
Health ping sent
Health ping sent
Health ping sent
Health ping sent
Health ping sent
Running for 40 seconds!
Health ping sent
Health ping sent
Health ping sent
Health ping sent
Health ping sent
Running for 50 seconds!
Health ping sent
Health ping sent
Health ping sent
Health ping sent
Health ping sent
GameServer Update:
	name: nodejs-simple-9bw4g
	state: Ready
Running for 60 seconds!
Shutting down after 60 seconds...
...marked for Shutdown
GameServer Update:
	name: nodejs-simple-9bw4g
	state: Shutdown
Health ping sent
GameServer Update:
	name: nodejs-simple-9bw4g
	state: Shutdown
Health ping sent
Health ping sent
Health ping sent
Health ping sent
Running for 70 seconds!
Health ping sent
Health ping sent
Health ping sent
Health ping sent
Health ping sent
Running for 80 seconds!
Health ping sent
Health ping sent
Health ping sent
Health ping sent
Health ping sent
Running for 90 seconds!
If everything goes as expected, the gameserver will exit automatically after about a minute.
In some cases, the gameserver goes into an unhealthy state, in which case it will be restarted indefinitely.
If this happens, you can manually remove it by running
kubectl delete gs ${GAMESERVER_NAME}
2. Build a simple gameserver
Change directories to your local agones/examples/nodejs-simple directory. To experiment with the SDK, open up
src/index.js in your favorite editor and change the interval at which the gameserver calls sdk.health() from
2 seconds to 20 seconds by modifying the lines in the health ping handler to be
Again, follow along with the lifecycle of the gameserver by running
kubectl logs ${GAMESERVER_NAME} nodejs-simple -f
which should produce output similar to
> @ start /home/server/examples/nodejs-simple
> node src/index.js

node.js Game Server has started!
Setting a label
(node:20) [DEP0005] DeprecationWarning: Buffer() is deprecated due to security and usability issues. Please use the Buffer.alloc(), Buffer.allocUnsafe(), or Buffer.from() methods instead.
Setting an annotation
Marking server as ready...
...marked Ready
GameServer Update:
	name: nodejs-simple-qkpqn
	state: Scheduled
GameServer Update:
	name: nodejs-simple-qkpqn
	state: Scheduled
GameServer Update:
	name: nodejs-simple-qkpqn
	state: RequestReady
GameServer Update:
	name: nodejs-simple-qkpqn
	state: Ready
Running for 10 seconds!
GameServer Update:
	name: nodejs-simple-qkpqn
	state: Unhealthy
Health ping sent
Running for 20 seconds!
GameServer Update:
	name: nodejs-simple-qkpqn
	state: Unhealthy
Running for 30 seconds!
Health ping sent
Running for 40 seconds!
Running for 50 seconds!
GameServer Update:
	name: nodejs-simple-qkpqn
	state: Unhealthy
Health ping sent
Shutting down after 60 seconds...
...marked for Shutdown
Running for 60 seconds!
Running for 70 seconds!
Health ping sent
Running for 80 seconds!
GameServer Update:
	name: nodejs-simple-qkpqn
	state: Unhealthy
Running for 90 seconds!
with the slower healthcheck interval, the gameserver gets automatically marked an Unhealthy by Code Blind.
To finish, clean up the gameserver by manually removing it
kubectl delete gs ${GAMESERVER_NAME}
7.3 - Tutorial Build and Run a Simple Gameserver (C++)
This tutorial describes how to use the Code Blind C++ SDK in a simple C++ gameserver.
Objectives
Run a simple gameserver
Understand how the simple gameserver uses the Code Blind C++ SDK
Build a customized version of the simple gameserver
To install on GKE, follow the install instructions (if you haven’t already) at
Setting up a Google Kubernetes Engine (GKE) cluster.
Also complete the “Installing Code Blind” instructions on the same page.
The game server sets up the Code Blind SDK, calls SDK::Ready() to inform Code Blind that it is ready to serve traffic,
prints a message every 10 seconds, and then calls SDK::Shutdown() after a minute to indicate that the gameserver
is going to exit.
You can follow along with the lifecycle of the gameserver by running
kubectl logs ${GAMESERVER_NAME} cpp-simple -f
which should produce output similar to
C++ Game Server has started!
Getting the instance of the SDK!
Attempting to connect...
...handshake complete.
Setting a label
Starting to watch GameServer updates...
Health ping sent
Setting an annotation
Marking server as ready...
...marked Ready
Getting GameServer details...
GameServer name: cpp-simple-tlgzp
Running for 0 seconds !
GameServer Update:
	name: cpp-simple-tlgzp
	state: Scheduled
GameServer Update:
	name: cpp-simple-tlgzp
	state: RequestReady
GameServer Update:
	name: cpp-simple-tlgzp
	state: RequestReady
GameServer Update:
	name: cpp-simple-tlgzp
	state: Ready
Health ping sent
Health ping sent
Health ping sent
Health ping sent
Health ping sent
Running for 10 seconds !
Health ping sent
...
GameServer Update:
	name: cpp-simple-2mtdc
	state: Ready
Shutting down after 60 seconds...
...marked for Shutdown
Running for 60 seconds !
Health ping sent
GameServer Update:
	name: cpp-simple-2mtdc
	state: Shutdown
GameServer Update:
	name: cpp-simple-2mtdc
	state: Shutdown
Health ping failed
Health ping failed
Health ping failed
Health ping failed
Running for 70 seconds !
Health ping failed
Health ping failed
Health ping failed
Health ping failed
Health ping failed
Running for 80 seconds !
Health ping failed
Health ping failed
Health ping failed
Health ping failed
Health ping failed
If everything goes as expected, the gameserver will exit automatically after about a minute.
In some cases, the gameserver goes into an unhealthy state, in which case it will be restarted indefinitely.
If this happens, you can manually remove it by running
You can again inspect the output of an individual gameserver (which will look the same as above), but what is more
interesting is to watch the set of all gameservers over time. Each gameserver exits after about a minute, but a fleet
is responsible for keeping a sufficient number of gameservers in the Ready state. So as each gameserver exits, it
is replaced by a new one. You can see this in action by running
watch "kubectl get gameservers"
which should show how gameservers are constantly transitioning from Scheduled to Ready to Shutdown before
disappearing.
When you are finished watching the fleet produce new gameservers you should remove the fleet by running
kubectl delete fleet ${FLEET_NAME}
3. Build a simple gameserver
Change directories to your local agones/examples/cpp-simple directory. To experiment with the SDK, open up server.cc
in your favorite editor and change the interval at which the gameserver calls SDK::Health from 2 seconds to 20
seconds by modifying the line in DoHealth to be
cd examples/cpp-simple
REPOSITORY=<your-repository> # e.g. gcr.io/agones-imagesmake build REPOSITORY=${REPOSITORY}
The multi-stage Dockerfile will pull down all of the dependencies needed to build the image. Note that it is normal
for this to take several minutes to complete.
Once the container has been built, push it to your repository
docker push ${REPOSITORY}/cpp-simple-server:0.6
4. Run the customized gameserver
Now it is time to deploy your newly created gameserver container into your Code Blind cluster.
First, you need to edit examples/cpp-simple/gameserver.yaml to point to your new image:
containers:- name:cpp-simpleimage:$(REPOSITORY)/cpp-simple-server:0.6imagePullPolicy:Always# add for development
Again, follow along with the lifecycle of the gameserver by running
kubectl logs ${GAMESERVER_NAME} cpp-simple -f
which should produce output similar to
C++ Game Server has started!
Getting the instance of the SDK!
Attempting to connect...
...handshake complete.
Setting a label
Health ping sent
Starting to watch GameServer updates...
Setting an annotation
Marking server as ready...
...marked Ready
Getting GameServer details...
GameServer name: cpp-simple-f255n
Running for 0 seconds !
GameServer Update:
	name: cpp-simple-f255n
	state: Scheduled
GameServer Update:
	name: cpp-simple-f255n
	state: Scheduled
GameServer Update:
	name: cpp-simple-f255n
	state: RequestReady
GameServer Update:
	name: cpp-simple-f255n
	state: Ready
Running for 10 seconds !
GameServer Update:
	name: cpp-simple-f255n
	state: Unhealthy
Health ping sent
Running for 20 seconds !
GameServer Update:
	name: cpp-simple-f255n
	state: Unhealthy
Running for 30 seconds !
Health ping sent
Running for 40 seconds !
Running for 50 seconds !
GameServer Update:
	name: cpp-simple-f255n
	state: Unhealthy
Health ping sent
Shutting down after 60 seconds...
...marked for Shutdown
Running for 60 seconds !
Running for 70 seconds !
Health ping sent
Running for 80 seconds !
GameServer Update:
	name: cpp-simple-f255n
	state: Unhealthy
Running for 90 seconds !
Health ping sent
with the slower healthcheck interval, the gameserver gets automatically marked an Unhealthy by Code Blind.
To finish, clean up the gameserver by manually removing it
kubectl delete gs ${GAMESERVER_NAME}
8 - Reference
Reference documentation for Code Blind Custom Resource Definitions
8.1 - GameServer Specification
Like any other Kubernetes resource you describe a GameServer’s desired state via a specification written in YAML or JSON to the Kubernetes API. The Code Blind controller will then change the actual state to the desired state.
A full GameServer specification is available below and in the
example folder for reference :
apiVersion:"agones.dev/v1"kind:GameServer# GameServer Metadata# https://v1-27.docs.kubernetes.io/docs/reference/generated/kubernetes-api/v1.27/#objectmeta-v1-metametadata:# generateName: "gds-example" # generate a unique name, with the given prefixname:"gds-example"# set a fixed namespec:# if there is more than one container, specify which one is the game servercontainer:example-server# Array of ports that can be exposed as direct connections to the game server containerports:# name is a descriptive name for the port- name:default# portPolicy has three options:# - "Dynamic" (default) the system allocates a free hostPort for the gameserver, for game clients to connect to# - "Static", user defines the hostPort that the game client will connect to. Then onus is on the user to ensure that the# port is available. When static is the policy specified, `hostPort` is required to be populated# - "Passthrough" dynamically sets the `containerPort` to the same value as the dynamically selected hostPort.# This will mean that users will need to lookup what port has been opened through the server side SDK.portPolicy:Static# The name of the container to open the port on. Defaults to the game server container if omitted or empty.container:simple-game-server# the port that is being opened on the game server processcontainerPort:7654# the port exposed on the host, only required when `portPolicy` is "Static". Overwritten when portPolicy is "Dynamic".hostPort:7777# protocol being used. Defaults to UDP. TCP and TCPUDP are other options# - "UDP" (default) use the UDP protocol# - "TCP", use the TCP protocol# - "TCPUDP", uses both TCP and UDP, and exposes the same hostPort for both protocols.# This will mean that it adds an extra port, and the first port is set to TCP, and second port set to UDPprotocol:UDP# Health checking for the running game serverhealth:# Disable health checking. defaults to false, but can be set to truedisabled:false# Number of seconds after the container has started before health check is initiated. Defaults to 5 secondsinitialDelaySeconds:5# If the `Health()` function doesn't get called at least once every period (seconds), then# the game server is not healthy. Defaults to 5periodSeconds:5# Minimum consecutive failures for the health probe to be considered failed after having succeeded.# Defaults to 3. Minimum value is 1failureThreshold:3# Parameters for game server sidecarsdkServer:# sdkServer log level parameter has three options:# - "Info" (default) The SDK server will output all messages except for debug messages# - "Debug" The SDK server will output all messages including debug messages# - "Error" The SDK server will only output error messageslogLevel:Info# grpcPort and httpPort control what ports the sdkserver listens on.# Starting with Code Blind 1.2 the default grpcPort is 9357 and the default# httpPort is 9358. In earlier releases, the defaults were 59357 and 59358# respectively but as these were in the ephemeral port range they could# conflict with other TCP connections.grpcPort:9357httpPort:9358# [Stage:Alpha]# [FeatureFlag:PlayerTracking]# Players provides the configuration for player tracking features.# Commented out since Alpha, and disabled by default# players:# # set this GameServer's initial player capacity# initialCapacity: 10## [Stage:Alpha]# [FeatureFlag:CountsAndLists]# Counts and Lists provides the configuration for generic (player, room, session, etc.) tracking features.# Commented out since Alpha, and disabled by default# counters: # counters are int64 counters that can be incremented and decremented by set amounts. Keys must be declared at GameServer creation time.# games: # arbitrary key.# count: 1 # initial value.# capacity: 100 # (Optional) Defaults to 1000 and setting capacity to max(int64) may lead to issues and is not recommended. See GitHub issue https://github.com/googleforgames/agones/issues/3636 for more details.# sessions:# count: 1# lists: # lists are lists of values stored against this GameServer that can be added and deleted from. Keys must be declared at GameServer creation time.# players: # an empty list, with a capacity set to 10.# capacity: 10 # capacity value, defaults to 1000.# rooms:# capacity: 333# values: # initial set of values in a list.# - room1# - room2# - room3# # Pod template configuration# https://v1-27.docs.kubernetes.io/docs/reference/generated/kubernetes-api/v1.27/#podtemplate-v1-coretemplate:# pod metadata. Name & Namespace is overwrittenmetadata:labels:myspeciallabel:myspecialvalue# Pod Specificationspec:containers:- name:simple-game-serverimage:us-docker.pkg.dev/codeblind/examples/simple-server:0.27imagePullPolicy:Always# nodeSelector is a label that can be used to tell Kubernetes which host# OS to use. For Windows game servers uncomment the nodeSelector# definition below.# Details: https://kubernetes.io/docs/setup/production-environment/windows/user-guide-windows-containers/#ensuring-os-specific-workloads-land-on-the-appropriate-container-host# nodeSelector:# kubernetes.io/os: windows
Since Code Blind defines a new Custom Resources Definition (CRD) we can define a new resource using the kind GameServer with the custom group agones.dev and API version v1.
You can use the metadata field to target a specific namespaces
but also attach specific annotations and labels to your resource. This is a very common pattern in the Kubernetes ecosystem.
The length of the name field of the Gameserver should not exceed 63 characters.
The spec field is the actual GameServer specification and it is composed as follow:
container is the name of container running the GameServer in case you have more than one container defined in the pod. If you do, this is a mandatory field. For instance this is useful if you want to run a sidecar to ship logs.
ports are an array of ports that can be exposed as direct connections to the game server container
name is an optional descriptive name for a port
portPolicy has three options:
- Dynamic (default) the system allocates a random free hostPort for the gameserver, for game clients to connect to.
- Static, user defines the hostPort that the game client will connect to. Then onus is on the user to ensure that the port is available. When static is the policy specified, hostPort is required to be populated.
- Passthrough dynamically sets the containerPort to the same value as the dynamically selected hostPort. This will mean that users will need to lookup what port to open through the server side SDK before starting communications.
container (Alpha) the name of the container to open the port on. Defaults to the game server container if omitted or empty.
containerPort the port that is being opened on the game server process, this is a required field for Dynamic and Static port policies, and should not be included in Passthrough configuration.
protocol the protocol being used. Defaults to UDP. TCP and TCPUDP are other options.
health to track the overall healthy state of the GameServer, more information available in the health check documentation.
sdkServer defines parameters for the game server sidecar
logging field defines log level for SDK server. Defaults to “Info”. It has three options:
“Info” (default) The SDK server will output all messages except for debug messages
“Debug” The SDK server will output all messages including debug messages
“Error” The SDK server will only output error messages
grpcPort the port that the SDK Server binds to for gRPC connections
httpPort the port that the SDK Server binds to for HTTP gRPC gateway connections
players (Alpha, behind “PlayerTracking” feature gate), sets this GameServer’s initial player capacity
counters (Alpha, requires “CountsAndLists” feature flag) are int64 counters with a default capacity of 1000 that can be incremented and decremented by set amounts. Keys must be declared at GameServer creation time. Note that setting the capacity to max(int64) may lead to issues.
lists (Alpha, requires “CountsAndLists” feature flag) are lists of values stored against this GameServer that can be added and deleted from. Key must be declared at GameServer creation time.
template the pod spec template to run your GameServer containers, see for more information.
Note
The GameServer resource does not support updates. If you need to make regular updates to the GameServer spec, consider using a Fleet.
Stable Network ID
If you want to connect to a GameServer from within your Kubernetes cluster via a convention based
DNS entry, each Pod attached to a GameServer automatically derives its hostname from the name of the GameServer.
To create internal DNS entries within the cluster, a group of Pods attached to GameServers can use a
Headless Service to control
the domain of the Pods, along with providing
a subdomain value to the GameServerPodTemplateSpec
to provide all the required details such that Kubernetes will create a DNS record for each Pod behind the Service.
You are also responsible for setting the labels on the GameServer.Spec.Template.Metadata to set the labels on the
created Pods and creating the Headless Service responsible for the network identity of the pods, Code Blind will not do
this for you, as a stable DNS record is not required for all use cases.
To ensure that the hostName value matches
RFC 1123, any . values
in the GameServer name are replaced by - when setting the underlying Pod.Spec.HostName value.
GameServer State Diagram
The following diagram shows the lifecycle of a GameServer.
Game Servers are created through Kubernetes API (either directly or through a Fleet) and their state transitions are orchestrated by:
GameServer controller, which allocates ports, launches Pods backing game servers and manages their lifetime
Allocation controller, which marks game servers as Allocated to handle a game session
SDK, which manages health checking and shutdown of a game server session
Primary Address vs Addresses
GameServer.Status has two fields which reflect the network address of the GameServer: address and addresses.
The address field is a policy-based choice of “primary address” that will work for many use cases,
and will always be one of the addresses. The addresses field contains every address in the Node.Status.addresses,
representing all known ways to reach the GameServer over the network.
e.g. if any ExternalDNS address is found in the respective Node, it is used as the address.
The policy for address will work for many use-cases, but for some advanced cases, such as IPv6 enablement, you may need
to evaluate all addresses and pick the addresses that best suits your needs.
8.2 - Fleet Specification
A Fleet is a set of warm GameServers that are available to be allocated from.
To allocate a GameServer from a Fleet, use a GameServerAllocation.
Like any other Kubernetes resource you describe a Fleet’s desired state via a specification written in YAML or JSON to the Kubernetes API. The Code Blind controller will then change the actual state to the desired state.
A full Fleet specification is available below and in the
example folder for reference :
apiVersion:"agones.dev/v1"kind:Fleet# Fleet Metadata# https://v1-27.docs.kubernetes.io/docs/reference/generated/kubernetes-api/v1.27/#objectmeta-v1-metametadata:name:fleet-examplespec:# the number of GameServers to keep Ready or Allocated in this Fleetreplicas:2# defines how GameServers are organised across the cluster.# Options include:# "Packed" (default) is aimed at dynamic Kubernetes clusters, such as cloud providers, wherein we want to bin pack# resources# "Distributed" is aimed at static Kubernetes clusters, wherein we want to distribute resources across the entire# clusterscheduling:Packed# a GameServer template - see:# https://agones.dev/docs/reference/gameserver/ for all the optionsstrategy:# The replacement strategy for when the GameServer template is changed. Default option is "RollingUpdate",# "RollingUpdate" will increment by maxSurge value on each iteration, while decrementing by maxUnavailable on each# iteration, until all GameServers have been switched from one version to another.# "Recreate" terminates all non-allocated GameServers, and starts up a new set with the new details to replace them.type:RollingUpdate# Only relevant when `type: RollingUpdate`rollingUpdate:# the amount to increment the new GameServers by. Defaults to 25%maxSurge:25%# the amount to decrements GameServers by. Defaults to 25%maxUnavailable:25%# [Stage:Beta]# [FeatureFlag:FleetAllocationOverflow]# Labels and/or Annotations to apply to overflowing GameServers when the number of Allocated GameServers is more# than the desired replicas on the underlying `GameServerSet`allocationOverflow:labels:mykey:myvalueversion:""# empty an existing label valueannotations:otherkey:setthisvalue## [Stage:Alpha]# [FeatureFlag:CountsAndLists]# Which gameservers in the Fleet are most important to keep around - impacts scale down logic.# priorities:# - type: Counter # Sort by a “Counter”# key: player # The name of the Counter. No impact if no GameServer found.# order: Descending # Default is "Ascending" so smaller capacity will be removed first on down scaling.# - type: List # Sort by a “List”# key: room # The name of the List. No impact if no GameServer found.# order: Ascending # Default is "Ascending" so smaller capacity will be removed first on down scaling.# template:# GameServer metadatametadata:labels:foo:bar# GameServer specificationspec:ports:- name:defaultportPolicy:DynamiccontainerPort:26000health:initialDelaySeconds:30periodSeconds:60# Parameters for game server sidecarsdkServer:logLevel:InfogrpcPort:9357httpPort:9358# The GameServer's Pod templatetemplate:spec:containers:- name:simple-game-serverimage:us-docker.pkg.dev/codeblind/examples/simple-server:0.27
Since Code Blind defines a new
Custom Resources Definition (CRD)
we can define a new resource using the kind Fleet with the custom group agones.dev and API
version v1.
You can use the metadata field to target a specific
namespaces but also
attach specific annotations
and labels to your resource.
This is a very common pattern in the Kubernetes ecosystem.
The length of the name field of the fleet should be at most 63 characters.
The spec field is the actual Fleet specification and it is composed as follow:
replicas is the number of GameServers to keep Ready or Allocated in this Fleet
scheduling defines how GameServers are organised across the cluster. Affects backing Pod scheduling, as well as scale
down mechanics.
“Packed” (default) is aimed at dynamic Kubernetes clusters, such as cloud providers, wherein we want to bin pack
resources. “Distributed” is aimed at static Kubernetes clusters, wherein we want to distribute resources across the entire
cluster. See Scheduling and Autoscaling for more details.
strategy is the GameServer replacement strategy for when the GameServer template is edited.
type is replacement strategy for when the GameServer template is changed. Default option is “RollingUpdate”, but “Recreate” is also available.
RollingUpdate will increment by maxSurge value on each iteration, while decrementing by maxUnavailable on each iteration, until all GameServers have been switched from one version to another.
Recreate terminates all non-allocated GameServers, and starts up a new set with the new GameServer configuration to replace them.
rollingUpdate is only relevant when type: RollingUpdate
maxSurge is the amount to increment the new GameServers by. Defaults to 25%
maxUnavailable is the amount to decrements GameServers by. Defaults to 25%
allocationOverflow (Beta, requires FleetAllocationOverflow flag) The labels and/or Annotations to apply to
GameServers when the number of Allocated GameServers exceeds the desired replicas in the underlying
GameServerSet.
labels the map of labels to be applied
annotations the map of annotations to be applied
Fleet's Scheduling Strategy: The GameServers associated with the GameServerSet are sorted based on either Packed or Distributed strategy.
Packed: Code Blind maximizes resource utilization by trying to populate nodes that are already in use before allocating GameServers to other nodes.
Distributed: Code Blind employs this strategy to spread out GameServer allocations, ensuring an even distribution of GameServers across the available nodes.
priorities: (Alpha, requires CountsAndLists feature flag): Defines which gameservers in the Fleet are most important to keep around - impacts scale down logic.
type: Sort by a “Counter” or a “List”.
key: The name of the Counter or List. If not found on the GameServer, has no impact.
order: Order: Sort by “Ascending” or “Descending”. “Descending” a bigger Capacity is preferred. “Ascending” would be smaller Capacity is preferred.
template a full GameServer configuration template.
See the GameServer reference for all available fields.
Fleet Scale Subresource Specification
Scale subresource is defined for a Fleet. Please refer to Kubernetes docs.
You can use the following command to scale the fleet with name simple-game-server:
Also exposing a Scale subresource would allow you to configure HorizontalPodAutoscaler and PodDisruptionBudget for a fleet in the future. However these features have not been tested, and are not currently supported - but if you are looking for these features, please be sure to let us know in the ticket.
8.3 - GameServerAllocation Specification
A GameServerAllocation is used to atomically allocate a GameServer out of a set of GameServers. This could be a single Fleet, multiple Fleets, or a self managed group of GameServers.
Allocation is the process of selecting the optimal GameServer that matches the filters defined in the GameServerAllocation specification below, and returning its details.
A successful Alloction moves the GameServer to the Allocated state, which indicates that it is currently active, likely with players on it, and should not be removed until SDK.Shutdown() is called, or it is explicitly manually deleted.
A full GameServerAllocation specification is available below and in the
example folder for reference:
apiVersion:"allocation.agones.dev/v1"kind:GameServerAllocationspec:# GameServer selector from which to choose GameServers from.# Defaults to all GameServers.# matchLabels, matchExpressions, gameServerState and player filters can be used for filtering.# See: https://kubernetes.io/docs/concepts/overview/working-with-objects/labels/ for more details on label selectors.# An ordered list of GameServer label selectors.# If the first selector is not matched, the selection attempts the second selector, and so on.# This is useful for things like smoke testing of new game servers.selectors:- matchLabels:agones.dev/fleet:green-fleet# [Stage:Alpha]# [FeatureFlag:PlayerAllocationFilter]players:minAvailable:0maxAvailable:99- matchLabels:agones.dev/fleet:blue-fleet- matchLabels:game:my-gamematchExpressions:- {key: tier, operator: In, values:[cache]}# Specifies which State is the filter to be used when attempting to retrieve a GameServer# via Allocation. Defaults to "Ready". The only other option is "Allocated", which can be used in conjunction with# label/annotation/player selectors to retrieve an already Allocated GameServer.gameServerState:Ready# [Stage:Alpha]# [FeatureFlag:CountsAndLists]# counters: # selector for counter current values of a GameServer count# rooms:# minCount: 1 # minimum value. Defaults to 0.# maxCount: 5 # maximum value. Defaults to max(int64)# minAvailable: 1 # minimum available (current capacity - current count). Defaults to 0.# maxAvailable: 10 # maximum available (current capacity - current count) Defaults to max(int64)# lists:# players:# containsValue: "x6k8z" # only match GameServers who has this value in the list. Defaults to "", which is all.# minAvailable: 1 # minimum available (current capacity - current count). Defaults to 0.# maxAvailable: 10 # maximum available (current capacity - current count) Defaults to 0, which translates to max(int64)# [Stage:Alpha] # [FeatureFlag:PlayerAllocationFilter]# Provides a filter on minimum and maximum values for player capacity when retrieving a GameServer# through Allocation. Defaults to no limits.players:minAvailable:0maxAvailable:99# defines how GameServers are organised across the cluster.# Options include:# "Packed" (default) is aimed at dynamic Kubernetes clusters, such as cloud providers, wherein we want to bin pack# resources# "Distributed" is aimed at static Kubernetes clusters, wherein we want to distribute resources across the entire# clusterscheduling:Packed# Optional custom metadata that is added to the game server at allocation# You can use this to tell the server necessary session datametadata:labels:mode:deathmatchannotations:map:garden22# [Stage:Alpha]# [FeatureFlag:CountsAndLists]# The first Priority on the array of Priorities is the most important for sorting. The allocator will# use the first priority for sorting GameServers by available Capacity in the Selector set. Acts as a# tie-breaker after sorting the game servers by State and Strategy Packed. Impacts which GameServer# is checked first. Optional.# priorities:# - type: List # Whether a Counter or a List.# key: rooms # The name of the Counter or List.# order: Ascending # "Ascending" lists smaller available capacity first.# [Stage:Alpha]# [FeatureFlag:CountsAndLists]# Counter actions to perform during allocation. Optional.# counters:# rooms:# action: increment # Either "Increment" or "Decrement" the Counter’s Count.# amount: 1 # Amount is the amount to increment or decrement the Count. Must be a positive integer.# capacity: 5 # Amount to update the maximum capacity of the Counter to this number. Min 0, Max int64.# List actions to perform during allocation. Optional.# lists:# players:# addValues: # appends values to a List’s Values array. Any duplicate values will be ignored# - x7un# - 8inz# capacity: 40 # Updates the maximum capacity of the Counter to this number. Min 0, Max 1000.
apiVersion:"allocation.agones.dev/v1"kind:GameServerAllocationspec:# Deprecated, use field selectors instead.# GameServer selector from which to choose GameServers from.# Defaults to all GameServers.# matchLabels, matchExpressions, gameServerState and player filters can be used for filtering.# See: https://kubernetes.io/docs/concepts/overview/working-with-objects/labels/ for more details on label selectors.# Deprecated, use field selectors instead.required:matchLabels:game:my-gamematchExpressions:- {key: tier, operator: In, values:[cache]}# Specifies which State is the filter to be used when attempting to retrieve a GameServer# via Allocation. Defaults to "Ready". The only other option is "Allocated", which can be used in conjunction with# label/annotation/player selectors to retrieve an already Allocated GameServer.gameServerState:Ready# [Stage:Alpha]# [FeatureFlag:PlayerAllocationFilter]# Provides a filter on minimum and maximum values for player capacity when retrieving a GameServer# through Allocation. Defaults to no limits.players:minAvailable:0maxAvailable:99# Deprecated, use field selectors instead.# An ordered list of preferred GameServer label selectors# that are optional to be fulfilled, but will be searched before the `required` selector.# If the first selector is not matched, the selection attempts the second selector, and so on.# If any of the preferred selectors are matched, the required selector is not considered.# This is useful for things like smoke testing of new game servers.# This also support matchExpressions, gameServerState and player filters.preferred:- matchLabels:agones.dev/fleet:green-fleet# [Stage:Alpha]# [FeatureFlag:PlayerAllocationFilter]players:minAvailable:0maxAvailable:99- matchLabels:agones.dev/fleet:blue-fleet# defines how GameServers are organised across the cluster.# Options include:# "Packed" (default) is aimed at dynamic Kubernetes clusters, such as cloud providers, wherein we want to bin pack# resources# "Distributed" is aimed at static Kubernetes clusters, wherein we want to distribute resources across the entire# clusterscheduling:Packed# Optional custom metadata that is added to the game server at allocation# You can use this to tell the server necessary session datametadata:labels:mode:deathmatchannotations:map:garden22
The spec field is the actual GameServerAllocation specification, and it is composed as follows:
Deprecated, use selectors instead. If selectors is set, this field will be ignored.
required is a GameServerSelector
(matchLabels. matchExpressions, gameServerState and player filters) from which to choose GameServers from.
Deprecated, use selectors instead. If selectors is set, this field will be ignored.
preferred is an ordered list of preferred GameServerSelector
that are optional to be fulfilled, but will be searched before the required selector.
If the first selector is not matched, the selection attempts the second selector, and so on.
If any of the preferred selectors are matched, the required selector is not considered.
This is useful for things like smoke testing of new game servers.
selectors is an ordered list of GameServerSelector.
If the first selector is not matched, the selection attempts the second selector, and so on.
This is useful for things like smoke testing of new game servers.
matchLabels is a map of {key,value} pairs. A single {key,value} in the matchLabels map is equivalent to an element
of matchExpressions, whose key field is “key”, the operator is “In”, and the values array contains only “value”.
The requirements are ANDed. Optional.
matchExpressions is a list of label selector requirements. The requirements are ANDed. Optional.
gameServerState GameServerState specifies which State is the filter to be used when attempting to retrieve a
GameServer via Allocation. Defaults to “Ready”. The only other option is “Allocated”, which can be used in
conjunction with label/annotation/player selectors to retrieve an already Allocated GameServer.
counters (Alpha, “CountsAndLists” feature flag) enables filtering based on game server Counter status, such as
the minimum and maximum number of active rooms. This helps in selecting game servers based on their current activity
or capacity. Optional.
lists (Alpha, “CountsAndLists” feature flag) enables filtering based on game server List status, such as allowing
for inclusion or exclusion of specific players. Optional.
scheduling defines how GameServers are organised across the cluster, in this case specifically when allocating
GameServers for usage.
“Packed” (default) is aimed at dynamic Kubernetes clusters, such as cloud providers, wherein we want to bin pack
resources. “Distributed” is aimed at static Kubernetes clusters, wherein we want to distribute resources across the entire
cluster. See Scheduling and Autoscaling for more details.
metadata is an optional list of custom labels and/or annotations that will be used to patch
the game server’s metadata in the moment of allocation. This can be used to tell the server necessary session data
priorities (Alpha, requires CountsAndLists feature flag) manages counters and lists for game servers, setting limits on
room counts and player inclusion/exclusion.
counters (Alpha, “CountsAndLists” feature flag) Counter actions to perform during allocation.
lists (Alpha, “CountsAndLists” feature flag) List actions to perform during allocation.
Once created the GameServerAllocation will have a status field consisting of the following:
State is the current state of a GameServerAllocation, e.g. Allocated, or UnAllocated
GameServerName is the name of the game server attached to this allocation, once the state is Allocated
Ports is a list of the ports that the game server makes available. See the GameServer Reference for more details.
Address is the primary network address where the game server can be reached.
Addresses is an array of all network addresses where the game server can be reached. It is a copy of the Node.Status.addresses field for the node the GameServer is scheduled on.
NodeName is the name of the node that the gameserver is running on.
Source is “local” unless this allocation is from a remote cluster, in which case Source is the endpoint of the remote agones-allocator. See Multi-cluster Allocation for more details.
Metadata conststs of:
Labels containing the labels of the game server at allocation time.
Annotations containing the annotations of the underlying game server at allocation time.
Info
For performance reasons, the query cache for a GameServerAllocation is eventually consistent.
Usually, the cache is populated practically immediately on GameServer change, but under high load of the Kubernetes
control plane, it may take some time for updates to GameServer selectable features to be populated into the cache
(although this doesn’t affect the atomicity of the Allocation operation).
While Code Blind will do a small series of retries when an allocatable GameServer is not available in its cache,
depending on your game requirements, it may be worth implementing your own more extend retry mechanism for
Allocation requests for high load scenarios.
Each GameServerAllocation will allocate from a single namespace. The namespace can be specified outside of
the spec, either with the --namespace flag when using the command line / kubectl or
in the url
when using an API call. If not specified when using the command line, the namespace will be automatically set to default.
Next Steps:
Check out the Allocator Service as a richer alternative to GameServerAllocation.
8.4 - Fleet Autoscaler Specification
A FleetAutoscaler’s job is to automatically scale up and down a Fleet in response to demand.
A full FleetAutoscaler specification is available below and in the
example folder for reference, but here are several
examples that show different autoscaling policies.
Ready Buffer Autoscaling
Fleet autoscaling with a buffer can be used to maintain a configured number of game server instances ready to serve
players based on number of allocated instances in a Fleet. The buffer size can be specified as an absolute number or a
percentage of the desired number of Ready game server instances over the Allocated count.
apiVersion:"autoscaling.agones.dev/v1"kind:FleetAutoscaler# FleetAutoscaler Metadata# https://v1-27.docs.kubernetes.io/docs/reference/generated/kubernetes-api/v1.27/#objectmeta-v1-metametadata:name:fleet-autoscaler-examplespec:# The name of the fleet to attach to and control. Must be an existing Fleet in the same namespace# as this FleetAutoscalerfleetName:fleet-example# The autoscaling policypolicy:# type of the policy. for now, only Buffer is availabletype:Buffer# parameters of the buffer policybuffer:# Size of a buffer of "ready" game server instances# The FleetAutoscaler will scale the fleet up and down trying to maintain this buffer, # as instances are being allocated or terminated# it can be specified either in absolute (i.e. 5) or percentage format (i.e. 5%)bufferSize:5# minimum fleet size to be set by this FleetAutoscaler. # if not specified, the actual minimum fleet size will be bufferSizeminReplicas:10# maximum fleet size that can be set by this FleetAutoscaler# requiredmaxReplicas:20# The autoscaling sync strategysync:# type of the sync. for now, only FixedInterval is availabletype:FixedInterval# parameters of the fixedInterval syncfixedInterval:# the time in seconds between each auto scalingseconds:30
Counter and List Autoscaling
A Counter based autoscaler can be used to autoscale GameServers based on a Count and Capacity set on each of the
GameServers in a Fleet to ensure there is always a buffer of total capacity available.
For example, if you have a game server that can support 10 rooms, and you want to ensure that there are always at least
5 rooms available, you could use a counter-based autoscaler with a buffer size of 5. The autoscaler would then scale the
Fleet up or down based on the difference between the count of rooms across the Fleet and the capacity of
rooms across the Fleet to ensure the buffer is maintained.
Counter-based FleetAutoscaler specification below and in the
example folder:
apiVersion:autoscaling.agones.dev/v1kind:FleetAutoscalermetadata:name:fleet-autoscaler-counterspec:fleetName:fleet-examplepolicy:type:Counter # Counter based autoscalingcounter:# Key is the name of the Counter. Required field.key:players# BufferSize is the size of a buffer of counted items that are available in the Fleet (available capacity).# Value can be an absolute number (ex: 5) or a percentage of the Counter available capacity (ex: 5%).# An absolute number is calculated from percentage by rounding up. Must be bigger than 0. Required field.bufferSize:5# MinCapacity is the minimum aggregate Counter total capacity across the fleet.# If BufferSize is specified as a percentage, MinCapacity is required and cannot be 0.# If non zero, MinCapacity must be smaller than MaxCapacity and must be greater than or equal to BufferSize.minCapacity:10# MaxCapacity is the maximum aggregate Counter total capacity across the fleet.# MaxCapacity must be greater than or equal to both MinCapacity and BufferSize. Required field.maxCapacity:100
A List based autoscaler can be used to autoscale GameServers based on the List length and Capacity set on each of the
GameServers in a Fleet to ensure there is always a buffer of total capacity available.
For example, if you have a game server that can support 10 players, and you want to ensure that there are always
room for at least 5 players across GameServers in a Fleet, you could use a list-based autoscaler with a buffer size
of 5. The autoscaler would then scale the Fleet up or down based on the difference between the total length of
the players and the total players capacity across the Fleet to ensure the buffer is maintained.
List-based FleetAutoscaler specification below and in the
example folder:
apiVersion:autoscaling.agones.dev/v1kind:FleetAutoscalermetadata:name:fleet-autoscaler-listspec:fleetName:fleet-examplepolicy:type:List # List based autoscaling.list:# Key is the name of the List. Required field.key:rooms# BufferSize is the size of a buffer based on the List capacity that is available over the current# aggregate List length in the Fleet (available capacity).# It can be specified either as an absolute value (i.e. 5) or percentage format (i.e. 5%).# Must be bigger than 0. Required field.bufferSize:5# MinCapacity is the minimum aggregate List total capacity across the fleet.# If BufferSize is specified as a percentage, MinCapacity is required must be greater than 0.# If non-zero, MinCapacity must be smaller than MaxCapacity and must be greater than or equal to BufferSize.minCapacity:10# MaxCapacity is the maximum aggregate List total capacity across the fleet.# MaxCapacity must be greater than or equal to both MinCapacity and BufferSize. Required field.maxCapacity:100
Webhook Autoscaling
A webhook-based FleetAutoscaler can be used to delegate the scaling logic to a separate http based service. This
can be useful if you want to use a custom scaling algorithm or if you want to integrate with other systems. For
example, you could use a webhook-based FleetAutoscaler to scale your fleet based on data from a match-maker or player
authentication system or a combination of systems.
Webhook based autoscalers have the added benefit of being able to scale a Fleet to 0 replicas, since they are able to
scale up on demand based on an external signal before a GameServerAllocation is executed from a match-maker or
similar system.
In order to define the path to your Webhook you can use either URL or service. Note that caBundle parameter is
required if you use HTTPS for webhook FleetAutoscaler, caBundle should be omitted if you want to use HTTP webhook
server.
For Webhook FleetAutoscaler below and in
example folder:
apiVersion:"autoscaling.agones.dev/v1"kind:FleetAutoscalermetadata:name:webhook-fleet-autoscalerspec:fleetName:simple-game-serverpolicy:# type of the policy - this example is Webhooktype:Webhook# parameters for the webhook policy - this is a WebhookClientConfig, as per other K8s webhookswebhook:# use a service, or URLservice:name:autoscaler-webhook-servicenamespace:defaultpath:scale# optional for URL defined webhooks# url: ""# caBundle: optional, used for HTTPS webhook type# The autoscaling sync strategysync:# type of the sync. for now, only FixedInterval is availabletype:FixedInterval# parameters of the fixedInterval syncfixedInterval:# the time in seconds between each auto scalingseconds:30
See the Webhook Endpoint Specification for the specification of the incoming and
outgoing JSON packet structure for the webhook endpoint.
Spec Field Reference
The spec field of the FleetAutoscaler is composed as follows:
fleetName is name of the fleet to attach to and control. Must be an existing Fleet in the same namespace
as this FleetAutoscaler.
policy is the autoscaling policy
type is type of the policy. “Buffer” and “Webhook” are available
buffer parameters of the buffer policy type
bufferSize is the size of a buffer of “ready” and “reserved” game server instances.
The FleetAutoscaler will scale the fleet up and down trying to maintain this buffer,
as instances are being allocated or terminated.
Note that “reserved” game servers could not be scaled down.
It can be specified either in absolute (i.e. 5) or percentage format (i.e. 5%)
minReplicas is the minimum fleet size to be set by this FleetAutoscaler.
if not specified, the minimum fleet size will be bufferSize if absolute value is used.
When bufferSize in percentage format is used, minReplicas should be more than 0.
maxReplicas is the maximum fleet size that can be set by this FleetAutoscaler. Required.
webhook parameters of the webhook policy type
service is a reference to the service for this webhook. Either service or url must be specified. If the webhook is running within the cluster, then you should use service. Port 8000 will be used if it is open, otherwise it is an error.
name is the service name bound to Deployment of autoscaler webhook. Required
(see example)
The FleetAutoscaler will scale the fleet up and down based on the response from this webhook server
namespace is the kubernetes namespace where webhook is deployed. Optional
If not specified, the “default” would be used
path is an optional URL path which will be sent in any request to this service. (i. e. /scale)
port is optional, it is the port for the service which is hosting the webhook. The default is 8000 for backward compatibility. If given, it should be a valid port number (1-65535, inclusive).
url gives the location of the webhook, in standard URL form ([scheme://]host:port/path). Exactly one of url or service must be specified. The host should not refer to a service running in the cluster; use the service field instead. (optional, instead of service)
caBundle is a PEM encoded certificate authority bundle which is used to issue and then validate the webhook’s server certificate. Base64 encoded PEM string. Required only for HTTPS. If not present HTTP client would be used.
Note: only one buffer or webhook could be defined for FleetAutoscaler which is based on the type field.
counter parameters of the counter policy type
counter contains the settings for counter-based autoscaling:
key is the name of the counter to use for scaling decisions.
bufferSize is the size of a buffer of counted items that are available in the Fleet (available capacity). Value can be an absolute number or a percentage of desired game server instances. An absolute number is calculated from percentage by rounding up. Must be bigger than 0.
minCapacity is the minimum aggregate Counter total capacity across the fleet. If zero, MinCapacity is ignored. If non zero, MinCapacity must be smaller than MaxCapacity and bigger than BufferSize.
maxCapacity is the maximum aggregate Counter total capacity across the fleet. It must be bigger than both MinCapacity and BufferSize.
list parameters of the list policy type
list contains the settings for list-based autoscaling:
key is the name of the list to use for scaling decisions.
bufferSize is the size of a buffer based on the List capacity that is available over the current aggregate List length in the Fleet (available capacity). It can be specified either as an absolute value or percentage format.
minCapacity is the minimum aggregate List total capacity across the fleet. If zero, it is ignored. If non zero, it must be smaller than MaxCapacity and bigger than BufferSize.
maxCapacity is the maximum aggregate List total capacity across the fleet. It must be bigger than both MinCapacity and BufferSize. Required field.
sync is autoscaling sync strategy. It defines when to run the autoscaling
type is type of the sync. For now only “FixedInterval” is available
fixedInterval parameters of the fixedInterval sync
seconds is the time in seconds between each autoscaling
Webhook Endpoint Specification
A webhook based FleetAutoscaler sends an HTTP POST request to the webhook endpoint every sync period (default is 30s)
with a JSON body, and scale the target fleet based on the data that is returned.
The JSON payload that is sent is a FleetAutoscaleReview data structure and a FleetAutoscaleResponse data
structure is expected to be returned.
The FleetAutoscaleResponse’s Replica field is used to set the target Fleet count with each sync interval, thereby
providing the autoscaling functionality.
// FleetAutoscaleReview is passed to the webhook with a populated Request value,
// and then returned with a populated Response.
typeFleetAutoscaleReviewstruct{Request*FleetAutoscaleRequest`json:"request"`Response*FleetAutoscaleResponse`json:"response"`}typeFleetAutoscaleRequeststruct{// UID is an identifier for the individual request/response. It allows us to distinguish instances of requests which are
// otherwise identical (parallel requests, requests when earlier requests did not modify etc)
// The UID is meant to track the round trip (request/response) between the Autoscaler and the WebHook, not the user request.
// It is suitable for correlating log entries between the webhook and apiserver, for either auditing or debugging.
UIDtypes.UID`json:"uid""`// Name is the name of the Fleet being scaled
Namestring`json:"name"`// Namespace is the namespace associated with the request (if any).
Namespacestring`json:"namespace"`// The Fleet's status values
Statusv1.FleetStatus`json:"status"`}typeFleetAutoscaleResponsestruct{// UID is an identifier for the individual request/response.
// This should be copied over from the corresponding FleetAutoscaleRequest.
UIDtypes.UID`json:"uid"`// Set to false if no scaling should occur to the Fleet
Scalebool`json:"scale"`// The targeted replica count
Replicasint32`json:"replicas"`}// FleetStatus is the status of a Fleet
typeFleetStatusstruct{// Replicas the total number of current GameServer replicas
Replicasint32`json:"replicas"`// ReadyReplicas are the number of Ready GameServer replicas
ReadyReplicasint32`json:"readyReplicas"`// ReservedReplicas are the total number of Reserved GameServer replicas in this fleet.
// Reserved instances won't be deleted on scale down, but won't cause an autoscaler to scale up.
ReservedReplicasint32`json:"reservedReplicas"`// AllocatedReplicas are the number of Allocated GameServer replicas
AllocatedReplicasint32`json:"allocatedReplicas"`}
For Webhook Fleetautoscaler Policy either HTTP or HTTPS could be used. Switching between them occurs depending on https presence in URL or by the presence of caBundle.
The example of the webhook written in Go could be found
here.
It implements the
scaling logic based on the percentage of allocated gameservers in a fleet.
8.5 - Code Blind Kubernetes API
Detailed list of Code Blind Custom Resource Definitions available
Deprecated: use field Selectors instead. If Selectors is set, this field is ignored.
Required is the GameServer selector from which to choose GameServers from.
Defaults to all GameServers.
Deprecated: use field Selectors instead. If Selectors is set, this field is ignored.
Preferred is an ordered list of preferred GameServer selectors
that are optional to be fulfilled, but will be searched before the required selector.
If the first selector is not matched, the selection attempts the second selector, and so on.
If any of the preferred selectors are matched, the required selector is not considered.
This is useful for things like smoke testing of new game servers.
(Alpha, CountsAndLists feature flag) The first Priority on the array of Priorities is the most
important for sorting. The allocator will use the first priority for sorting GameServers by
available Capacity in the Selector set. Acts as a tie-breaker after sorting the game servers
by State and Strategy Packed. Impacts which GameServer is checked first.
Ordered list of GameServer label selectors.
If the first selector is not matched, the selection attempts the second selector, and so on.
This is useful for things like smoke testing of new game servers.
Note: This field can only be set if neither Required or Preferred is set.
CounterSelector is the filter options for a GameServer based on the count and/or available capacity.
Field
Description
minCountint64
(Optional)
MinCount is the minimum current value. Defaults to 0.
maxCountint64
(Optional)
MaxCount is the maximum current value. Defaults to 0, which translates as max(in64).
minAvailableint64
(Optional)
MinAvailable specifies the minimum capacity (current capacity - current count) available on a GameServer. Defaults to 0.
maxAvailableint64
(Optional)
MaxAvailable specifies the maximum capacity (current capacity - current count) available on a GameServer. Defaults to 0, which translates to max(int64).
Deprecated: use field Selectors instead. If Selectors is set, this field is ignored.
Required is the GameServer selector from which to choose GameServers from.
Defaults to all GameServers.
Deprecated: use field Selectors instead. If Selectors is set, this field is ignored.
Preferred is an ordered list of preferred GameServer selectors
that are optional to be fulfilled, but will be searched before the required selector.
If the first selector is not matched, the selection attempts the second selector, and so on.
If any of the preferred selectors are matched, the required selector is not considered.
This is useful for things like smoke testing of new game servers.
(Alpha, CountsAndLists feature flag) The first Priority on the array of Priorities is the most
important for sorting. The allocator will use the first priority for sorting GameServers by
available Capacity in the Selector set. Acts as a tie-breaker after sorting the game servers
by State and Strategy Packed. Impacts which GameServer is checked first.
Ordered list of GameServer label selectors.
If the first selector is not matched, the selection attempts the second selector, and so on.
This is useful for things like smoke testing of new game servers.
Note: This field can only be set if neither Required or Preferred is set.
GameServerState specifies which State is the filter to be used when attempting to retrieve a GameServer
via Allocation. Defaults to “Ready”. The only other option is “Allocated”, which can be used in conjunction with
label/annotation/player selectors to retrieve an already Allocated GameServer.
[Stage:Alpha]
[FeatureFlag:PlayerAllocationFilter]
Players provides a filter on minimum and maximum values for player capacity when retrieving a GameServer
through Allocation. Defaults to no limits.
(Alpha, CountsAndLists feature flag) Counters provides filters on minimum and maximum values
for a Counter’s count and available capacity when retrieving a GameServer through Allocation.
Defaults to no limits.
(Alpha, CountsAndLists feature flag) Lists provides filters on minimum and maximum values
for List capacity, and for the existence of a value in a List, when retrieving a GameServer
through Allocation. Defaults to no limits.
ListSelector is the filter options for a GameServer based on List available capacity and/or the
existence of a value in a List.
Field
Description
containsValuestring
(Optional)
ContainsValue says to only match GameServers who has this value in the list. Defaults to “”, which is all.
minAvailableint64
(Optional)
MinAvailable specifies the minimum capacity (current capacity - current count) available on a GameServer. Defaults to 0.
maxAvailableint64
(Optional)
MaxAvailable specifies the maximum capacity (current capacity - current count) available on a GameServer. Defaults to 0, which is translated as max(int64).
BufferPolicy controls the desired behavior of the buffer policy.
Field
Description
maxReplicasint32
MaxReplicas is the maximum amount of replicas that the fleet may have.
It must be bigger than both MinReplicas and BufferSize
minReplicasint32
MinReplicas is the minimum amount of replicas that the fleet must have
If zero, it is ignored.
If non zero, it must be smaller than MaxReplicas and bigger than BufferSize
BufferSize defines how many replicas the autoscaler tries to have ready all the time
Value can be an absolute number (ex: 5) or a percentage of desired gs instances (ex: 15%)
Absolute number is calculated from percentage by rounding up.
Example: when this is set to 20%, the autoscaler will make sure that 20%
of the fleet’s game server replicas are ready. When this is set to 20,
the autoscaler will make sure that there are 20 available game servers
Must be bigger than 0
Note: by “ready” we understand in this case “non-allocated”; this is done to ensure robustness
and computation stability in different edge case (fleet just created, not enough
capacity in the cluster etc)
CounterPolicy controls the desired behavior of the Counter autoscaler policy.
Field
Description
keystring
Key is the name of the Counter. Required field.
maxCapacityint64
MaxCapacity is the maximum aggregate Counter total capacity across the fleet.
MaxCapacity must be bigger than both MinCapacity and BufferSize. Required field.
minCapacityint64
MinCapacity is the minimum aggregate Counter total capacity across the fleet.
If zero, MinCapacity is ignored.
If non zero, MinCapacity must be smaller than MaxCapacity and bigger than BufferSize.
BufferSize is the size of a buffer of counted items that are available in the Fleet (available
capacity). Value can be an absolute number (ex: 5) or a percentage of desired gs instances
(ex: 5%). An absolute number is calculated from percentage by rounding up.
Must be bigger than 0. Required field.
FleetAutoscaleRequest defines the request to webhook autoscaler endpoint
Field
Description
uidk8s.io/apimachinery/pkg/types.UID
UID is an identifier for the individual request/response. It allows us to distinguish instances of requests which are
otherwise identical (parallel requests, requests when earlier requests did not modify etc)
The UID is meant to track the round trip (request/response) between the Autoscaler and the WebHook, not the user request.
It is suitable for correlating log entries between the webhook and apiserver, for either auditing or debugging.
namestring
Name is the name of the Fleet being scaled
namespacestring
Namespace is the namespace associated with the request (if any).
ListPolicy controls the desired behavior of the List autoscaler policy.
Field
Description
keystring
Key is the name of the List. Required field.
maxCapacityint64
MaxCapacity is the maximum aggregate List total capacity across the fleet.
MaxCapacity must be bigger than both MinCapacity and BufferSize. Required field.
minCapacityint64
MinCapacity is the minimum aggregate List total capacity across the fleet.
If zero, it is ignored.
If non zero, it must be smaller than MaxCapacity and bigger than BufferSize.
BufferSize is the size of a buffer based on the List capacity that is available over the
current aggregate List length in the Fleet (available capacity). It can be specified either
as an absolute value (i.e. 5) or percentage format (i.e. 5%).
Must be bigger than 0. Required field.
WebhookPolicy controls the desired behavior of the webhook policy.
It contains the description of the webhook autoscaler service
used to form url which is accessible inside the cluster
Field
Description
urlstring
(Optional)
url gives the location of the webhook, in standard URL form
(scheme://host:port/path). Exactly one of url or service
must be specified.
The host should not refer to a service running in the cluster; use
the service field instead. The host might be resolved via external
DNS in some apiservers (e.g., kube-apiserver cannot resolve
in-cluster DNS as that would be a layering violation). host may
also be an IP address.
Please note that using localhost or 127.0.0.1 as a host is
risky unless you take great care to run this webhook on all hosts
which run an apiserver which might need to make calls to this
webhook. Such installs are likely to be non-portable, i.e., not easy
to turn up in a new cluster.
The scheme must be “https”; the URL must begin with “https://”.
A path is optional, and if present may be any string permissible in
a URL. You may use the path to pass an arbitrary string to the
webhook, for example, a cluster identifier.
Attempting to use a user or basic auth e.g. “user:password@” is not
allowed. Fragments (“#…”) and query parameters (“?…”) are not
allowed, either.
service is a reference to the service for this webhook. Either
service or url must be specified.
If the webhook is running within the cluster, then you should use service.
caBundle[]byte
(Optional)
caBundle is a PEM encoded CA bundle which will be used to validate the webhook’s server certificate.
If unspecified, system trust roots on the apiserver are used.
ClusterConnectionInfo defines the connection information for a cluster
Field
Description
clusterNamestring
Optional: the name of the targeted cluster
allocationEndpoints[]string
The endpoints for the allocator service in the targeted cluster.
If the AllocationEndpoints is not set, the allocation happens on local cluster.
If there are multiple endpoints any of the endpoints that can handle allocation request should suffice
secretNamestring
The name of the secret that contains TLS client certificates to connect the allocator server in the targeted cluster
namespacestring
The cluster namespace from which to allocate gameservers
serverCa[]byte
The PEM encoded server CA, used by the allocator client to authenticate the remote server.
ConnectionInfoIterator
ConnectionInfoIterator an iterator on ClusterConnectionInfo
Field
Description
currPriorityint
currPriority Current priority index from the orderedPriorities
[Stage: Beta]
[FeatureFlag:FleetAllocationOverflow]
Labels and/or Annotations to apply to overflowing GameServers when the number of Allocated GameServers is more
than the desired replicas on the underlying GameServerSet
(Alpha, CountsAndLists feature flag) The first Priority on the array of Priorities is the most
important for sorting. The Fleetautoscaler will use the first priority for sorting GameServers
by total Capacity in the Fleet and acts as a tie-breaker after sorting the game servers by
State and Strategy. Impacts scale down logic.
GameServer is the data structure for a GameServer resource.
It is worth noting that while there is a GameServerStatus Status entry for the GameServer, it is not
defined as a subresource - unlike Fleet and other Code Blind resources.
This is so that we can retain the ability to change multiple aspects of a GameServer in a single atomic operation,
which is particularly useful for operations such as allocation.
(Alpha, CountsAndLists feature flag) Counters provides the configuration for tracking of int64 values against a GameServer.
Keys must be declared at GameServer creation time.
(Alpha, CountsAndLists feature flag) Lists provides the configuration for tracking of lists of up to 1000 values against a GameServer.
Keys must be declared at GameServer creation time.
[Stage: Beta]
[FeatureFlag:FleetAllocationOverflow]
Labels and Annotations to apply to GameServers when the number of Allocated GameServers drops below
the desired replicas on the underlying GameServerSet
(Alpha, CountsAndLists feature flag) The first Priority on the array of Priorities is the most
important for sorting. The Fleetautoscaler will use the first priority for sorting GameServers
by total Capacity in the Fleet and acts as a tie-breaker after sorting the game servers by
State and Strategy. Impacts scale down logic.
AllocationOverflow specifies what labels and/or annotations to apply on Allocated GameServers
if the desired number of the underlying GameServerSet drops below the number of Allocated GameServers
attached to it.
Game server supports termination via SIGTERM:
- Always: Allow eviction for both Cluster Autoscaler and node drain for upgrades
- OnUpgrade: Allow eviction for upgrades alone
- Never (default): Pod should run to completion
[Stage: Beta]
[FeatureFlag:FleetAllocationOverflow]
Labels and/or Annotations to apply to overflowing GameServers when the number of Allocated GameServers is more
than the desired replicas on the underlying GameServerSet
(Alpha, CountsAndLists feature flag) The first Priority on the array of Priorities is the most
important for sorting. The Fleetautoscaler will use the first priority for sorting GameServers
by total Capacity in the Fleet and acts as a tie-breaker after sorting the game servers by
State and Strategy. Impacts scale down logic.
Replicas the total number of current GameServer replicas
readyReplicasint32
ReadyReplicas are the number of Ready GameServer replicas
reservedReplicasint32
ReservedReplicas are the total number of Reserved GameServer replicas in this fleet.
Reserved instances won’t be deleted on scale down, but won’t cause an autoscaler to scale up.
allocatedReplicasint32
AllocatedReplicas are the number of Allocated GameServer replicas
PortPolicy defines the policy for how the HostPort is populated.
Dynamic port will allocate a HostPort within the selected MIN_PORT and MAX_PORT range passed to the controller
at installation time.
When Static portPolicy is specified, HostPort is required, to specify the port that game clients will
connect to
containerstring
(Optional)
Container is the name of the container on which to open the port. Defaults to the game server container.
containerPortint32
ContainerPort is the port that is being opened on the specified container’s process
hostPortint32
HostPort the port exposed on the host for clients to connect to
[Stage: Beta]
[FeatureFlag:FleetAllocationOverflow]
Labels and Annotations to apply to GameServers when the number of Allocated GameServers drops below
the desired replicas on the underlying GameServerSet
(Alpha, CountsAndLists feature flag) The first Priority on the array of Priorities is the most
important for sorting. The Fleetautoscaler will use the first priority for sorting GameServers
by total Capacity in the Fleet and acts as a tie-breaker after sorting the game servers by
State and Strategy. Impacts scale down logic.
(Alpha, CountsAndLists feature flag) Counters provides the configuration for tracking of int64 values against a GameServer.
Keys must be declared at GameServer creation time.
(Alpha, CountsAndLists feature flag) Lists provides the configuration for tracking of lists of up to 1000 values against a GameServer.
Keys must be declared at GameServer creation time.
googleforgames/space-agon - Space Agon is a demo of Code Blind and
Open Match with a browser based game.
googleforgames/global-multiplayer-demo - A demo of a global scale multiplayer game using Code Blind, Open Match, Unreal Engine 5 and multiple Google Cloud products.
10 - Advanced
Advanced Guides, Techniques and walk-throughs
10.1 - Scheduling and Autoscaling
Scheduling and autoscaling go hand in hand, as where in the cluster GameServers are provisioned impacts how to autoscale fleets up and down (or if you would even want to)
The default scheduling strategy (Packed) is designed to work with the Kubernetes autoscaler out of the box.
The autoscaler will automatically add Nodes to the cluster when GameServers don’t have room to be scheduled on the
clusters, and then scale down when there are empty Nodes with no GameServers running on them.
This means that scaling Fleets up and down can be used to control the size of the cluster, as the cluster autoscaler
will adjust the size of the cluster to match the resource needs of one or more Fleets running on it.
To enable and configure autoscaling on your cloud provider, check their connector implementation,
or their cloud specific documentation.
Fleet autoscaling is the only type of autoscaling that exists in Code Blind. It is currently available as a
buffer autoscaling strategy or as a webhook driven strategy, such that you can provide your own autoscaling logic.
To facilitate autoscaling, we need to combine several concepts and functionality, as described below.
Allocation Scheduling
Allocation scheduling refers to the order in which GameServers, and specifically their backing Pods are chosen
from across the Kubernetes cluster within a given Fleet when allocation occurs.
Pod Scheduling
Each GameServer is backed by a Kubernetes Pod. Pod scheduling
refers to the strategy that is in place that determines which node in the Kubernetes cluster the Pod is assigned to,
when it is created.
Fleet Scale Down Strategy
Fleet Scale Down strategy refers to the order in which the GameServers that belong to a Fleet are deleted,
when Fleets are shrunk in size.
Fleet Scheduling
There are two scheduling strategies for Fleets - each designed for different types of Kubernetes Environments.
This is the default Fleet scheduling strategy. It is designed for dynamic Kubernetes environments, wherein you wish
to scale up and down as load increases or decreases, such as in a Cloud environment where you are paying
for the infrastructure you use.
It attempts to pack as much as possible into the smallest set of nodes, to make
scaling infrastructure down as easy as possible.
This affects the Cluster autoscaler, Allocation Scheduling, Pod Scheduling and Fleet Scale Down Scheduling.
Cluster Autoscaler
When using the “Packed” strategy, Code Blind will ensure that the Cluster Autoscaler doesn’t attempt to evict and move GameServerPods onto new Nodes during
gameplay.
If a gameserver can tolerate being evicted
(generally in combination with setting an appropriate graceful termination period on the gameserver pod) and you
want the Cluster Autoscaler to compact your cluster by evicting game servers when it would allow the Cluster
Autoscaler to reduce the number of nodes in the cluster, Controlling Disruption describes
how to choose the .eviction setting appropriate for your GameServer or Fleet.
Allocation Scheduling Strategy
Under the “Packed” strategy, allocation will prioritise allocating GameServers to nodes that are running on
Nodes that already have allocated GameServers running on them.
Pod Scheduling Strategy
Under the “Packed” strategy, Pods will be scheduled using the PodAffinity
with a preferredDuringSchedulingIgnoredDuringExecution affinity with hostname
topology. This attempts to group together GameServer Pods within as few nodes in the cluster as it can.
Note
The default Kubernetes scheduler doesn’t do a perfect job of packing, but it’s a good enough job for what we need -
at least at this stage.
Fleet Scale Down Strategy
With the “Packed” strategy, Fleets will remove ReadyGameServers from Nodes with the least number of Ready and
AllocatedGameServers on them. Attempting to empty Nodes so that they can be safely removed.
This Fleet scheduling strategy is designed for static Kubernetes environments, such as when you are running Kubernetes
on bare metal, and the cluster size rarely changes, if at all.
This attempts to distribute the load across the entire cluster as much as possible, to take advantage of the static
size of the cluster.
Note
Distributed scheduling does not set
a PodAffinity
on GameServerPods, and instead assumes that the default scheduler for your cluster will distribute the
GameServerPods across the cluster by default.
If your default scheduler does not do this, you may wish to set your own PodAffinity to spread the load across the
cluster, or update the default scheduler to provide this functionality.
This affects Allocation Scheduling, Pod Scheduling and Fleet Scale Down Scheduling.
Cluster Autoscaler
Since this strategy is not aimed at clusters that autoscale, this strategy does nothing for the cluster autoscaler.
Allocation Scheduling Strategy
Under the “Distributed” strategy, allocation will prioritise allocating GameServers to nodes that have the least
number of allocated GameServers on them.
Pod Scheduling Strategy
Under the “Distributed” strategy, Pod scheduling is provided by the default Kubernetes scheduler, which will attempt
to distribute the GameServerPods across as many nodes as possible.
Fleet Scale Down Strategy
With the “Distributed” strategy, Fleets will remove ReadyGameServers from Nodes with at random, to ensure
a distributed load is maintained.
10.2 - High Availability Code Blind
Learn how to configure your Code Blind services for high availability and resiliancy to disruptions.
High Availability for Code Blind Controller
The agones-controller responsibility is split up into agones-controller, which enacts the Code Blind control loop, and agones-extensions, which acts as a service endpoint for webhooks and the allocation extension API. Splitting these responsibilities allows the agones-extensions pod to be horizontally scaled, making the Code Blind control plane highly available and more resiliant to disruption.
Multiple agones-controller pods enabled, with a primary controller selected via leader election. Having multiple agones-controller minimizes downtime of the service from pod disruptions such as deployment updates, autoscaler evictions, and crashes.
Extension Pod Configrations
The agones-extensions binary has a similar helm configuration to agones-controller, see here. If you previously overrode agones.controller.* settings, you may need to override the same agones.extensions.* setting.
To change controller.numWorkers to 200 from 100 values and through the use of helm --set, add the follow to the helm command:
Important: This will not have any effect on any extensions values!
 ...
 --set agones.controller.numWorkers=200
 ...
An important configuration to note is the PodDisruptionBudget fields, agones.extensions.pdb.minAvailable and agones.extensions.pdb.maxUnavailable. Currently, the agones.extensions.pdb.minAvailable field is set to 1.
Deployment Considerations
Leader election will automatically be enabled and agones.controller.replicas is > 1. agones.controller.replicas defaults to 2.
The default configuration now deploys 2 agones-controller pods and 2 agones-extensions pods, replacing the previous single agones-controller pod setup. For example:
The number of replicas for agones-extensions can be set using helm variable agones.extensions.replicas, but the default is 2.
We expect the aggregate memory consumption of the pods will be slightly higher than the previous singleton pod, but as the responsibilities are now split across the pods, the aggregate CPU consumption should also be similar.
Game servers running on Code Blind may be disrupted by Kubernetes; learn how to control disruption of your game servers.
Disruption in Kubernetes
A Pod in Kubernetes may be disrupted for involuntary reasons, e.g. hardware failure, or voluntary reasons, such as when nodes are drained for upgrades.
By default, Code Blind assumes your game server should never be disrupted voluntarily and configures the Pod appropriately - but this isn’t always the ideal setting. Here we discuss how Code Blind allows you to control the two most significant sources of voluntary Pod evictions, node upgrades and Cluster Autoscaler, using the eviction API on the GameServer object.
Benefits of Allowing Voluntary Disruption
It’s not always easy to write your game server in a way that allows for disruption, but it can have major benefits:
Compaction of your cluster using Cluster Autoscaler can lead to considerable cost savings for your infrastructure.
Allowing automated node upgrades can save you management toil, and lowers the time it takes to patch security vulnerabilites.
Considerations
When discussing game server pod disruption, it’s important to keep two factors in mind:
TERM signal: Is your game server tolerant of graceful termination? If you wish to support voluntary disruption, your game server must handle the TERM signal (even if it runs to completion after receiving TERM).
Termination Grace Period: After receiving TERM, how long does your game server need to run? If you run to completion after receiving TERM, this is equivalent to the session length - if not, you can think of this as the cleanup time. In general, we bucket the grace period into “less than 10 minutes”, “10 minutes to an hour”, and “greater than an hour”. (See below if you are curious about grace period considerations.)
eviction API
The eviction API is specified as part of the GameServerSpec, like:
No to either: Does the game server support TERM and terminate within an hour?
Yes to both: Set safe: OnUpgrade, and configure terminationGracePeriodSeconds to the session length or cleanup time.
No to either: Set safe: Never. If your game server does not terminate within an hour, see below.
Note
To maintain backward compatibility with Code Blind prior to the introduction of eviction API, if your game server previously configured the cluster-autoscaler.kubernetes.io/safe-to-evict: true annotation, we assume eviction.safe: Always is intended.
Note
GKE Autopilot supports only Never and Always, not OnUpgrade.
What’s special about ten minutes and one hour?
Ten minutes: Cluster Autoscaler respects ten minutes of graceful termination on scale-down. On some cloud products, you can configure --max-graceful-termination-sec to change this, but it is not advised: Cluster Autoscaler is currently only capable of scaling down one node at a time, and larger graceful termination windows slow this down farther (see autoscaler#5079). If the ten minute limit does not apply to you, generally you should choose between safe: Always (for sessions less than an hour), or see below.
One hour: On many cloud products, PodDisruptionBudget can only block node upgrade evictions for a certain period of time - on GKE this is 1h. After that, the PDB is ignored, or the node upgrade fails with an error. Controlling Pod disruption for longer than one hour requires cluster configuration changes outside of Code Blind - see below.
Considerations for long sessions
Outside of Cluster Autoscaler, the main source of disruption for long sessions is node upgrade. On some cloud products, such as GKE Standard, node upgrades are entirely within your control. On others, such as GKE Autopilot, node upgrade is automatic. Typical node upgrades use an eviction based, rolling recreate strategy, and may not honor PodDisruptionBudget for longer than an hour. See Best Practices for information specific to your cloud product.
Implementation / Under the hood
Each option uses a slightly different permutation of:
the agones.dev/safe-to-evict label selector to select the agones-gameserver-safe-to-evict-falsePodDisruptionBudget. This blocks Cluster Autoscaler and (for a limited time) disruption from node upgrades.
Note that PDBs do influence pod preemption as well, but it’s not guaranteed.
Kubernetes natively has inbuilt capabilities for requesting and limiting both CPU and Memory usage of running containers.
As a short description:
CPU Requests are limits that are applied when there is CPU congestion, and as such can burst above their set limits.
CPU Limits are hard limits on how much CPU time the particular container gets access to.
This is useful for game servers, not just as a mechanism to distribute compute resources evenly, but also as a way
to advice the Kubernetes scheduler how many game server processes it is able to fit into a given node in the cluster.
It’s worth reading the Managing Compute Resources for Containers
Kubernetes documentation for more details on “requests” and “limits” to both CPU and Memory, and how to configure them.
GameServers
Since the GameServer specification provides a full PodSpecTemplate,
we can take advantage of both resource limits and requests in our GameServer configurations.
For example, to set a CPU limit on our GameServer configuration of 250m/0.25 of a CPU,
we could do so as followed:
apiVersion:"agones.dev/v1"kind:GameServermetadata:name:"simple-game-server"spec:ports:- name:defaultcontainerPort:7654template:spec:containers:- name:simple-game-serverimage:us-docker.pkg.dev/codeblind/examples/simple-server:0.27resources:limits:cpu:"250m"#this is our limit here
If you do not set a limit or request, the default is set by Kubernetes at a 100m CPU request.
SDK GameServer sidecar
You may also want to tweak the CPU request or limits on the SDK GameServer sidecar process that spins up alongside
each game server container.
You can do this through the Helm configuration when installing Code Blind.
By default, this is set to having a CPU request value of 30m, with no hard CPU limit. This ensures that the sidecar always has enough CPU
to function, but it is configurable in case a lower, or higher value is required on your clusters, or if you desire
hard limit.
10.5 - Out of Cluster Dev Server
Running and debugging server binary locally while connected to a full kubernetes stack
This section builds upon the topics discussed in local SDK Server, Local Game Server, and GameServer allocation (discussed here, here, and here).
Having a firm understanding of those concepts will be necessary for running an “out of cluster” local server.
Running an “out of cluster” dev server combines the best parts of local debugging and being a part of a cluster.
A developer will be able to run a custom server binary on their local machine, even within an IDE with breakpoints.
The server would also be allocatable within a cluster, allowing integration with the project’s full stack for handling game server lifetime.
For each run, the only manual steps required by the developer is to manually run the local SDK Server and to run their custom gameplay binary (each can easily be reused/restarted).
All other state progression will be automatically handled by the custom gameplay server (calling the SDK API), the SDK Server (handling the SDK calls), the cluster GameServer Controller (progressing specific states), and the cluster’s allocation system (whether be through GameServerAllocation or via the Allocator Service) – just as it would when running in a pod in a cluster!
Out of cluster development is a fantastic option during early prototyping, as it can (optionally) all be run on a single machine with tools such as Minikube.
The name “out of cluster” is to contrast InClusterConfig which is used in the internal golang kubeconfig API.
Prerequisite steps
To be able to run an “out of cluster” local game server, one needs to first complete a few prerequisite steps.
Cluster created
First, a cluster must have been created that the developer has access to through commands like kubectl.
This cluster could be running on a provider or locally (e.g. on Minikube).
See Create Kubernetes Cluster for more details on how to create a cluster, if not already done so.
Code Blind GameServer resource created
Out of cluster dev servers make use of local dev servers.
Follow the instructions there to create a GameServer resource for use with a local game server.
Note that the metadata:annotations:agones.dev/dev-address should be updated to point to the local machine, more details below around port forwarding.
SDK Server available
An “out of cluster” dev server requires the need to also run the SDK Server locally.
When a GameServer runs normally in a prod-like environment, the Code Blind cluster controller will handle initializing the containers which contain the SDK Server and the game server binary.
The game server binary will be able to connect over gRPC to the SDK Server running in the sidecar container.
When the game server binary makes SDK calls (e.g. SDK.Ready()), those get sent to the SDK Server via gRPC and the SDK Server as able to modify the GameServer resource in the cluster.
When the GameServer resource gets modified (either by the Code Blind cluster controller, by the Code Blind Allocation Service, or by the K8s API), the SDK Server is monitoring and sends update events over gRPC to the SDK API, resulting in a callback in the game server binary logic.
The goal of an “out of cluster” dev server is to keep all this prod-like functionality, even in a debuggable context.
To do so, the developer must run the SDK Server locally such that the (also local) game server binary can connect via gRPC.
Instructions for downloading and running the SDK Server can be found here.
However, instead of using --local or --file, the SDK Server will need to be run in “out of cluster” mode by providing a kubeconfig file to connect to the cluster. This section is focusing on getting the SDK Server ready to run locally, more detail about running it can be found below.
Game server binary available
When running Code Blind normally, the game server binary is inside a prebuilt docker image which is loaded into a container in a GameServer’s pod.
This can either be a custom, developer-created, docker image and contained binary or a sample image/binary from an external source.
This document will use the sample simple-game-server, which follows suit from various other documentation pages (e.g. Quickstart: Create a Game Server).
The simple-game-server can be run from the docker image us-docker.pkg.dev/codeblind/examples/simple-server:0.27.
The game server binary can either be run within a docker container or run locally, so long as all ports are published/forward – more on this below.
Alternatively, the simple-game-server can also be run from source code; see examples/simple-game-server/main.go. More details about running from source can be found here.
Disclaimer: Code Blind is run and tested with the version of Go specified by the GO_VERSION variable in the project’s build Dockerfile. Other versions are not supported, but may still work.
If a developer has their own game server logic, written in the language of their choice, that would be perfectly fine.
A custom game server can be similarly run within a docker container, run directly on commandline, or run via an IDE/debugger.
Forwarded Ports
As the game server binary will be run on the developer’s machine and a requesting client will attempt to connect to the game server via the GameServer’s metadata:annotations:agones.dev/dev-address and spec:ports:hostPort fields, the developer needs to ensure that connection can take place.
If the game server binary and the arbitrary connecting client logic are both on the same network, then connecting should work without any extra steps.
However, if the developer has a more complicated network configuration or if they are attempting to connect over the public internet, extra steps may be required.
Obviously, this document does not know what every developer’s specific network configuration is, how their custom game client(s) work, their development environment, and/or various other factors.
The developer will need to figure out which steps are necessary for their specific configuration.
If attempting to connect via the internet, the developer needs to set the GameServer’s metadata:annotations:agones.dev/dev-address field to their public IP.
This can be found by going to whatsmyip.org or whatismyip.com in a web browser.
The GameServer’s spec:ports:hostPort/spec:ports:containerPort should be set to whichever port the game server binary’s logic will bind to – the port used by simple-game-server is 7654 (by default).
The local network’s router must also be configured to forward this port to the desired machine; allowing inbound external requests (from the internet) to be directed to the machine on the network that is running the game server.
If the SDK Server is run on the same machine as the game server binary, no extra steps are necessary for the two to connect.
By default, the SDK API (in the game server binary) will attempt to gRPC connect to the SDK Server on localhost on the port 9357.
If the SDK Server is run on another machine, or if the SDK Server is set to use different ports (e.g. via commandline arguments), the developer will need to also take appropriate steps to ensure that the game server can connect to the SDK Server.
As discussed further below running the SDK Server with --address 0.0.0.0 can be quite helpful with various setups.
If the developer is running the SDK Server or the game server binary within docker container(s), then publishing ports and/or connecting to a docker network may be necessary.
Again, these configurations can vary quite dramatically and the developer will need to find the necessary steps for their specific setup.
Running “out of cluster” local game server
Now that all prerequisite steps have been completed, the developer should have:
A helpful (optional) step to see progress when running is to watch the GameServer resource.
This can be done with the command:
kubectl get --watch -n default gs my-local-server
It may be necessary to replace default and my-local-server with whichever namespace/name values are used by the dev GameServer created above).
With this command running, the terminal will automatically show updates to the GameServer’s state – however, this is not necessary to proceed.
Running SDK Server locally
The first step is to run the SDK Server, making it available for the (later run) game server binary to connect.
Here is a sample command to run the SDK Server, with each argument discussed after.
--gameserver-name is a necessary arg, passed instead of the GAMESERVER_NAME enviroment variable.
It is set to the name of the dev GameServer k8s resource.
It tells the SDK Sever which resource to read/write to on the k8s cluster.
This example value of my-local-server matches to the instructions for setting up a Local Game Server.
--pod-namespace is a necessary arg, passed instead of the POD_NAMESPACE enviroment variable.
It is set set to the namespace which the dev GameServer resides in.
It tells the SDK Sever which namespace to look under for the GameServer to read/write to on the k8s cluster.
This example value of default is used as most instructions in this documentation assumes GameServers to be created in the default namespace.
--kubeconfig tells the SDK Server how to connect to the k8s cluster.
This actually does not trigger any special flow (unlike --local or --file).
The SDK Server will run just as it would when created in a sidecar container in a k8s cluster.
Passing this argument simply provides where to connect along with the credentials to do so.
This example value of "$HOME/.kube/config" is the default location for k8s authentication information. This requires the developer be logged in via kubectl and have the desired cluster selected via kubectl config use-context.
--address specifies the binding IP address for the SDK Server’s SDK API.
By default, the binding address is localhost. This may be difficult for some development setups.
Overriding this value changes which IP address(es) the server will bind to for receiving gRPC/REST SDK API calls.
This example value of 0.0.0.0 sets the SDK Server to receive API calls that are sent to any IP address (that reach the machine).
--graceful-termination set to false will disable some smooth state transitions when exiting.
By default, the SDK Server will wait until the GameServer has reached the Shutdown state before exiting (“graceful termination”).
This will cause the SDK Server to hang (waiting on state update) when attempting to terminate (e.g. with ^C).
When running binaries in a development context, quickly exiting and restarting the SDK Server is handy.
This can easily be terminated with ^C and restarted as necessary.
Note that terminating the SDK Server while the game server binary (discussed in the next section) is using it may result in failure to update/watch GameServer state and may result in a runtime error in the game server binary.
Running game server binary locally
Now that the SDK Server is running locally with k8s credentials, the game server binary can run in an integrated fashion.
The game server binary’s SDK calls will reach the local SDK Server, which will then interact with the GameServer resource on the k8s cluster.
Again, this document will make use of simple-game-server via its docker image, but running directly or use of a custom game server binary is just as applicable.
Run the game server binary with the command:
docker run --rm --network="host" us-docker.pkg.dev/codeblind/examples/simple-server:0.27
The --rm flag will nicely autoclean up the docker container after exiting.
The --network="host" flag will tell the docker container to use the host’s network stack directly; this allows calls to localhost to reach the SDK Server.
The commands and flags used will likely differ if running a custom game server binary.
If the earlier kubectl get --watch command was run, it will now show the GameServer progressed to the RequestReady state, which will automatically be progressed to the Ready state by the Code Blind controller on the cluster.
The GameServer state can further be modified by SDK calls, gRPC/REST calls, allocation via either GameServerAllocation or Allocator Service, K8s API calls, etc.
These changes will be shown by the kubectl get --watch command.
These changes will also be picked up by the game server binary, if there is a listener registered through the SDK API.
This means that this GameServer can be allocated just as it would be when running completely on k8s, but it can be locally debugged.
If the server crashes or is killed by the developer, it can easily be restarted.
This can be done without restarting the SDK Server or any other manual intevention with the GameServer resource.
Naturally, this may have implications on any connected clients, but that is project specific and left to the developer to handle.
10.6 - Allocator Service
Code Blind provides an mTLS based allocator service that is accessible from outside the cluster using a load balancer. The service is deployed and scales independent to Code Blind controller.
To allocate a game server, Code Blind provides a gRPC and REST service with mTLS authentication, called agones-allocator that can be used instead of
GameServerAllocations.
Both gRPC and REST are accessible through a Kubernetes service that can be externalized using a load balancer. By default, gRPC and REST are served from the same port. However, either service can be disabled or the services can be served from separate ports using the helm configuration.
If you require a fully compatible or feature compatible gRPC server implementation, you must separate the gRPC port from the REST port or disable the REST service.
For requests to either service to succeed, a client certificate must be provided that is in the authorization list of the allocator service.
The remainder of this article describes how to manually make a successful allocation request using the API.
The guide assumes you have command line tools installed for jq, go and openssl.
GameServerAllocation vs Allocator Service
There are several reasons you may prefer to use the Allocator Service over the GameServerAllocation custom resource
definition, depending on your architecture and requirements:
Want to create Allocations from outside the Code Blind Kubernetes cluster.
Prefer SSL based authentication over Kubernetes RBAC.
Prefer a gRPC or REST based API over an integration with the
Kubernetes API.
Find the external IP
The service is hosted under the same namespace as the Code Blind controller. To find the external IP of your allocator service, replace agones-system namespace with the namespace to which Code Blind is deployed and execute the following command:
kubectl get service agones-allocator -n agones-system
The output of the command should look like:
NAME                        TYPE           CLUSTER-IP      EXTERNAL-IP     PORT(S)            AGE
agones-allocator            LoadBalancer   10.55.251.73    34.82.195.204   443:30250/TCP      7d22h
Server TLS certificate
If the agones-allocator service is installed as a LoadBalancerusing a reserved IP, a valid self-signed server TLS certificate is generated using the IP provided. Otherwise, the server TLS certificate should be replaced. If you installed Code Blind using helm, you can easily reconfigure the allocator service with a preset IP address by setting the agones.allocator.service.loadBalancerIP parameter to the address that was automatically assigned to the service and helm upgrade:
The parameter used to automatically
replace the certificate changed in Code Blind 1.18.0. If you are using an older
version of Code Blind you should pass the parameter
agones.allocator.http.loadBalancerIP instead. If you need your script to work
with both older and newer versions of Code Blind, you can pass both parameters as
only one of them will effect the helm chart templates.
Another approach is to replace the default server TLS certificate with a certificate with CN and subjectAltName. There are multiple approaches to generate a certificate. Code Blind recommends using cert-manager.io solution for cluster level certificate management.
In order to use the cert-manager solution, first install cert-manager on the cluster.
Then, configure an Issuer/ClusterIssuer resource and
last configure a Certificate resource to manage allocator-tls Secret.
Make sure to configure the Certificate based on your system’s requirements, including the validity duration.
Here is an example of using a self-signed ClusterIssuer for configuring allocator-tls Secret:
#!/bin/bash
# Create a self-signed ClusterIssuercat <<EOF | kubectl apply -f -
apiVersion: cert-manager.io/v1
kind: ClusterIssuer
metadata:
name: selfsigned
spec:
selfSigned: {}
EOFEXTERNAL_IP=$(kubectl get services agones-allocator -n agones-system -o jsonpath='{.status.loadBalancer.ingress[0].ip}')# for EKS use hostname# HOST_NAME=$(kubectl get services agones-allocator -n agones-system -o jsonpath='{.status.loadBalancer.ingress[0].hostname}')# Create a Certificate with IP for the allocator-tls secretcat <<EOF | kubectl apply -f -
apiVersion: cert-manager.io/v1
kind: Certificate
metadata:
name: allocator-tls
namespace: agones-system
spec:
commonName: ${EXTERNAL_IP}
ipAddresses:
- ${EXTERNAL_IP}
secretName: allocator-tls
issuerRef:
name: selfsigned
kind: ClusterIssuer
EOF# Wait for the allocator-tls Secretsleep 1TLS_CA_VALUE=$(kubectl get secret allocator-tls -n agones-system -ojsonpath='{.data.ca\.crt}')# Add ca.crt to the allocator-tls-ca Secretkubectl get secret allocator-tls-ca -o json -n agones-system | jq '.data["tls-ca.crt"]="'${TLS_CA_VALUE}'"'| kubectl apply -f -
echo$TLS_CA_VALUE| base64 -d > ca.crt
# In case of MacOS# echo $TLS_CA_VALUE | base64 -D > ca.crt
Bring Your Own Certificates (advanced)
If you would like to completely manage the tls secrets outside of helm, you can create them in the namespace where agones is going to be installed, and then set the helm value agones.allocator.disableSecretCreation to true. This method will also work with the cert-manager method, as long as your certificate and secret are created ahead of time, and you populate the allocator-tls-ca and allocator-client-ca yourself.
Client Certificate
Because agones-allocator uses an mTLS authentication mechanism, a client must provide a certificate that is accepted by the server.
If Code Blind is installed using Helm, you can leverage a default client secret, allocator-client.default, created in the game server namespace and allowlisted in allocator-client-ca Kubernetes secret. You can extract and use that secret for client side authentication, by following the allocation example.
Otherwise, here is an example of generating a client certificate using openssl.
The last command creates a new entry in the secret data map for allocator-client-ca for the client CA. This is for the agones-allocator service to accept the newly generated client certificate.
Send allocation request
After setting up agones-allocator with server certificate and allowlisting the client certificate, the service can be used to allocate game servers. Make sure you have a fleet with ready game servers in the game server namespace.
Set the environment variables and store the client secrets before allocating using gRPC or REST APIs:
NAMESPACE=default # replace with any namespaceEXTERNAL_IP=$(kubectl get services agones-allocator -n agones-system -o jsonpath='{.status.loadBalancer.ingress[0].ip}')KEY_FILE=client.key
CERT_FILE=client.crt
TLS_CA_FILE=ca.crt
# allocator-client.default secret is created only when using helm installation. Otherwise generate the client certificate and replace the following.# In case of MacOS replace "base64 -d" with "base64 -D"kubectl get secret allocator-client.default -n "${NAMESPACE}" -ojsonpath="{.data.tls\.crt}"| base64 -d > "${CERT_FILE}"kubectl get secret allocator-client.default -n "${NAMESPACE}" -ojsonpath="{.data.tls\.key}"| base64 -d > "${KEY_FILE}"kubectl get secret allocator-tls-ca -n agones-system -ojsonpath="{.data.tls-ca\.crt}"| base64 -d > "${TLS_CA_FILE}"
Using gRPC
To start, take a look at the allocation gRPC client examples in
golang and
C# languages. In the following, the
golang gRPC client example is used to allocate a Game Server in the default namespace.
#!/bin/bash
go run examples/allocator-client/main.go --ip ${EXTERNAL_IP}\
--port 443\
--namespace ${NAMESPACE}\
--key ${KEY_FILE}\
--cert ${CERT_FILE}\
--cacert ${TLS_CA_FILE}
The service accepts a metadata field, which can be used to apply labels and annotations to the allocated GameServer. The old metaPatch fields is now deprecated, but can still be used for compatibility. If both metadata and metaPatch fields are set, metaPatch is ignored.
Secrets Explained
agones-allocator has a dependency on three Kubernetes secrets:
allocator-tls - stores the server certificate.
allocator-client-ca - stores the allocation authorized client CA for mTLS to allowlist client certificates.
allocator-tls-ca (optional) - stores allocator-tls CA.
The separation of CA secret from the private secret is for the security reason to avoid reading the private secret, while retrieving the allocator CA that is used by the allocation client to validate the server. It is optional to set or maintain the allocator-tls-ca secret.
Troubleshooting
If you encounter problems, explore the following potential root causes:
Check server certificate - Using openssl you can get the certificate chain for the server.
Inspect the server certificate by storing the certificate returned, under Server certificate and validating using openssl x509 -in tls.crt -text -noout.
Make sure the certificate is not expired and the Subject Alternative Name is set.
If the issuer is CN = allocation-ca, the certificate is generated using Code Blind helm installation.
Check client certificate
You may get an error such as rpc error: code = Unavailable desc = all SubConns are in TransientFailure, latest connection error: connection closed, make sure your client certificate is allowlisted by being added to allocator-client-ca.
kubectl get secret allocator-client-ca -o json -n agones-system
If the server certificate is not accepted by the client, you may get an error such as rpc error: code = Unavailable desc = all SubConns are in TransientFailure, latest connection error: connection error: desc = "transport: authentication handshake failed: x509: certificate signed by unknown authority", depending on the client. In this case, verify that the TLS CA file matches the server certificate.
kubectl get secret allocator-tls -n agones-system -ojsonpath="{.data.tls\.crt}"| base64 -d > tls.crt
openssl verify -verbose -CAfile ca.crt tls.crt
tls.crt: OK
kubectl get service agones-allocator -n agones-system
agones-allocator   LoadBalancer   10.55.248.14   34.82.195.204    443:32468/TCP   6d23h
API Reference
The AllocationService API is located as a gRPC service
here. Additionally, the REST API is available as a
Swagger API.
10.7 - Multi-cluster Allocation
In order to allow allocation from multiple clusters, Code Blind provides a mechanism to set redirect rules for allocation requests to the right cluster.
There may be different types of clusters, such as on-premise, and Google Kubernetes Engine (GKE), used by a game to help with the cost-saving and availability.
For this purpose, Code Blind provides a mechanism to define priorities on the clusters. Priorities are defined on
GameServerAllocationPolicy agones CRD. A matchmaker can enable the multi-cluster rules on a request and target agones-allocator endpoint in any of the clusters and get resources allocated on the cluster with the highest priority. If the cluster with the highest priority is overloaded, the allocation request is redirected to the cluster with the next highest priority.
The remainder of this article describes how to enable multi-cluster allocation.
Define Cluster Priority
GameServerAllocationPolicy is the CRD defined by Code Blind for setting multi-cluster allocation rules. In addition to cluster priority, it describes the connection information for the target cluster, including the game server namespace, agones-allocator endpoint and client K8s secrets name for redirecting the allocation request. Game servers will be allocated from clusters with the lowest priority number. If there are no available game servers available in clusters with the lowest priority number, they will be allocated from clusters with the next lowest priority number. For clusters with the same priority, the cluster is chosen with a probability relative to its weight.
Here is an example of setting the priority for a cluster and it’s connection rules. One such resource should be defined per cluster.
In the following example the policy is defined for cluster B in cluster A.
To define the local cluster priority a GameServerAllocationPolicy should be defined without an allocationEndpoints field. If the local cluster priority is not defined, the allocation from the local cluster happens only if allocation from other clusters with the existing allocation rules is unsuccessful.
Allocation requests with multi-cluster allocation enabled but with only the local cluster available (e.g. in development) must have a local cluster priority defined, or the request fails with the error “no multi-cluster allocation policy is specified”.
The namespace field in connectionInfo is the namespace that the game servers will be allocated in, and must be a namespace in the target cluster that has been previously defined as allowed to host game servers. The Namespace specified in the allocation request (below) is used to refer to the namespace that the GameServerAllocationPolicy itself is located in.
serverCa is the server TLS CA public certificate, set only if the remote server certificate is not signed by a public CA (e.g. self-signed). If this field is not specified, the certificate can also be specified in a field named ca.crt of the client secret (the secret referred to in the secretName field).
Establish trust
To accept allocation requests from other clusters, agones-allocator for cluster B should be configured to accept the client’s certificate from cluster A and the cluster A’s client should be configured to accept the server TLS certificate, if it is not signed by a public Certificate Authority (CA).
Follow the steps to configure the agones allocator gRPC service. The client certificate pair in the mentioned document is stored as a K8s secret. Here are the secrets to set:
To enable multi-cluster allocation, set multiClusterSetting.enabled to true in
allocation.proto and send allocation requests. For more information visit agones-allocator. In the following, using
allocator-client sample, a multi-cluster allocation request is sent to the agones-allocator service. If the allocation succeeds, the AllocationResponse will contain a
Source field which indicates the endpoint of the remote agones-allocator.
Set the environment variables and store the client secrets before allocating using gRPC or REST APIs
#!/bin/bash
NAMESPACE=default # replace with any namespaceEXTERNAL_IP=$(kubectl get services agones-allocator -n agones-system -o jsonpath='{.status.loadBalancer.ingress[0].ip}')KEY_FILE=client.key
CERT_FILE=client.crt
TLS_CA_FILE=ca.crt
# allocator-client.default secret is created only when using helm installation. Otherwise generate the client certificate and replace the following.# In case of MacOS replace "base64 -d" with "base64 -D"kubectl get secret allocator-client.default -n "${NAMESPACE}" -ojsonpath="{.data.tls\.crt}"| base64 -d > "${CERT_FILE}"kubectl get secret allocator-client.default -n "${NAMESPACE}" -ojsonpath="{.data.tls\.key}"| base64 -d > "${KEY_FILE}"kubectl get secret allocator-tls-ca -n agones-system -ojsonpath="{.data.tls-ca\.crt}"| base64 -d > "${TLS_CA_FILE}"
#!/bin/bash
go run examples/allocator-client/main.go --ip ${EXTERNAL_IP}\
--namespace ${NAMESPACE}\
--key ${KEY_FILE}\
--cert ${CERT_FILE}\
--cacert ${TLS_CA_FILE}\
--multicluster true
If you encounter problems, explore the following potential root causes:
Make sure single cluster allocation works for each cluster using this troubleshooting.
For each cluster, make sure there is a GameServerAllocationPolicy resource defined in the game server cluster.
Inspect the .spec.connectionInfo for GameServerAllocationPolicy for each cluster. Use the cluster connection information in that field to verify that single cluster allocation works. Use the information to verify the connection:
POLICY_NAME=<policy-name>
POLICY_NAMESPACE=<policy-namespace>

NAMESPACE=$(kubectl get gameserverallocationpolicy ${POLICY_NAME} -n ${POLICY_NAMESPACE} -ojsonpath={.spec.connectionInfo.namespace})
EXTERNAL_IP=$(kubectl get gameserverallocationpolicy ${POLICY_NAME} -n ${POLICY_NAMESPACE} -ojsonpath={.spec.connectionInfo.allocationEndpoints\[0\]})
CLIENT_SECRET_NAME=$(kubectl get gameserverallocationpolicy ${POLICY_NAME} -n ${POLICY_NAMESPACE} -ojsonpath={.spec.connectionInfo.secretName})

KEY_FILE=client.key
CERT_FILE=client.crt
TLS_CA_FILE=ca.crt

# In case of MacOS replace "base64 -d" with "base64 -D"
kubectl get secret "${CLIENT_SECRET_NAME}" -n "${POLICY_NAMESPACE}" -ojsonpath="{.data.tls\.crt}" | base64 -d > "${CERT_FILE}"
kubectl get secret "${CLIENT_SECRET_NAME}" -n "${POLICY_NAMESPACE}" -ojsonpath="{.data.tls\.key}" | base64 -d > "${KEY_FILE}"
kubectl get secret "${CLIENT_SECRET_NAME}" -n "${POLICY_NAMESPACE}" -ojsonpath="{.data.ca\.crt}" | base64 -d > "${TLS_CA_FILE}"
#!/bin/bash
go run examples/allocator-client/main.go --ip ${EXTERNAL_IP}\
--port 443\
--namespace ${NAMESPACE}\
--key ${KEY_FILE}\
--cert ${CERT_FILE}\
--cacert ${TLS_CA_FILE}
10.8 - GameServer Pod Service Accounts
RBAC permissions and service accounts for the GameServer Pod.
Default Settings
By default, Code Blind sets up service accounts and sets them appropriately for the Pods that are created for GameServers.
Since Code Blind provides GameServerPods with a sidecar container that needs access to Code Blind Custom Resource Definitions,
Pods are configured with a service account with extra RBAC permissions to ensure that it can read and modify the resources it needs.
Since service accounts apply to all containers in a Pod, Code Blind will automatically overwrite the mounted key for the
service account in the container that is running the dedicated game server in the backing Pod. This is done
since game server containers are exposed publicly, and generally don’t require the extra permissions to access aspects
of the Kubernetes API.
Bringing your own Service Account
If needed, you can provide your own service account on the Pod specification in the GameServer configuration.
Warning
If you bring your own Service Account, it’s your responsibility to ensure it matches all the RBAC permissions
the GameServerPod usually acquires from Code Blind by default, otherwise GameServers can fail.
The default RBAC permissions for can be found in the
installation
YAML on GitHub and can be used for a reference.
For example:
apiVersion:"agones.dev/v1"kind:GameServermetadata:generateName:"simple-game-server-"spec:ports:- name:defaultcontainerPort:7654template:spec:serviceAccountName:my-special-service-account# a custom service accountcontainers:- name:simple-game-serverimage:us-docker.pkg.dev/codeblind/examples/simple-server:0.27
If a service account is configured, the mounted key is not overwritten, as it assumed that you want to have full control
of the service account and underlying RBAC permissions.
11 - Frequently Asked Questions
Architecture
What is the relationship between a Kubernetes Pod and an Code Blind GameServer?
Code Blind creates a backing Pod with the appropriate configuration parameters for each GameServer that is configured in
the cluster. They both have the same name if you are ever looking to match one to the other.
Can I reuse a GameServer for multiple game sessions?
Yes.
Code Blind is inherently un-opinionated about the lifecycle of your game. When you call
SDK.Allocate() you are
protecting that GameServer instance from being scaled down for the duration of the Allocation. Typically, you would
run one game session within a single allocation. However, you could allocate, and run N sessions on a single
GameServer, and then de-allocate/shutdown at a later time.
How can I return an Allocated GameServer to the Ready state?
If you wish to return an Allocated GameServer to the Ready state, you can use the
SDK.Ready() command whenever it
makes sense for your GameServer to return to the pool of potentially Allocatable and/or scaled down GameServers.
What are some common patterns for integrating the SDK with a Game Server Binary?
In-Engine
Integrate the SDK directly with the dedicated game server, such that it is part of the same codebase.
Sidecar
Use a Kubernetes sidecar pattern to run the SDK
in a separate process that runs alongside your game server binary, and can share the disk and network namespace.
This game server binary could expose its own API, or write to a shared file, that the sidecar process
integrates with, and can then communicate back to Code Blind through the SDK.
Wrapper
Write a process that wraps the game server binary, and intercepts aspects such as the foreground log output, and
use that information to react and communicate with Code Blind appropriately.
This can be particularly useful for legacy game servers or game server binaries wherein you do not have access to
the original source. You can see this in both the
Xonotic and
SuperTuxKart examples.
What if my engine / language of choice does not have a supported SDK, what can I do?
Game Server SDKs are a thin wrapper around either REST or gRPC clients, depending on language or platform, and can be
used as examples.
How can I pass data to my Game Server binary on Allocation?
A GameServerAllocation has a spec.metadata section,
that will apply any configured Labels
and/or Annotations to a requested
GameServer at Allocation time.
The game server binary can watch for the state change to Allocated, as well as changes to the GameServer metadata,
through SDK.WatchGameServer().
Combining these two features allows you to pass information such as map data, gameplay metadata and more to a game
server binary at Allocation time, through Code Blind functionality.
Do note, that if you wish to have either the labels or annotations on the GameServer that are set via a GameServerAllocation to be editable by the game server binary with the Code Blind SDK, the label key will need to
be prefixed with agones.dev/sdk-.
See SDK.SetLabel()
and SDK.SetAnnotation() for more information.
How can I expose information from my game server binary to an external service?
This information is then queryable via the Kubernetes API,
and can be used for game specific, custom integrations.
If my game server requires more states than what Code Blind provides (e.g. Ready, Allocated, Shutdown, etc), can I add my own?
If you want to track custom game server states, then you can utilise the game server client SDK
SDK.SetLabel()
and SDK.SetAnnotation() functionality to
expose these custom states to outside systems via your own labels and annotations.
This information is then queryable via the Kubernetes API, and
can be used for game specific state integrations with systems like matchmakers and more.
How large can an Code Blind cluster be? / How many GameServers can be supported in a single cluster?
The answer to this question is “it depends” 😁.
As a rule of thumb, we recommend clusters no larger than 500 nodes, based on production workloads.
That being said, this is highly dependent on Kubernetes hosting platform, control plane resources, node resources,
requirements of your game server, game server session length, node spin up time, etc, and therefore you
should run your own load tests against your hosting provider to determine the optimal cluster size for your game.
We recommend running multiple clusters for your production GameServer workloads, to spread the load and
provide extra redundancy across your entire game server fleet.
Network
How are IP addresses allocated to GameServers?
Each GameServer inherits the IP Address of the Node on which it resides. If it can find an ExternalIP address on
the Node (which it should if it’s a publicly addressable Node), that it utilised, otherwise it falls back to using the
InternalIP address.
How do I use the DNS name of the Node?
If the Kubernetes nodes have an ExternalDNS record, then it will be utilised as the GameServer address
preferentially over the ExternalIP node record.
How is traffic routed from the allocated Port to the GameServer container?
This opens a port on the host Node and routes traffic to the container
via iptables or
ipvs, depending on host
provider and/or network overlay.
In worst case scenarios this routing can add an extra 0.5ms latency to UDP packets, but that is extremely rare.
Why did you use hostPort and not hostNetwork for your networking?
The decision was made not to use hostNetwork, as the benefits of having isolated network namespaces between
game server processes give us the ability to run
sidecar containers, and provides an extra layer of
security to each game server process.
Performance
How big an image can I use for my GameServer?
We routinely see users running container images that are multiple GB in size.
The only downside to larger images, is that they can take longer to first load on a Kubernetes node, but that can be
managed by your
Fleet and
Fleet Autoscaling
configuration to ensure this load time is taken into account on a new Node’s container initial load.
How quickly can Code Blind spin up new GameServer instances?
When running Code Blind on GKE, we have verified that an Code Blind cluster can start up
to 10,000 GameServer instances per minute (not including node creation).
This number could vary depending on the underlying scaling capabilities
of your cloud provider, Kubernetes cluster configuration, and your GameServer Ready startup time, and
therefore we recommend you always run your own load tests for your specific game and game server containers.
Architecture
Can’t we use a Deployment or a StatefulSet for game server workloads?
Kubernetes Deployments were built for
unordered, stateless workloads. That is, workloads that are essentially homogeneous
between each instance, and therefore it doesn’t matter which order they are scaled up, or scaled down.
A set of web servers behind the same load balancer are a perfect example of this. The configuration and application
code between instances is the same, and as long as there are enough replicas to handle the requests coming through a
load balancer, if we scale from 10 to 5, it doesn’t matter which ones are removed and in which order.
Kubernetes StatefulSets
were built for ordered, stateful workloads. That is, workloads in which each instance is
essentially heterogeneous, and for reliability and predictability it’s extremely important that scale up happens in
order (0 ,1, 2, 3) and scaling down happens in reverse (3, 2, 1, 0).
Databases are a great use case for a StatefulSet, since (depending on the database), instance 0 may be the primary,
and instances 1, 2, 3+ may be replicas. Knowing that the order of scale up and down is completely reliable to both
ensure that the correct disk image is in place, but also allow for appropriate synchronisation between a primaries
and/or replicas can occur, and no downtime occurs.
Dedicated, authoritative game server workloads are sometimes stateful, and while
not ordered/unordered, game servers are prioritised for both scale down and allocation for player usage.
Game servers are sometimes stateful, because their state only matters if players are playing on them. If no players
are playing on a game server, then it doesn’t matter if it gets shut down, or replaced, since nobody will notice.
But they are stateful (most often in-memory state, for the game simulation) when players are playing on them, and
therefore can’t be shutdown while that is going on.
Game Server workloads are also prioritised, in that the order of demarcating game servers for player connection
and also on game server scale down impact optimal usage of the hosting infrastructure.
For example, in Cloud based workloads, you will want to pack the game servers that have players on them as tightly
as possible across as few Nodes as possible, while on scale down, will want to prioritise removing game servers from Nodes that are the most empty to create empty Nodes that then can be deleted - thereby using the least amount of
infrastructure as possible.
So while one might be able to use Deployments and/or StatefulSets to run game server workloads, it will be extremely
hard (impossible? 🤔) to run as optimally as a tailored solution such as Code Blind.
Ecosystem
Is there an example of Code Blind and other project working together?
Yes! There are several! Check out both our
official
and third party examples!
12 - Third Party Content
Content created by our community
12.1 - Third Party Videos and Presentations
Community contributed videos and presentations on Code Blind.
Presentations
Large-Scale Multiplayer Gaming on Kubernetes (Cloud Next ‘19)
Code Blind: Scaling Multiplayer Game Servers with Open Source (GDC 2019)
Intro to Code Blind: Scaling Multiplayer Game Servers with Kubernetes (Kubecon, 2018)
Google Cloud Next ‘18 London: Carl Dionne, Development Director at Ubisoft Montreal
Code Blind: Scaling Multiplayer Dedicated Game Servers with Kubernetes (Cloud Next ‘18)
Screencasts
Code Blind: How Do I Docker and Kubernetes? (Part 1 & Part 2)
12.2 - Third Party Examples
Community contributed Dedicated Game Server examples on Code Blind.
Minetest is a free and open-source sandbox video game available for Linux, FreeBSD,
Microsoft Windows, MacOS, and Android. Minetest game play is very similar to that of Minecraft. Players explore a blocky 3D world, discover and extract raw materials, craft tools and items, and build structures and landscapes.
Minetest server for Code Blind is an example of the Minetest
server hosted on Kubernetes using Code Blind. It wraps the Minetest server with a Go binary, and introspects stdout to provide the event hooks for the SDK integration. The wrapper is from Xonotic Example with a few changes to look for the Minetest ready output message.
You will need to download the Minetest client separately to play.
Quilkin
Quilkin is a non-transparent UDP proxy specifically designed for use with large scale multiplayer dedicated game server deployments, to ensure security, access control, telemetry data, metrics and more.
You will need to download the Xonotic client to interact with the demo.
Shulker
Shulker is a Kubernetes operator for managing complex and dynamic Minecraft
infrastructure at scale, including game servers and proxies.
It builds on top Code Blind GameServer and Fleet primitives to provide simplified abstractions specifically tailored
to orchestrating Minecraft workloads.
Shulker requires you to have a genuine Minecraft account. You’ll need to purchase the game
to test the “Getting Started” example.
Minikube Code Blind Cluster - Automates the creation of a complete Kubernetes/Code Blind Cluster locally, using Xonotic as a sample gameserver. Intended to provide a local environment for developers which approximates a production Code Blind deployment.
13 - Documentation Editing and Contribution
How to contribute to the docs
Writing Documentation
We welcome contributions to documentation!
Running the site
If you clone the repository and run make site-server from the build directory, this will run the live hugo server,
running as a showing the next version’s content and upcoming publishedDate’d content as well. This is likely to be
the next releases’ version of the website.
To show the current website’s view, run it as make site-server ENV=RELEASE_VERSION=1.38.0 ARGS=
Platform
This site and documentation is built with a combination of Hugo, static site generator,
with the Docsy theme for open source documentation.
Since we may want to update the existing documentation for a given release, when writing documentation,
you will likely want to make sure it doesn’t get published until the next release.
There are two approaches for hiding documentation for upcoming features, such that it only gets published when the
version is incremented on the release:
At the Page Level
Use publishDate and expiryDate in Hugo Front Matter to control
when the page is displayed (or hidden). You can look at the Release Calendar
to align it with the next release
candidate release date - or whichever release is most relevant.
Within a Page
We have a feature shortcode that can be used to show, or hide sections of pages based on the current semantic version
(set in config.toml, and overwritable by env variable).
For example, to show a section only from 1.24.0 forwards:
{{% feature publishVersion="1.24.0" %}}
This is my special content that should only display >= 1.24.0
{{% /feature %}}
or to hide a section from 1.24.0 onward:
{{% feature expiryVersion="1.24.0" %}}
This is my special content that will be hidden >= 1.24.0
{{% /feature %}}
Regenerate Diagrams
To regenerate the PlantUML or Dot diagrams,
delete the .png version of the file in question from /static/diagrams/, and run make site-images.