This is the blog section. It has two categories: News and Releases.
Files in these directories will be listed in reverse chronological order.
This is the multi-page printable view of this section. Click here to print.
This is the blog section. It has two categories: News and Releases.
Files in these directories will be listed in reverse chronological order.
Greetings tech enthusiasts and developers! Today, we continue our journey to secure services running on our Mighty Pi Cloud. This post digs into the details of ensuring we keep private communication private introducing CloudFlare using Let’s Encrypt certificates into our setup.

The journey to secure our services running on our RPi5 MicroK8s cluster is both nostalgic and illuminating. Back in my college days, a group of us experimented with network sniffers using libpcap, a groundbreaking technology at the time. Security was a whimsical concept then — or should I say really nonexistent. Placing a computer Network Interface Card (NIC) in promiscuous mode allowed us to listen to all traffic on the Local Area Network (LAN). If you can believe, most internet traffic traversed using Hypertext Transfer Protocol (HTTP), with sites often employing Basic Authentication for username and password login — essentially transmitting sensitive information in plain text across the network and around the globe! It was interesting times indeed! 😱
Fortunately, the landscape evolved, and HTTPS (Hypertext Transfer Protocol Secure) emerged as the de facto standard for web communication, with major pushes for its adoption beginning in the mid-2000s. In July of 2018 Google released Chrome 68, which marked all HTTP only sites as "Not Secure" in the browser’s address bar. This embarrassment applied significant pressure on website owners to transition to HTTPS.
Today, ensuring that our services support HTTPS and Transport Layer Security (TLS) is monitory. HTTPS adds an essential layer of security to the standard HTTP protocol by encrypting data exchanged between clients (such as web browsers) and servers (such as websites), safeguarding sensitive information such as login credentials, credit card details, and personal healthcare information.
In this post, we explore how we enhance the CIA of our environment, but using Let’s Encrypt certificates for TLS, and improve our security posture by adding Cloudflare in front our our platform.
Before we proceed, let’s touch on the fundamental principles of information security — Confidentiality, Integrity, and Availability (CIA). These principles guide the design, implementation, and maintenance of secure systems.
TLS is a cryptographic protocol at the heart of secure communication over networks, playing a pivotal role in keeping our data secret while in transit. It ensures privacy, data integrity, and authentication between communicating applications. Let’s break down its key components and functionalities:
Using Cloudflare can significantly enhance the availability aspect of the CIA (Confidentiality, Integrity, and Availability) security triad in several ways:
DDoS Protection: Cloudflare provides robust Distributed Denial of Service (DDoS) protection, which helps ensure the availability of our services by mitigating large-scale attacks that could otherwise overwhelm your infrastructure. By leveraging Cloudflare, we can maintain the availability of our services even under heavy attack.
DNS Management: Cloudflare’s DNS management services provide advanced features such as DNSSEC (Domain Name System Security Extensions) and Anycast routing, which improve the availability and security of the DNS infrastructure. This helps us mitigate DNS-related attacks, such as DDoS attacks and DNS spoofing.
Cloudflare’s had a much larger, comprehensive suite of security and performance solutions - however for the purpose of this article, these two features help us achieve the CIA level protection we need.
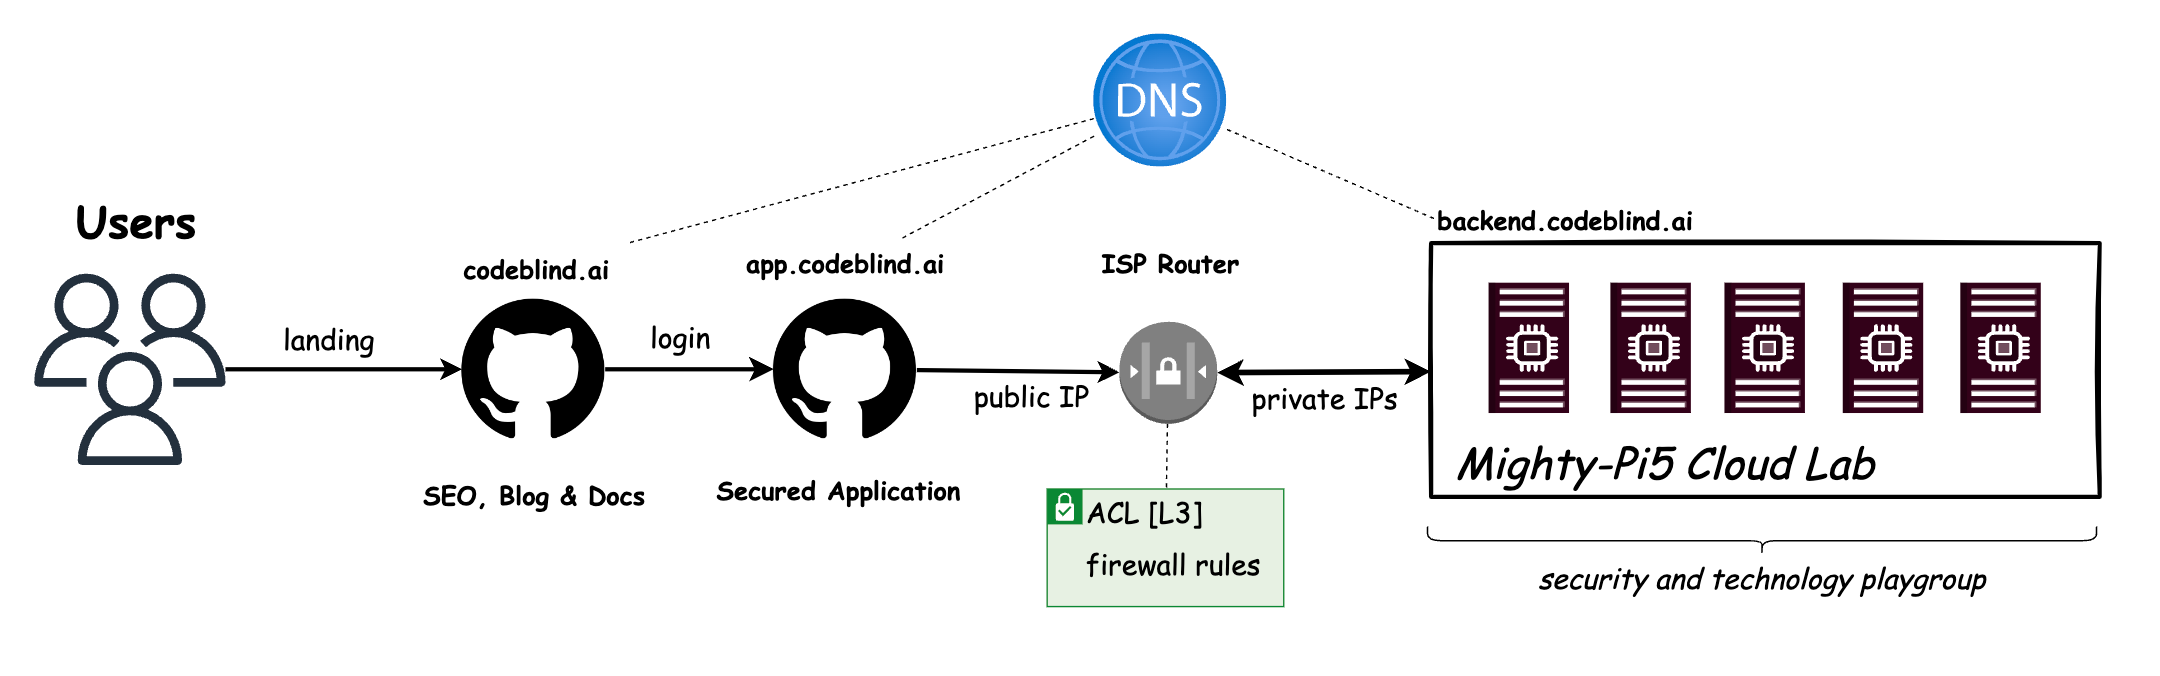
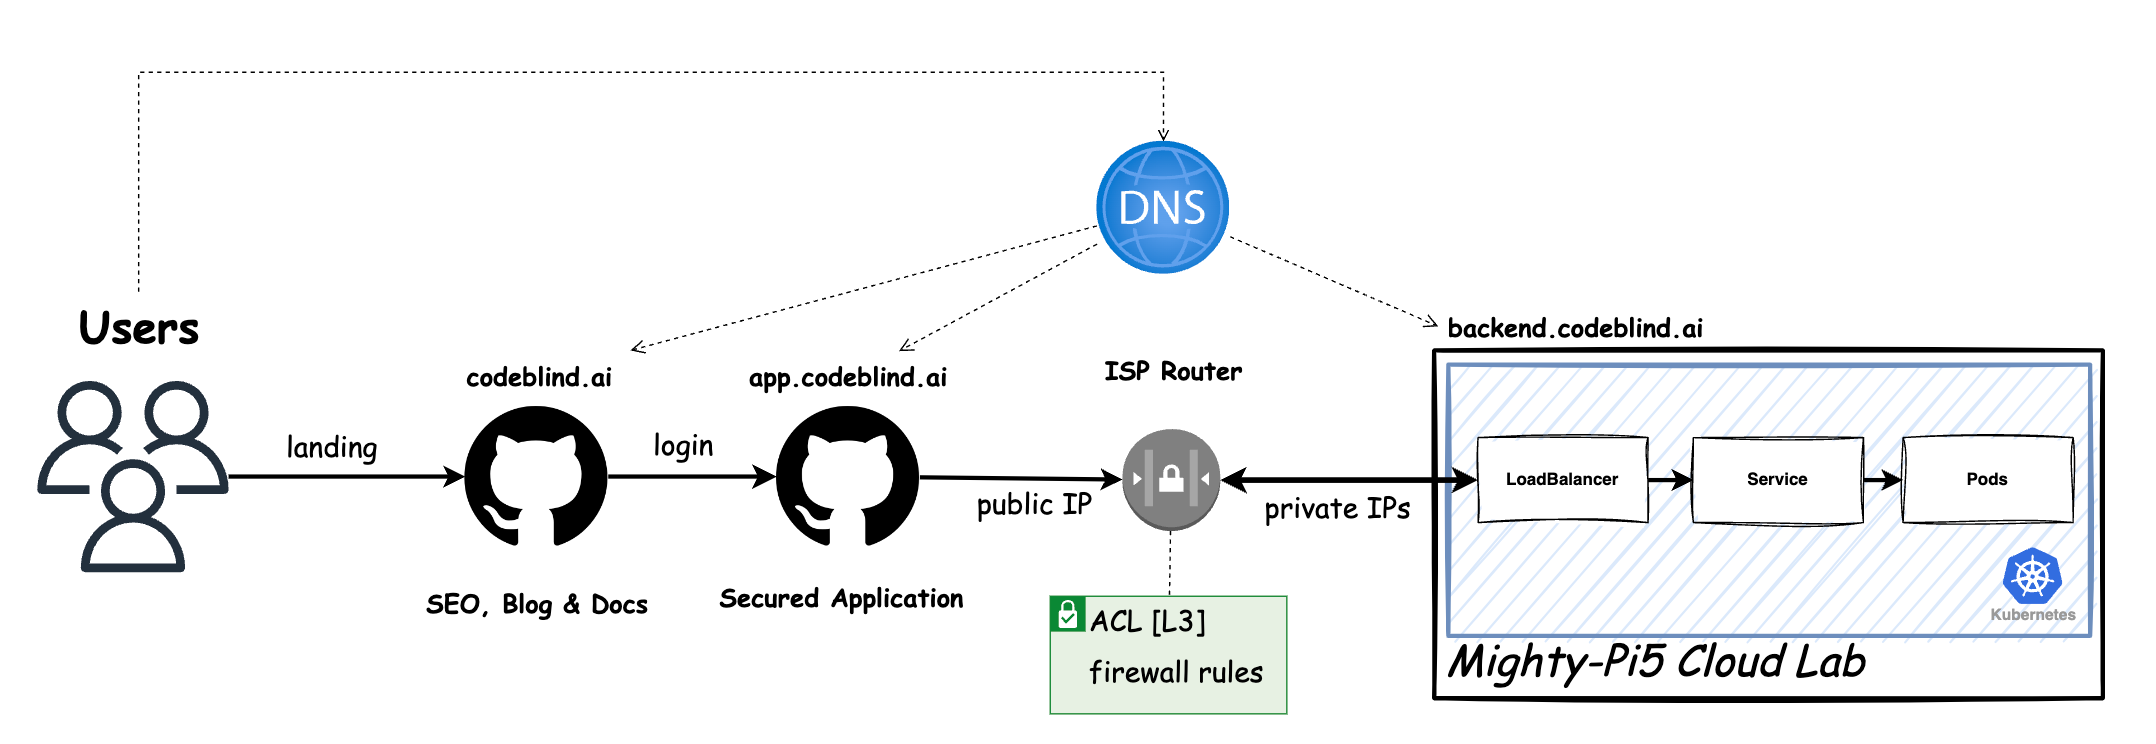
Currently, our “Might RPi Cloud Lab” looks a lot like the diagram above. It is a cluster of Raspberry Pi5 nodes running Kubernetes - with Load Balancer support provided by MetalLB.
In the diagram above, we define the plan of this blog - which is a little intimidating to look at - so lets break it down.
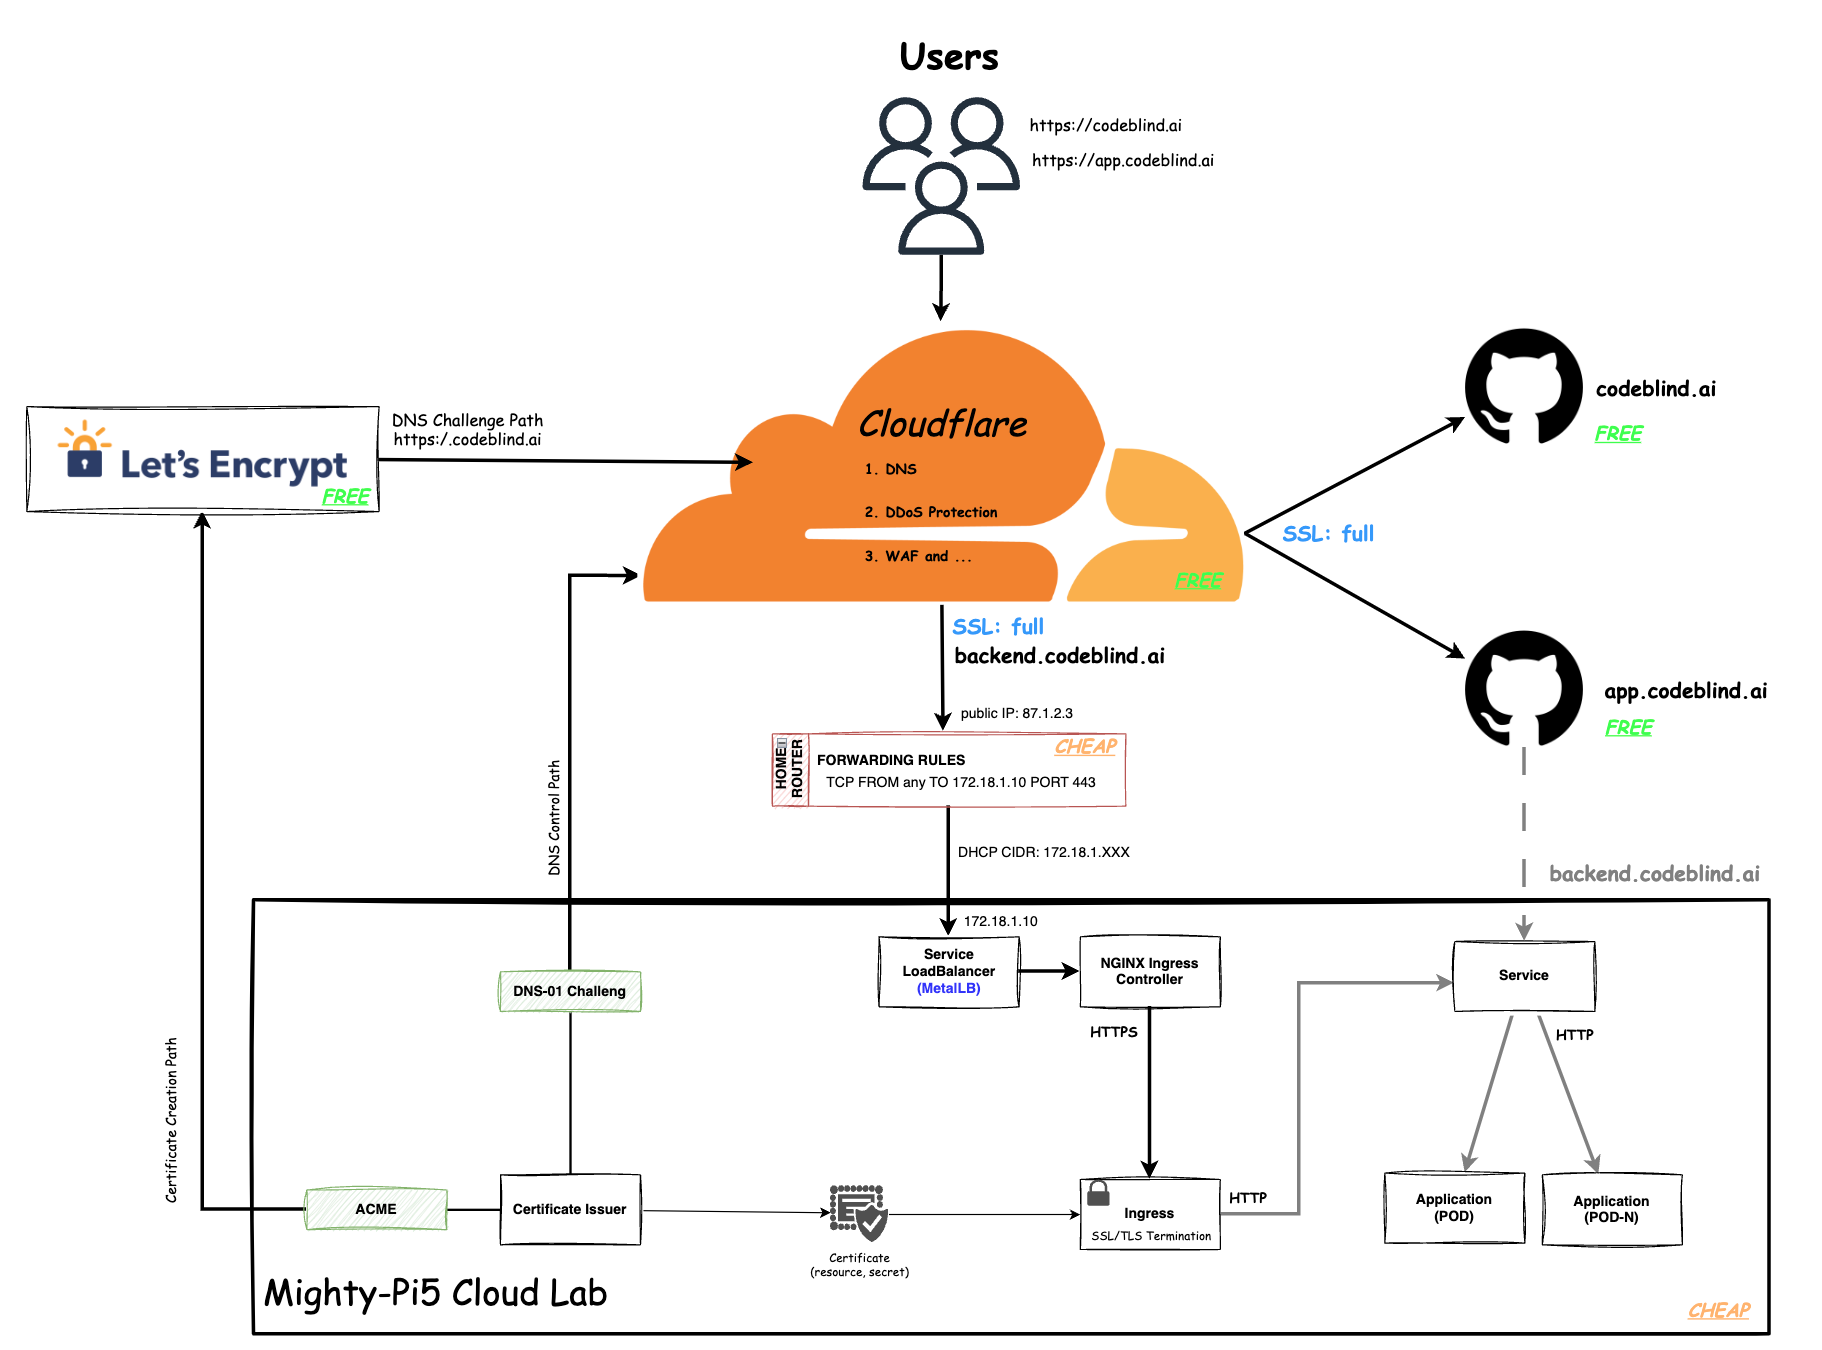
app.codeblind.ai.cert-manager we can ensure the certificates are rotated automatically as we - saving us from performing the task manually.Putting this all together, we should be able to provide a secure and highly available API service for the frontend SPA. Let’s get building.
To realize the architecture above we first need to start at the CloudFlare and our Domain Name Provider.
If you don’t have an account, create one - it is free for hobby projects (❤️ Thank you cloudflare). Next you need to configure CloudFlare to provide DNS resolution for your domain name. They have a fantastic guide in their documentation which has specialized instructions for most Domain Name Registrars; so I won’t repeat it here.
Hurry and complete that configuration… I will wait 😊
Note this setup assumes you have already deployed a static site on github pages. During that process you mapped your DNS to point to your site at the registrar, and in github pages for a custom domain name (codeblind.ai in my case). When we configure SSL on Cloudflare - we would normally set
full or strictmode to ensure no routing loops). However when using our private cloud we will run into a few issues which we resolve later. You have been warned…
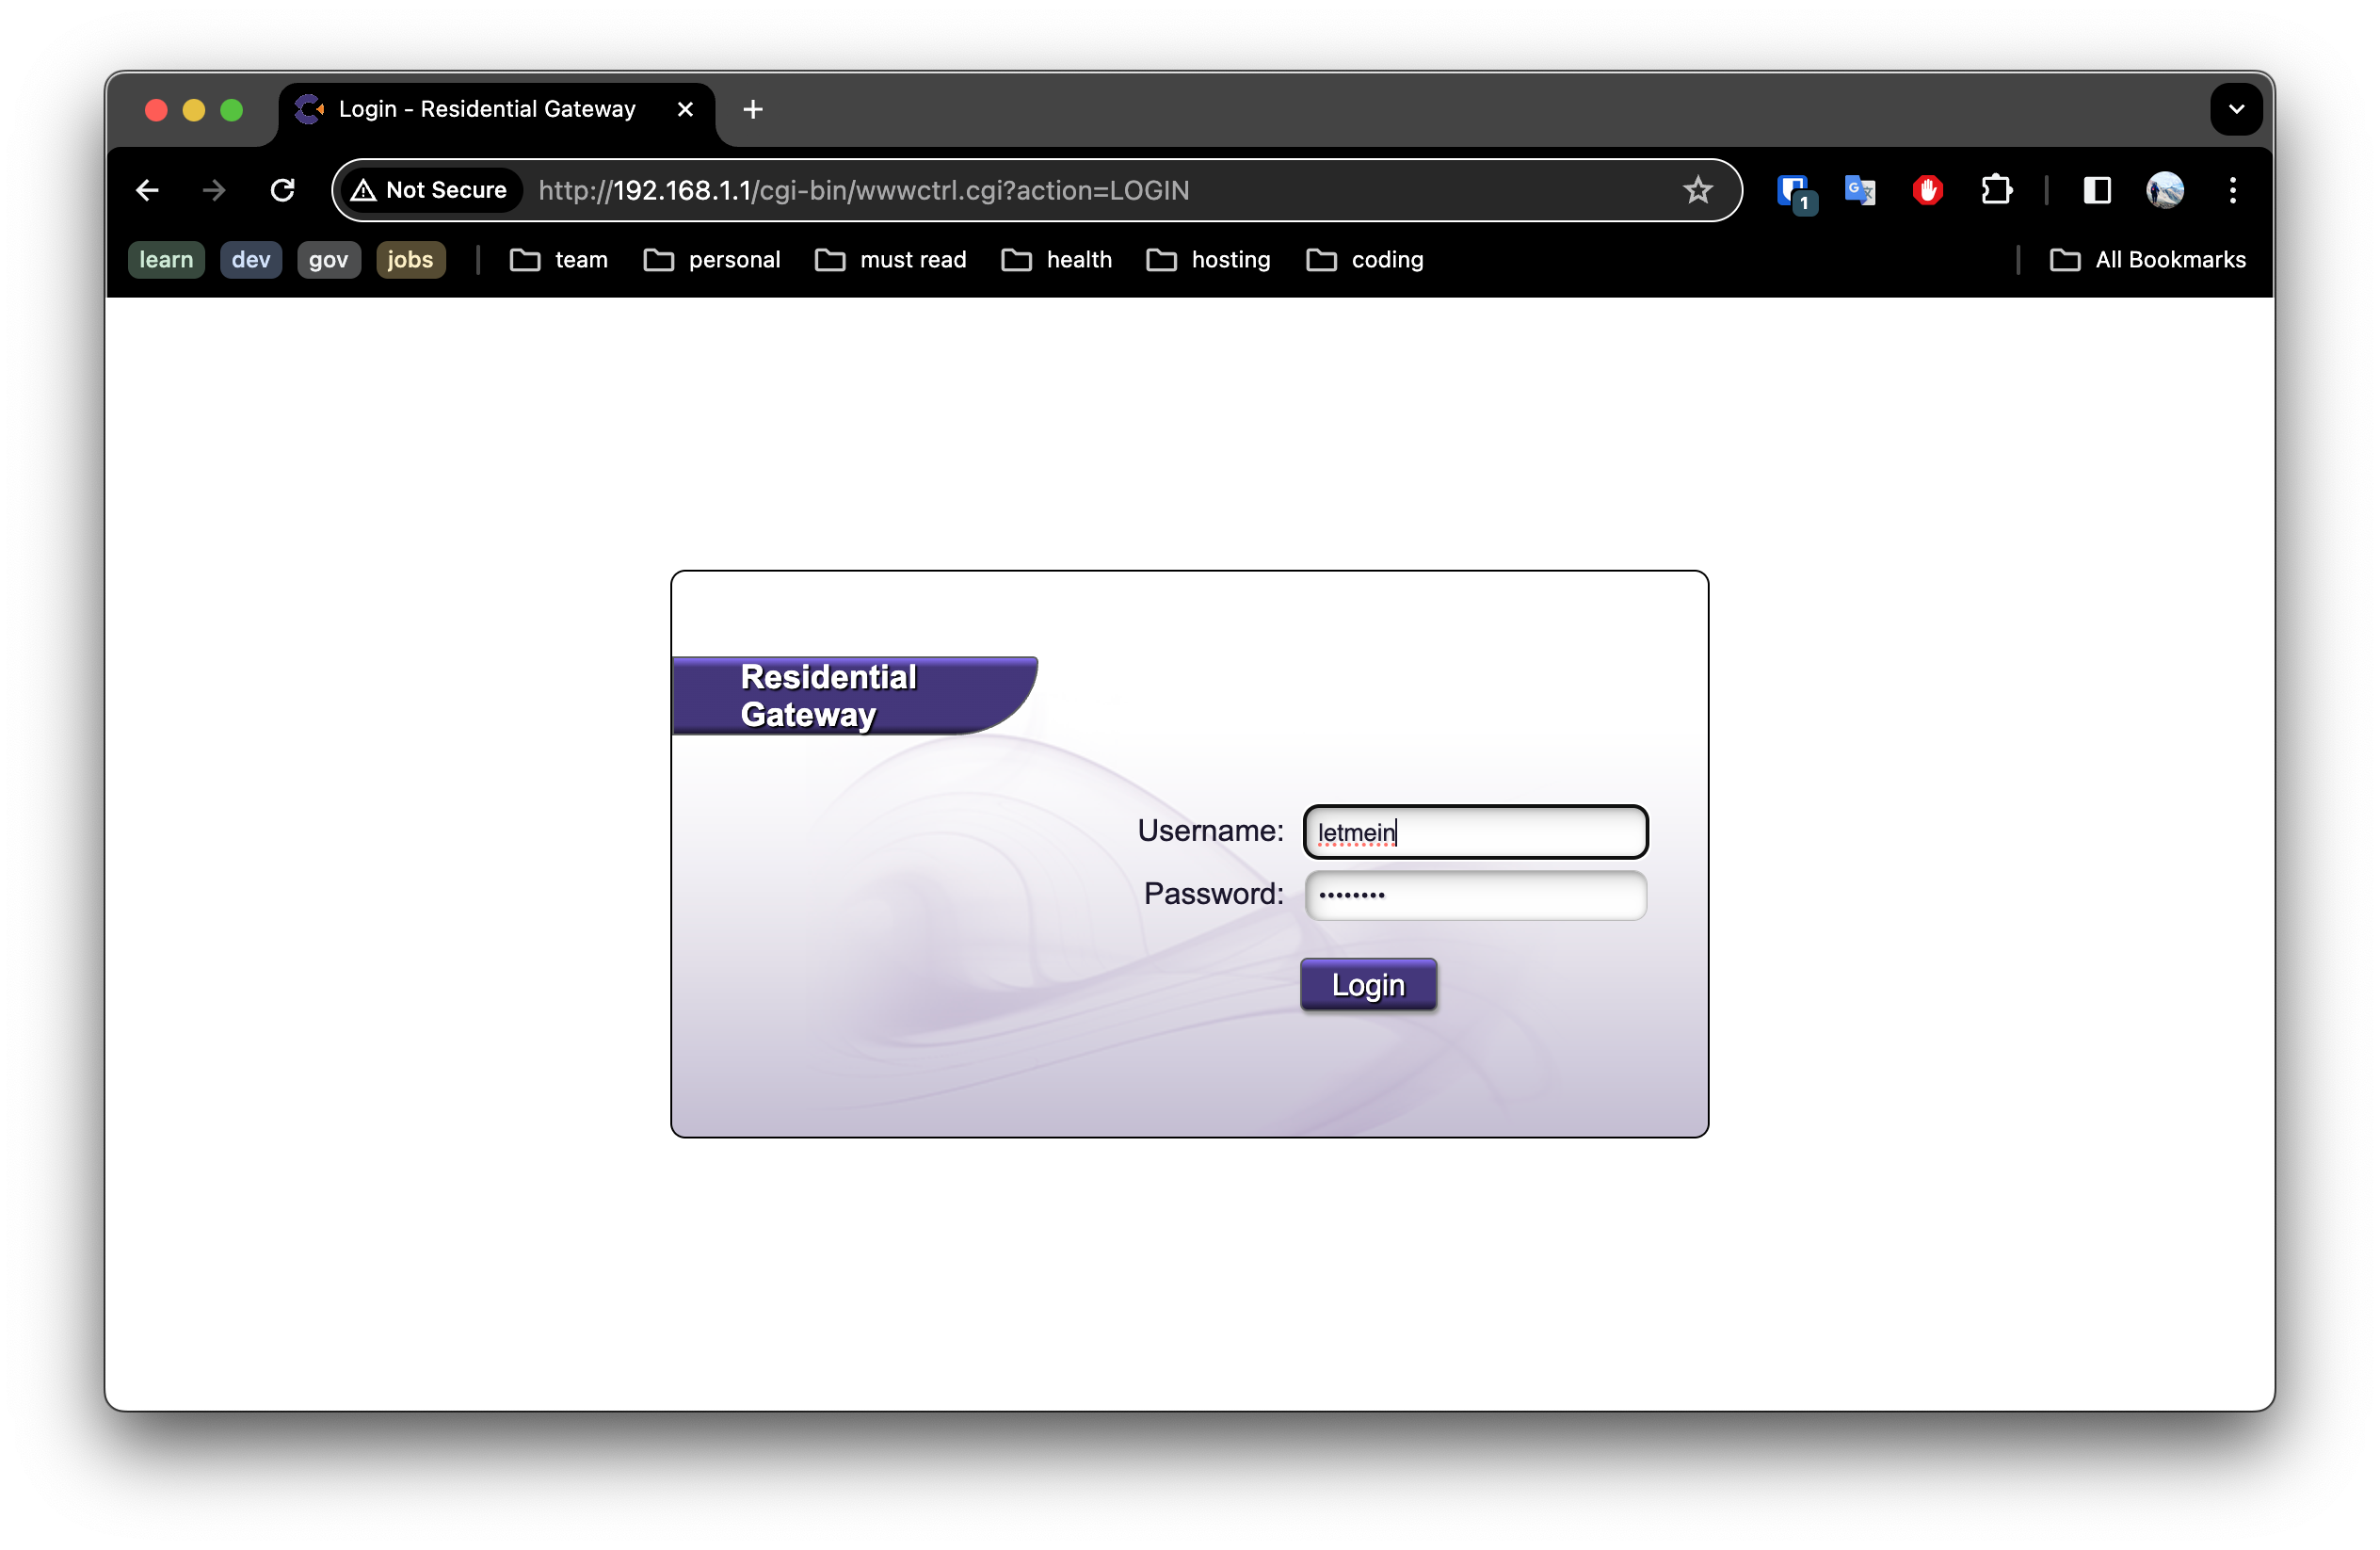
Any guide I provide here is likely to not work for your specific case. I recommend looking at your router, and hopefully admin login information is available on a sticker on the router itself.
Once you login, with a bit of luck you will find two things:
Note this guide assume you have that configured correctly. Since this is our first service, metalLB will chose the first address in the reserved range.
Note from a security standpoint, and operations standpoint this is not ideal. We don’t want to have to isolate ranges of IPs, nor open up firewall rules for each service we deploy. In a later post we will remove this burden by using
Cloudflare Tunnels. However that will have to wait, we are busy learning after all…
Our MicroK8s cluster provides us the ability to start applications, but until now we have not needed to secure communication.
In Kubernetes, cert-manager can be used to automate the creation of certificates for TLS workloads in our Kubernetes cluster and renews the certificates before they expire.
cert-manager setup on MicroK8s is a breeze, simple run:
microk8s enable cert-manager
Alternatively (note I did this), you could use the official installation by running:
kubectl apply -f https://github.com/jetstack/cert-manager/releases/download/v1.14.4/cert-manager.yaml
This command fetches the YAML manifest for cert-manager from the official Jetstack GitHub repository and applies it to your Kubernetes cluster. Find the latest release version available, on the releases page, and replace it in URL (eg.
v1.14.4) before running the command.This way you don’t have to worry about an old version supplied by MicroK8S.
MicroK8s provides a ready to use NGINX Ingress controller. You can enable it by running:
microk8s enable ingress
Using the built in ingress gives you a well configured NGINX ingress controller and a compatible internal dns configuration for network communication between pods. Note there are many different ingress controllers available, but NGINX will work find for what we need to accomplish today.
So far, setup has hopefully been very easy. Now the fun begins. 🙈
We first need to create a ClusterIssuer. A ClusterIssuer is a microservice in the cluster which another service can use to allocate a certificate.
We will use Let’s Encrypt (LE) so we get trusted certificates for free. There are two ways to get verified before a certificate is issued:
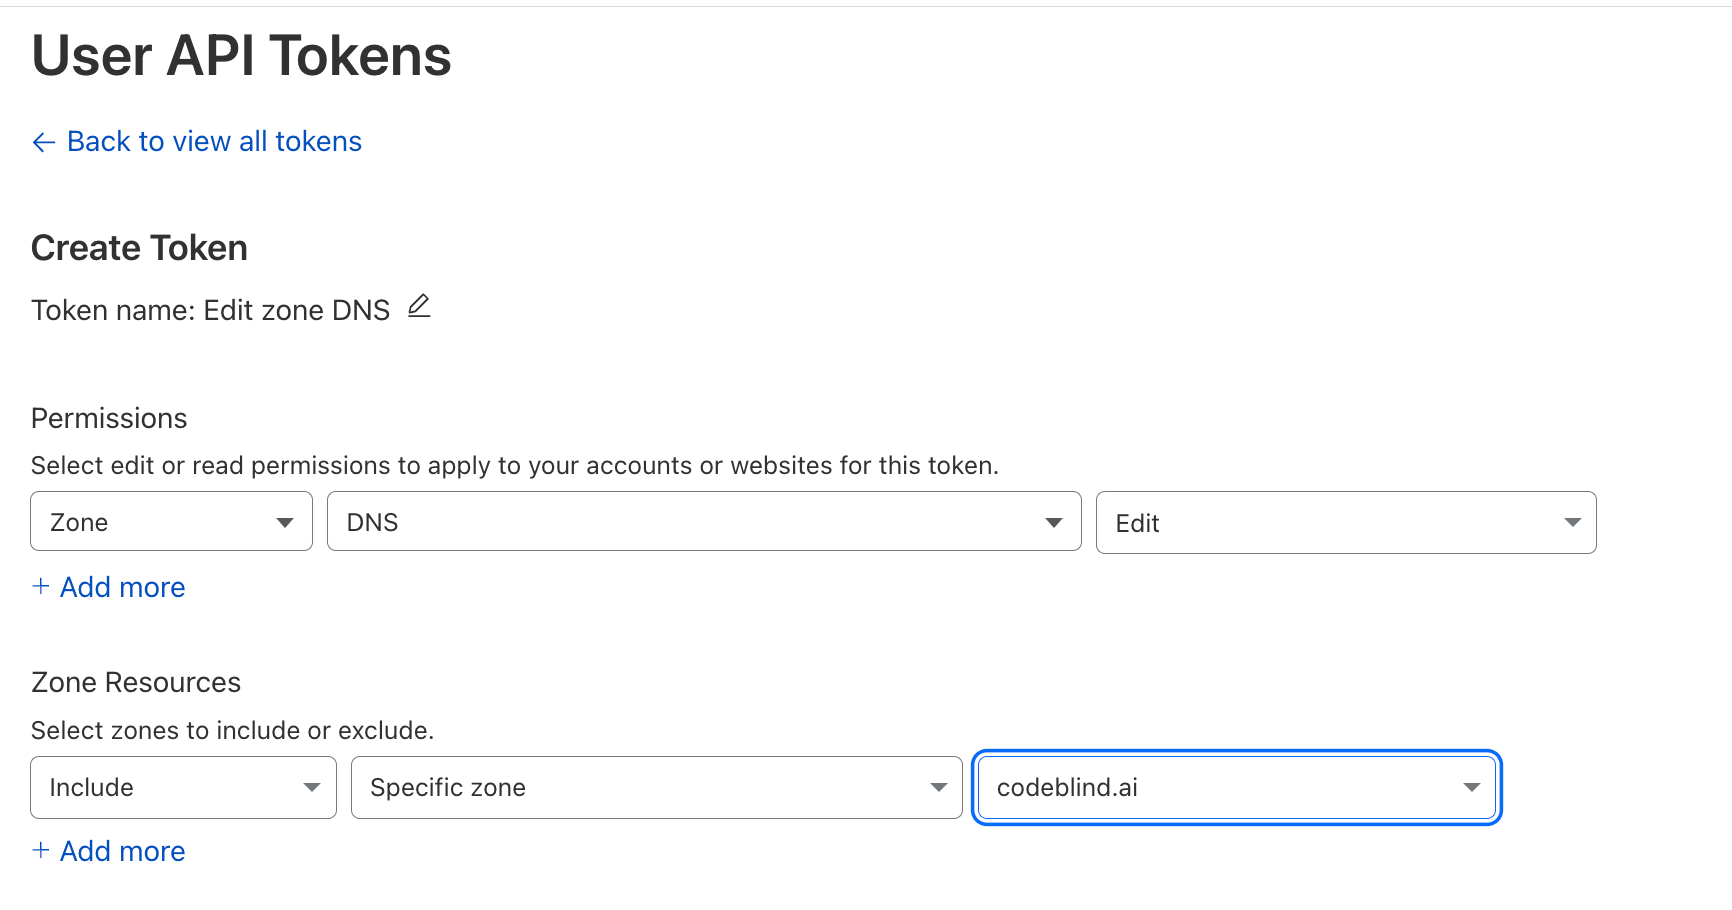
To allow the ClusterIssuer to modify records at Cloudflare, we must provide it with an API Key with enough permissions to modify the DNS records for the domain.
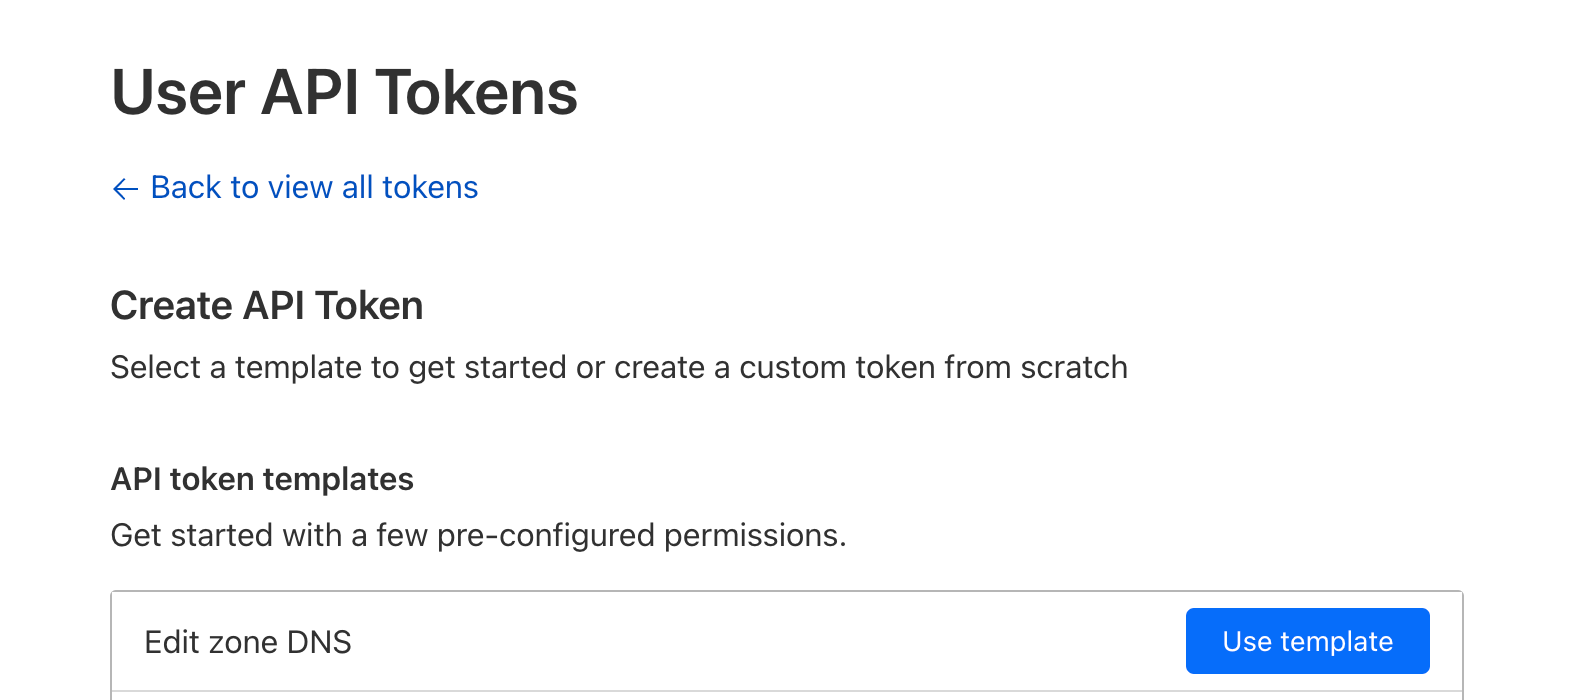
Zone:DNS:Edit and Include:Specific Zone:{your domain name}
IMPORTANT save this token somewhere safe. You will need it in the next step
Assuming you are going to place the Certificate Issuer in the cert-manager namespace, do the following:
kubectl create secret \
        -n cert-manager \
        generic cloudflare-api-key-secret \
        --dry-run=client \
        -o yaml \
        --from-literal=api-key={YOUR API KEY GOES HERE} | tee issuer-secret.yaml | kubectl apply -f -
--dry-run flag prepares the secret (encodes it to base64) and then the -o yaml outputs the yaml file configuration.
by piping to tee we are saving the secret for cleanup later.
by piping the output of tee to kubectl apply, we create the secret
Note, later we will reference the secret by the name cloudflare-api-key-secret
Additionally, Notice it is added to cert-manager namespace. This is because _secrets are only accessible from the namespace that they are stored in. Since this is needed by the cluster issuer, and we place it in the cert-manager namespace. However you can place the secret and issuer in any namespace you like.
kubectl apply -f cloudflare-secret.yaml
kubectl -n cert-manager get secrets
kubectl -n cert-manager describe secret cloudflare-api-key-secret
kubectl -n cert-manager get secret cloudflare-api-key-secret -o yaml
Finally, we will create a Certifcate Issuer. Create a file called cluster-issuer.yaml with the following contents:
apiVersion: cert-manager.io/v1
kind: ClusterIssuer
metadata:
  name: letsencrypt-dns01-issuer    # name for the issuer (for use when creating ingresses)
  namespace: cert-manager           # it will live in the cert-manager namespace
spec:
  acme:
    email: [email protected] # The email associated with allocated certificates
    privateKeySecretRef:
      name: letsencrypt-dns01-private-key           # key used to allow access to the issuer during certificate resource creation (used later)
    server: https://acme-staging-v02.api.letsencrypt.org/directory # NOTE: changeThis is staging - for production change to: https://acme-v02.api.letsencrypt.org/directory
    solvers:
    - dns01:
        cloudflare:
          email: [email protected]  # the email address we use to login to cloudflare
          apiTokenSecretRef:
            name: cloudflare-api-key-secret          The secret we created earlier with our cloudflare API key
            key: api-key
Make sure to update your
email addressesas outlined.
Then apply the configuration to kubernetes:
kubectl apply -f cluster-issuer.yaml
$ kubectl get clusterissuer -n cert-manager
NAME                       READY   AGE
letsencrypt-dns01-issuer   True    10h
Now for the moment of truth… Let’s create a real certificate (resource) which we will use in our backend ingress for HTTPS and TLS.
Since our service must be tied to our domain name, in the Certificate definition, we must specify the domain and sub-domains for which we intend to use in the certificate. For my purposes, I am using codeblind.ai, and a few other sub-domains. Create a similar file names certificate.yaml using the guidance below:
apiVersion: cert-manager.io/v1
kind: Certificate
metadata:
  name: codeblind-cert             # some name you choose for the certificate
  namespace: codeblind             # the namespace where I want to use the certificate
spec:
  secretName: codeblind-tls-secret # Output secret location where the certificate will be places after creation
  commonName: codeblind.ai         # our top level domain
  dnsNames:
    - backend.codeblind.ai         # backend sub-domain
    - '*.backend.codeblind.ai'     # wildcards for future endpoints.
  issuerRef:
    name: letsencrypt-dns01-issuer # the reference to the issuer we defined earlier
    kind: ClusterIssuer            # and the issuers `kind`
Note, if you don’t have the namespace yet for your app, you can create it now by running:
kubectl create namespace <add-namespace-here> --dry-run=client -o yaml | tee namespace.yaml | kubectl apply -f -
Now create the certificate:
kubectl apply -f certificate.yaml
Validate the certificate is created
$ kubectl get certificate -n codeblind
NAME             READY   SECRET                 AGE
codeblind-cert   True    codeblind-tls-secret   9s
If READY is not true - we might have a configuration issue. What I normally do is look at the cert-manager logs:
List the pods
$ kubectl -n cert-manager get pods
NAME                                       READY   STATUS    RESTARTS      AGE
cert-manager-webhook-7f9f8648b9-bz7vx      1/1     Running   0             44h
cert-manager-cainjector-5c5695d979-sx47r   1/1     Running   6 (26h ago)   44h
cert-manager-67c98b89c8-lhbbk              1/1     Running   0             22h
Inspect the logs
kubectl -n cert-manager logs -f cert-manager-67c98b89c8-lhbbk
Check the status of the certificate (describe):
$ kubectl -n codeblind describe certificate codeblind-cert
Name:         codeblind-cert
Namespace:    codeblind
Labels:       <none>
Annotations:  <none>
API Version:  cert-manager.io/v1
Kind:         Certificate
Metadata:
  Creation Timestamp:  2024-04-02T14:51:08Z
  Generation:          1
  Resource Version:    1383722
  UID:                 3721465a-8ca9-4480-8ef4-529b5f11437f
Spec:
  Common Name:  backend.codeblind.ai
  Dns Names:
    backend.codeblind.ai
    *.backend.codeblind.ai
  Issuer Ref:
    Kind:       ClusterIssuer
    Name:       letsencrypt-dns01-issuer
  Secret Name:  codeblind-tls-secret
Status:
  Conditions:
    Last Transition Time:  2024-04-02T14:51:08Z
    Message:               Certificate is up to date and has not expired
    Observed Generation:   1
    Reason:                Ready
    Status:                True
    Type:                  Ready
  Not After:               2024-07-01T02:54:35Z
  Not Before:              2024-04-02T02:54:36Z
  Renewal Time:            2024-06-01T02:54:35Z
Events:                    <none>
Check the certificate key material is in the secret:
$ kubectl -n codeblind describe secret codeblind-tls-secret
Name:         codeblind-tls-secret
Namespace:    codeblind
Labels:       controller.cert-manager.io/fao=true
Annotations:  cert-manager.io/alt-names: *.backend.codeblind.ai,backend.codeblind.ai
              cert-manager.io/certificate-name: codeblind-cert
              cert-manager.io/common-name: backend.codeblind.ai
              cert-manager.io/ip-sans:
              cert-manager.io/issuer-group:
              cert-manager.io/issuer-kind: ClusterIssuer
              cert-manager.io/issuer-name: letsencrypt-dns01-issuer
              cert-manager.io/uri-sans:

Type:  kubernetes.io/tls

Data
====
tls.crt:  3793 bytes
tls.key:  1675 bytes
If all went well, you now have a certificate READY to use.
Before we go further, we need to check out the SSL mode setting in cloudflare.According to the documenation, we should be using either full or strict.
What you might notice once you enable full or strict is that when you open your github page in the browser (for example https://codeblind.ai) - it will work just fine. However if you set it to flexible it will not render and in the debugger tab you might notice error “ERR_TOO_MANY_REDIRECTS”.). So we know we must have full or strict set for our site(s) to keep working.
However if you deploy the application, and try to send it a curl request - you will receive a 523 error. I am saying this early because we need (for now) to configure a special rule to allow flexible mode while taking to the backend. The backend will still be using HTTPS and the LetsEncrypt certificate, however cloudflare did not seem to work for me with strict mode. (I likely made a mistake, but let’s move on).
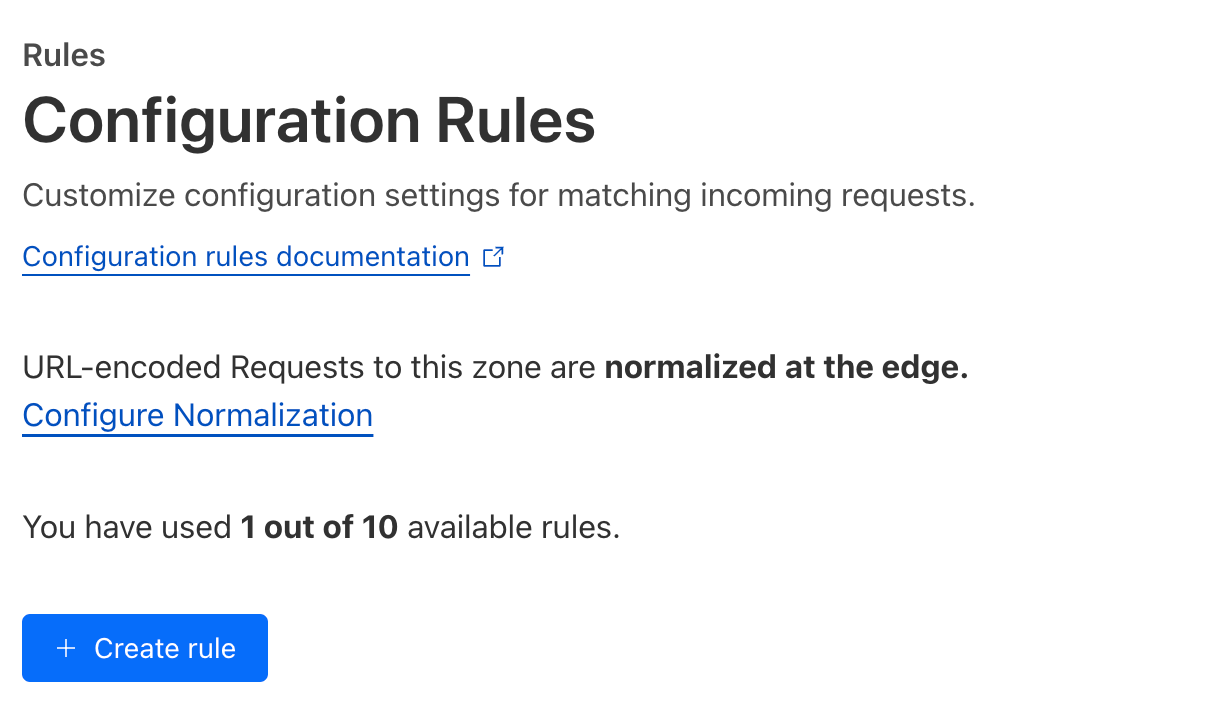
SSL –> Configuration Rules page.

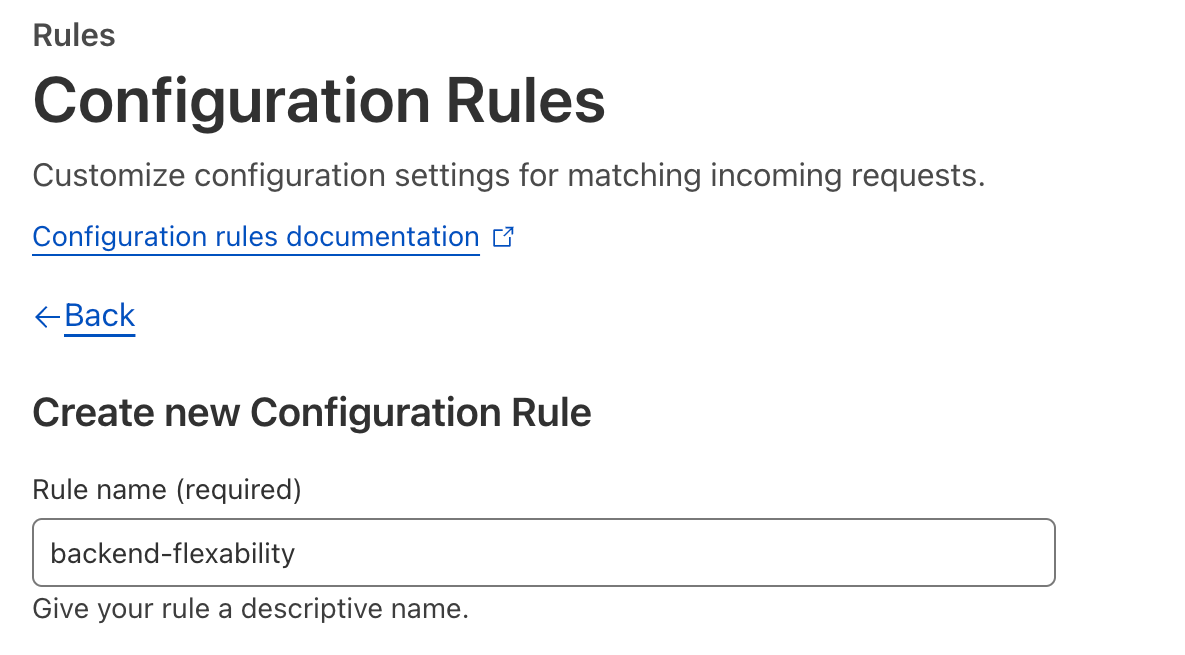
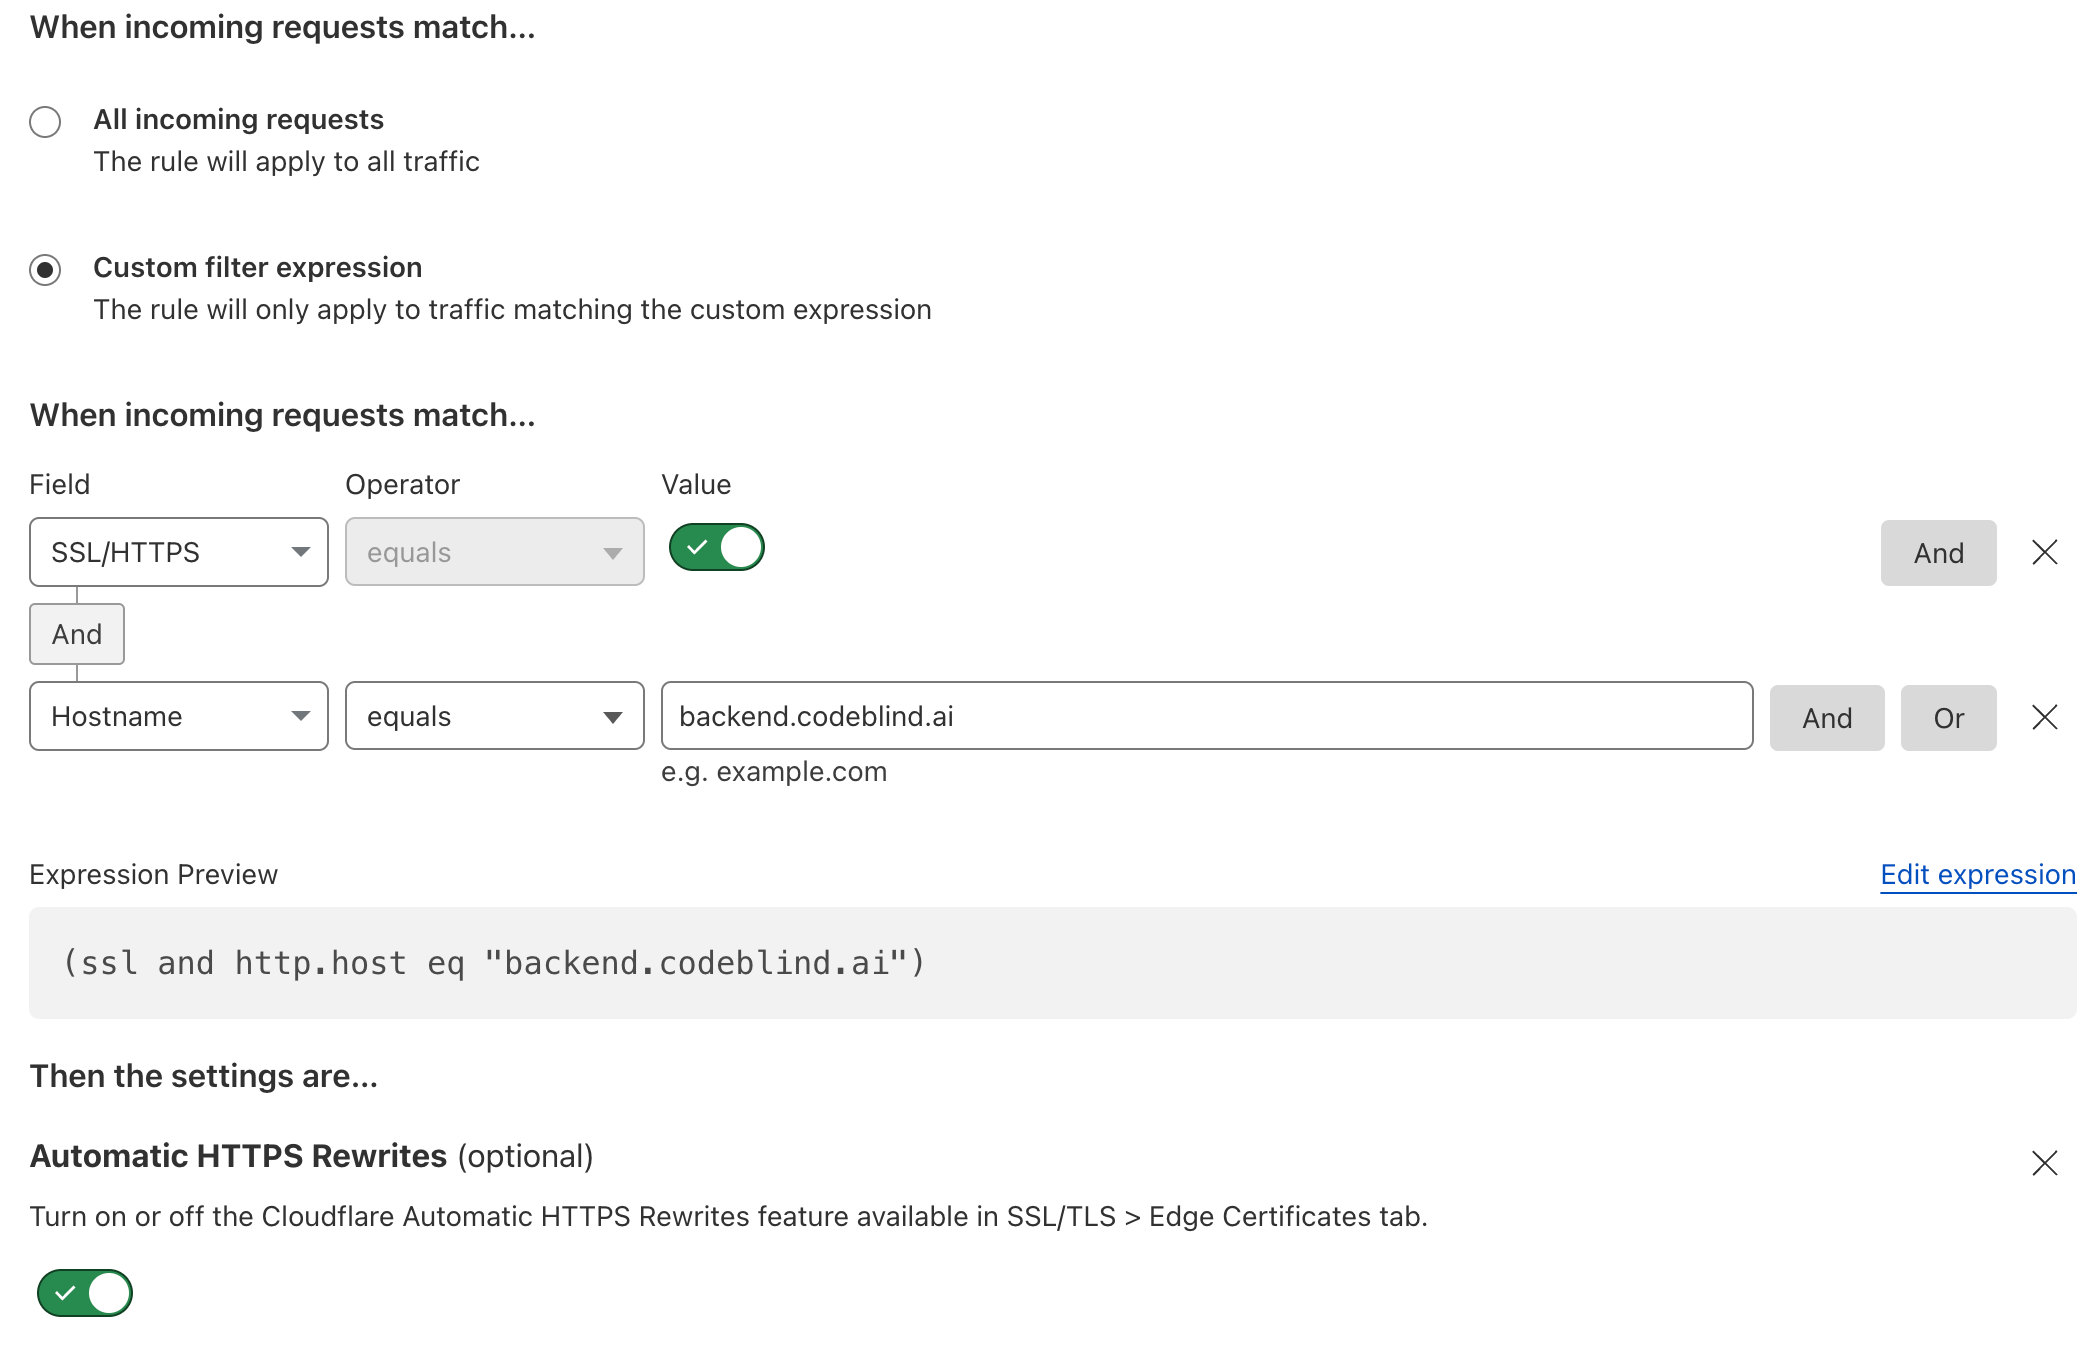
custom filter so that all SSL/HTTPS request destined for the backend domain name will activate this rule. Also turn on HTTPS rewrites to remove any HTTP from going to our backend.
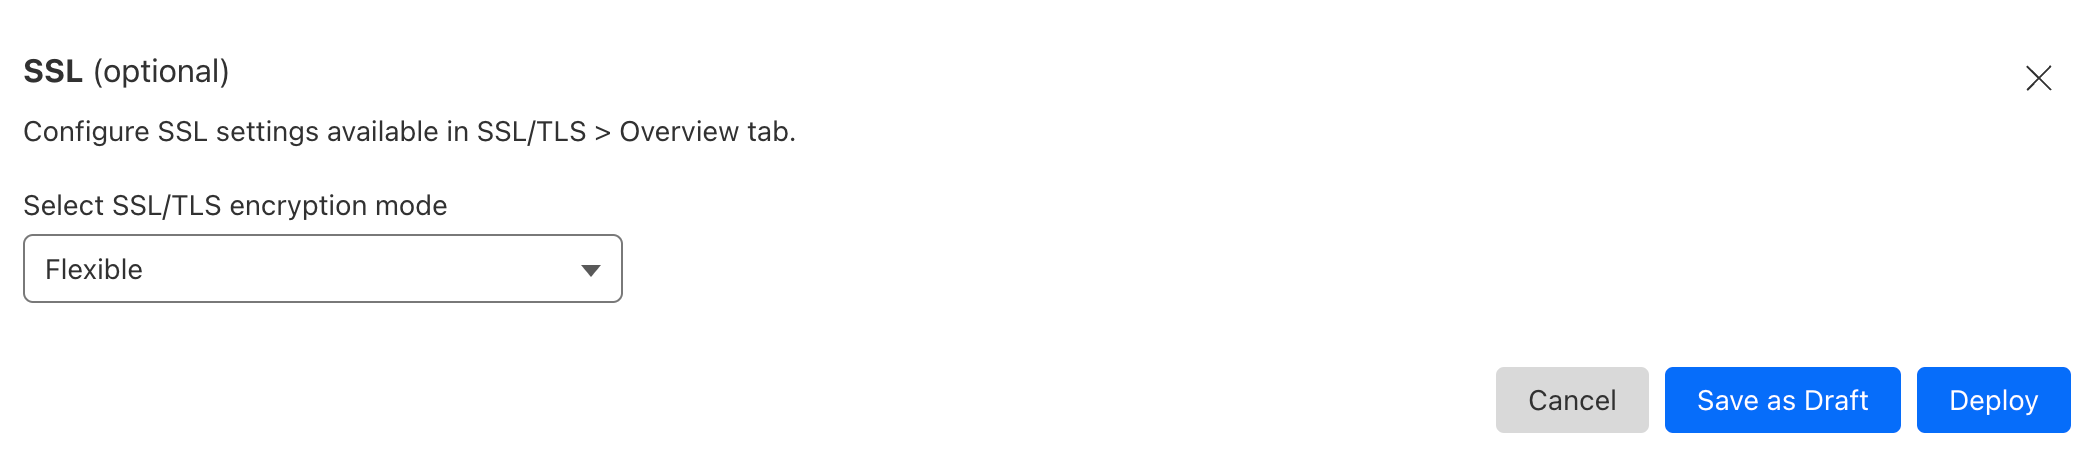
flexible. This is the setting which solves our 523 HTTP Error Code. Then click deploy.
Finally, we can now deploy our backend service. Below is an example service I use for testing which lives in my private repository (thus the secret). Below the manifest deployment, I will discuss the critical elements of the Ingress as that is the most important element which will terminate our HTTPS sessions.
apiVersion: v1
kind: Secret
type: kubernetes.io/dockerconfigjson
metadata:
  name: ghcrcred
  namespace: codeblind
data:
  .dockerconfigjson: YOUR-REDACTED-REPO-PRIVATE-KEY
---
apiVersion: apps/v1
kind: Deployment
metadata:
  name: codeblind
  namespace: codeblind
  labels:
    app: codeblind
spec:
  selector:
    matchLabels:
      app: codeblind
  replicas: 1
  template:
    metadata:
      labels:
        app: codeblind
    spec:
      runtimeClassName: kata
      imagePullSecrets:
      - name: ghcrcred
      containers:
        - name: codeblind
          image: ghcr.io/codeblind-ai/echo:0.0.2
          ports:
            - containerPort: 8080
---
apiVersion: v1
kind: Service
metadata:
  name: codeblind-backend
  namespace: codeblind
  labels:
    app: codeblind-backend
spec:
  type: LoadBalancer
  selector:
    app: codeblind
  ports:
    - port: 80
      name: standard
      targetPort: 8080
      protocol: TCP
---
apiVersion: networking.k8s.io/v1
kind: Ingress
metadata:
  name: codeblind-ingress
  namespace: codeblind
  annotations:
    cert-manager.io/issuer: letsencrypt-dns01-issuer
spec:
  tls:
  - hosts:
    - backend.codeblind.ai
    secretName: codeblind-tls-secret # cert output of our certificate (resource) we created earlier
  rules:
    - host: backend.codeblind.ai
      http:
        paths:
          - path: /
            pathType: Prefix
            backend:
              service:
                name: codeblind-backend
                port:
                  number: 80
In the Ingress configuration I want you to notice a few things:
codeblind-tls-secret matches the name used in during the certificate creation. This is where the certificate material lives after a successful certificate creation.Let’s deploy it!
kube apply -f deployment.yaml
Once deployed, things should be working. Let’s give it a test:
curl -X POST https://backend.codeblind.ai/hello -d 'Mighty-Pi'
If everything worked, you should see a success response with "Hello, Mighty-Pi".
I will skip the summary, as this was kind of a long an involved post - but I hope it all worked for you. In the next post - I will be establishing Tunnels and Origin Certificates to allow us to remove the special SSL configuration rules, remove the port forwarding on our router, and prevent IP based DDoS attacks on our infrastructure. Stay tuned!
In the early days of the internet, loading a website was a straightforward process: your request traveled to a server, which then delivered the requested page. However, when too many requests flooded a server, it could crash, leaving visitors stranded. Cloudflare emerged to tackle these issues head-on, leveraging a robust edge network to deliver content and services as swiftly as possible, ensuring users receive information without delay.
Moreover, Cloudflare provides robust security measures, safeguarding internet properties from various malicious activities, including DDoS attacks and intrusive bots. Additionally, features like SSL and content distribution are seamlessly integrated into Cloudflare’s offerings, benefiting millions of internet properties worldwide.
DNS (Domain Name System) management is crucial for directing internet traffic to the correct destinations. Cloudflare simplifies this process, offering a comprehensive DNS service that enhances security and performance.
DDoS (Distributed Denial of Service) attacks pose a significant threat to online services, disrupting operations by overwhelming servers with malicious traffic. Cloudflare’s DDoS mitigation operates in four stages:
Transitioning your domain’s DNS management to Cloudflare is a straightforward process, offering enhanced security and performance benefits. Here’s how to do it:
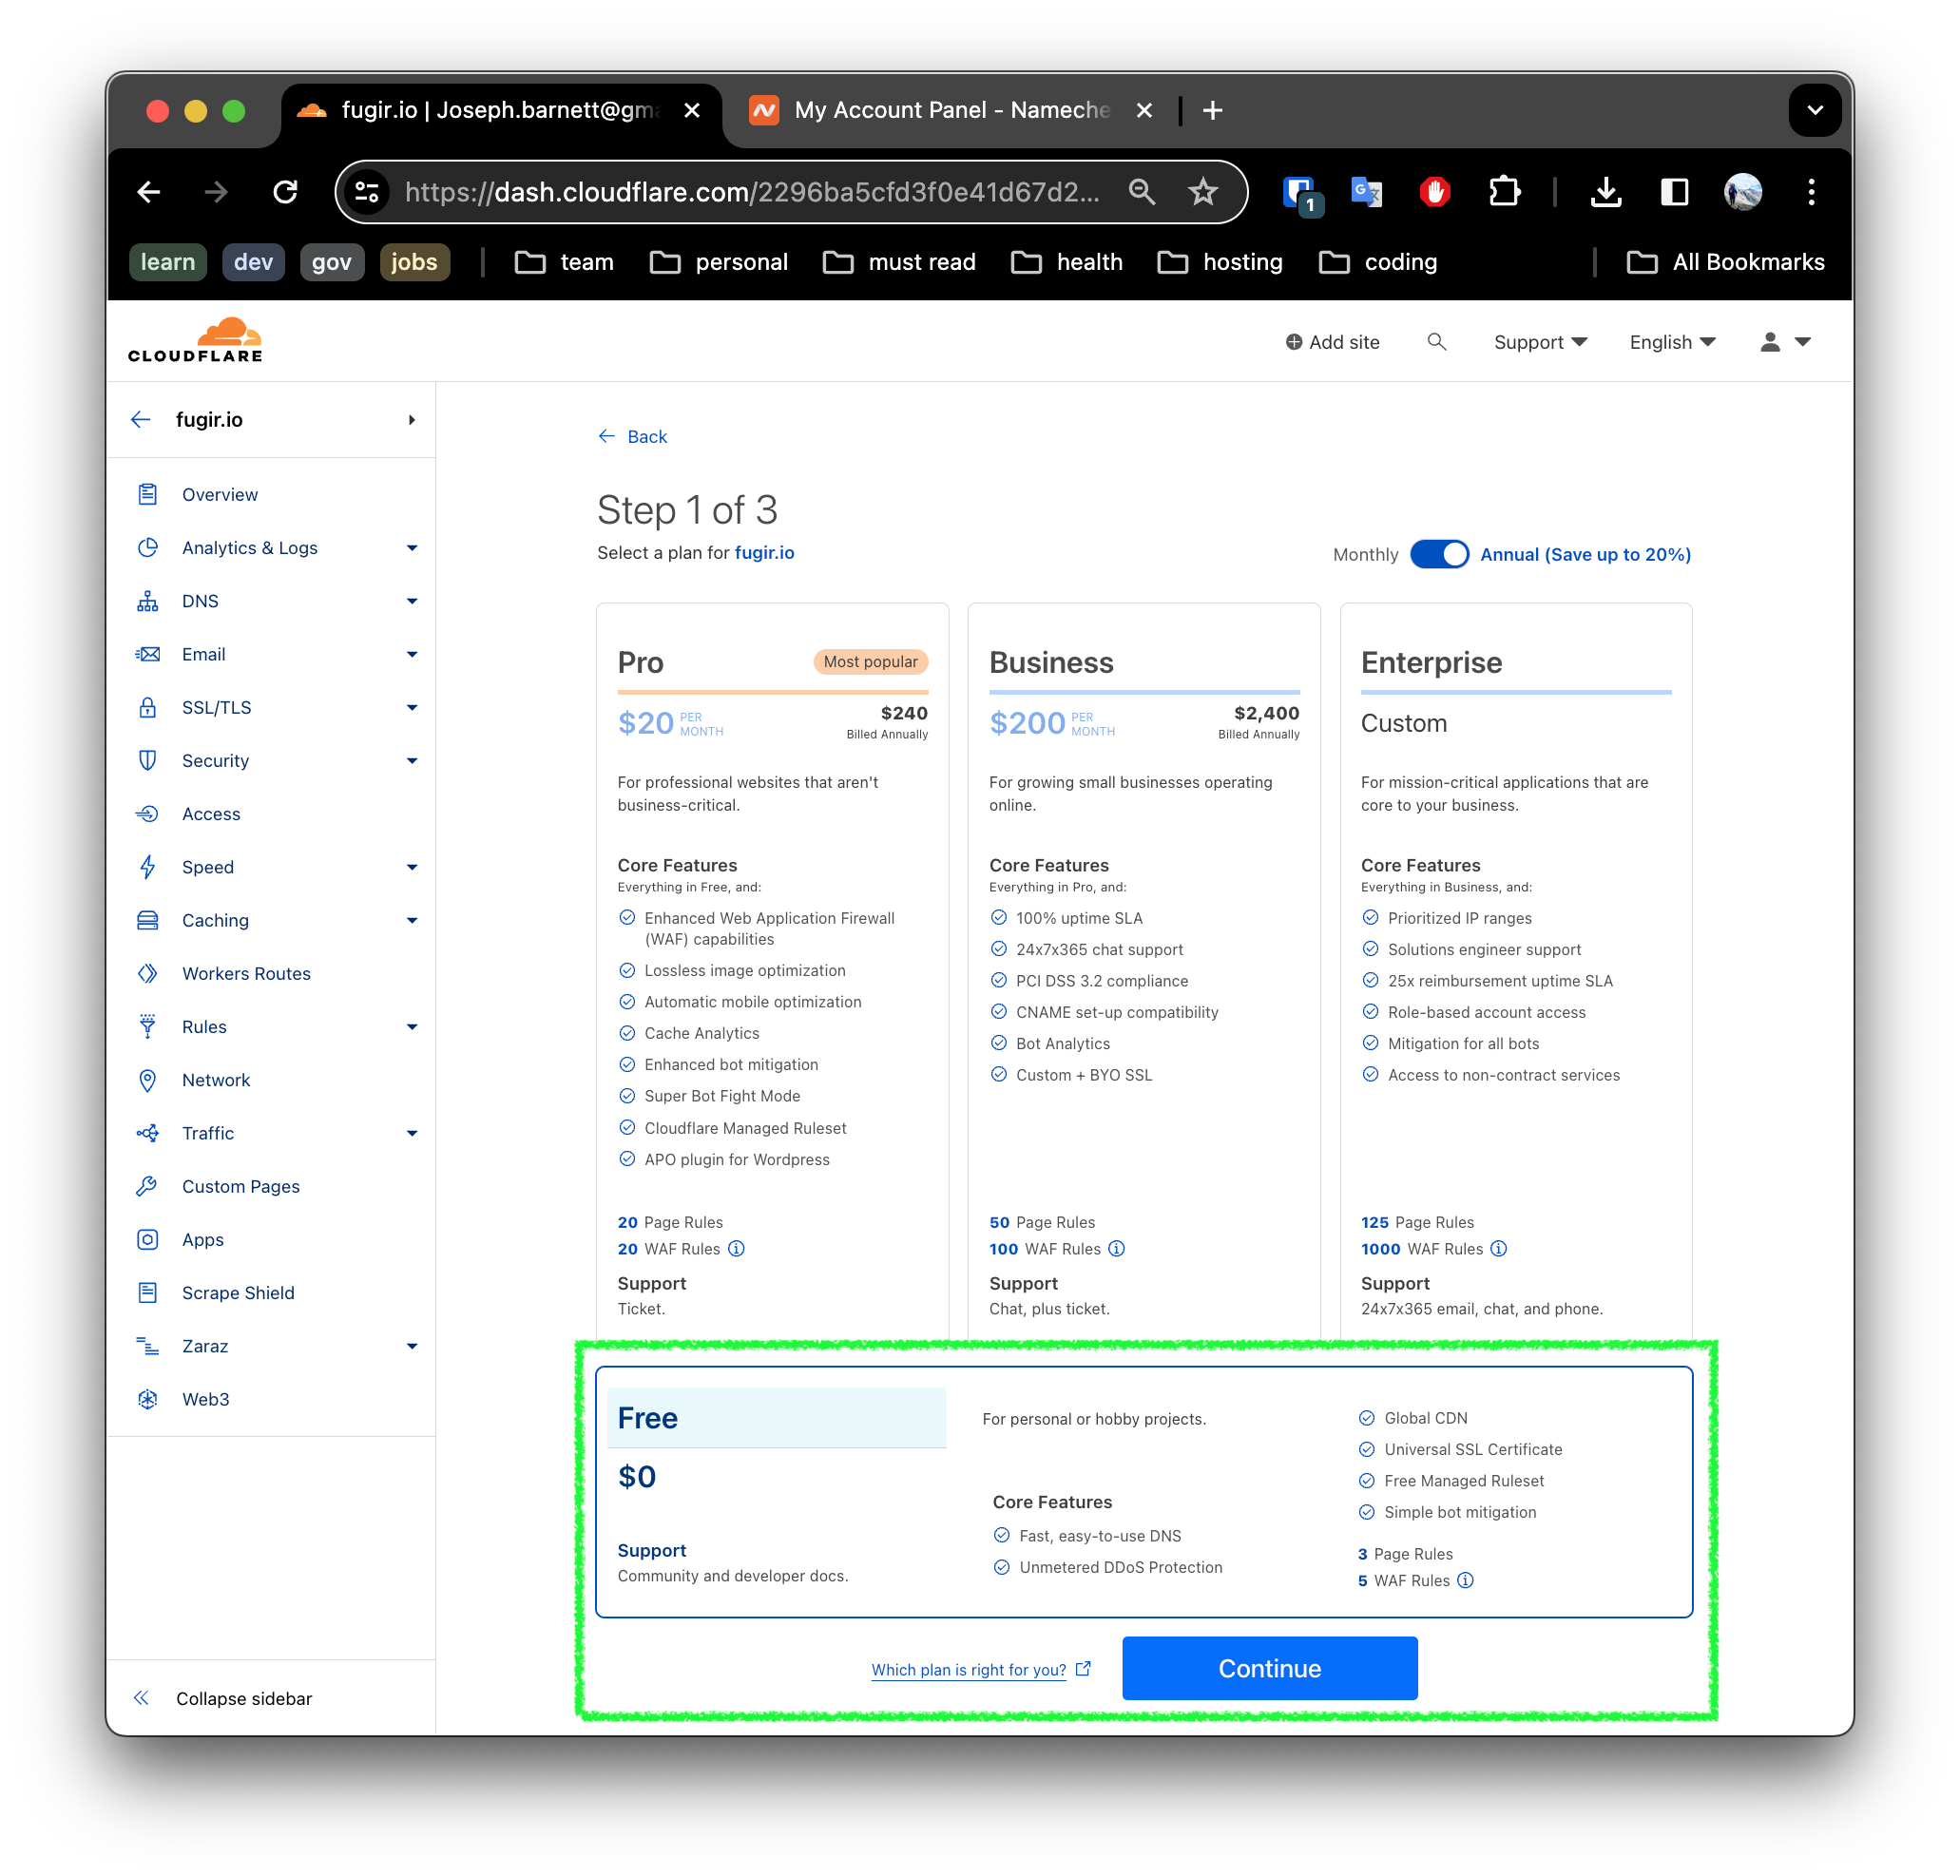
First you will need to create a Cloudflare account. You will be presented with a set of plans to chose from. Since we are building a hobby project, I recommend starting with the free plan as show:

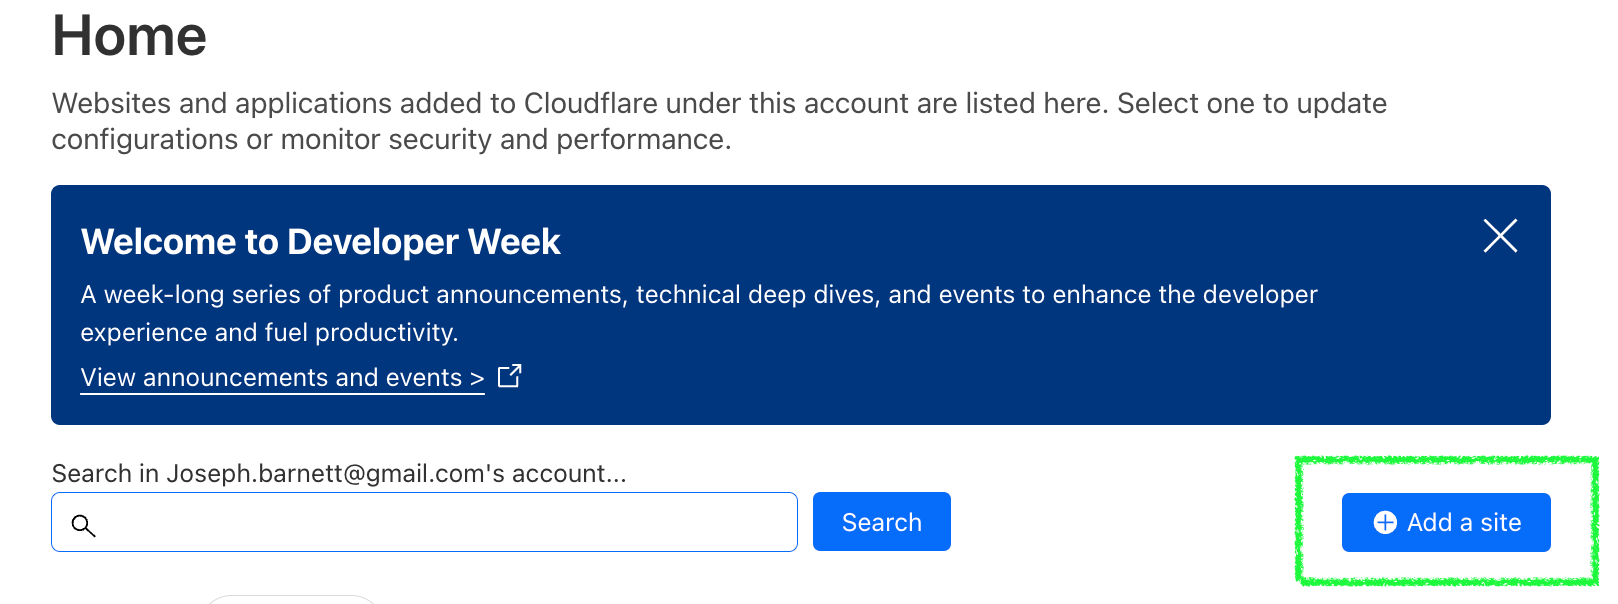
Click the Add a Site button in Cloudflare to add your domain.
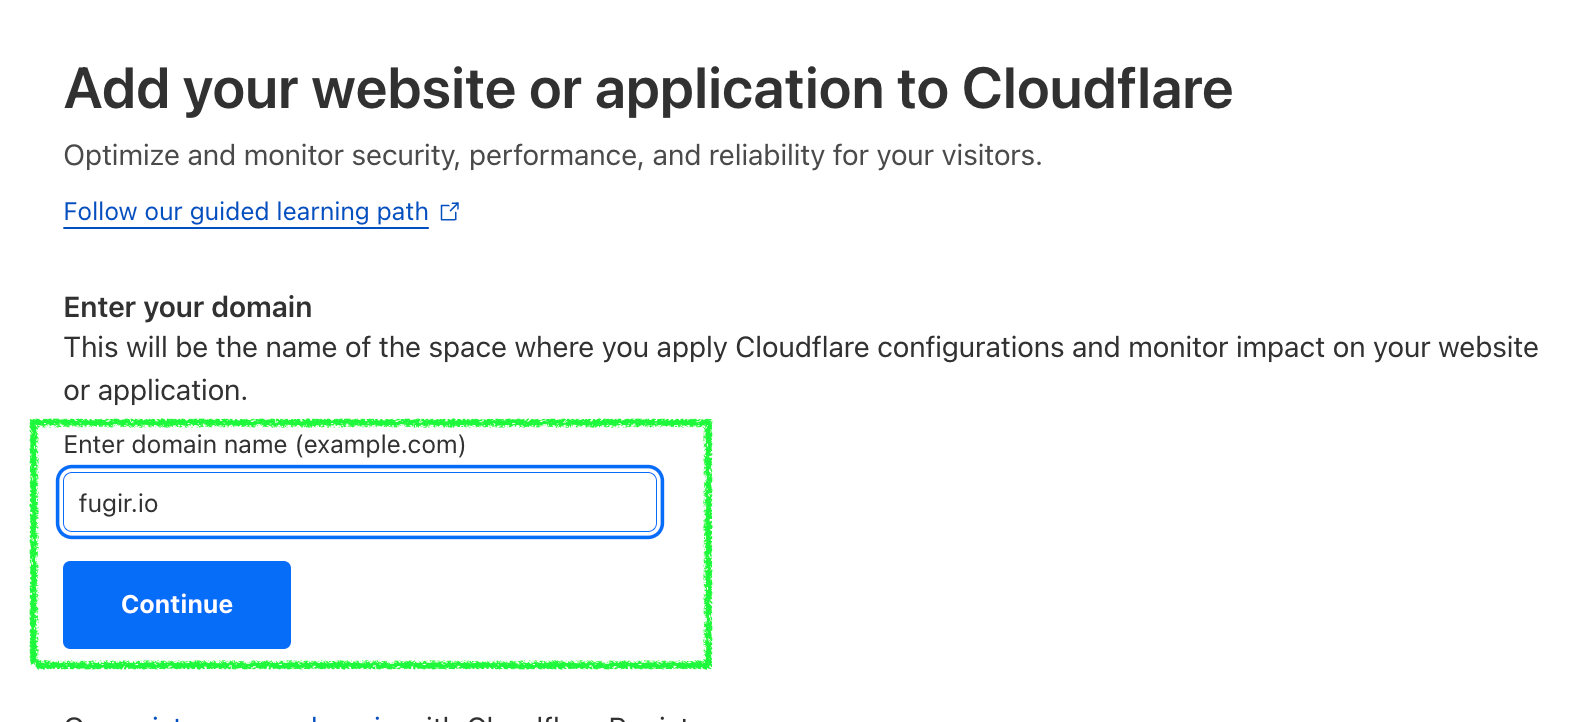 Enter your site name, and click
 Continue
Since we are building a hobby site - we will select the free option and Continue.
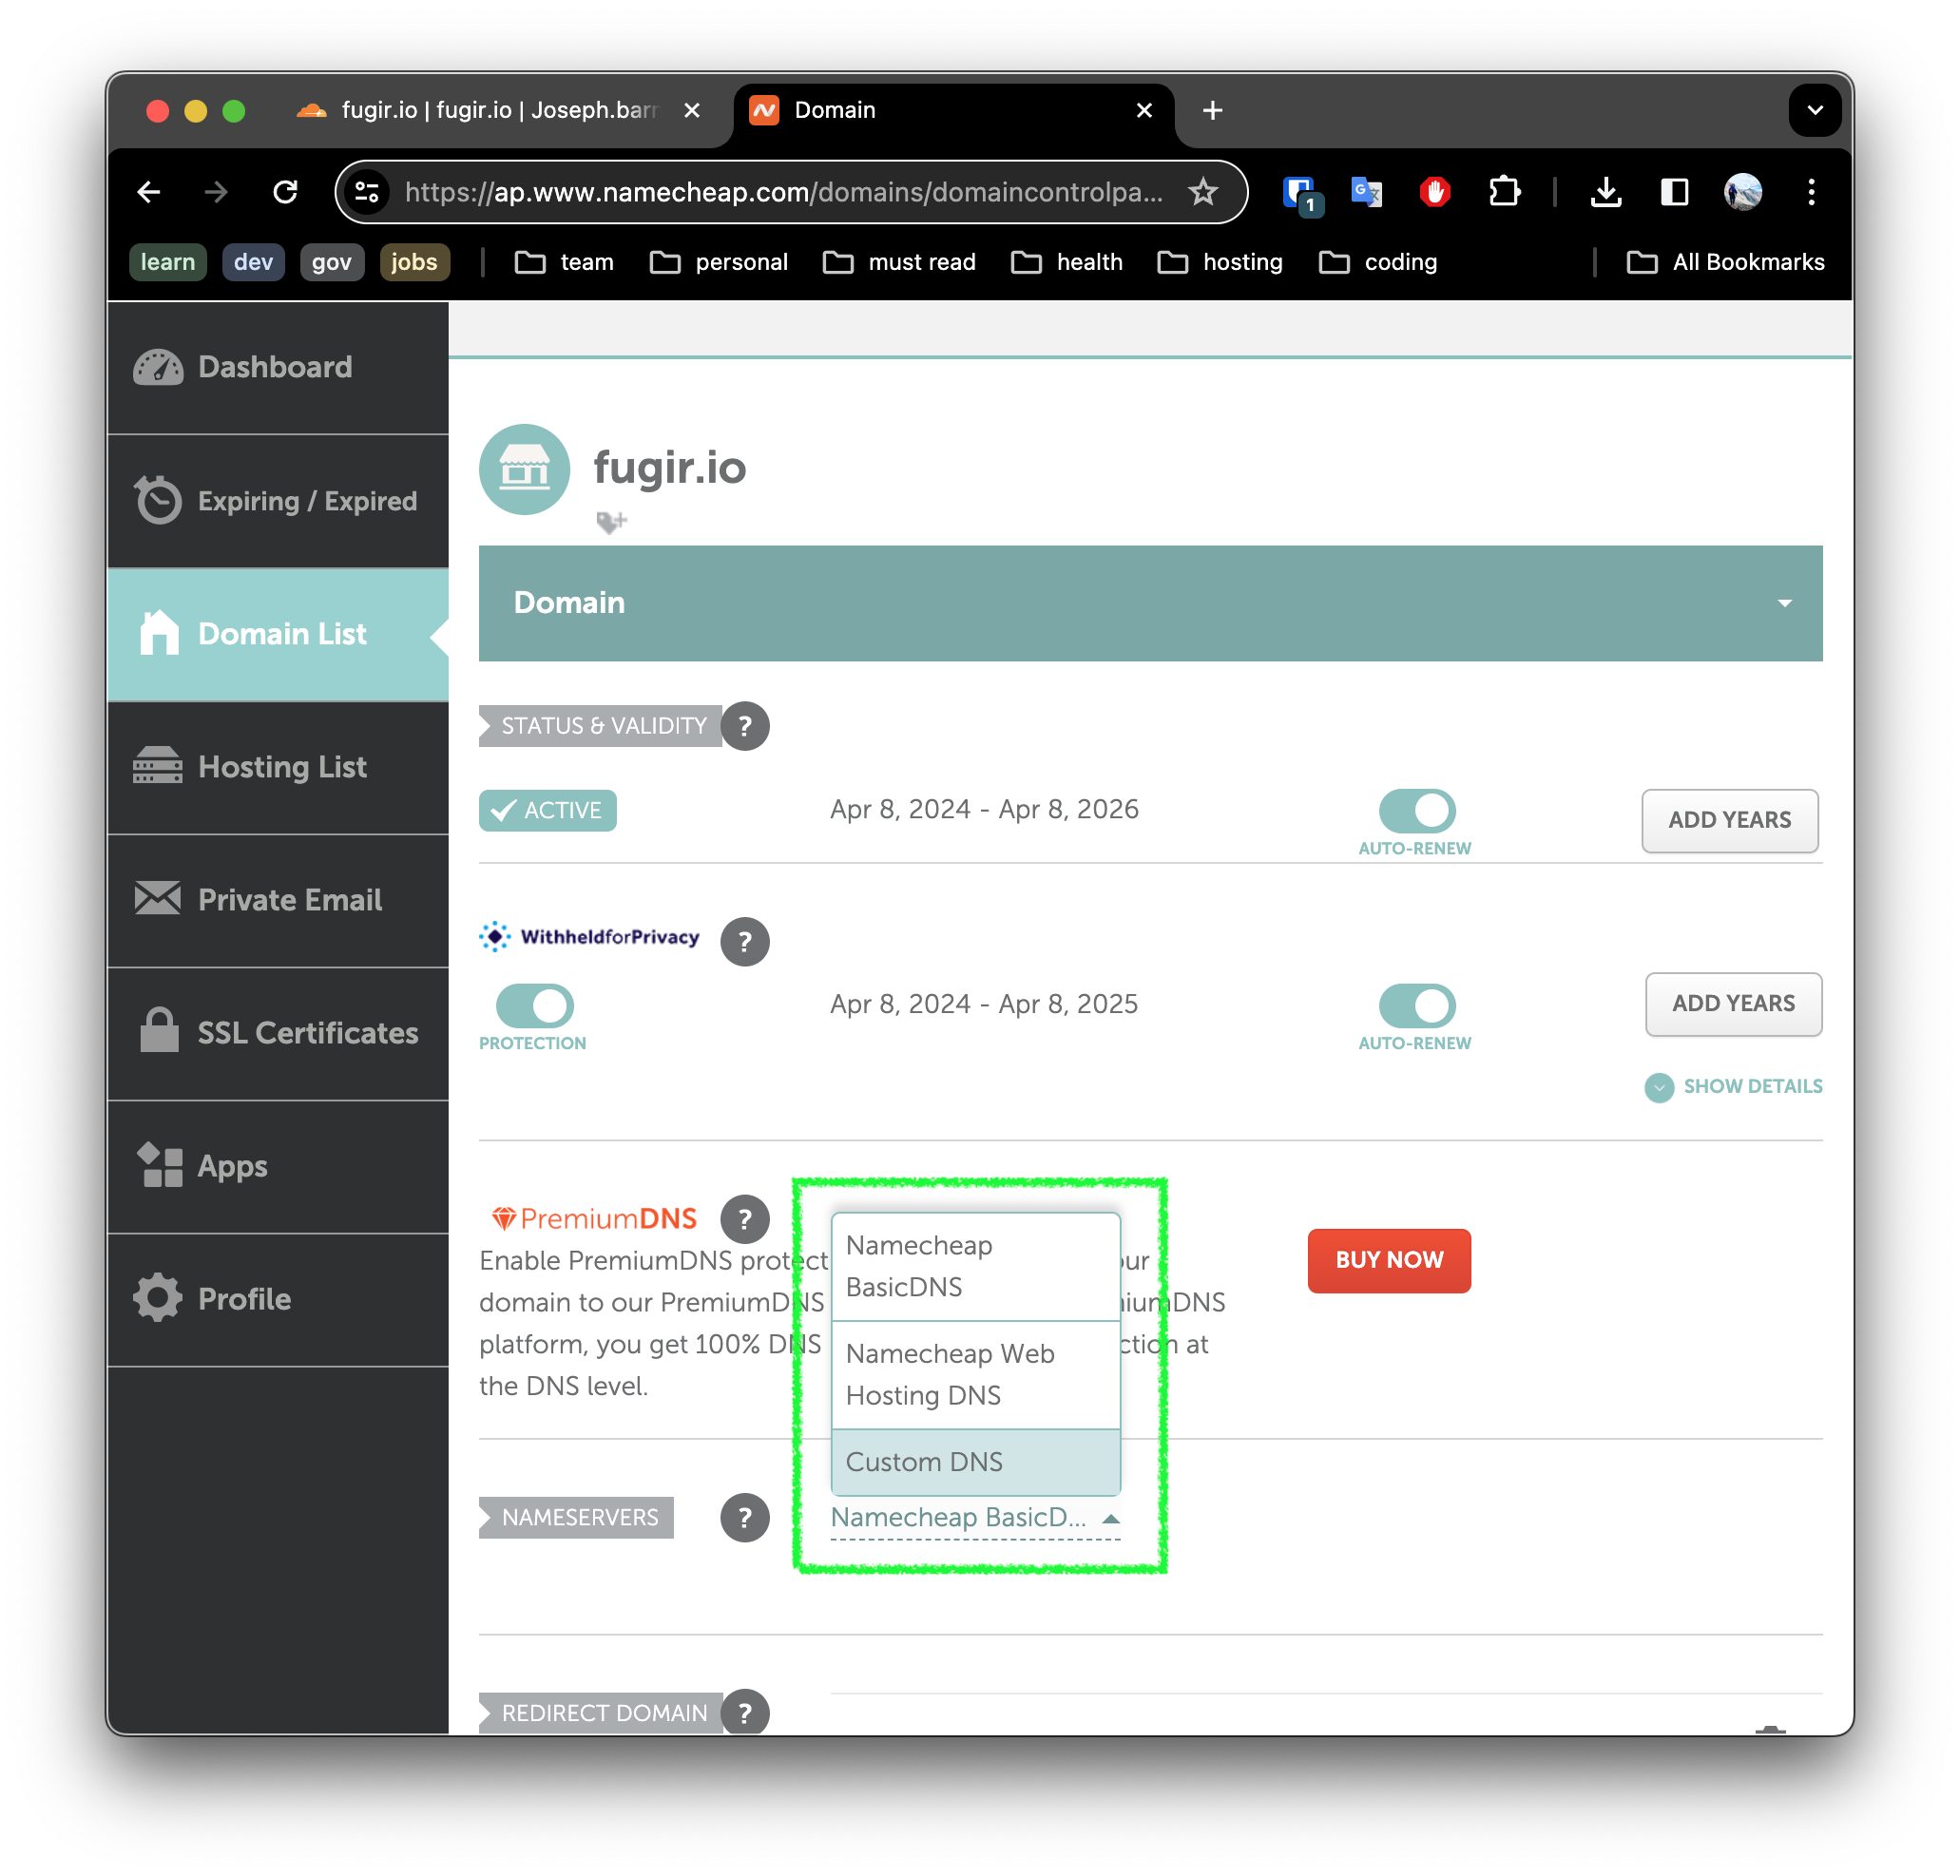
We are using namecheap, so we can login and go to the management dashboard for our domain.
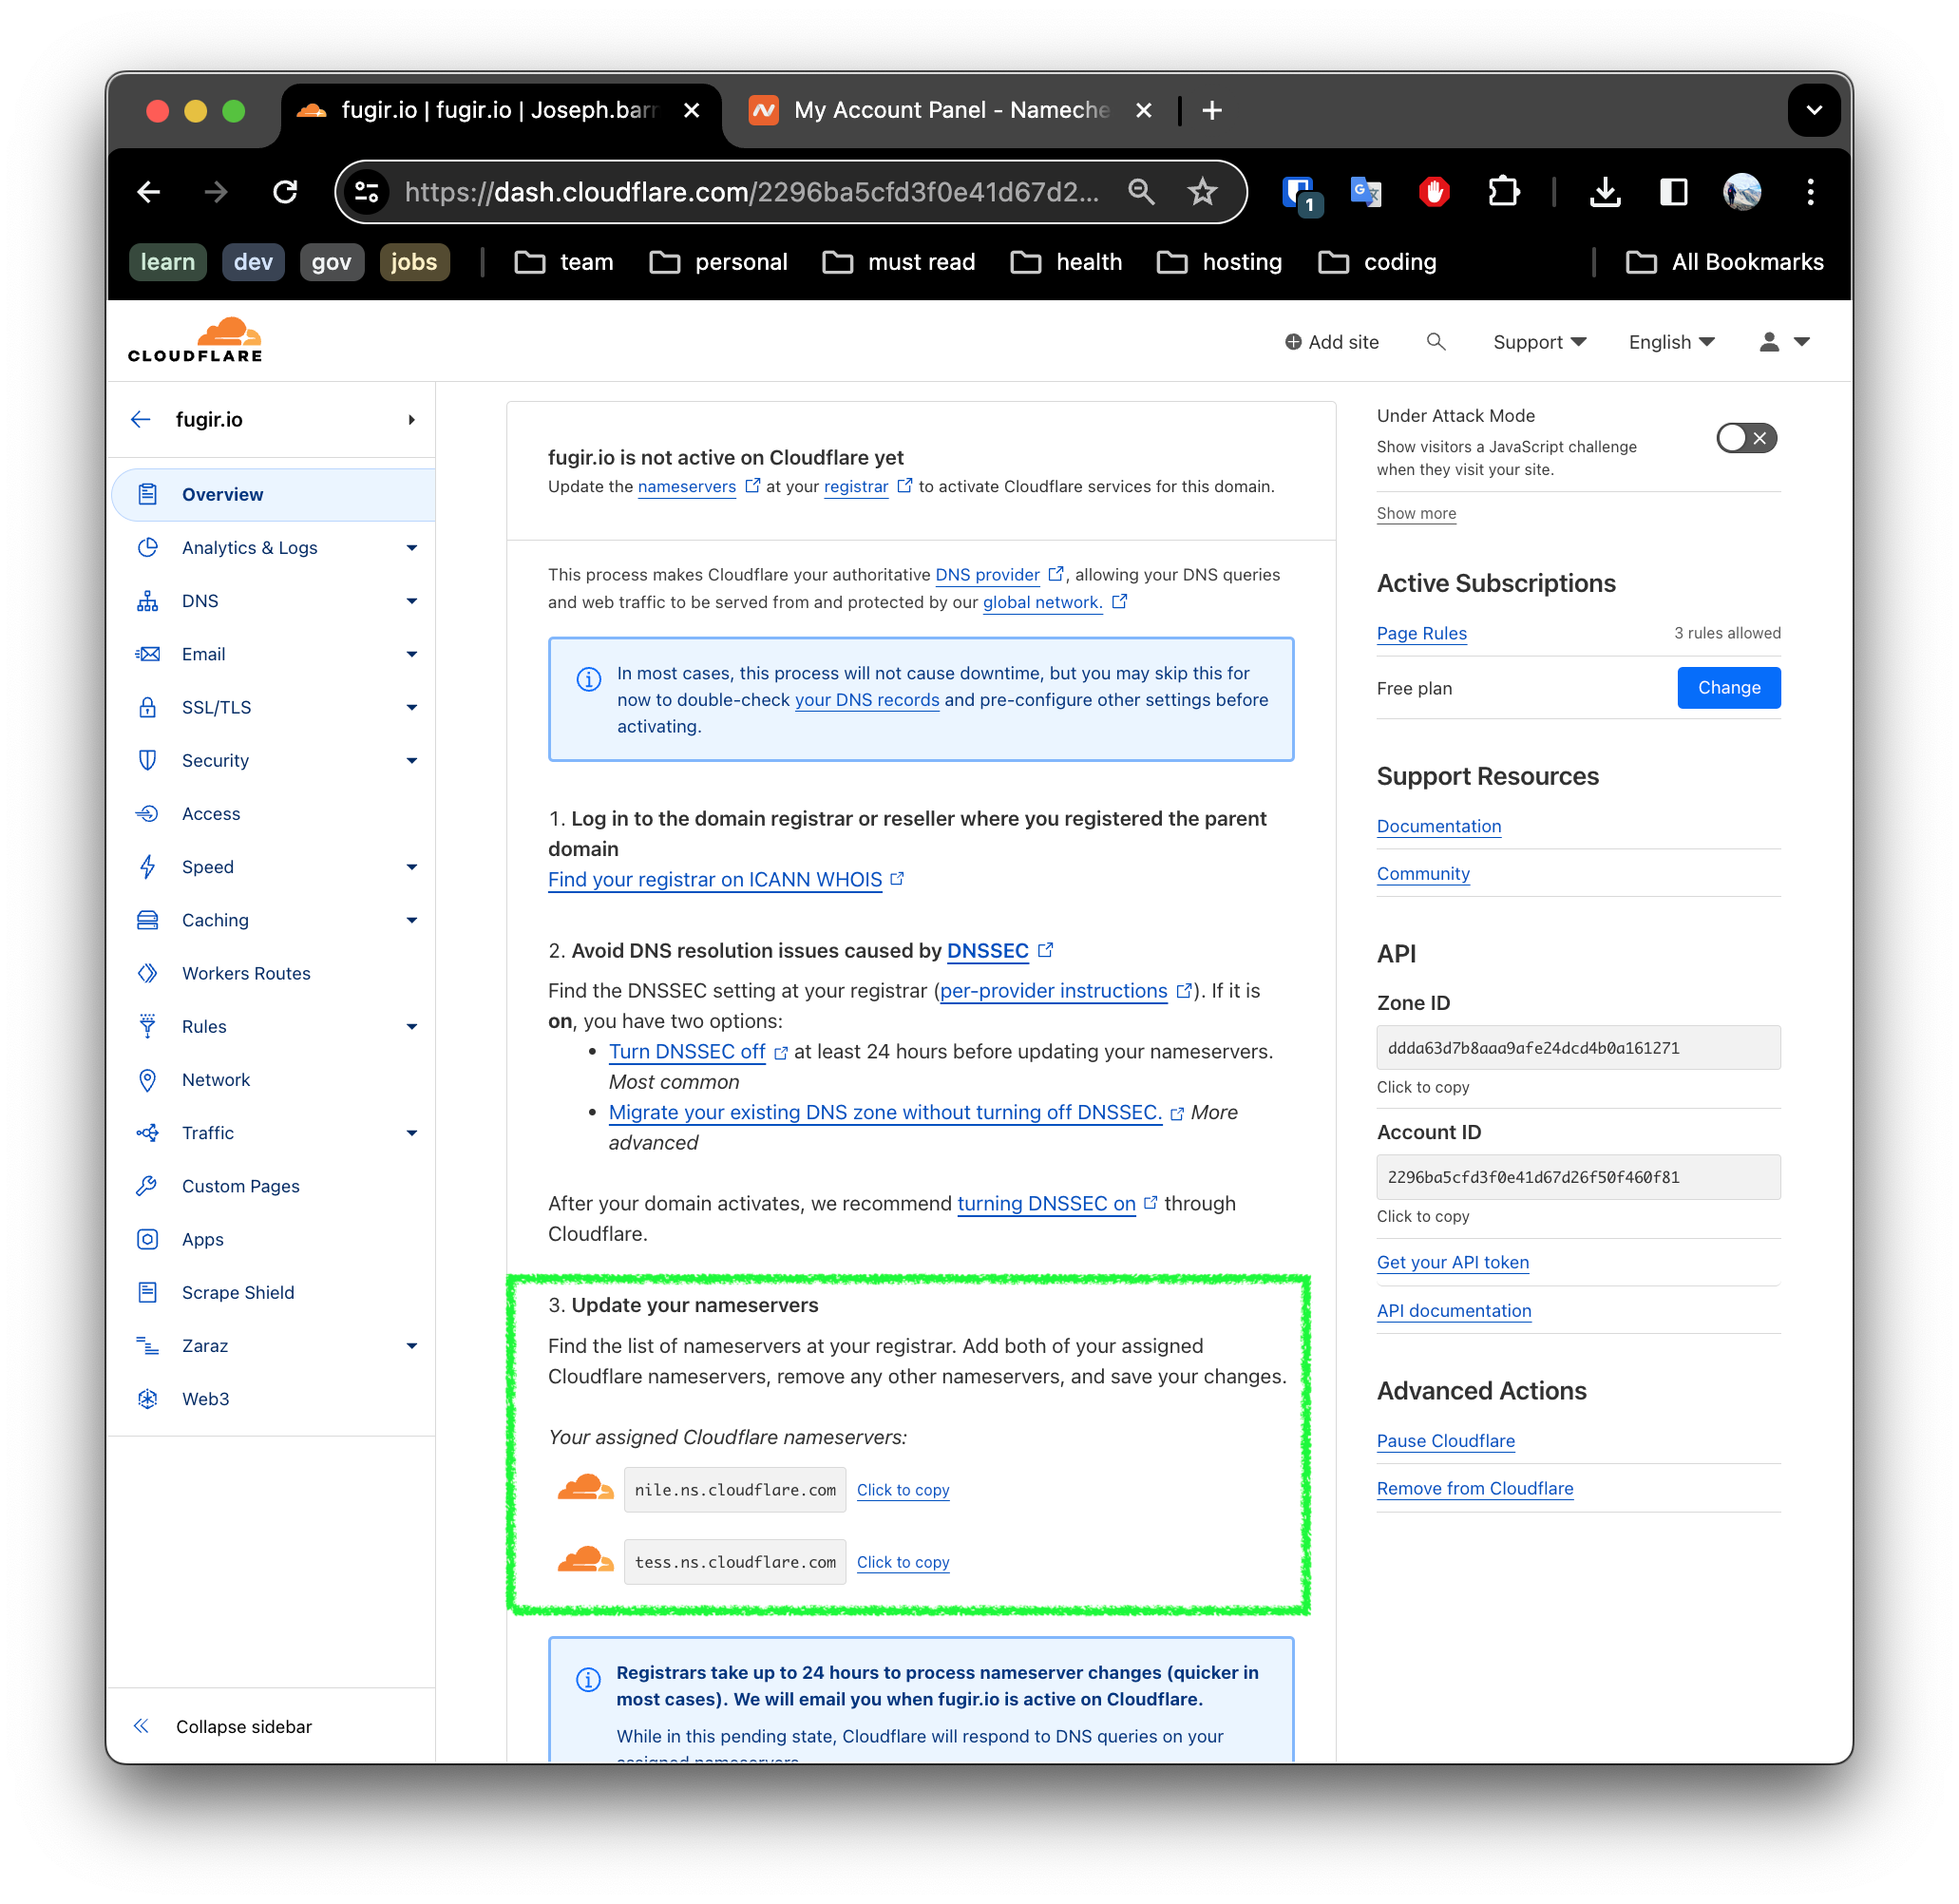
Here we will update the NAMESERVERS configuration, selecting Custom DNS.
Here we will update the NAMESERVERS configuration, selecting Custom DNS.
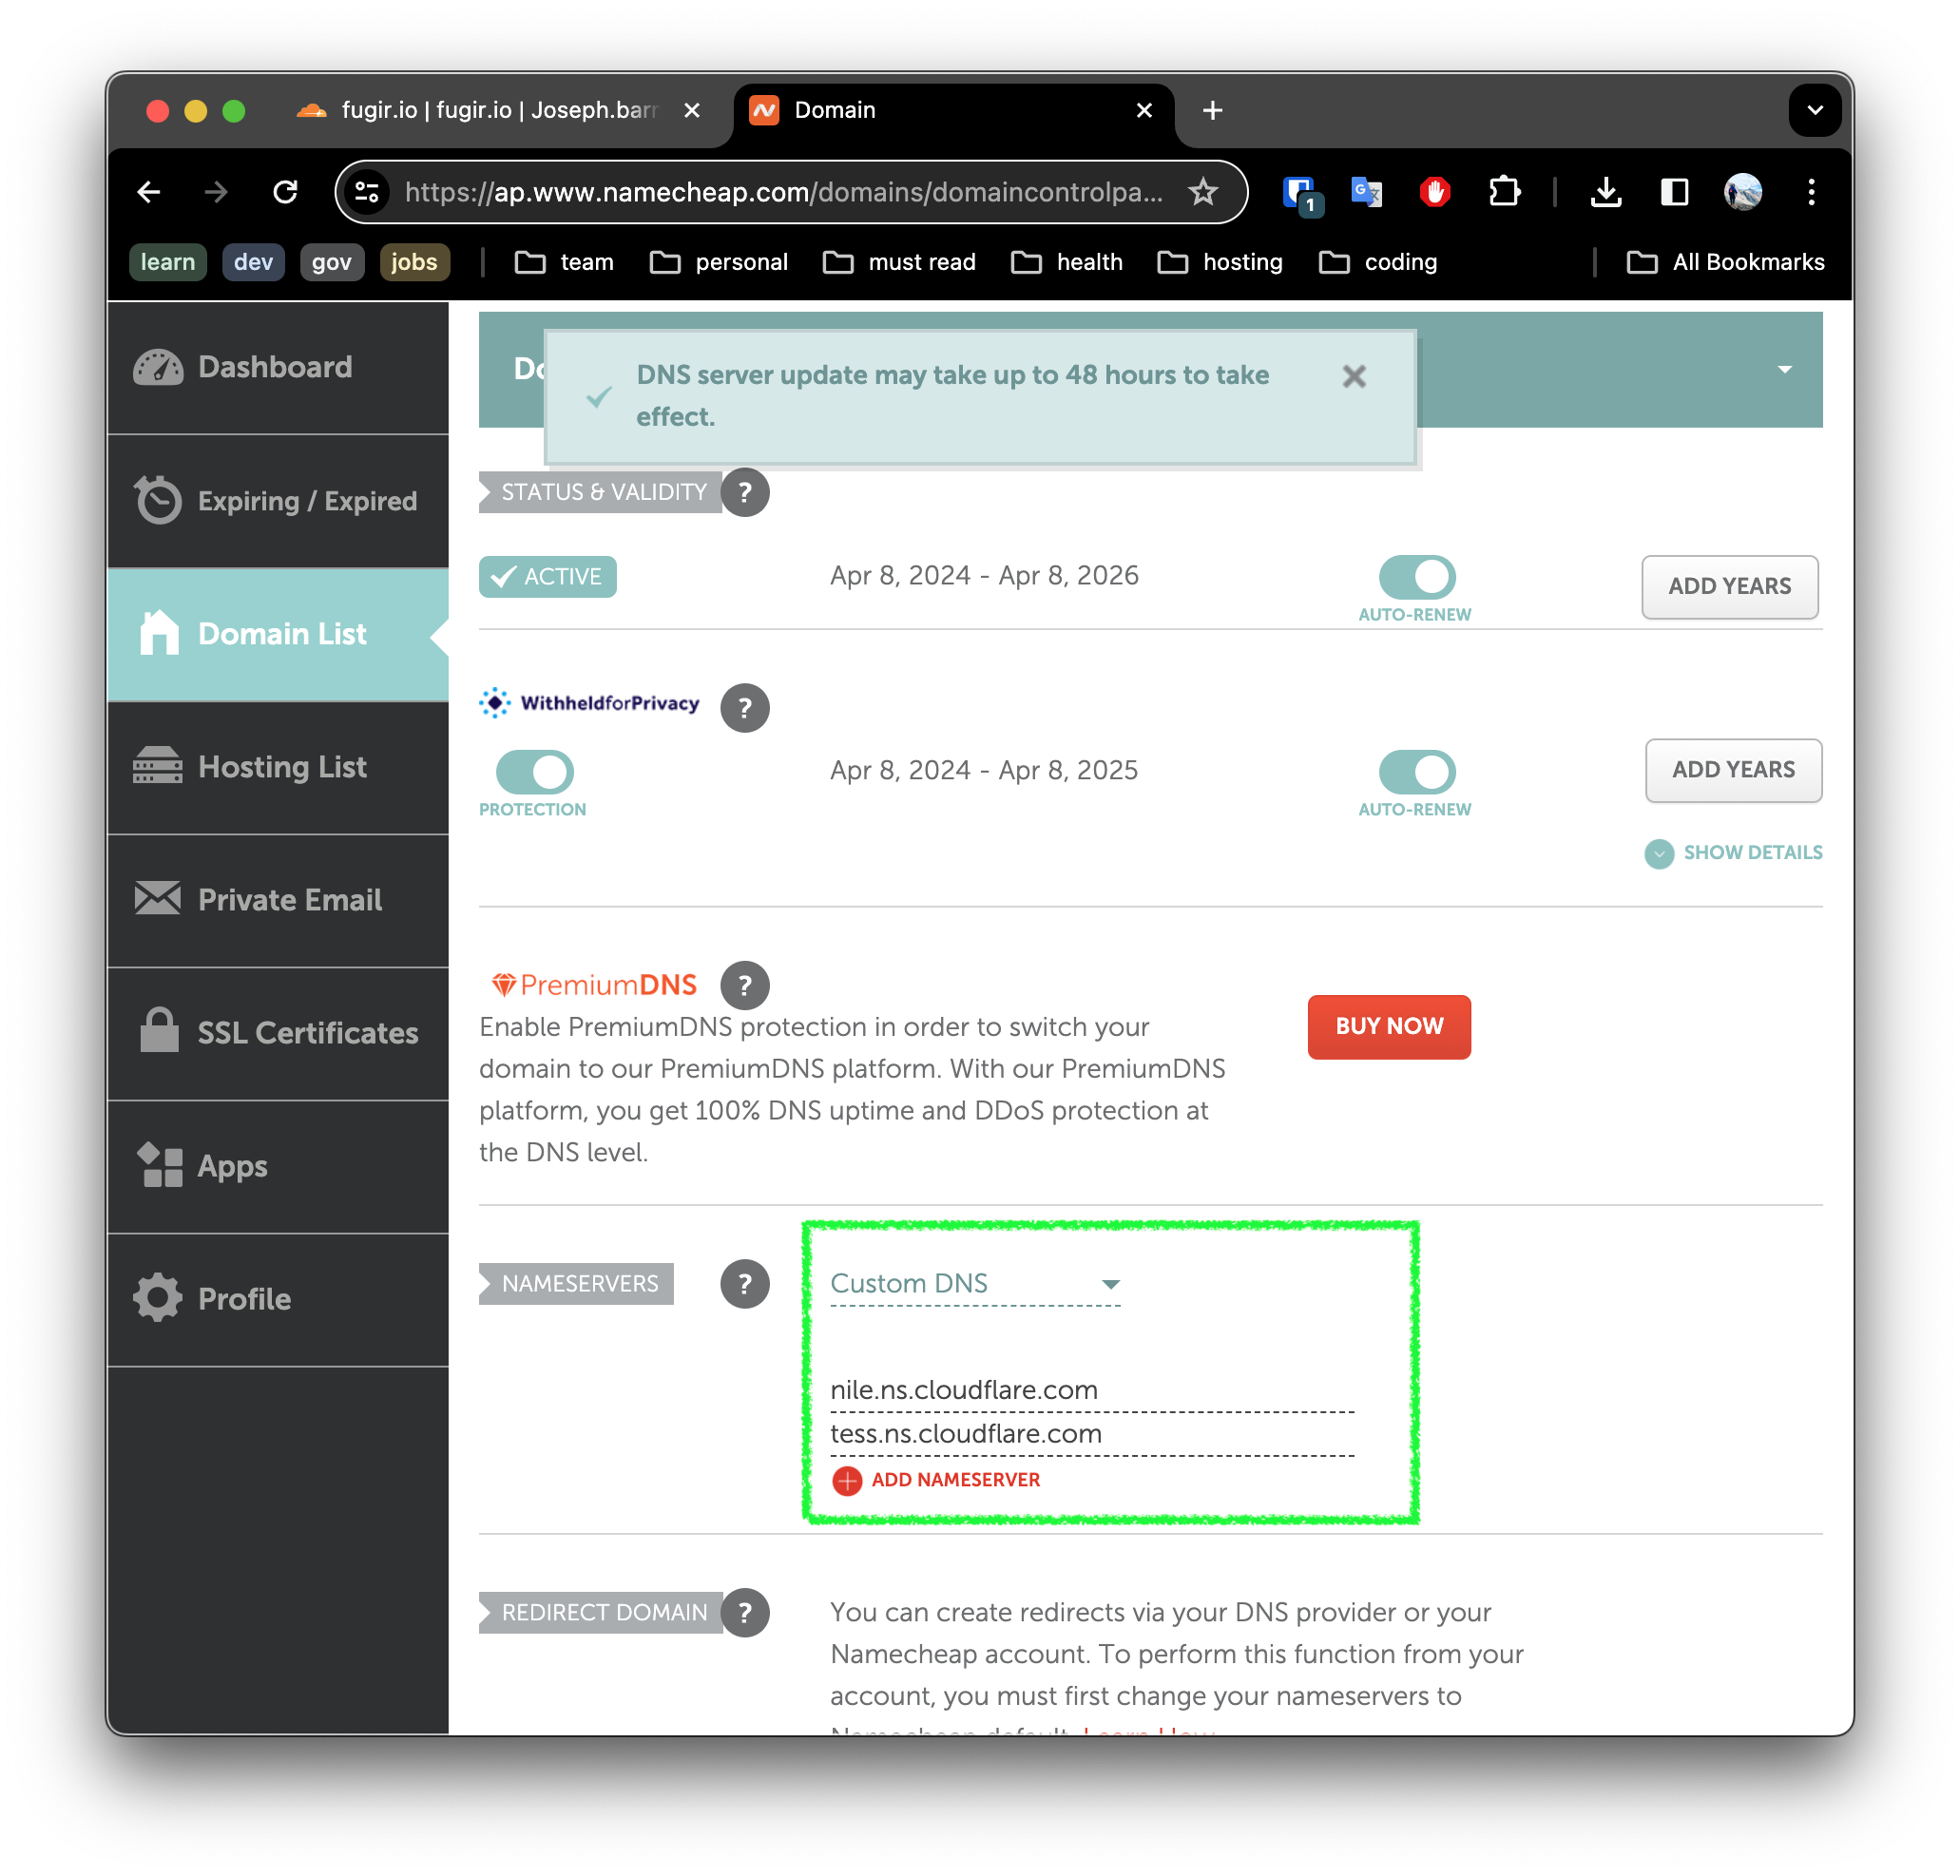
Next we enter the data we collected in step 4.

Then click save - and we should see a success banner.

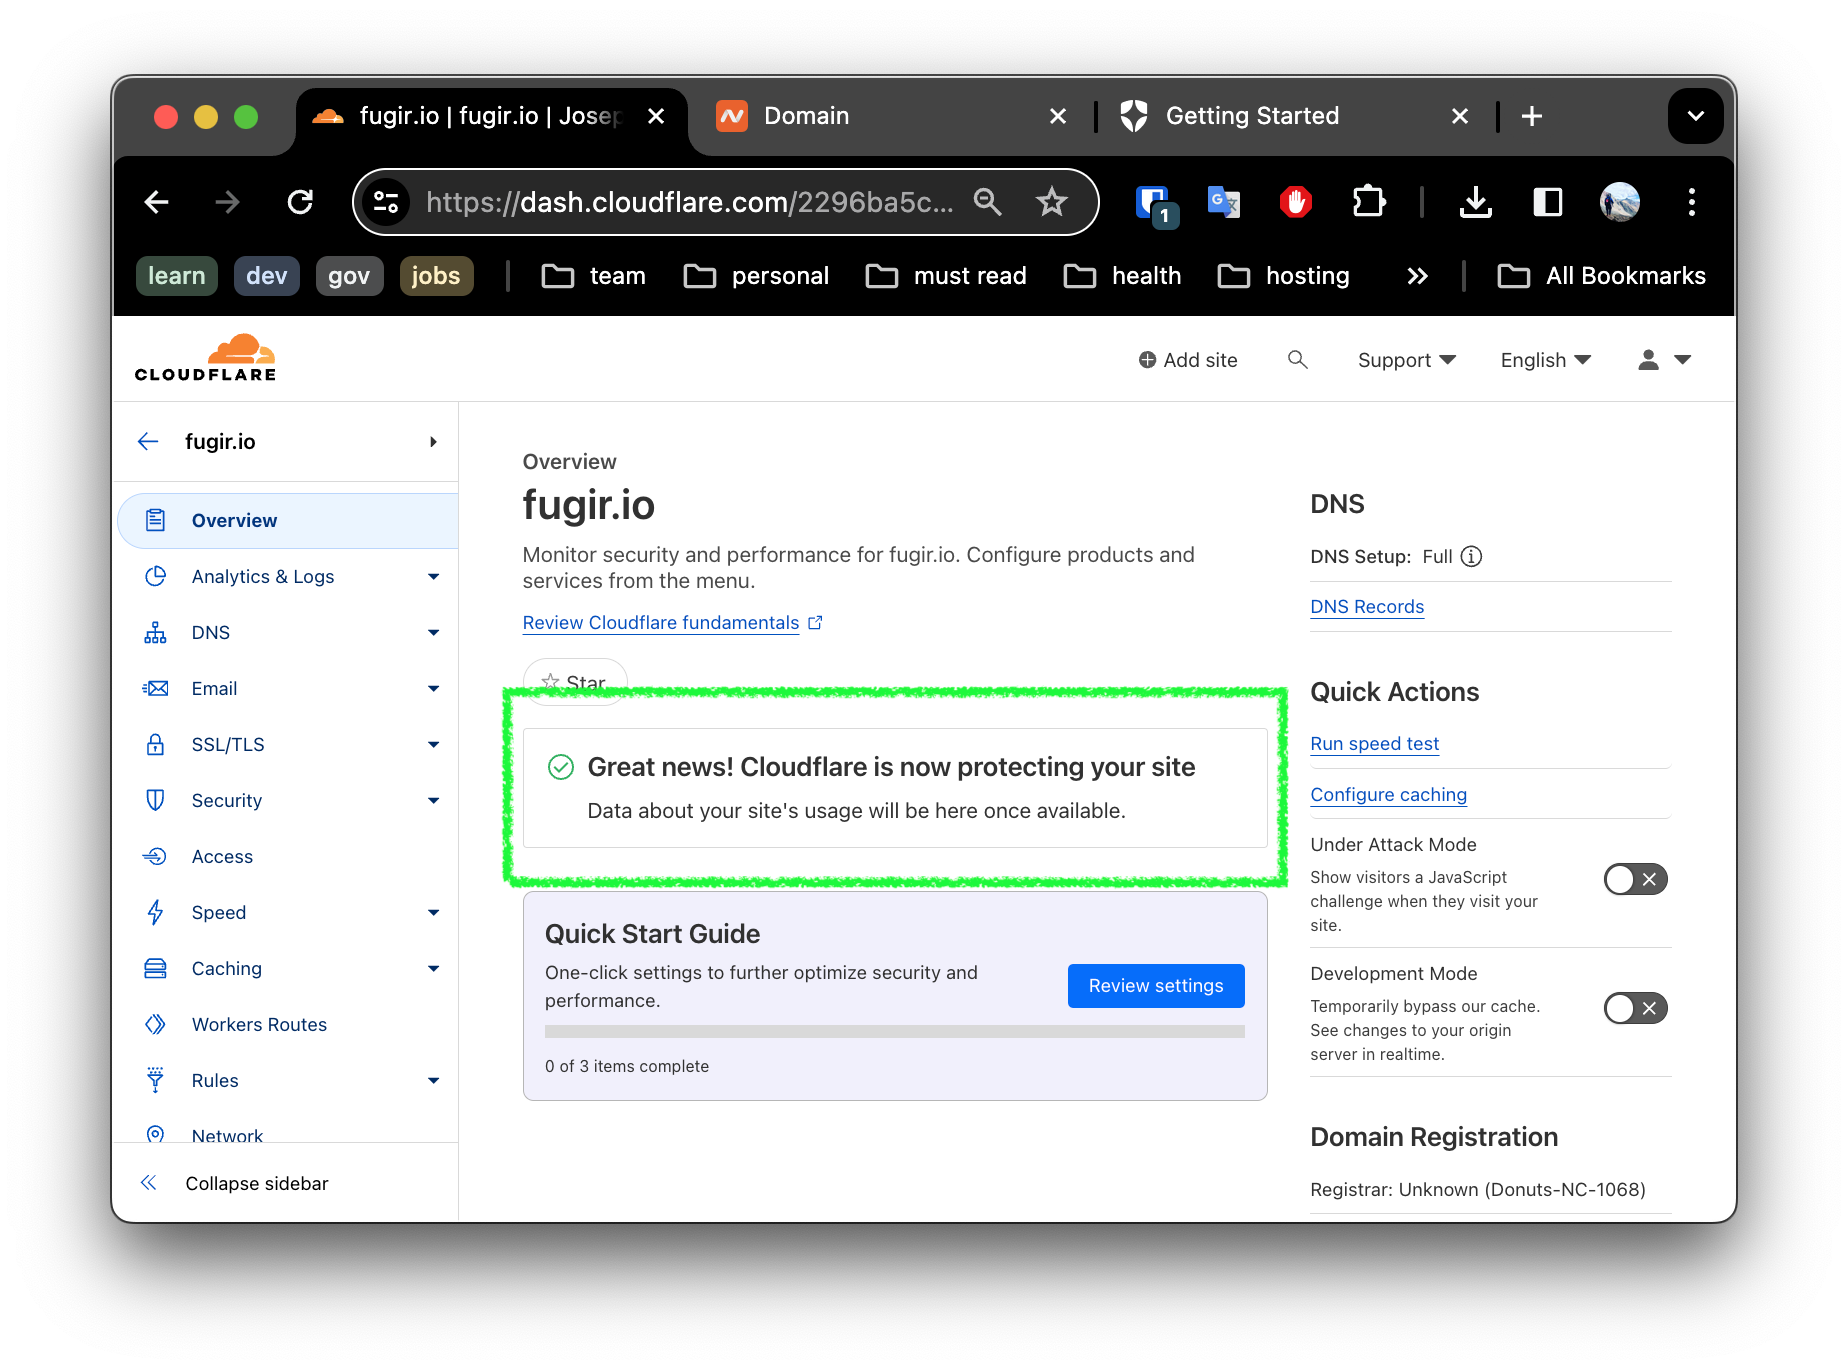
By now, we should see a success banner in Cloudflare as well.
Navigate to the DNS settings, and add two CNAME records for your github pages site as shown:
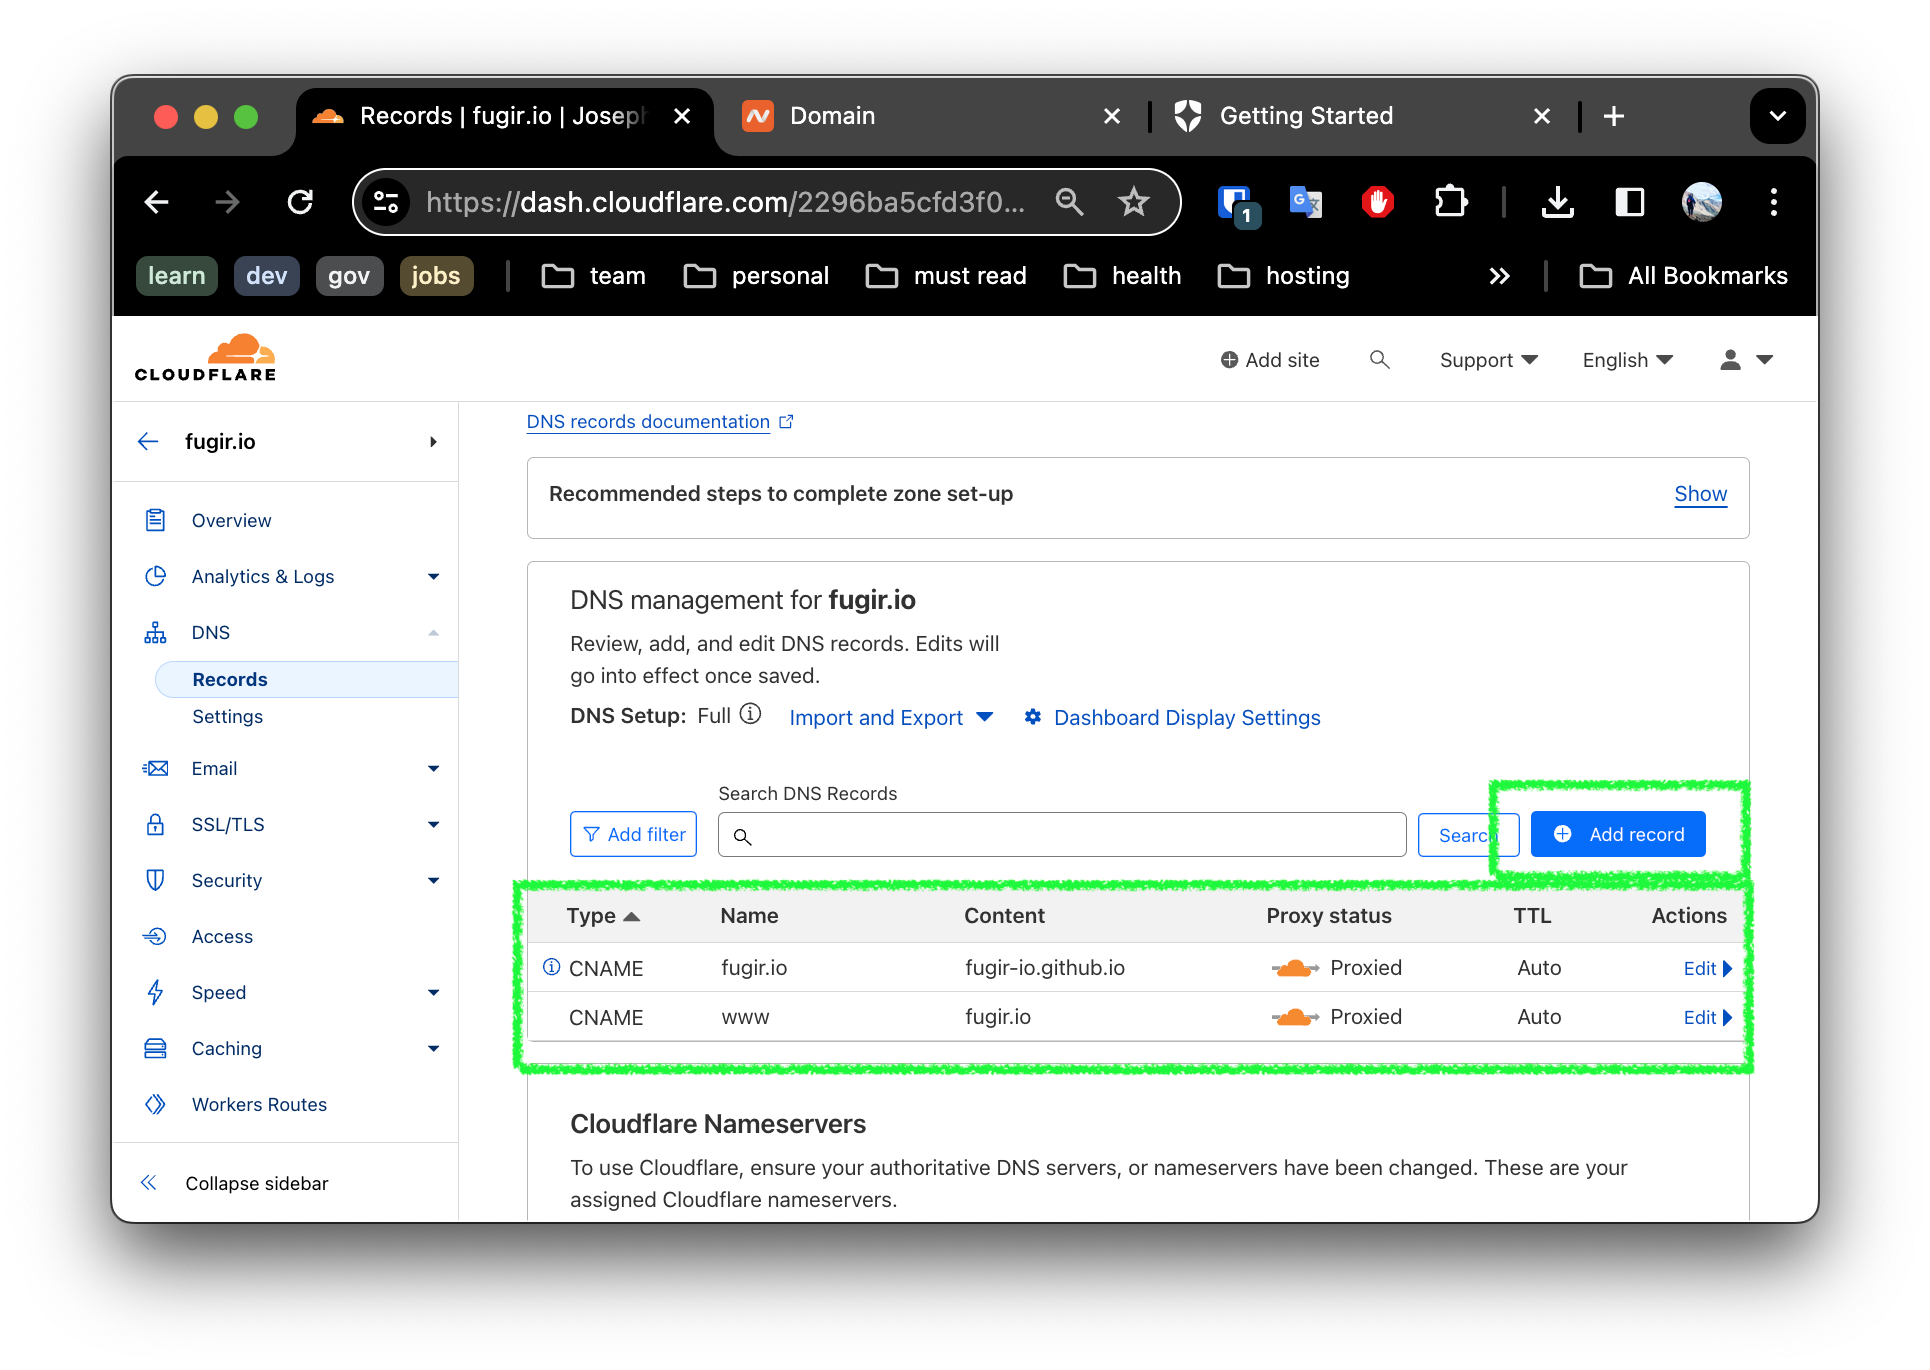
Thats it! We are all done. The site should be working as it was before!
We learned how to quickly add strong DDoS protection to our site using Cloudflare. Next we will setup TLS for our services using Let’s Encrypt and Cloudflare. Stay tuned!
Kata Containers offers a game-changing solution to the security and performance challenges faced in containerized environments. By seamlessly integrating lightweight VMs with Kubernetes, Kata Containers empowers developers to achieve unprecedented levels of security and efficiency.
Key Features include:
In this post, we provide a step-by-step configuring of Kata Containers on Kubernetes.
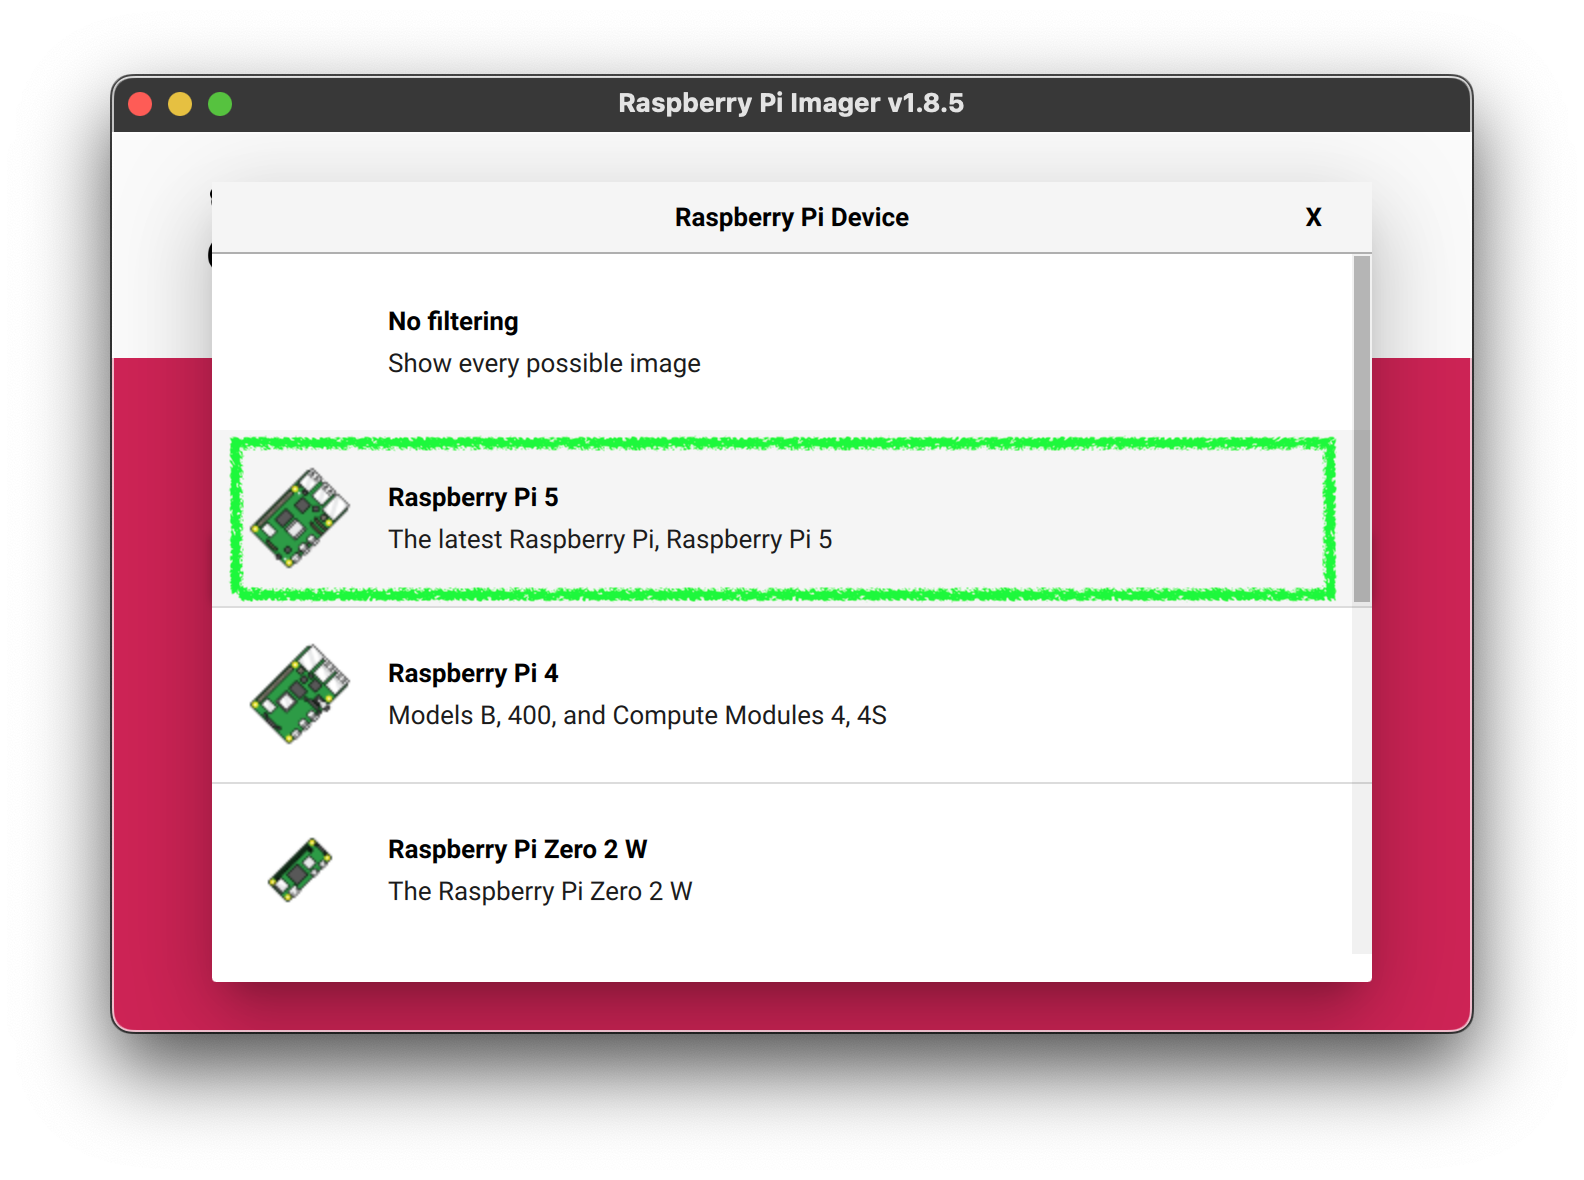
Previously in the series we’ve creates a Kubernetes cluster on Raspberry Pi 5. If you haven’t done so, please refer to the previous posts.
wget https://raw.githubusercontent.com/kata-containers/kata-containers/main/utils/kata-manager.sh
chmod +x kata-manager.sh
./kata-manager.sh -o
./kata-manager.sh -L
You should expect the following output:
clh	-	packaged	golang
dragonball	-	packaged	golang
fc	-	packaged	golang
qemu	default	packaged	golang
qemu-nvidia-gpu	-	packaged	golang
qemu-sev	-	packaged	golang
qemu-snp	-	packaged	golang
qemu-tdx	-	packaged	golang
Notice by default we have
qemuas the default hypervisor
sudo apt install qemu-system
sudo cat <<EOF > /etc/containerd/config.toml
version = 2

[plugins]
  [plugins."io.containerd.grpc.v1.cri"]
    [plugins."io.containerd.grpc.v1.cri".containerd]
      no_pivot = false
      [plugins."io.containerd.grpc.v1.cri".containerd.runtimes]
        [plugins."io.containerd.grpc.v1.cri".containerd.runtimes.runc]
          privileged_without_host_devices = false
          runtime_type = "io.containerd.runc.v2"
          [plugins."io.containerd.grpc.v1.cri".containerd.runtimes.runc.options]
            BinaryName = ""
            CriuImagePath = ""
            CriuPath = ""
            CriuWorkPath = ""
            IoGid = 0
        [plugins."io.containerd.grpc.v1.cri".containerd.runtimes.kata]
          runtime_type = "io.containerd.kata.v2"
          privileged_without_host_devices = true
          pod_annotations = ["io.katacontainers.*"]
          container_annotations = ["io.katacontainers.*"]
          [plugins."io.containerd.grpc.v1.cri".containerd.runtimes.kata.options]
            ConfigPath = "/opt/kata/share/defaults/kata-containers/configuration.toml"
    [plugins."io.containerd.grpc.v1.cri".cni]
      conf_dir = "/etc/cni/net.d"
EOF
sudo systemctl stop containerd
sudo systemctl daemon-reload
sudo systemctl start containerd
sudo systemctl status containerd
cat <<EOF > runtime.yaml
apiVersion: node.k8s.io/v1
kind: RuntimeClass
metadata:
  name: kata
handler: kata
EOF

kubectl apply -f runtime.yaml
cat <<EOF > pingpong-service.yaml
apiVersion: v1
kind: Namespace
metadata:
  name: ping
---
apiVersion: apps/v1
kind: Deployment
metadata:
  name: ping
  namespace: ping
  labels:
    app: ping
spec:
  selector:
    matchLabels:
      app: ping
  replicas: 2
  template:
    metadata:
      labels:
        app: ping
    spec:
      runtimeClassName: kata
      containers:
        - name: ping
          image: dasralph/ping:arm64_0.0.5
          ports:
            - containerPort: 8080
---
apiVersion: v1
kind: Service
metadata:
  name: ping
  namespace: ping
  labels:
    app: ping
spec:
  type: LoadBalancer
  selector:
    app: ping
  ports:
    - port: 80
      targetPort: 8080
      protocol: TCP
---
EOF

kubectl apply -f pingpong-service.yaml
Check that the nodes are running:
kubectl get pods -n ping -o wide
ps aux | grep qemu
Expected output looks similar to the following:
ps aux | grep qemu
root       83180  6.3  1.6 2730640 135824 ?      Sl   02:16   0:02 /opt/kata/bin/qemu-system-aarch64 -name sandbox-26519d5f8744b3d582b81dd8986b591d055bf3debcd2e498e5947efb4abe60d7 -uuid...
Enabling Kata Containers is a game-changer for security and performance; not to mention not terribly hard. We’ve seen how to install Kata Containers, determine the available hypervisor, install QEMU, update the containerd configuration, enable Kata Containers Runtime Class, and redeploy PingPong using Kata Containers and QEMU.
Stay tuned for more on how to leverage Kata Containers using Firecracker as the VM hypervisor.
Kubernetes does provide internal cluster IPs for services, but these IPs are only accessible within the cluster itself. When you deploy a service of type LoadBalancer in Kubernetes, it typically relies on a cloud provider’s load balancer to expose the service externally. However, in environments like our Mighty Raspberry Pi 5 cluster where there is no built-in cloud infrastructure, you need an alternative solution to expose services externally.
This is where MetalLB comes in. MetalLB serves as a load balancer for Kubernetes clusters, bridging the gap between internal and external accessibility. It seamlessly assigns external IP addresses to services of type LoadBalancer, enabling external traffic to reach our cluster and be directed to the appropriate pods. But how do we unleash the power of MetalLB in our non-cloud environment?
MetalLB doesn’t create IP addresses out of thin air. You must give it pools of IP addresses that it can manage. MetalLB will take care of assigning and recycling individual addresses as services come and go, but it will only ever hand out IPs that are part of its configured pools.
How - or where - you get IP address pools for MetalLB depends on your environment. If you’re running a bare-metal cluster in a collocation facility, your hosting provider probably offers IP addresses for lease. In our case, we have a home router, so we must login to the administrative console an restrict the DHCP address range assigned by our router - to create a pool which can be managed by MetalLB.
That is a great question reader! Typically your home router router acts as the DHCP server for your home LAN, assigning IP addresses to authorized devices, and advertise that assignment of IP to MAC using a Layer 2 mode (ARP/NDP) protocol.
MetalLB supports both BGP and Layer 2 ARP Advertisement so our PaaS plays nice with out home network.
If you had a larger environment, such as in a co-location, you might consider BGP. But for our purposes that is overkill.
Astute networking question! Layer 2 mode has two main limitations you should be aware of when it comes to Kubernetes.
During unplanned failover, service IPs may become unreachable until problematic clients update their cache entries.
sequenceDiagram
    participant MetalLB
    participant Node1
    participant Node2
    participant Client
    MetalLB->>Node1: Single-node bottlenecking
    MetalLB->>Node2: Single-node bottlenecking
    MetalLB->>Client: Potentially slow failover
    Client->>Node1: Delayed cache update
    Node1->>Client: Forward traffic
    Client->>Node2: Updated cache
    Node2->>Client: Forward traffic
Hopefully this background information is enlightening, let’s setup Metal LB and see how it work!
Before diving into MetalLB configuration, it’s essential to ensure we have a pool of IP addresses available. In our home network scenario, this involves tweaking the DHCP settings on our router to reserve a block of addresses for MetalLB management.
Login to your Router as admin. This information is typically listed on a sticker on your router. If not, you may need to read the documentation for your router, or contact your ISP for help.
Navigate to the DHCP settings, typically found under Advanced -> IP Addresses -> DHCP Settings on most routers.
We will configure the DHCP to reserve a block of addresses within the 192.168.1.X range, which falls under Class-C private IP addresses as defined by RFC 1918 for private network use.
In a standard IPv4 network, with one IP address reserved for the network identifier and another for broadcast, it leaves 254 IP addresses available for devices. Thus, the subnet can accommodate a maximum of 254 devices.
To ensure efficient IP address allocation, we’ll limit the router to assigning addresses between 192.168.1.2 and 192.168.1.64, allowing for up to 62 devices.
This allocation strategy frees up addresses from 192.168.1.65 to 192.168.1.250, which we’ll assign to MetalLB for managing addresses in our cluster.

From a security perspective, it’s crucial to implement LAN segmentation to isolate devices within a network. However at this time we will Keep it Simple - and visit that topic in another post.
With our IP pool secured, it’s time to install MetalLB. A simple command on our master node - microk8s enable metallb - sets the stage for MetalLB’s magic.
microk8s enable metallb
MetalLB requires explicit instructions on IP address allocation. By creating a YAML file specifying our IP address range and applying it to our platform, we empower MetalLB to manage these addresses effectively.
Create a file named metallb-address-pool.yaml as follows:
# addresspool.yaml
---
apiVersion: metallb.io/v1beta1
kind: IPAddressPool
metadata:
  name: custom-addresspool
  namespace: metallb-system
spec:
  addresses:
  - 192.168.1.65-192.168.1.254
IMPORTANT: don’t forget to use the IP address range you reserved on your router!
Now apply this using to your platform:
kubectl apply -f metallb-address-pool.yaml
In our discussion, we explored the nuances of Layer 2 mode and its implications for our network environment. We ensured smooth integration by addressing potential bottlenecks and failover challenges.
Luckily for us we installed Microk8s which has already configured everything for us! So there is nothing to do! 🎉
For everyone else, I will direct you to the documentation.
With MetalLB configured, it’s time to put it to the test. We will deploy a sample service and marveled as MetalLB seamlessly assigned an external IP address to it. Through meticulous validation steps, from checking service assignments to verifying ARP advertisements, we confirmed the robustness of our setup.
Create a file named hello-deployment.yaml with the following content:
apiVersion: apps/v1
kind: Deployment
metadata:
  name: echo-deployment
spec:
  replicas: 1
  selector:
    matchLabels:
      app: echo-server
  template:
    metadata:
      labels:
        app: echo-server
    spec:
      containers:
        - name: echo-server
          image: hashicorp/http-echo
          ports:
            - name: http-port
              containerPort: 5678
---
apiVersion: v1
kind: Service
metadata:
  name: echo-service
spec:
  type: LoadBalancer
  ports:
    - name: http-port
      port: 80
      targetPort: http-port
      protocol: TCP
  selector:
    app: echo-server
Notice the type: LoadBalancer specified in the service? This activates MetalLB to assign a new IP address to the service externally!
We can apply this and do some validation.
$ kubectl apply -f hello-deployment.yaml
deployment.apps/echo-deployment created
$ kubectl get services
NAME               TYPE           CLUSTER-IP       EXTERNAL-IP    PORT(S)                      AGE
echo-service       LoadBalancer   10.152.183.167   192.168.1.66   80:31136/TCP                 7s
Notice we got an External IP address of 192.168.1.66!
We can verify the ARP advertisement by running the following:
$ arp -a
...
? (192.168.1.66) at 2c:cf:67:19:72:6e on en0 ifscope [ethernet]
...
$ curl http://192.168.1.66
hello-world
Great - it is all working! 🎉🎉🎉
Armed with MetalLB, we’ve unlocked a new frontier in our Kubernetes journey. External accessibility is no longer a barrier, and our cluster stands ready to face new challenges. As we bid farewell to this chapter, we look forward to the next leg of our adventure, armed with newfound knowledge and determination.
Infrastructure as a Service (IaaS) is a cloud computing model that provides users with virtualized computing resources such as servers, storage, networking, and virtualization on-demand over the internet.
Platform as a Service (PaaS) is a cloud computing model that offers a complete development and deployment environment in the cloud. It provides developers with tools and resources to build, deploy, and manage applications without having to worry about underlying infrastructure management.
At this stage, we are setting up a working Kubernetes cluster on our Raspberry Pi 5, which serves as our IaaS foundation. Kubernetes enables us to access computing resources such as servers, networking, and compute (containers) on our Pi cluster.
With Kubernetes installed, we can deploy and manage containers and services on our cluster. Additionally, we can access these services from our home network, laying the groundwork for our IaaS infrastructure.
MicroK8s is a lightweight and easy-to-use Kubernetes distribution that is perfect for running on resource-constrained environments like Raspberry Pi. In this guide, we’ll walk through the process of setting up a MicroK8s cluster on Raspberry Pi devices, enabling you to harness the power of Kubernetes for your projects.
Before we begin, ensure you have the following:
Ensure your Raspberry Pi devices are up to date and have necessary packages installed:
sudo apt update
sudo apt upgrade
sudo apt install linux-modules-extra-raspi
Use Netplan to configure network settings to ensure connectivity.
# Set up Ethernet connection (if not already enabled)
sudo ip link set dev eth0 up
sudo dhclient eth0 -v
sudo vi /etc/netplan/50-cloud-init.yaml
sudo netplan apply
Disabling swap in Kubernetes environments is crucial for maintaining performance, stability, and effective resource management by preventing unnecessary swapping of memory to disk..
sudo dphys-swapfile swapoff
sudo dphys-swapfile uninstall
sudo apt purge -y dphys-swapfile
sudo apt autoremove -y
enable cgroups in the kernel by running the following command:
sudo sed -i '/^console.*=BL/s/$/ cgroup_enable=cpuset cgroup_enable=memory cgroup_memory=1/' /boot/firmware/cmdline.txt
now reboot the RPi to activate these settings:
sudo reboot
Install MicroK8s using Snap:
sudo snap install microk8s --classic
After navigating to the home directory and creating the .kube directory, use the microk8s config command to configure the MicroK8s user settings.
cd $HOME
mkdir .kube
cd .kube
sudo microk8s config > config
Configure the a microk8s group so sudo is not required by the user:
sudo usermod -aG microk8s "$USER"
If you are provisioning more than one RPi 5 to be part of the cluster, such as in my case I have five, you will want to repeat steps 1 through 6 on each RPi.
Decide which Raspberry Pi will be the master and which ones will be workers. Add worker nodes to the cluster.
On the master node run the following command to identify the worker join command:
microk8s add-node
Example output:
From the node you wish to join to this cluster, run the following:
microk8s join 192.168.1.56:25000/0f112c22f3bbdb062abaab9a3d65c0a2f/421deadbeef

Use the '--worker' flag to join a node as a worker not running the control plane, eg:
microk8s join 192.168.1.56:25000/0f112c22f3bbdb062abaab9a3d65c0a2f/421deadbeef --worker

If the node you are adding is not reachable through the default interface you can use one of the following:
microk8s join 192.168.1.56:25000/0f112c22f3bbdb062abaab9a3d65c0a2f/baddeadbeef
microk8s join 192.168.1.57:25000/0f112c22f3bbdb062abaab9a3d65c0a2f/421deadbeef
Since we are only adding workers, and don’t plan to add more controller nodes, we only want to run the following command from above on each worker:
microk8s join 192.168.1.56:25000/0f112c22f3bbdb062abaab9a3d65c0a2f/421deadbeef --worker
note you will get a different value for
microk8s join <master-ip>:25000/<token>/<hash> --worker
Validate the nodes have joined the cluster
$ microk8s kubectl get nodes
 NAME    STATUS     ROLES    AGE   VERSION
 pi5p0   Ready      <none>   18d   v1.28.7
 pi5p1   Ready      <none>   18d   v1.28.7
 pi5p2   Ready      <none>   18d   v1.28.7
 pi5p3   Ready      <none>   18d   v1.28.7
 pi5p4   Ready      <none>   18d   v1.28.7
Each node should be listed and ready
Set up aliases for easier command-line usage.
echo "alias kubectl='microk8s kubectl'" >> ~/.bashrc
echo "alias ctr='ctr kubectl'"" >> ~/.bashrc
source ~/.bashrc
I recommend doing this on all nodes.
Enable essential add-ons for your MicroK8s cluster, such as the dashboard, DNS, and community.
sudo microk8s enable dashboard dns community
Deploy a hello world application and verify its status.
Deploy a hello world application
kubectl create deployment hello-node --image=registry.k8s.io/e2e-test-images/agnhost:2.39 -- /agnhost netexec --http-port=8080
Check to see if the pod is ready
kubectl get deployments
note sometimes it may take a second to pull the image
kubectl get pods
kubectl get events
In this guide, we’ve successfully transformed our Raspberry Pi 5 devices into a powerful Kubernetes cluster using MicroK8s. By following the step-by-step instructions, we’ve laid the foundation for our PaaS infrastructure, enabling us to deploy and manage containerized applications with ease. We’ve learned how to configure network settings, install MicroK8s, add worker nodes, and enable essential add-ons.
Next, we’ll explore adding the MetalLB add-on and configuring our Home Router to expose our services to our LAN, taking our PaaS infrastructure to the next level. Stay tuned for more exciting developments in our journey to canning clouds with Raspberry Pi!

As I set up my new RPi5s, a bolt of inspiration struck me — what if I could create a real-ish cloud lab using only Raspberry Pi 5s and free resources? The possibilities are endless!
Imagine the thrill of building your own cloud infrastructure from scratch, all while saving a ton in cloud costs. Picture the hands-on learning opportunities as we delve into security best practices and platform building techniques. This is not just a project; it’s an adventure waiting to unfold!
The diagram above is just a glimpse of what’s to come as we embark on this journey together. But I need your help to make it happen! Join me as we push the boundaries of what’s possible with Raspberry Pi and free resources. Together, we’ll build something truly extraordinary.
As we embark on our journey to build a Raspberry Pi cloud lab, the idea of creating our own Platform as a Service (PaaS) using Kubernetes is both thrilling and ambitious.
Imagine having the power to deploy, manage, and scale applications effortlessly, all within the confines of our Raspberry Pi cluster. Kubernetes, with its robust orchestration capabilities, provides the perfect foundation for such an endeavor.
By harnessing the capabilities of Kubernetes, we can transform our Raspberry Pi cluster into a fully functional PaaS, offering developers the tools they need to deploy their applications seamlessly. From containerized workloads to automated scaling, our PaaS built on Kubernetes will empower developers to focus on building great software without worrying about the underlying infrastructure.
But how exactly might this work? Stay tuned as we explore the intricacies of deploying Kubernetes on Raspberry Pi and configuring it to function as a PaaS. Together, we’ll uncover the possibilities and challenges of building our own PaaS solution from scratch.
Get ready to dive deeper into the world of cloud-native technologies and unlock the full potential of our Raspberry Pi cloud lab. The journey ahead promises to be both exhilarating and enlightening—let’s make it happen!
Before we begin, make sure you have the following:
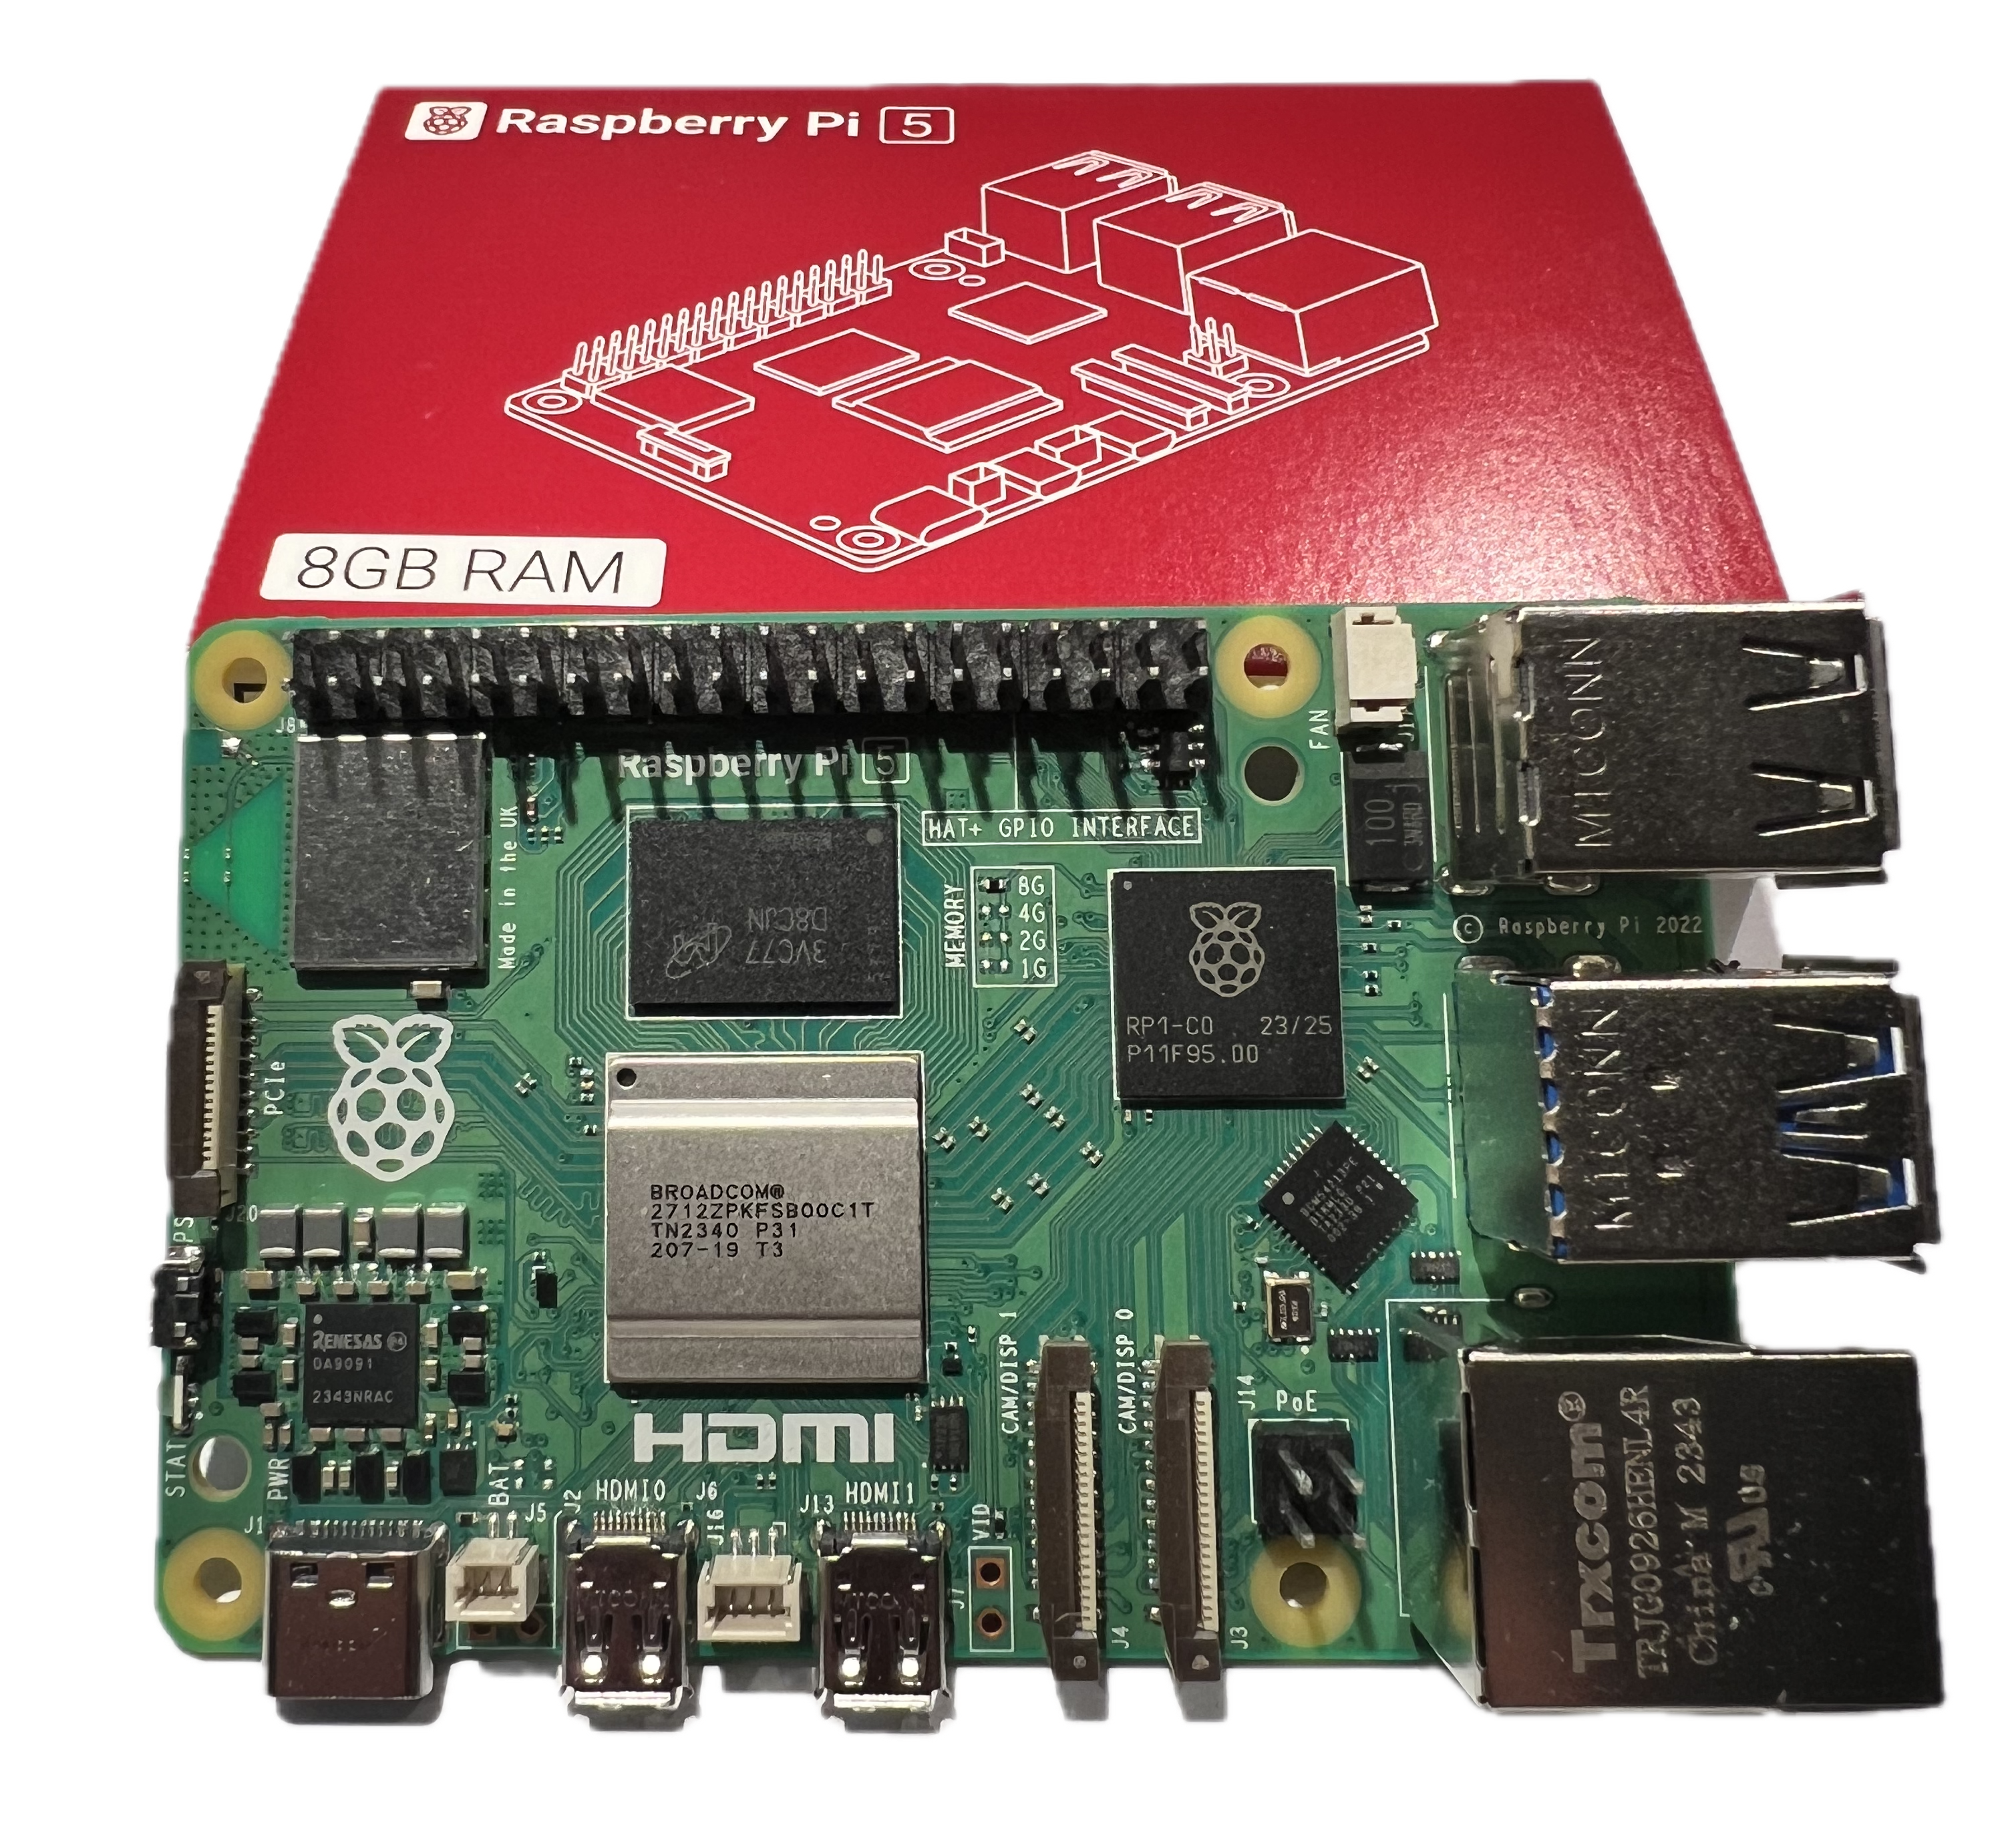
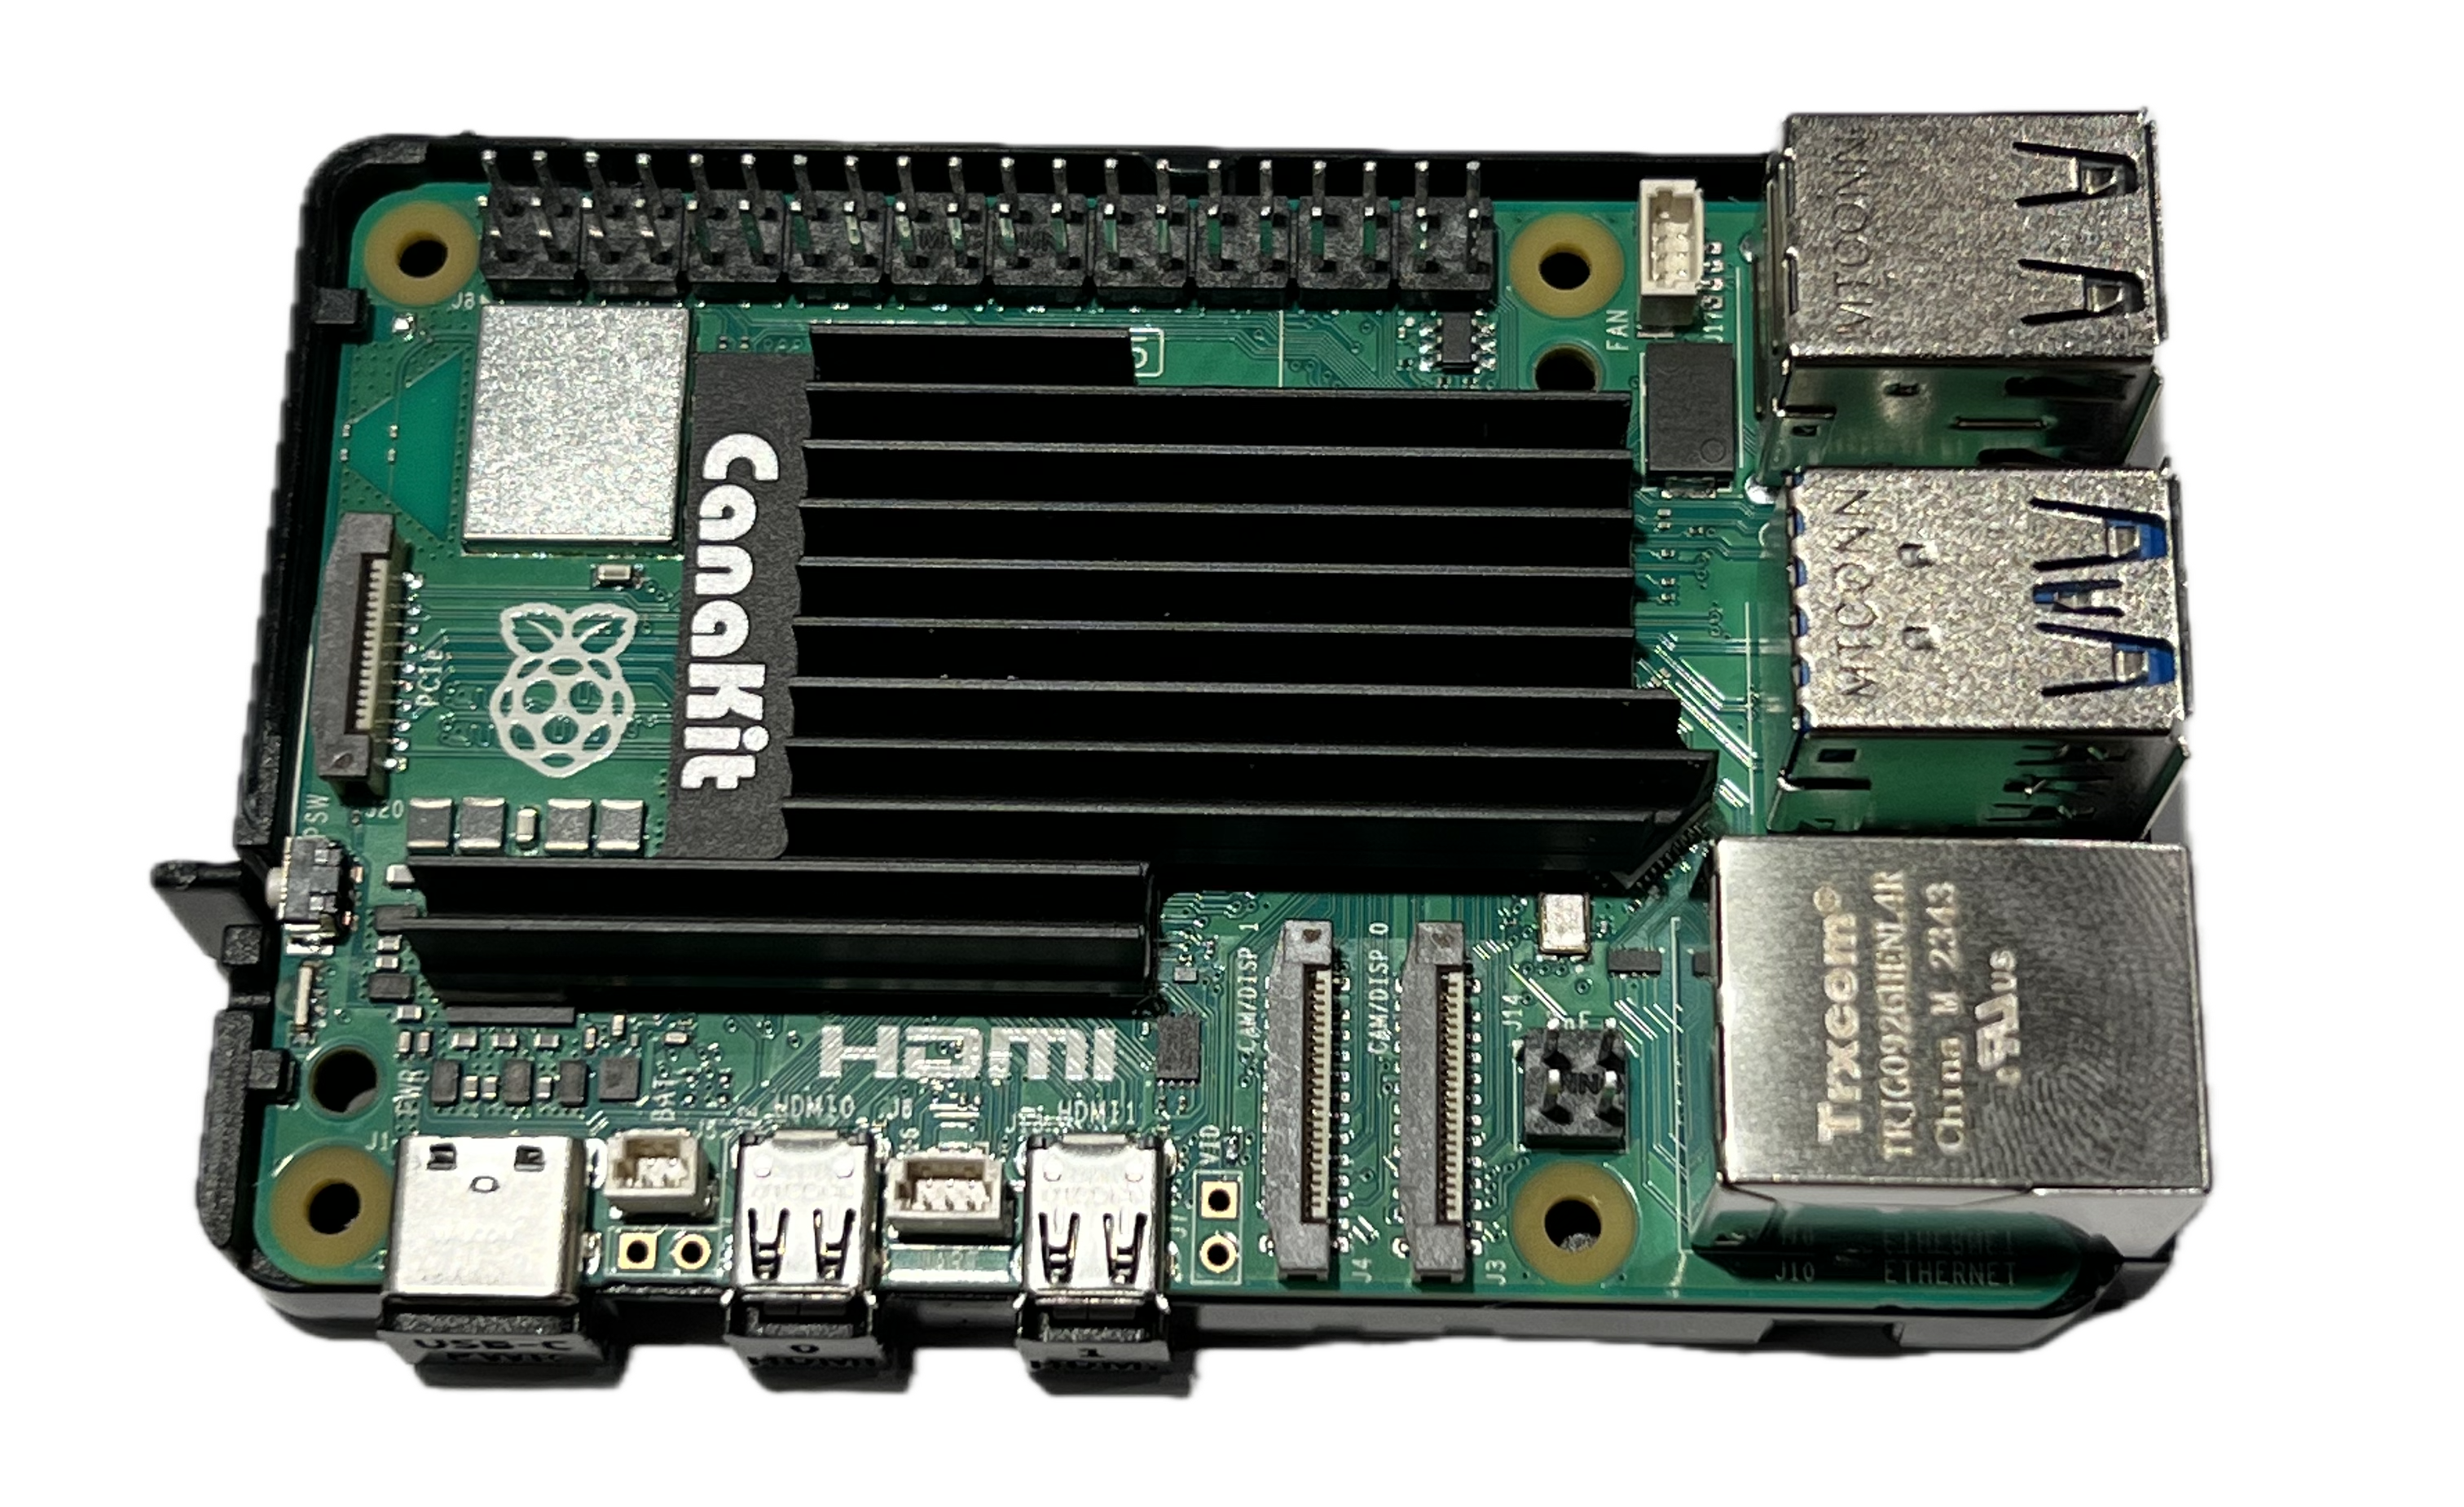
This is the exciting part. Unbox the Raspberry Pi 5 and take a moment to appreciate the beauty of this tiny computer.
This is an important step. The new RPi5 can get very hot. It’s important to keep it cool.

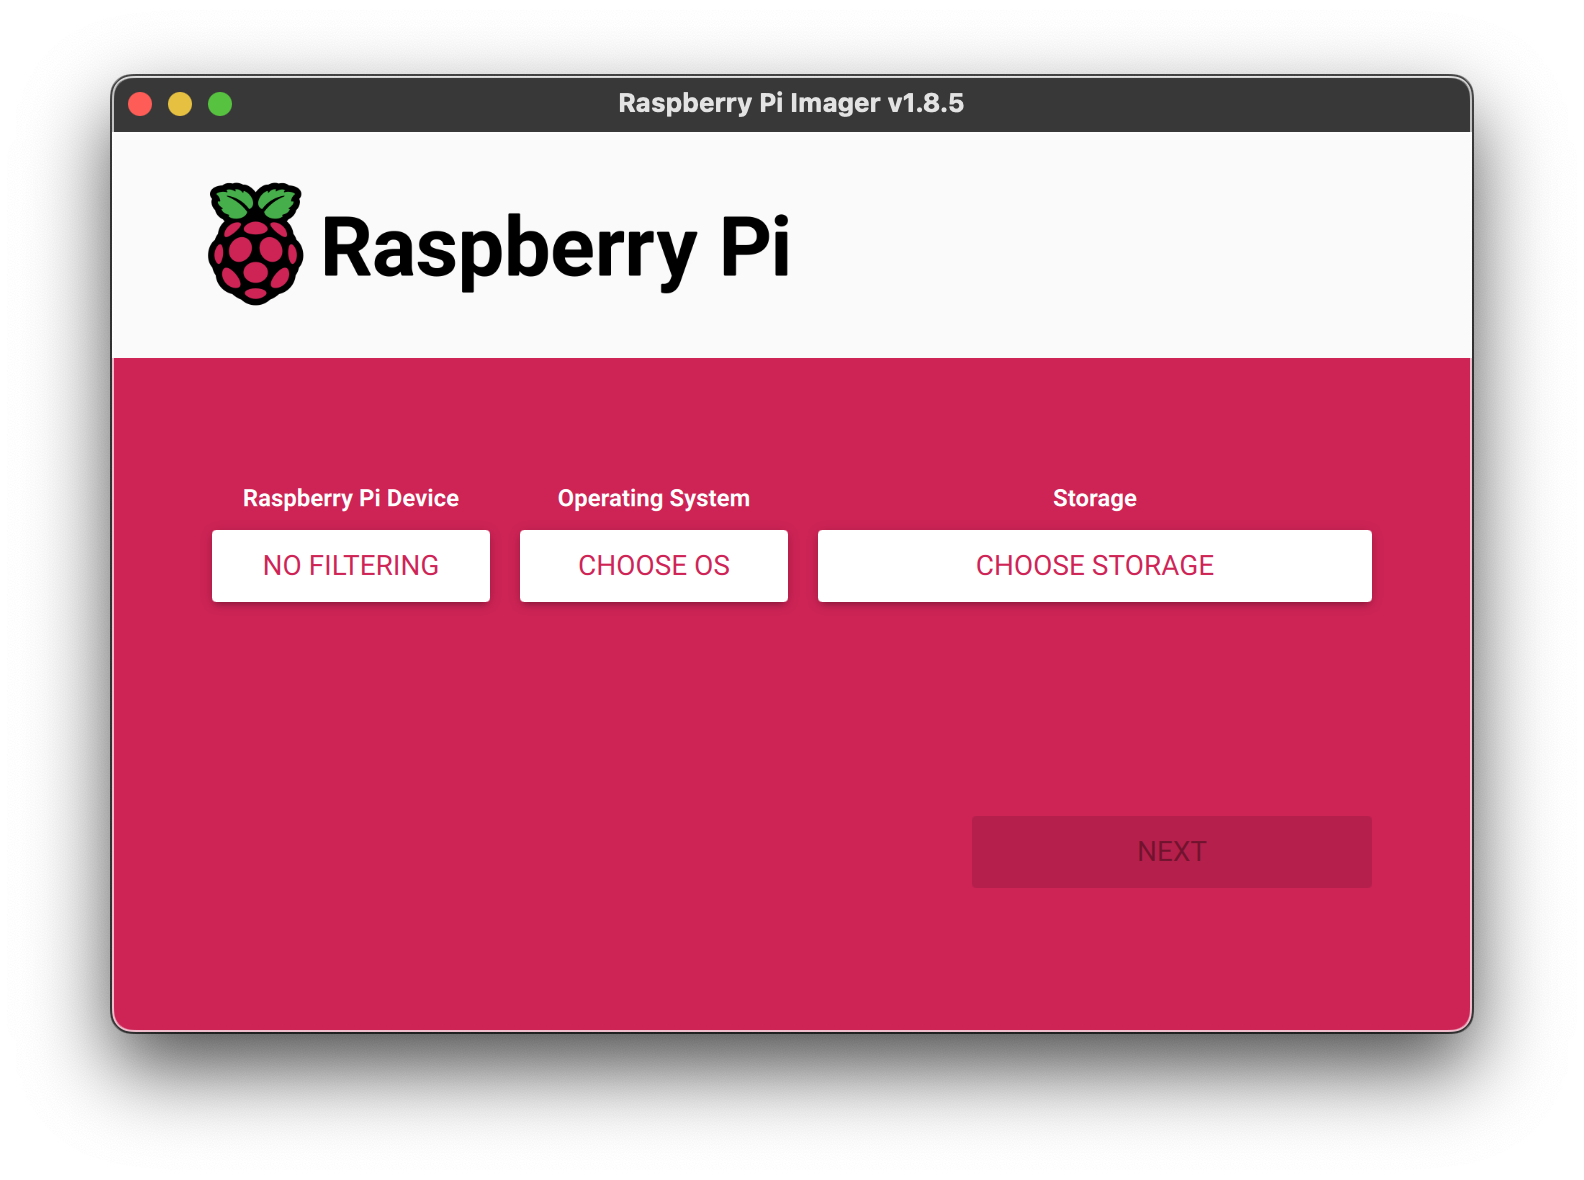
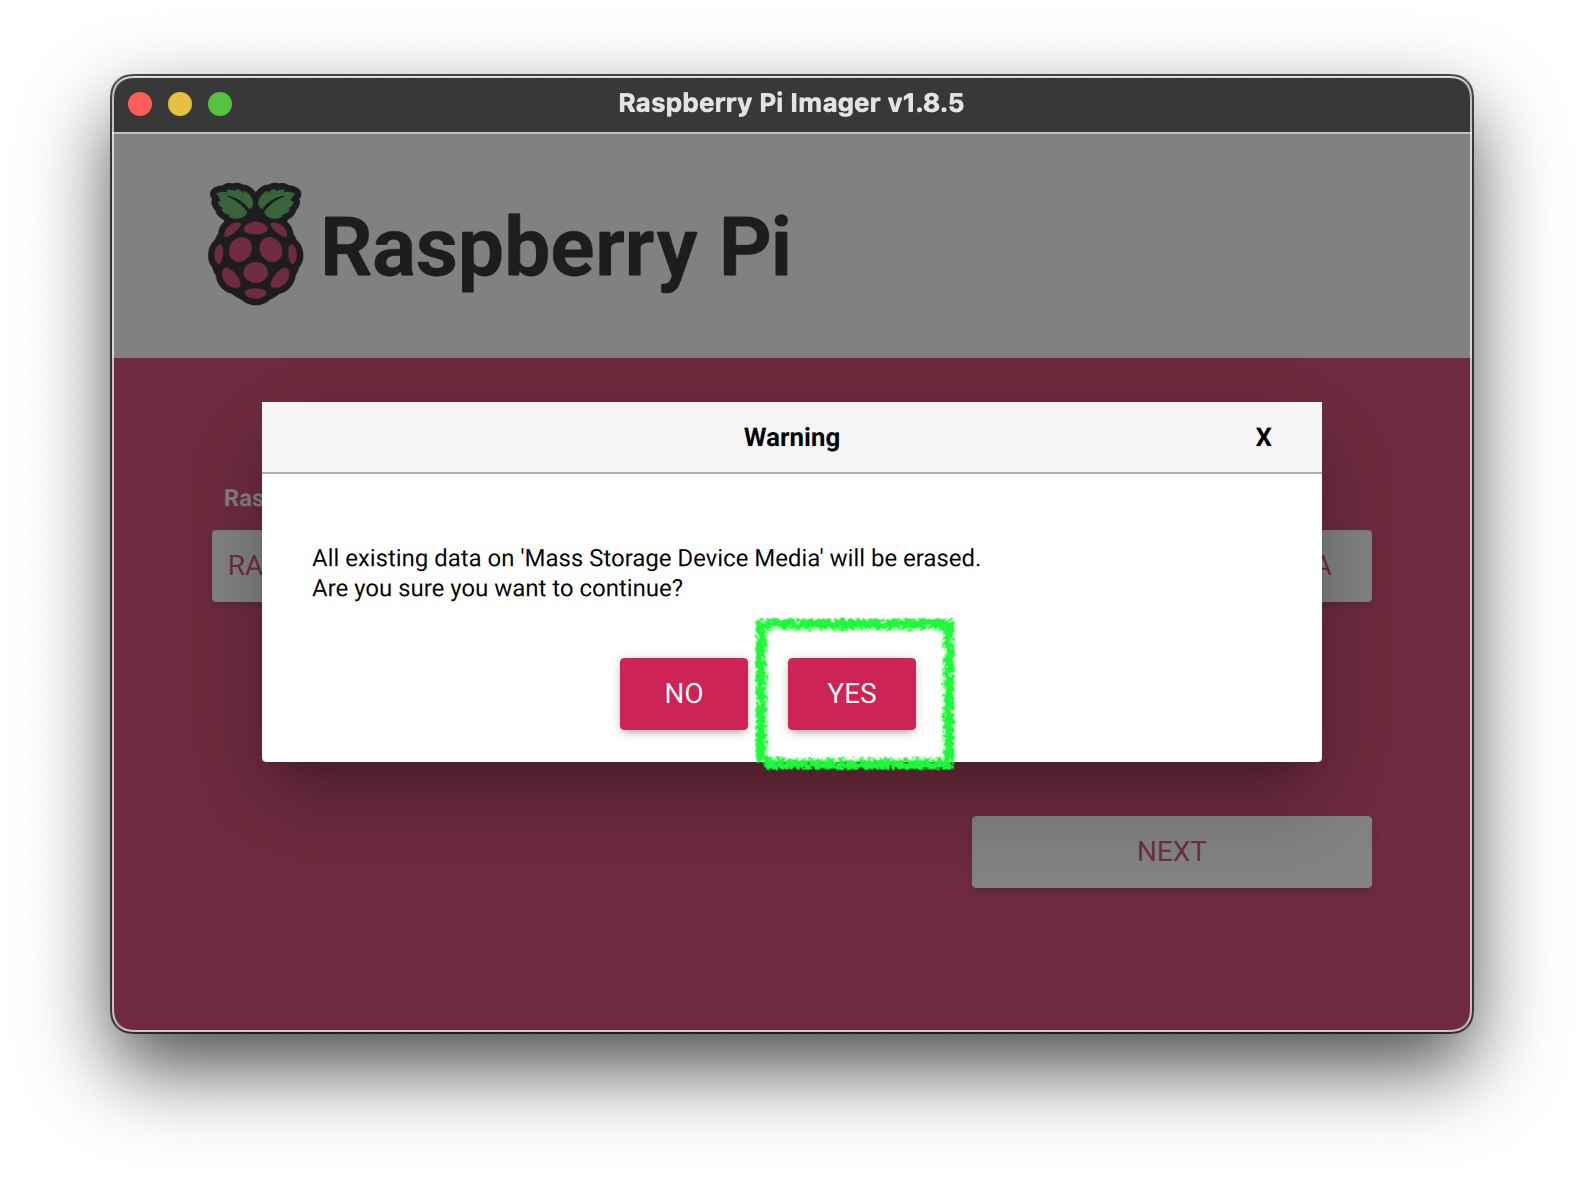
The installer is available on the Raspberry Pi website. Download the installer and install it onto your laptop or work station.
This is an important step. The new RPi5 can get very hot. It’s important to keep it cool.
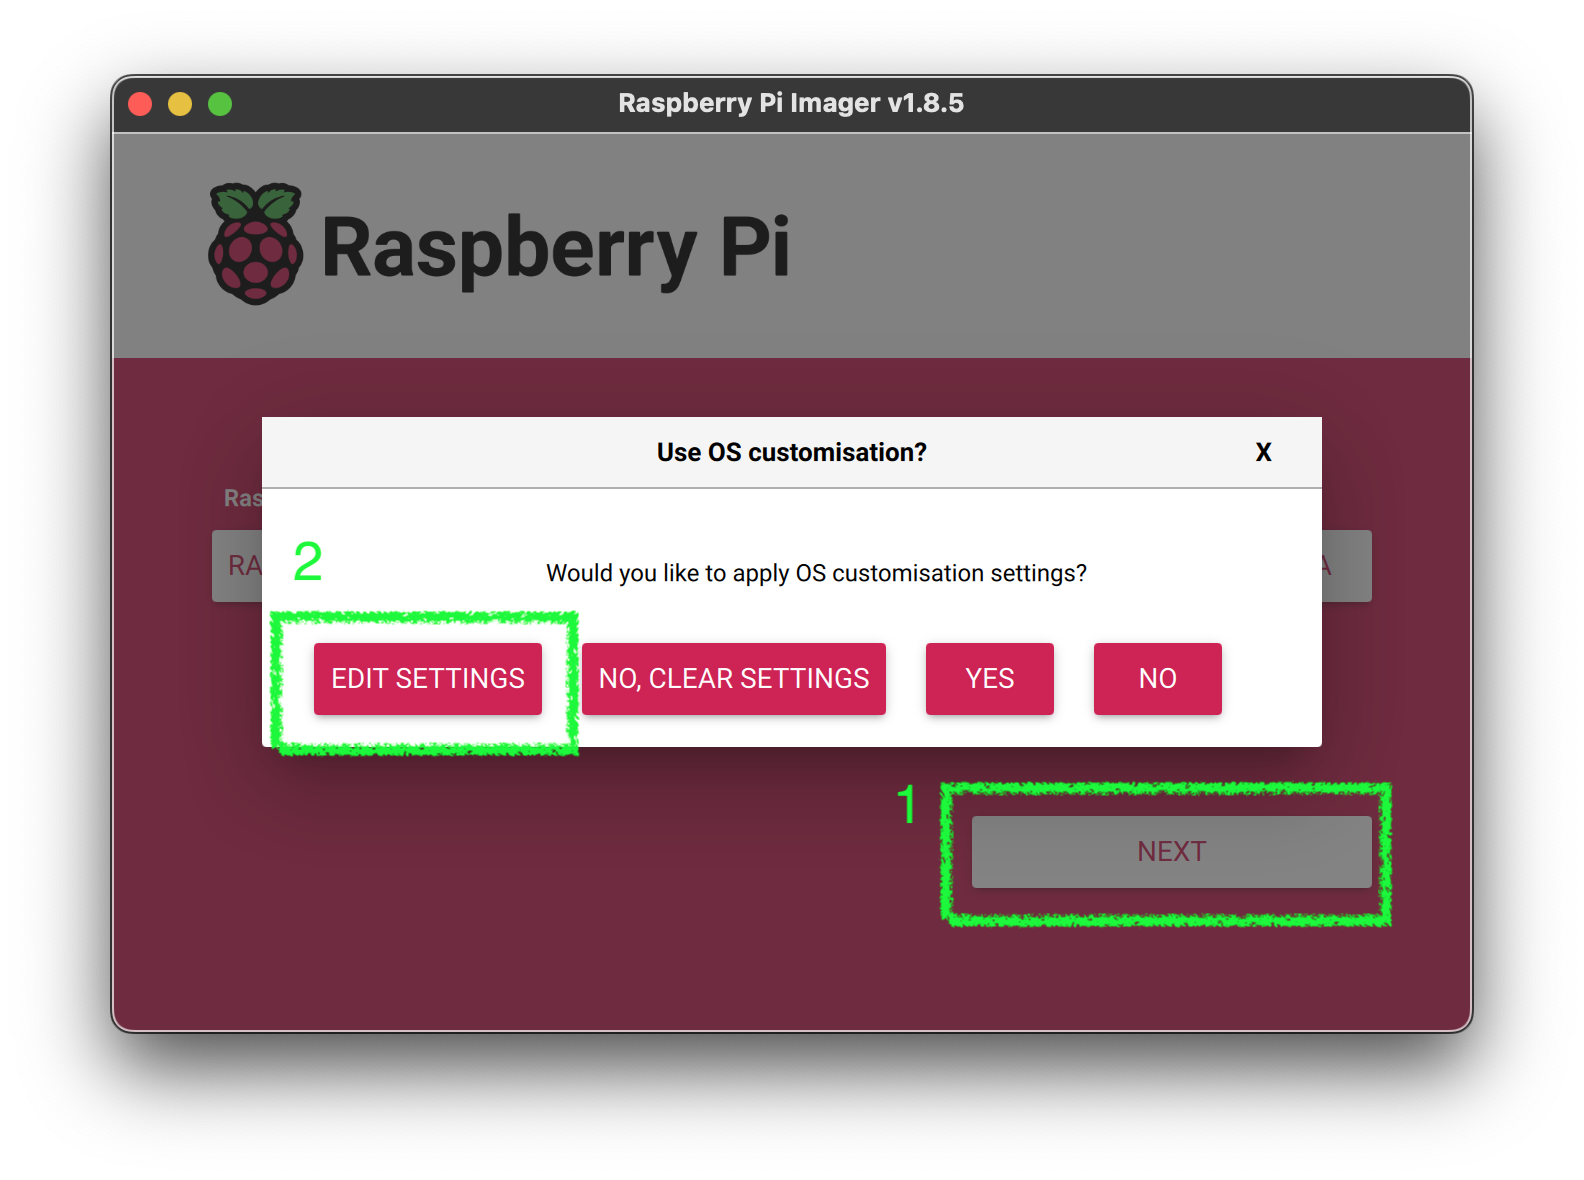
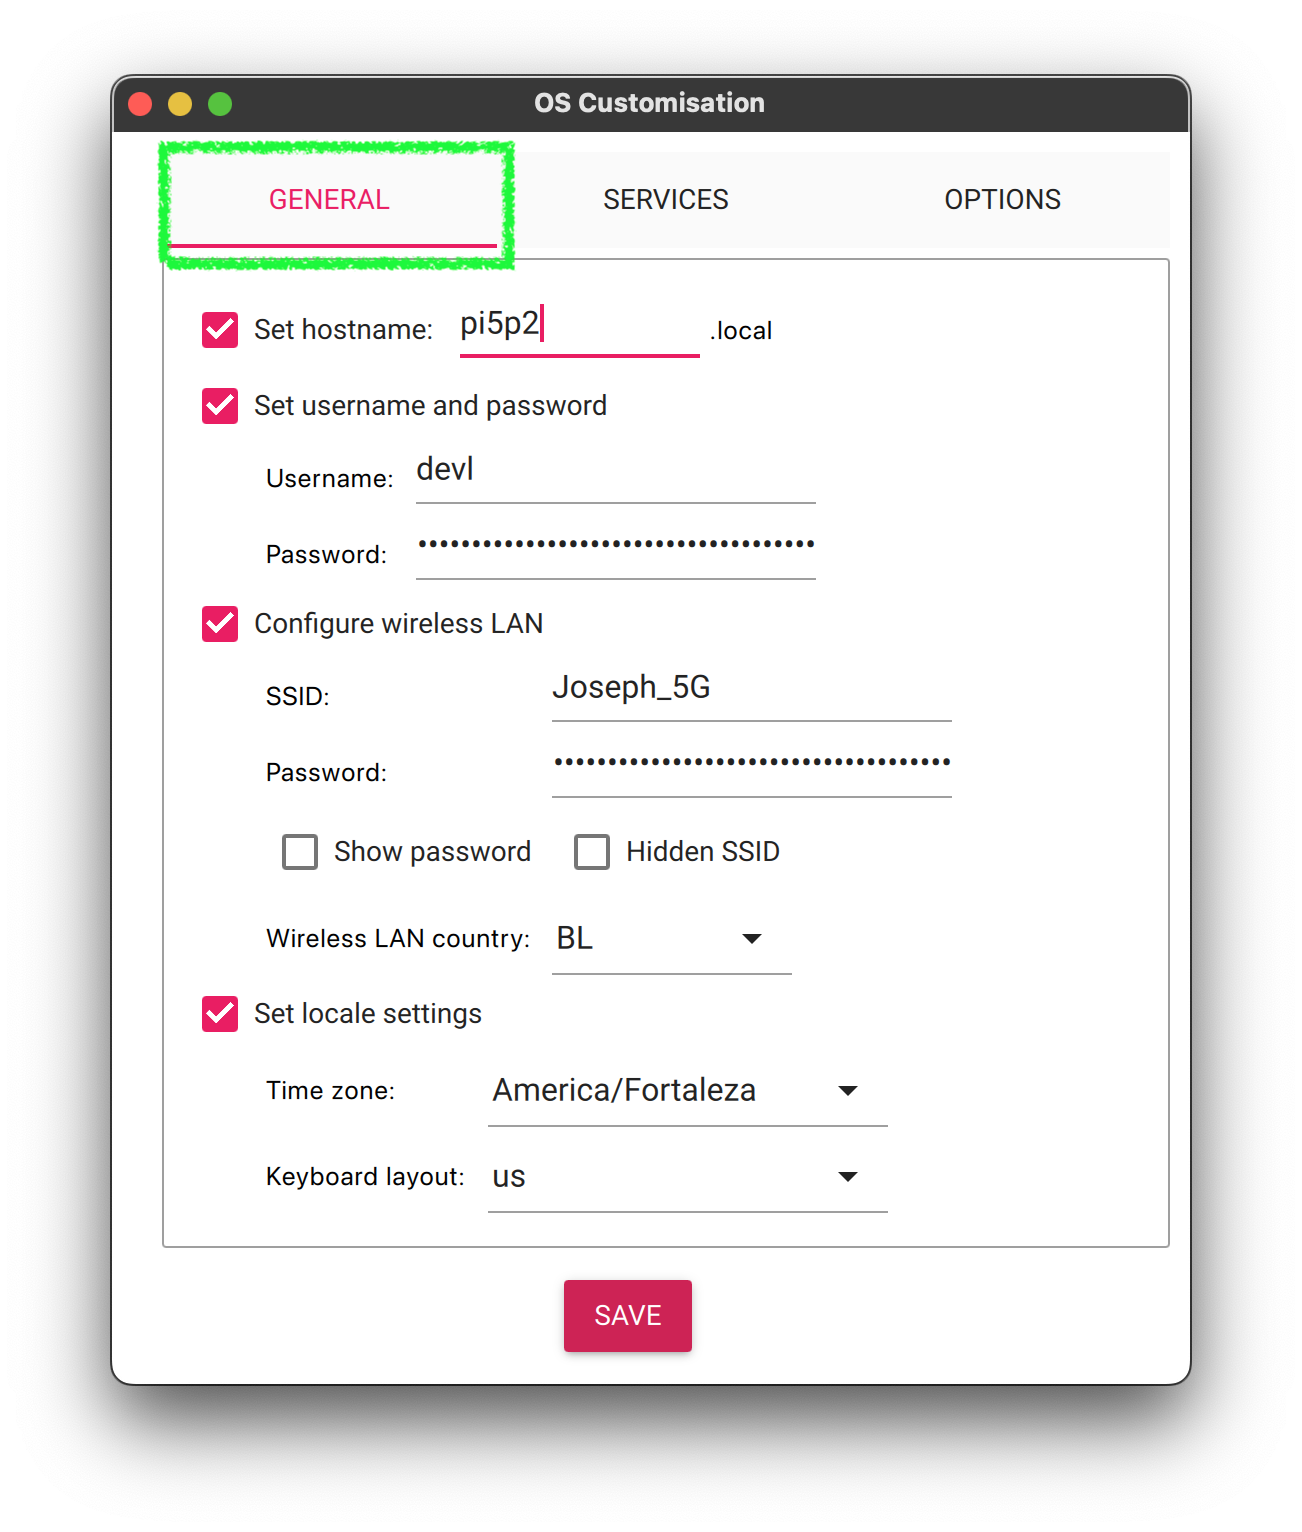
user with a strong passwordWiFi settings to your local network. This allows you to find and access the RPi5 on your network without needing to connect a monitor and keyboard.Don’t click save yet. We need to configure the
SSHsettings.
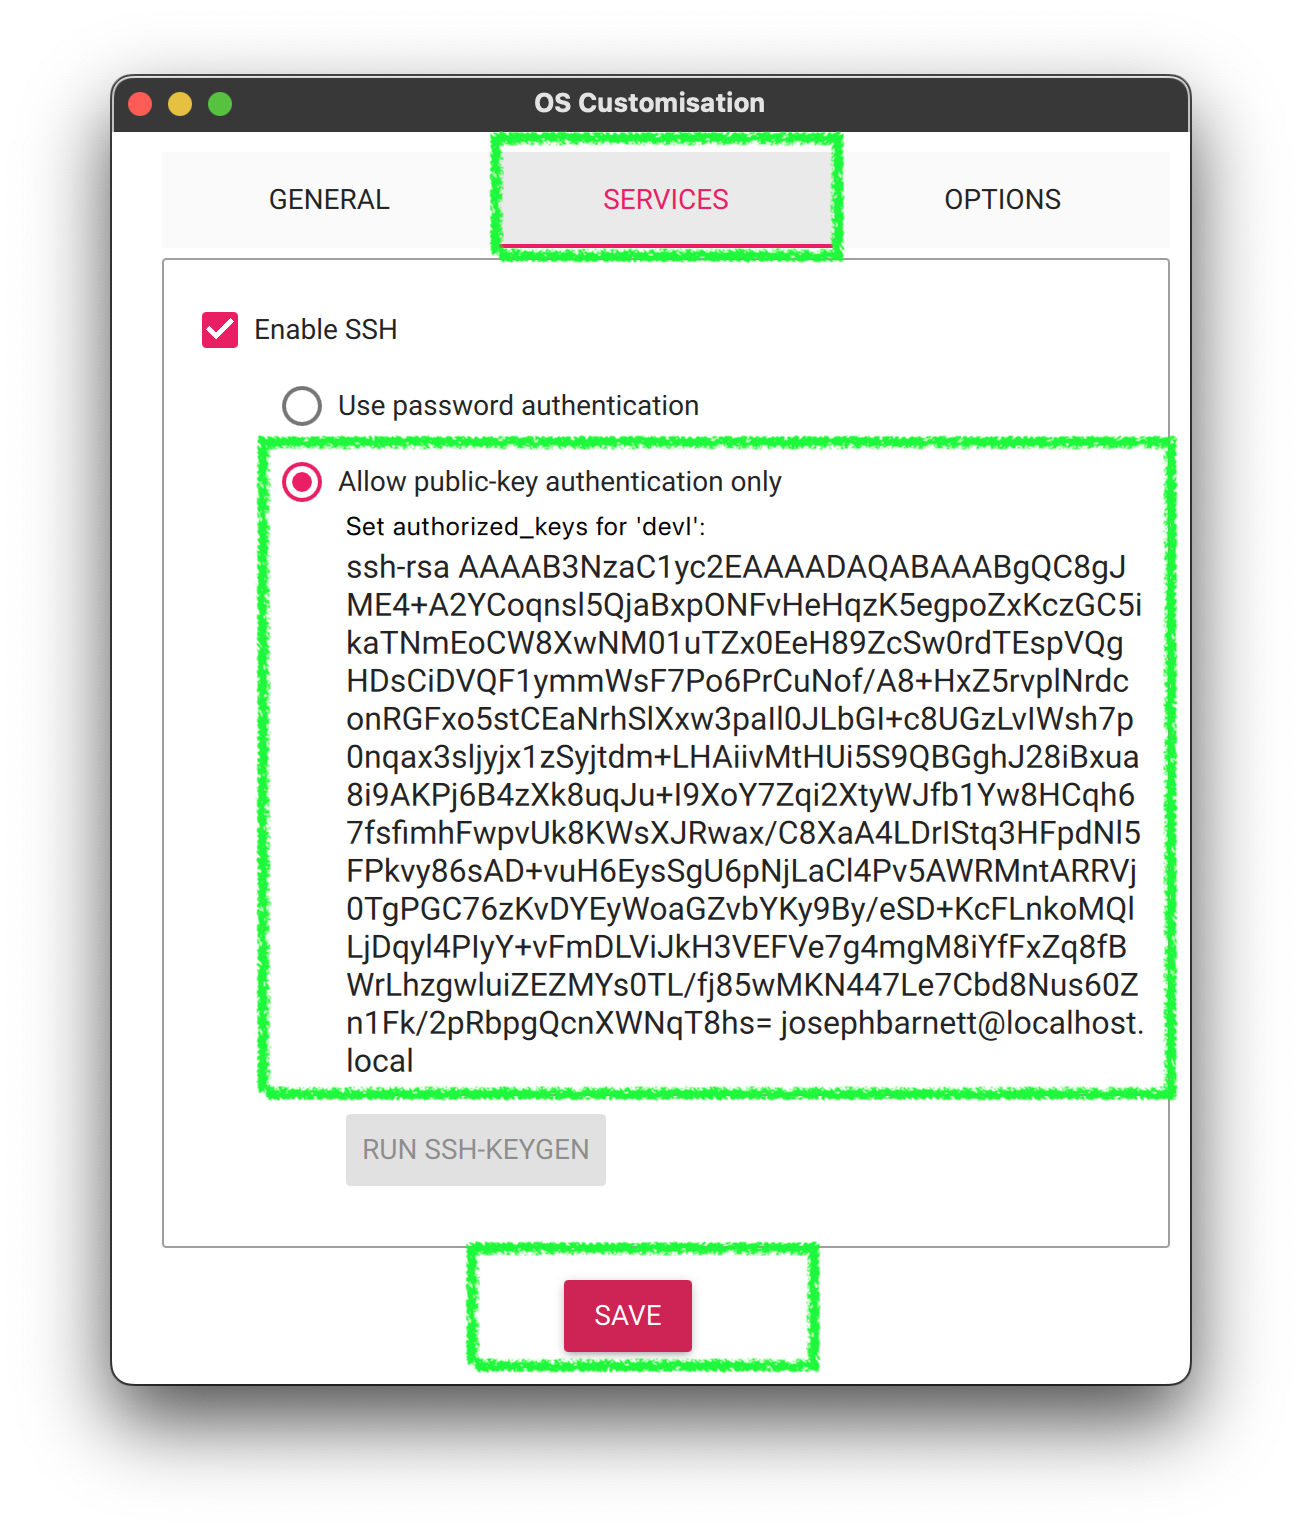
Enable SSHssh-keygen command. Follow the github instructions. I think they are the clearest.Save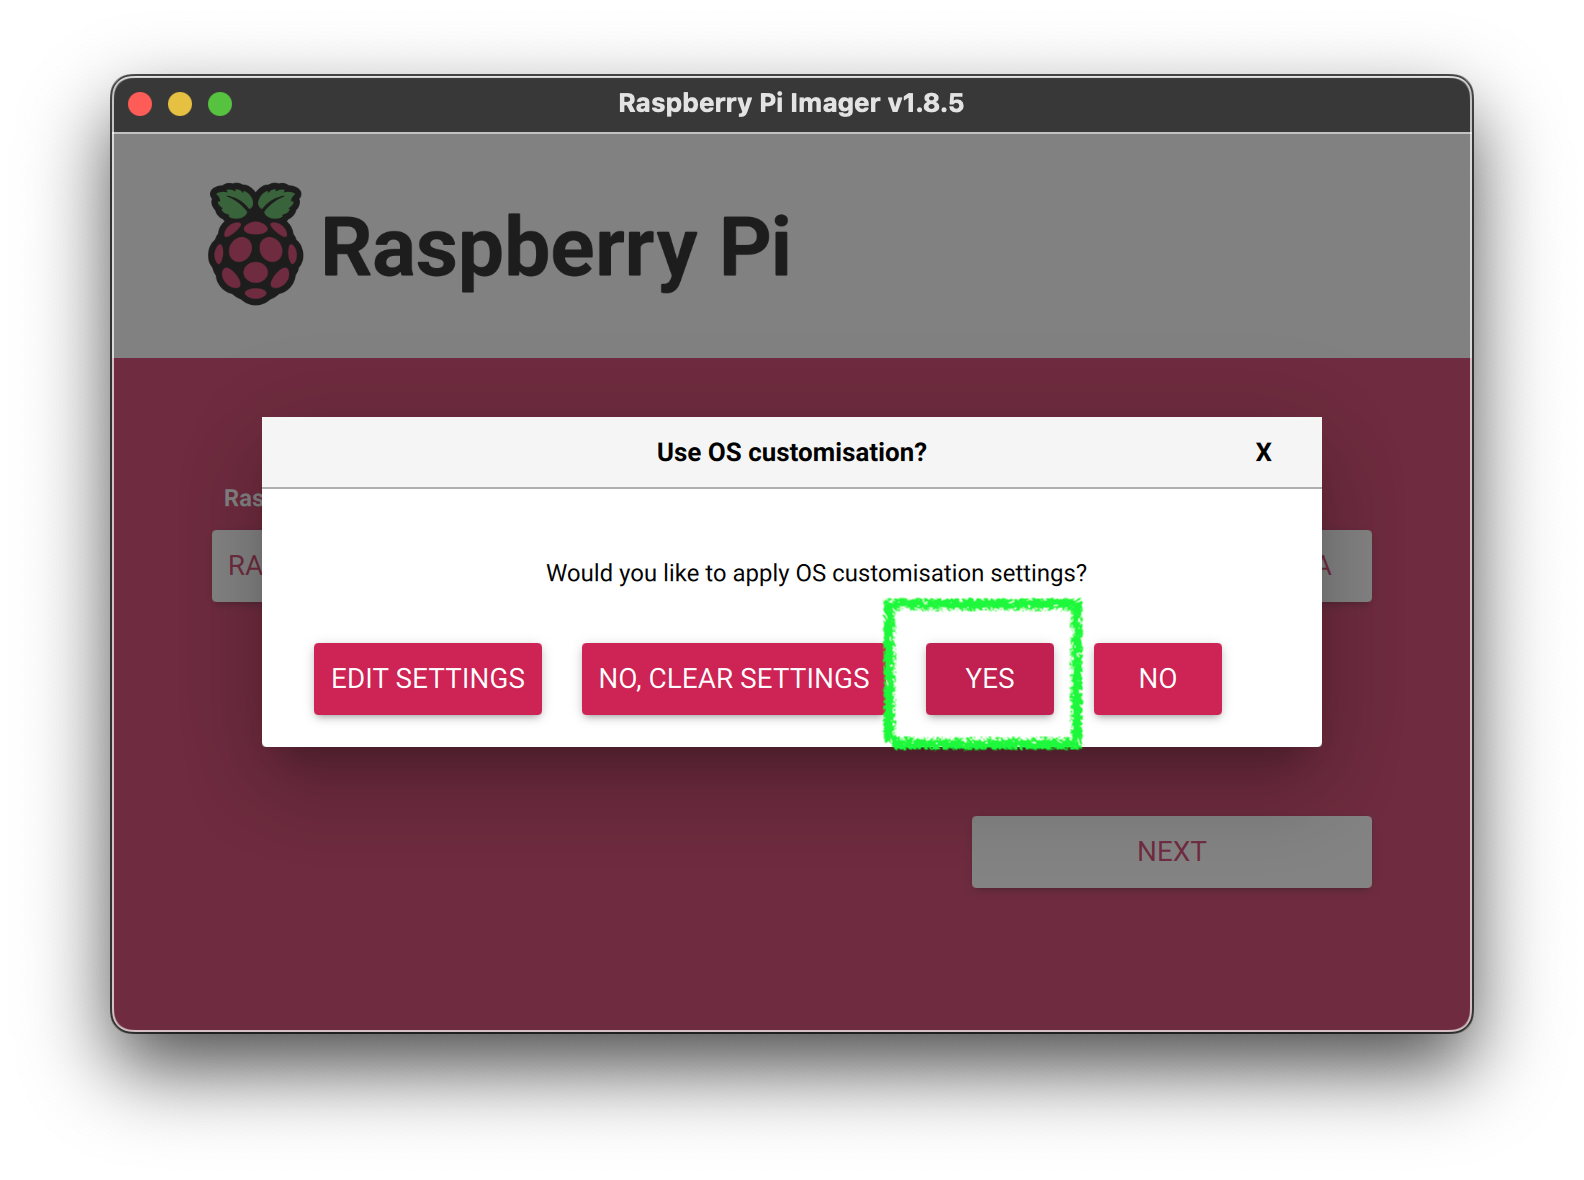
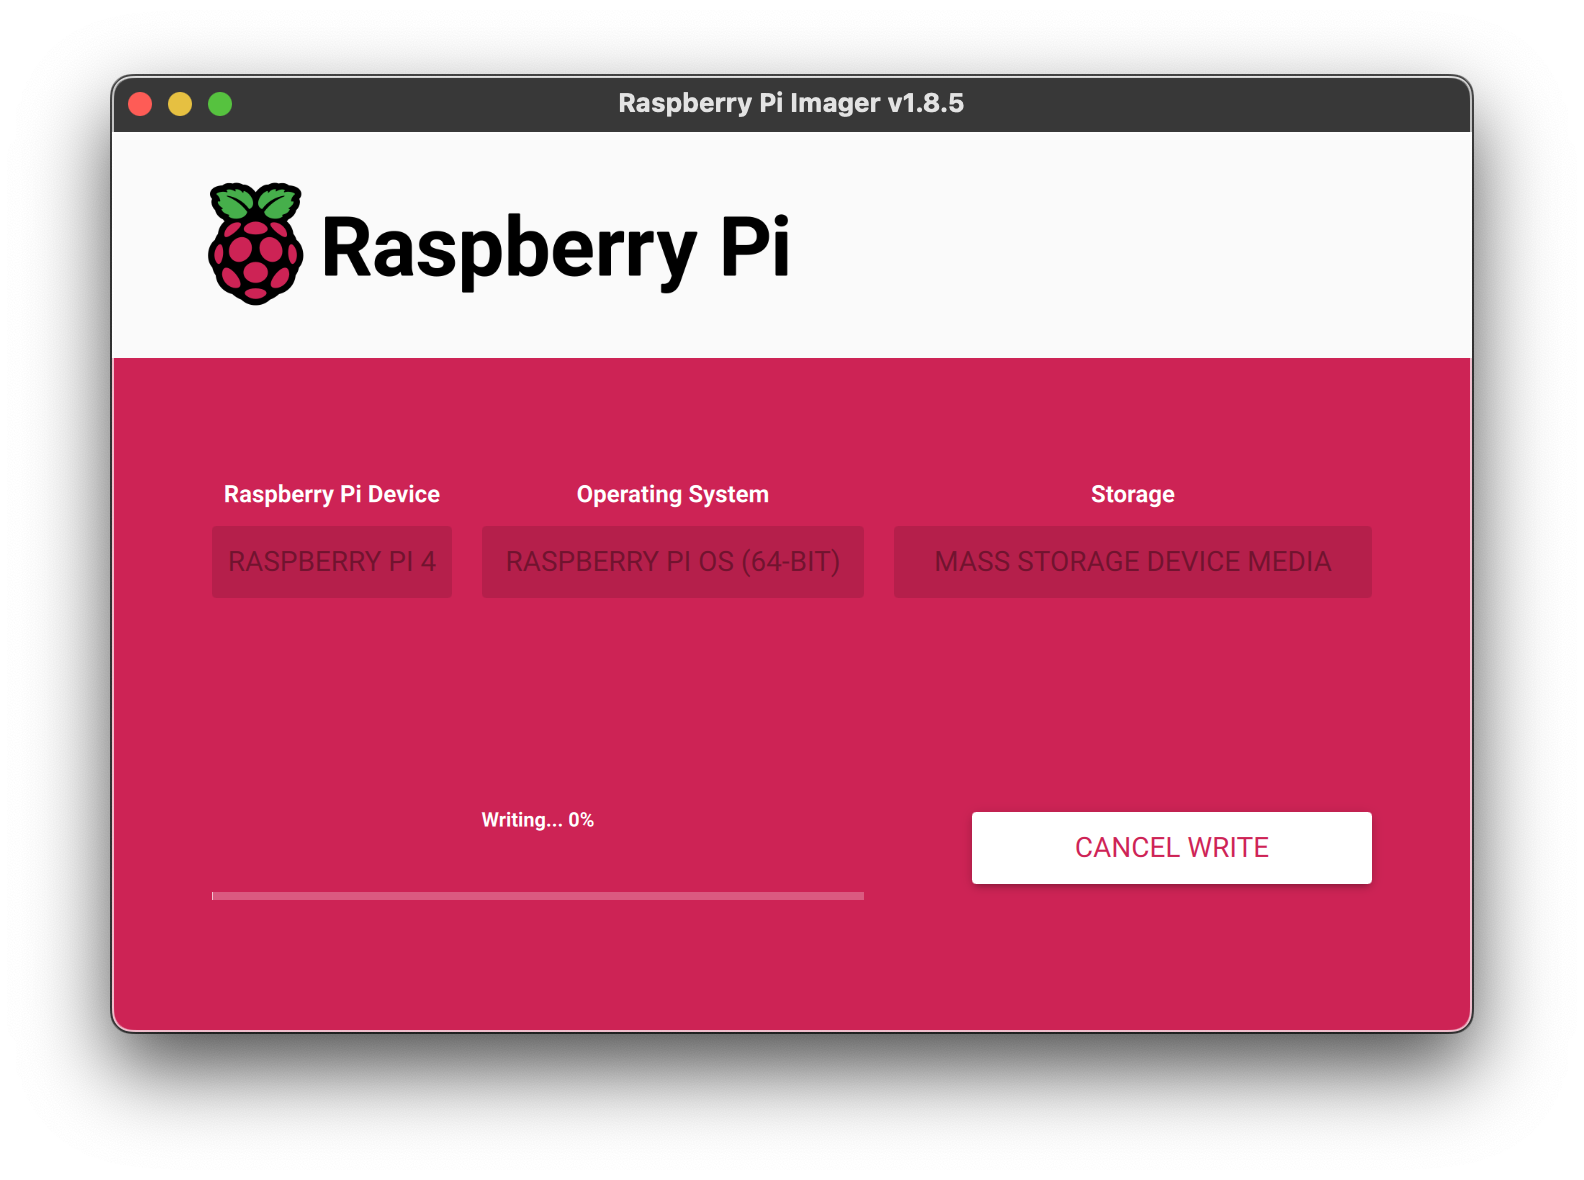
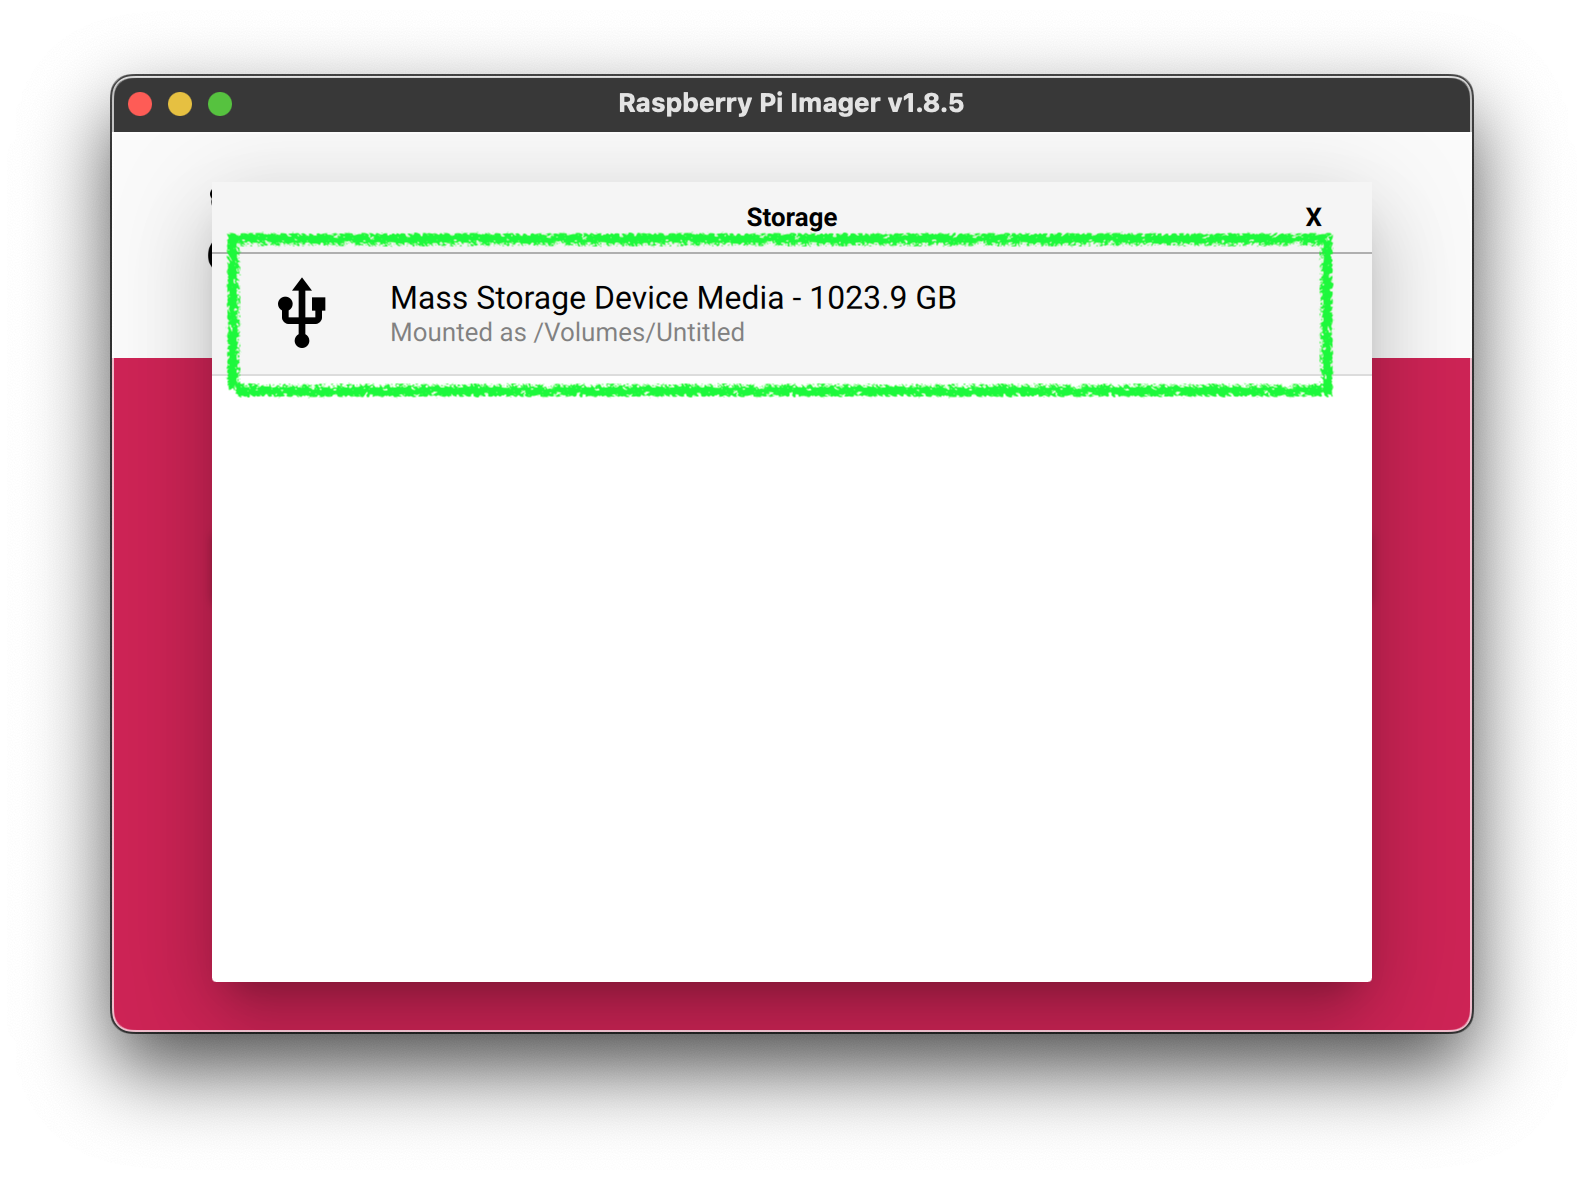
At the end of this process, you can install the SD card into the RPi5 and power it up. You should be able to find it on your network and SSH into it.
arp -a
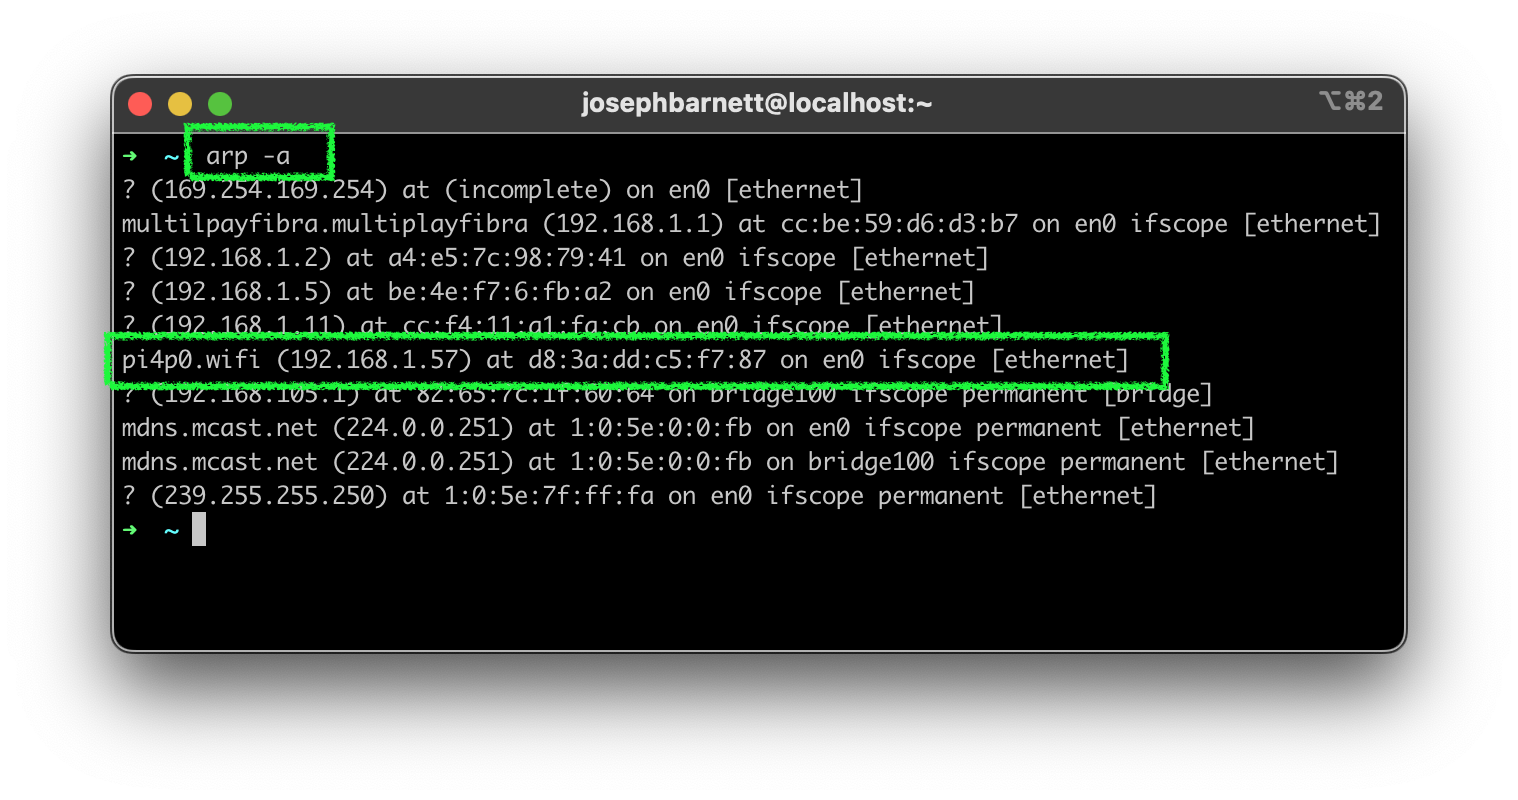
ssh -i ~/.ssh/id_<your key> <user>@<ip address>
Replace the
<your key>with the name of your SSH key,<user>with the user you configured, and<ip address>with the IP address you discovered.

🎉🎉🎉 Congratulations! You’ve successfully set up your Raspberry Pi 5 for the first time. You can now start exploring the world of cloud native technologies on this powerful little computer. Enjoy your journey into the world of cloud computing and container orchestration!
Now that you have your Raspberry Pi 5 set up, you can start exploring various cloud native technologies such as Kubernetes, Containerd, ctr, nerdctl, and more. You can also start deploying and managing containers using Kubernetes. Enjoy your journey into the world of cloud computing and container orchestration!
This is the Broadcom chip used in the Raspberry Pi 4 Model B, the Raspberry Pi 400, and the Raspberry Pi Compute Module 4. The architecture of the BCM2711 is a considerable upgrade on that used by the SoCs in earlier Raspberry Pi models. It continues the quad-core CPU design of the BCM2837, but uses the more powerful ARM A72 core. It has a greatly improved GPU feature set with much faster input/output, due to the incorporation of a PCIe link that connects the USB 2 and USB 3 ports, and a natively attached Ethernet controller. It is also capable of addressing more memory than the SoCs used before.
The ARM cores are capable of running at up to 1.5 GHz, making the Raspberry Pi 4 about 50% faster than the Raspberry Pi 3B+. The new VideoCore VI 3D unit now runs at up to 500 MHz. The ARM cores are 64-bit, and while the VideoCore is 32-bit, there is a new Memory Management Unit, which means it can access more memory than previous versions.
The BCM2711 chip continues to use the heat spreading technology started with the BCM2837B0, which provides better thermal management.
Processor: Quad-core https://en.wikipedia.org/wiki/ARM_Cortex-A72[Cortex-A72] (ARM v8) 64-bit SoC @ 1.5 GHz.
Memory: Accesses up to 8GB LPDDR4-2400 SDRAM (depending on model)
Caches: 32kB data + 48kB instruction L1 cache per core. 1MB L2 cache.
Multimedia: H.265 (4Kp60 decode); H.264 (1080p60 decode, 1080p30 encode); OpenGL ES, 3.0 graphics
I/O: PCIe bus, onboard Ethernet port, 2 × DSI ports (only one exposed on Raspberry Pi 4B), 2 × CSI ports (only one exposed on Raspberry Pi 4B), up to 6 × I2C, up to 6 × UART (muxed with I2C), up to 6 × SPI (only five exposed on Raspberry Pi 4B), dual HDMI video output, composite video output.
The https://datasheets.raspberrypi.com/bcm2711/bcm2711-peripherals.pdf[datasheet for the BCM2711] contains further details.
Broadcom BCM2712 is the 16nm application processor at the heart of Raspberry Pi 5. It is the successor to the BCM2711 device used in Raspberry Pi 4, and shares many common architectural features with other devices in the BCM27xx family, used on earlier Raspberry Pi products.
Built around a quad-core Arm Cortex-A76 CPU cluster, clocked at up to 2.4GHz, with 512KB per-core L2 caches and a 2MB shared L3 cache, it integrates an improved 12-core VideoCore VII GPU; a hardware video scaler and HDMI controller capable of driving dual 4kp60 displays; and a Raspberry Pi-developed HEVC decoder and Image Signal Processor. A 32-bit LPDDR4X memory interface provides up to 17GB/s of memory bandwidth, while x1 and x4 PCI Express interfaces support high-bandwidth external peripherals; on Raspberry Pi 5 the latter is used to connect to the Raspberry Pi RP1 south bridge, which provides the bulk of the external-facing I/O functionality on the platform.
Headline features include:
In aggregate, the new features present in BCM2712 deliver a performance uplift of 2-3x over Raspberry Pi 4 for common CPU or I/O-intensive use cases.
Previously we looked at Cloud provider costs. We blindly selected the cheapest instance type (c6g.xlarge) and went with it. But what is really running on those instances? What is the processor? How does it compare to the Raspberry Pi?
The c6g instance family provides the Graviton2 processor, featuring 64 ARM Neoverse N1 cores and a clock speed of 2.5 GHz, is designed for scalable cloud computing. In the case of the c6g.xlarge instance type, which typically provides access to four virtual CPUs, the allocation of cache resources plays a significant role in determining overall performance.
Here’s the breakdown of cache allocation for each c6g.xlarge instance:
L1 Cache: The Graviton2 processor has 32 KB of L1 cache per core. With four cores allocated to each instance, the total L1 cache available per instance is 32 KB * 4 = 128 KB. In comparison, the RPi5 gives us 128 KiB (64 KiB I-cache with parity, 64 KiB D-cache) per core of L1 cache. This is the same as the c6g.xlarge instance!
L2 Cache: Each core of the Graviton2 processor is equipped with 1 MB of L2 cache. With four cores per instance, the total L2 cache available per instance is 1 MB * 4 = 4 MB. In comparison, the RPi5 gives us 512 KiB per core of L2 cache. So the c6g.xlarge instance has 8x more L2 cache than the RPi5. This would make a big difference in compute performance for memory or IO intense workloads.
L3 Cache: The Graviton2 processor features a shared L3 cache of 32 MB. Allocating this cache across multiple instances requires careful consideration. Assuming equal distribution, if we divide the total L3 cache equally among, for example, 10 c6g.xlarge instances, each instance would receive 32 MB / 10 = 3.2 MB of L3 cache. The RPi5 has a 2MB shared L3 cache. So the c6g.xlarge instance has more L3 cache than the RPi5 - but not a whole lot more.
It’s essential to note that this allocation is simplified and theoretical. In practice, cloud providers dynamically manage resource allocation based on workload demands and system optimization strategies. Understanding these allocation principles enables users to make informed decisions when configuring and optimizing their cloud deployments.
By contrast, Raspberry Pi’s BCM2711 and BCM2712 chips offer dedicated cache resources for standalone computing tasks, emphasizing performance in single-board computing and hobbyist projects. While these chips provide consistent performance within their designated environments, the shared infrastructure of cloud instances like the c6g.xlarge demands a nuanced understanding of resource allocation for optimal utilization.
In our previous blog post, we showcased the simplicity and speed of creating static landing sites with Hugo. However, when the need for dynamic and interactive web experiences arises, Nuxt.js and Vue.js step in to offer powerful solutions.
Nuxt.js and Vue.js provide a versatile approach for building dynamic web applications, offering benefits such as server-side rendering (SSR) or Single Page Application (SPA) behavior akin to static sites. This hybrid approach ensures better performance, SEO optimization, and enhanced user experience compared to purely static sites. Additionally, Vue.js’s component-based architecture and intuitive syntax make development straightforward and enjoyable.
Let’s dive into building a Nuxt.js demo application, complete with login capabilities integrated using Auth0, to unlock the full potential of dynamic web experiences.
Single Page Applications (SPAs) have transformed web development, ushering in an era of seamless user experiences through dynamic content loading sans full-page refreshes. By fetching data asynchronously, SPAs deliver lightning-fast load times and fluid interactions, captivating users with their responsiveness.
In contrast, static sites pre-render content during build time, serving up crisp, pre-generated files directly to users. This approach bypasses server-side processing, unleashing unrivaled speed and scalability upon the digital landscape.
Now, imagine a fusion of these two paradigms—SPAs and static sites—ushering in a new era of web development innovation. Enter frameworks like Nuxt.js, seamlessly blending the dynamic prowess of SPAs with the rapid deployment capabilities of static site generation. With features like server-side rendering (SSR), static site generation (SSG), and effortless plugin integration, Nuxt.js empowers developers to craft web experiences that are as dynamic as they are efficient.
OAuth has become the de facto standard for secure authentication and authorization on the web. It enables users to leverage login credentials from third-party applications (such as GitHub, Google, etc.) without sharing their credentials directly.
These systems provide limited access to user contact information or resources without sharing their credentials.
OAuth’s protocol flow involves authentication servers, authorization grants, and access tokens, ensuring secure communication between the user, client application, and resource server.
The following diagram outlines the typical flow of implementing a web app that supports OAuth.
sequenceDiagram
    participant Browser as SPA
    participant Auth0 as Auth0
    participant Backend as Backend Service

    Browser->>Auth0: User clicks "Login with Auth0"
    Auth0->>Browser: Redirect to Auth0 login page
    Browser->>Auth0: User enters credentials
    Auth0->>Browser: Redirect to callback URL with authorization code
    Browser->>Backend: Send authorization code
    Backend->>Auth0: Exchange code for access token
    Auth0->>Backend: Provide access token
    Backend->>Browser: Deliver requested data
Flow Explanation:
Implementing OAuth authentication for every web application can indeed be cumbersome and intricate. Fortunately, authentication aggregation services like Auth0 exist to alleviate these challenges. They not only handle the complexities of authentication protocols and security measures but also simplify the integration process into your application with just a few lines of code.
With Auth0, developers can leverage a comprehensive suite of authentication and authorization features, including user management, social login integrations, multi-factor authentication, and more. By abstracting away the intricacies of OAuth implementation and providing a user-friendly dashboard for configuration, Auth0 empowers developers to focus on building their applications’ core functionality without compromising on security or user experience.
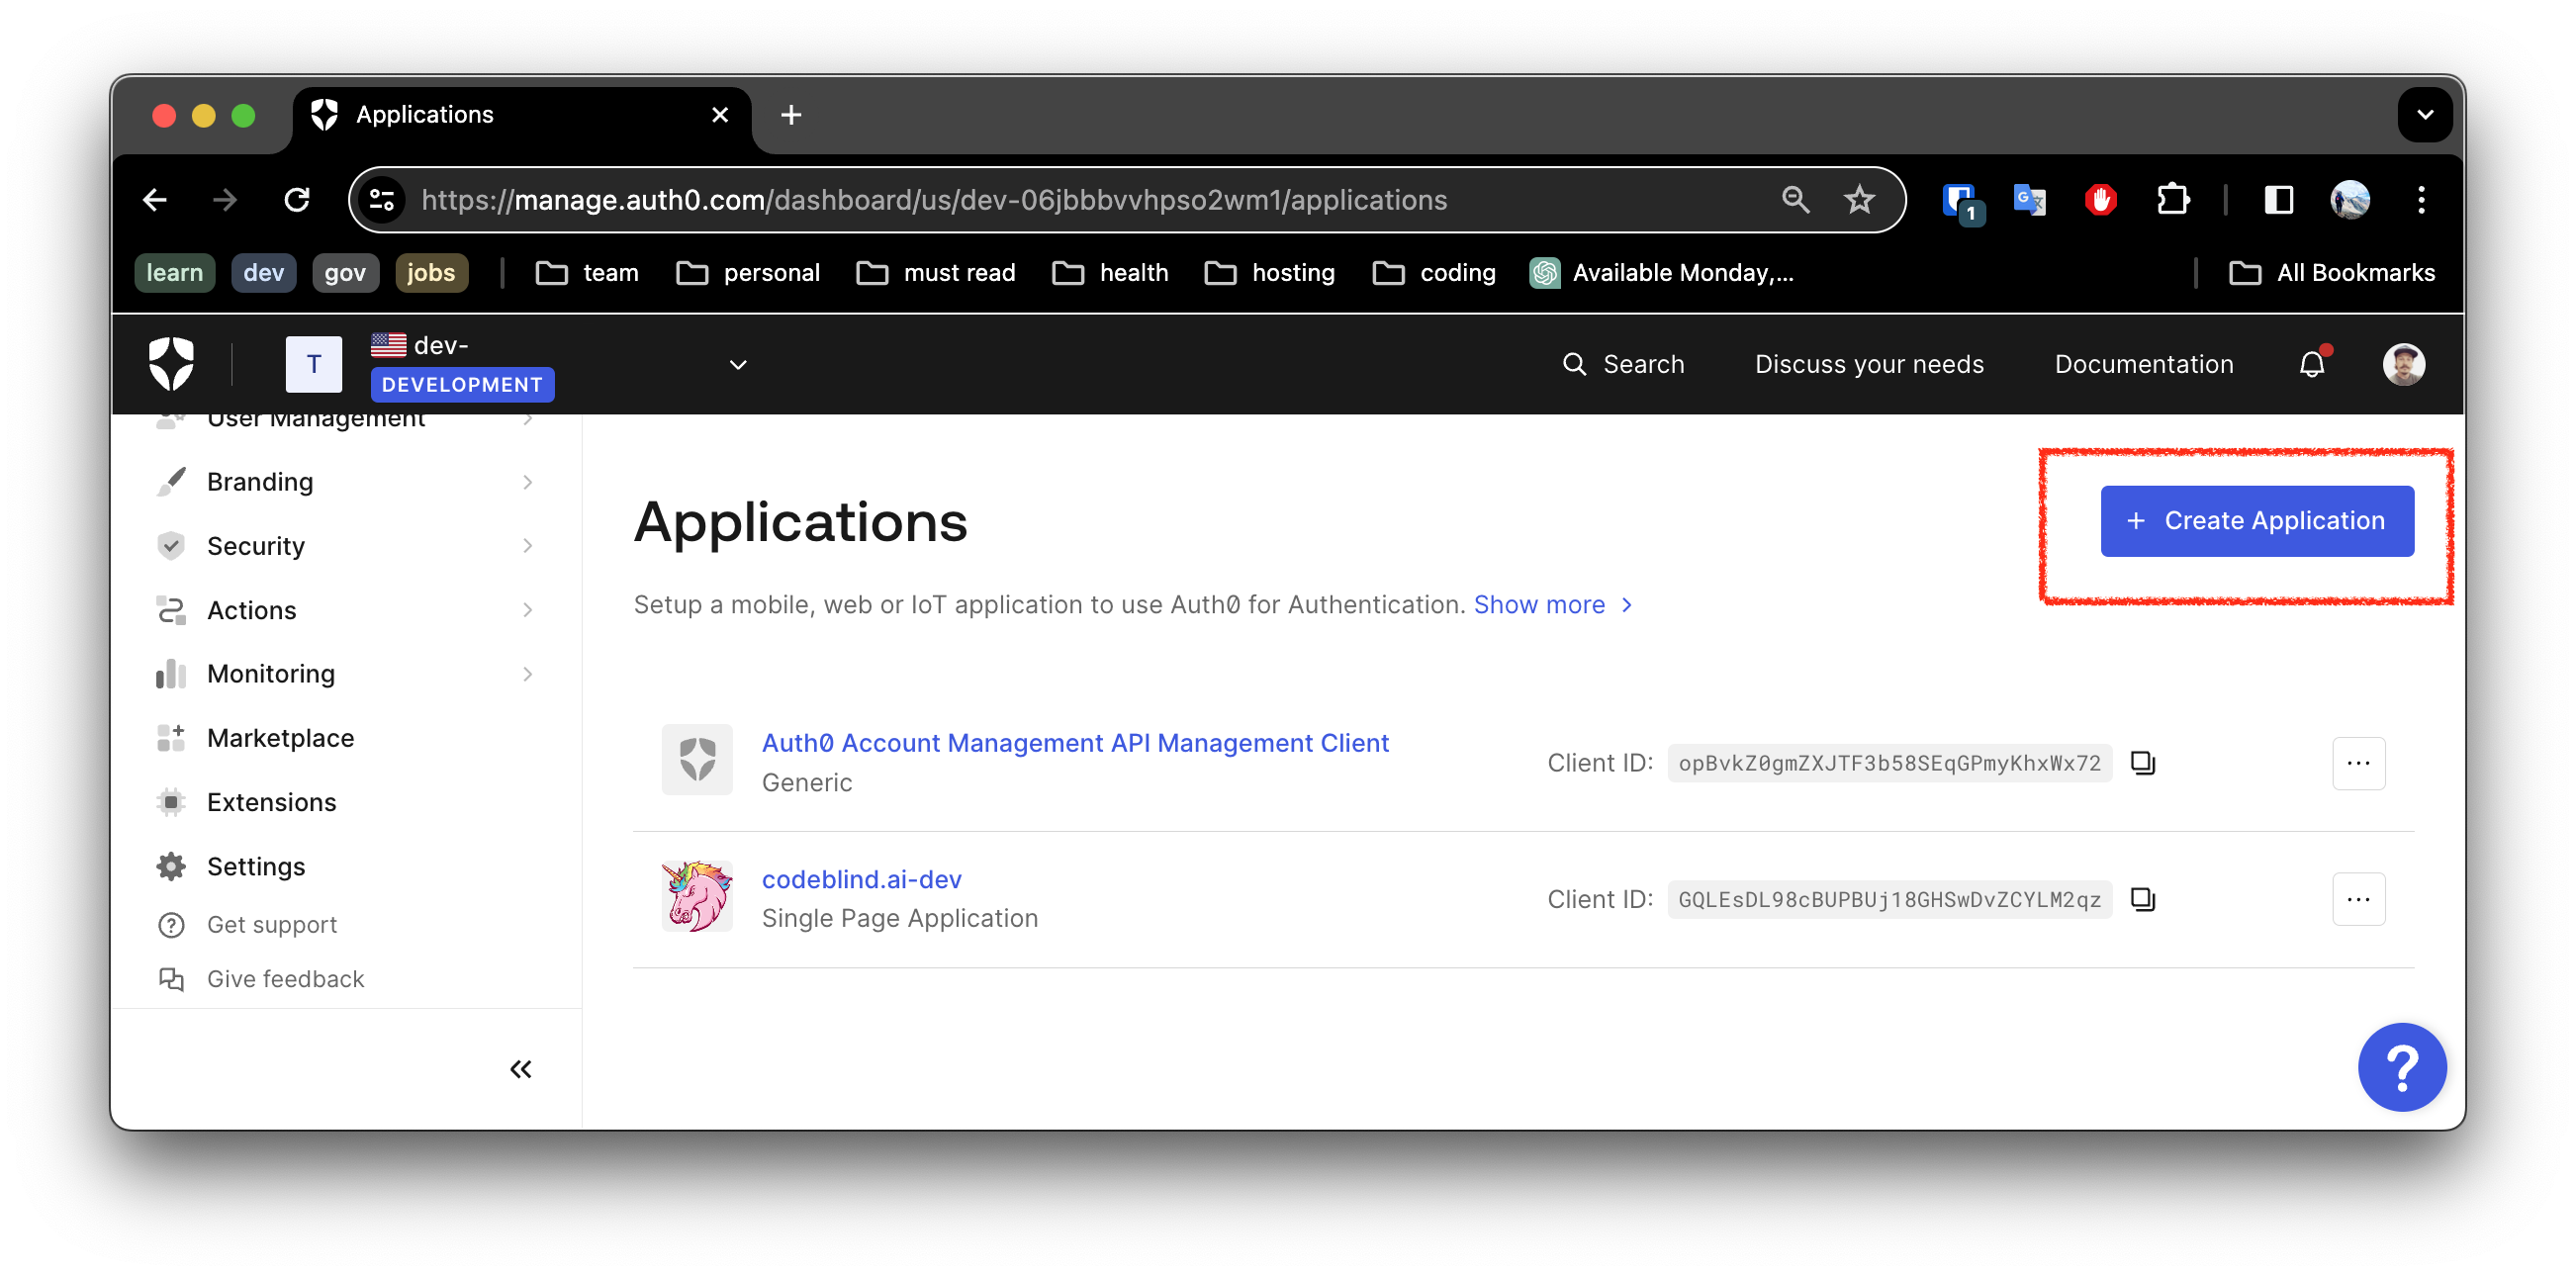
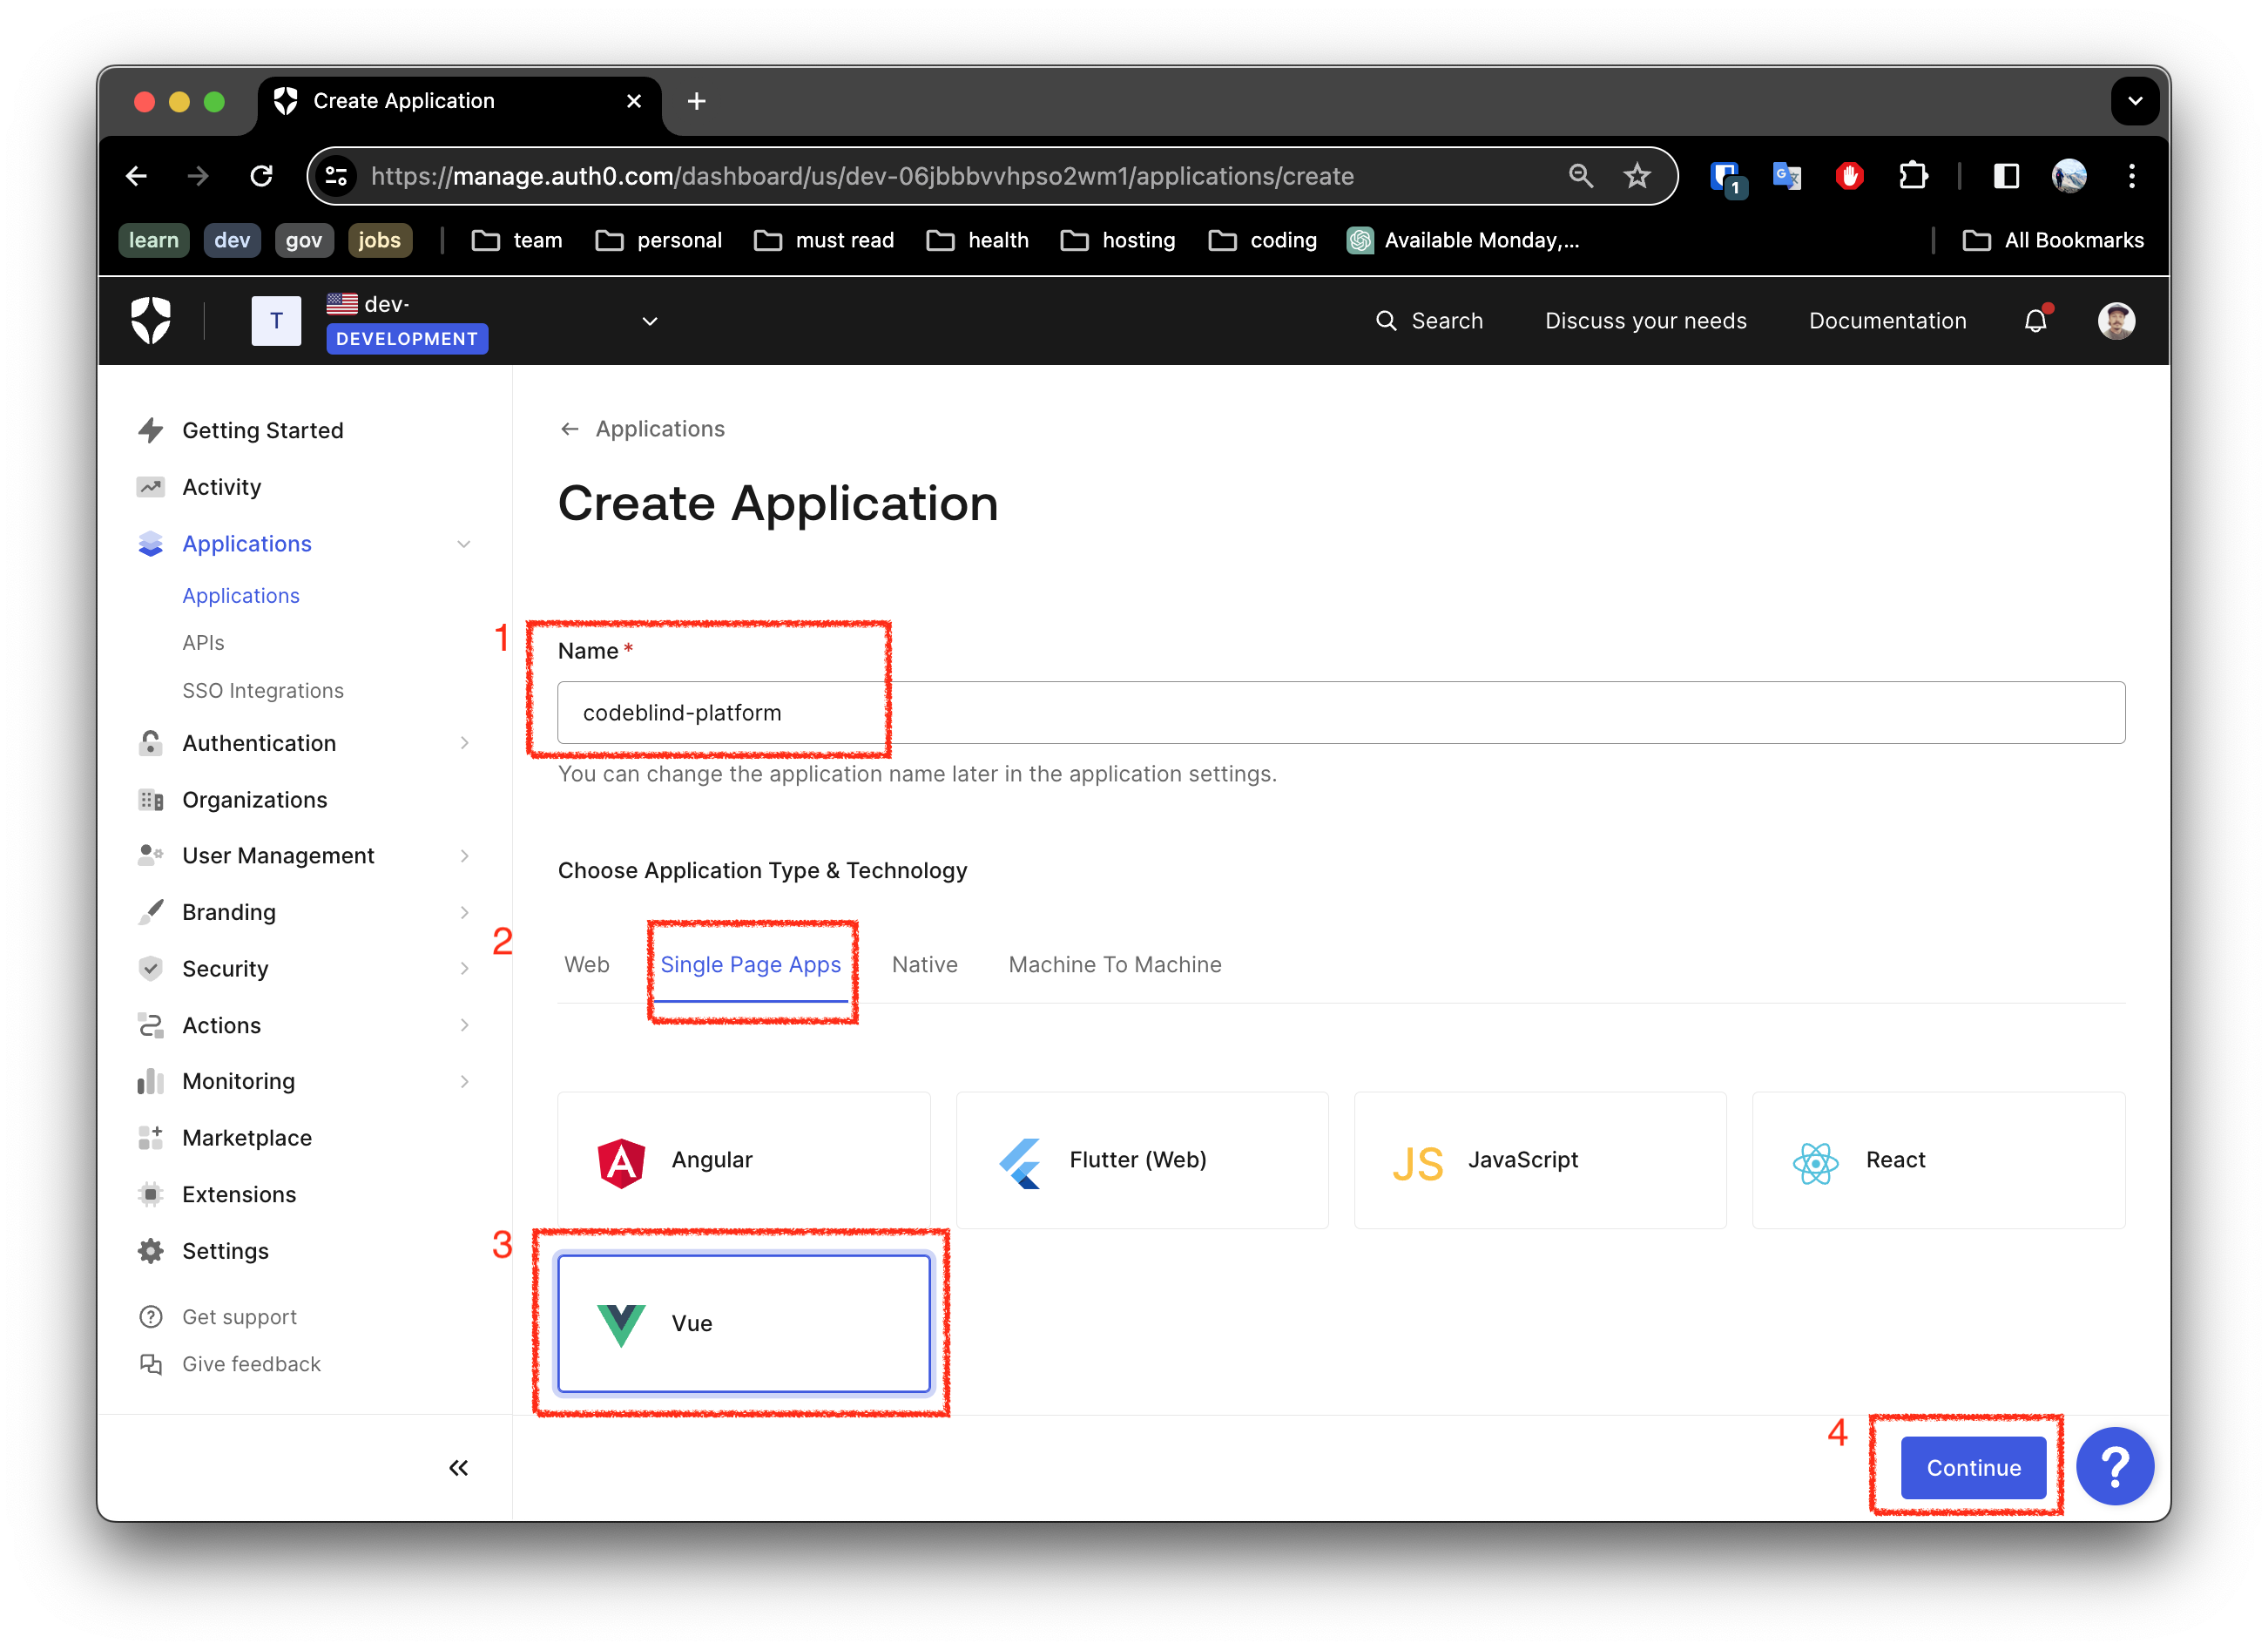
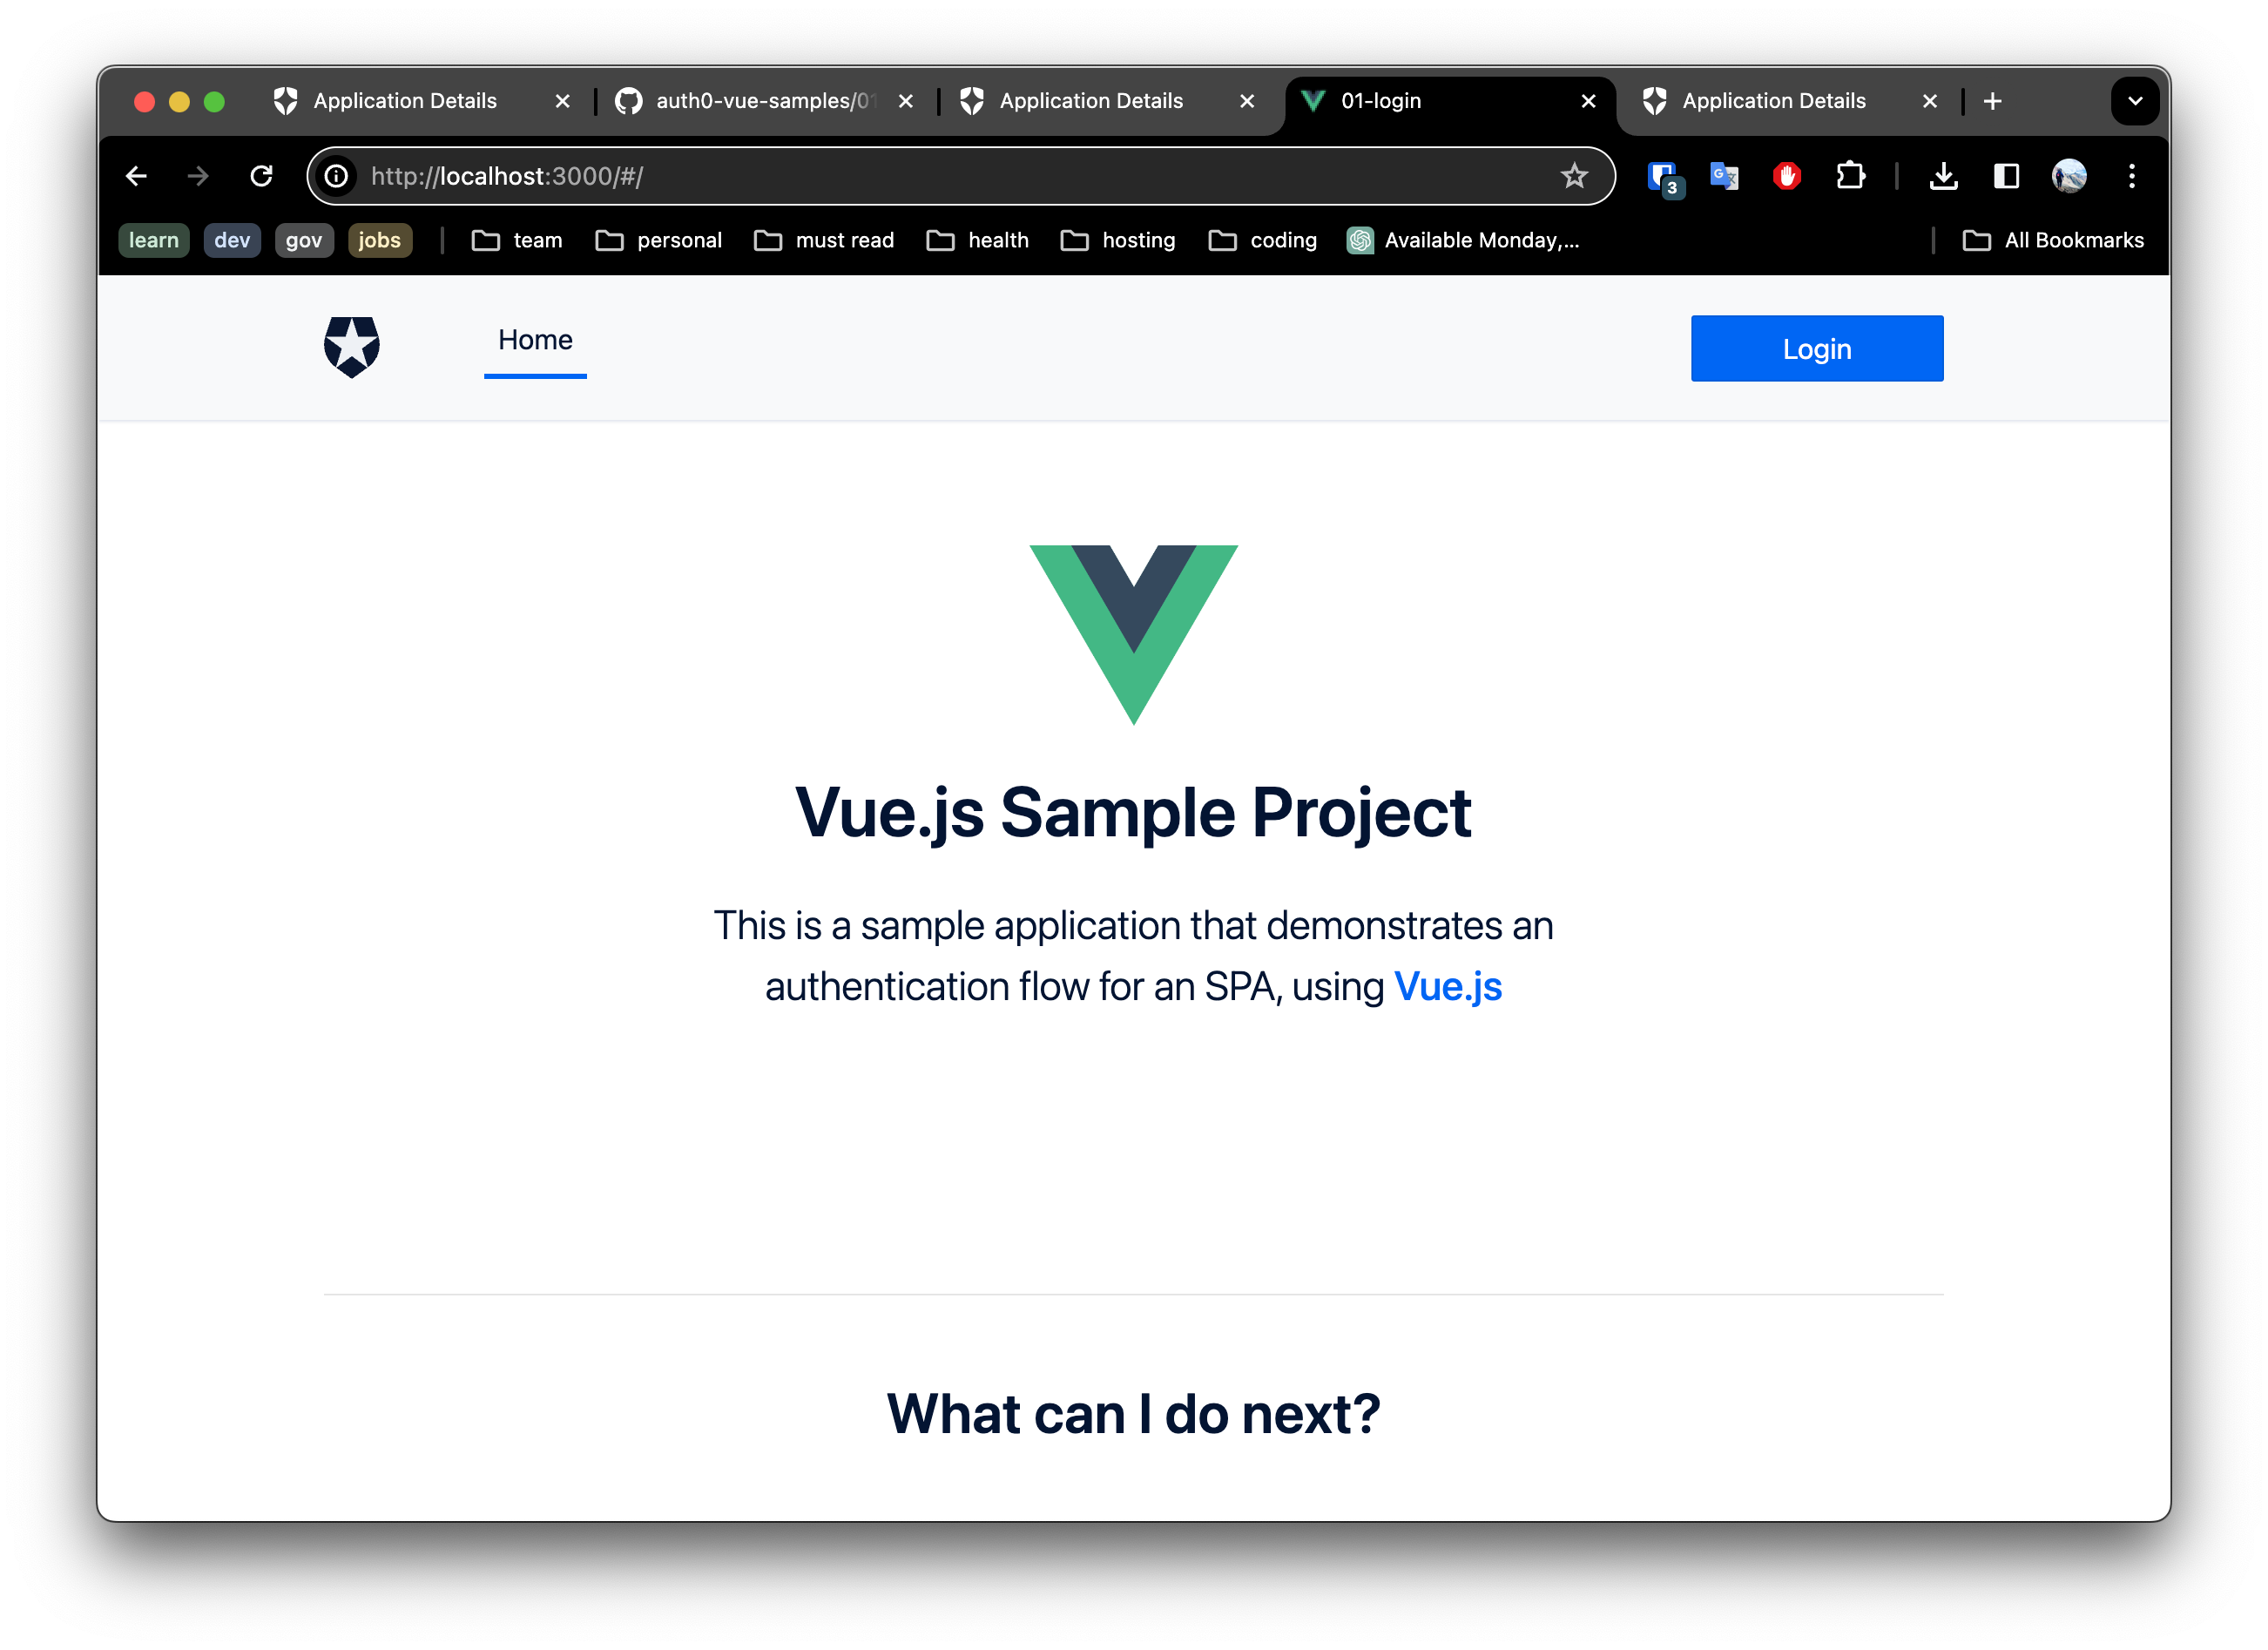
Single Page AppVue (or your favorite framework)Continue ButtonNext Auth0 will allow you to download a ready to use application for that framework!
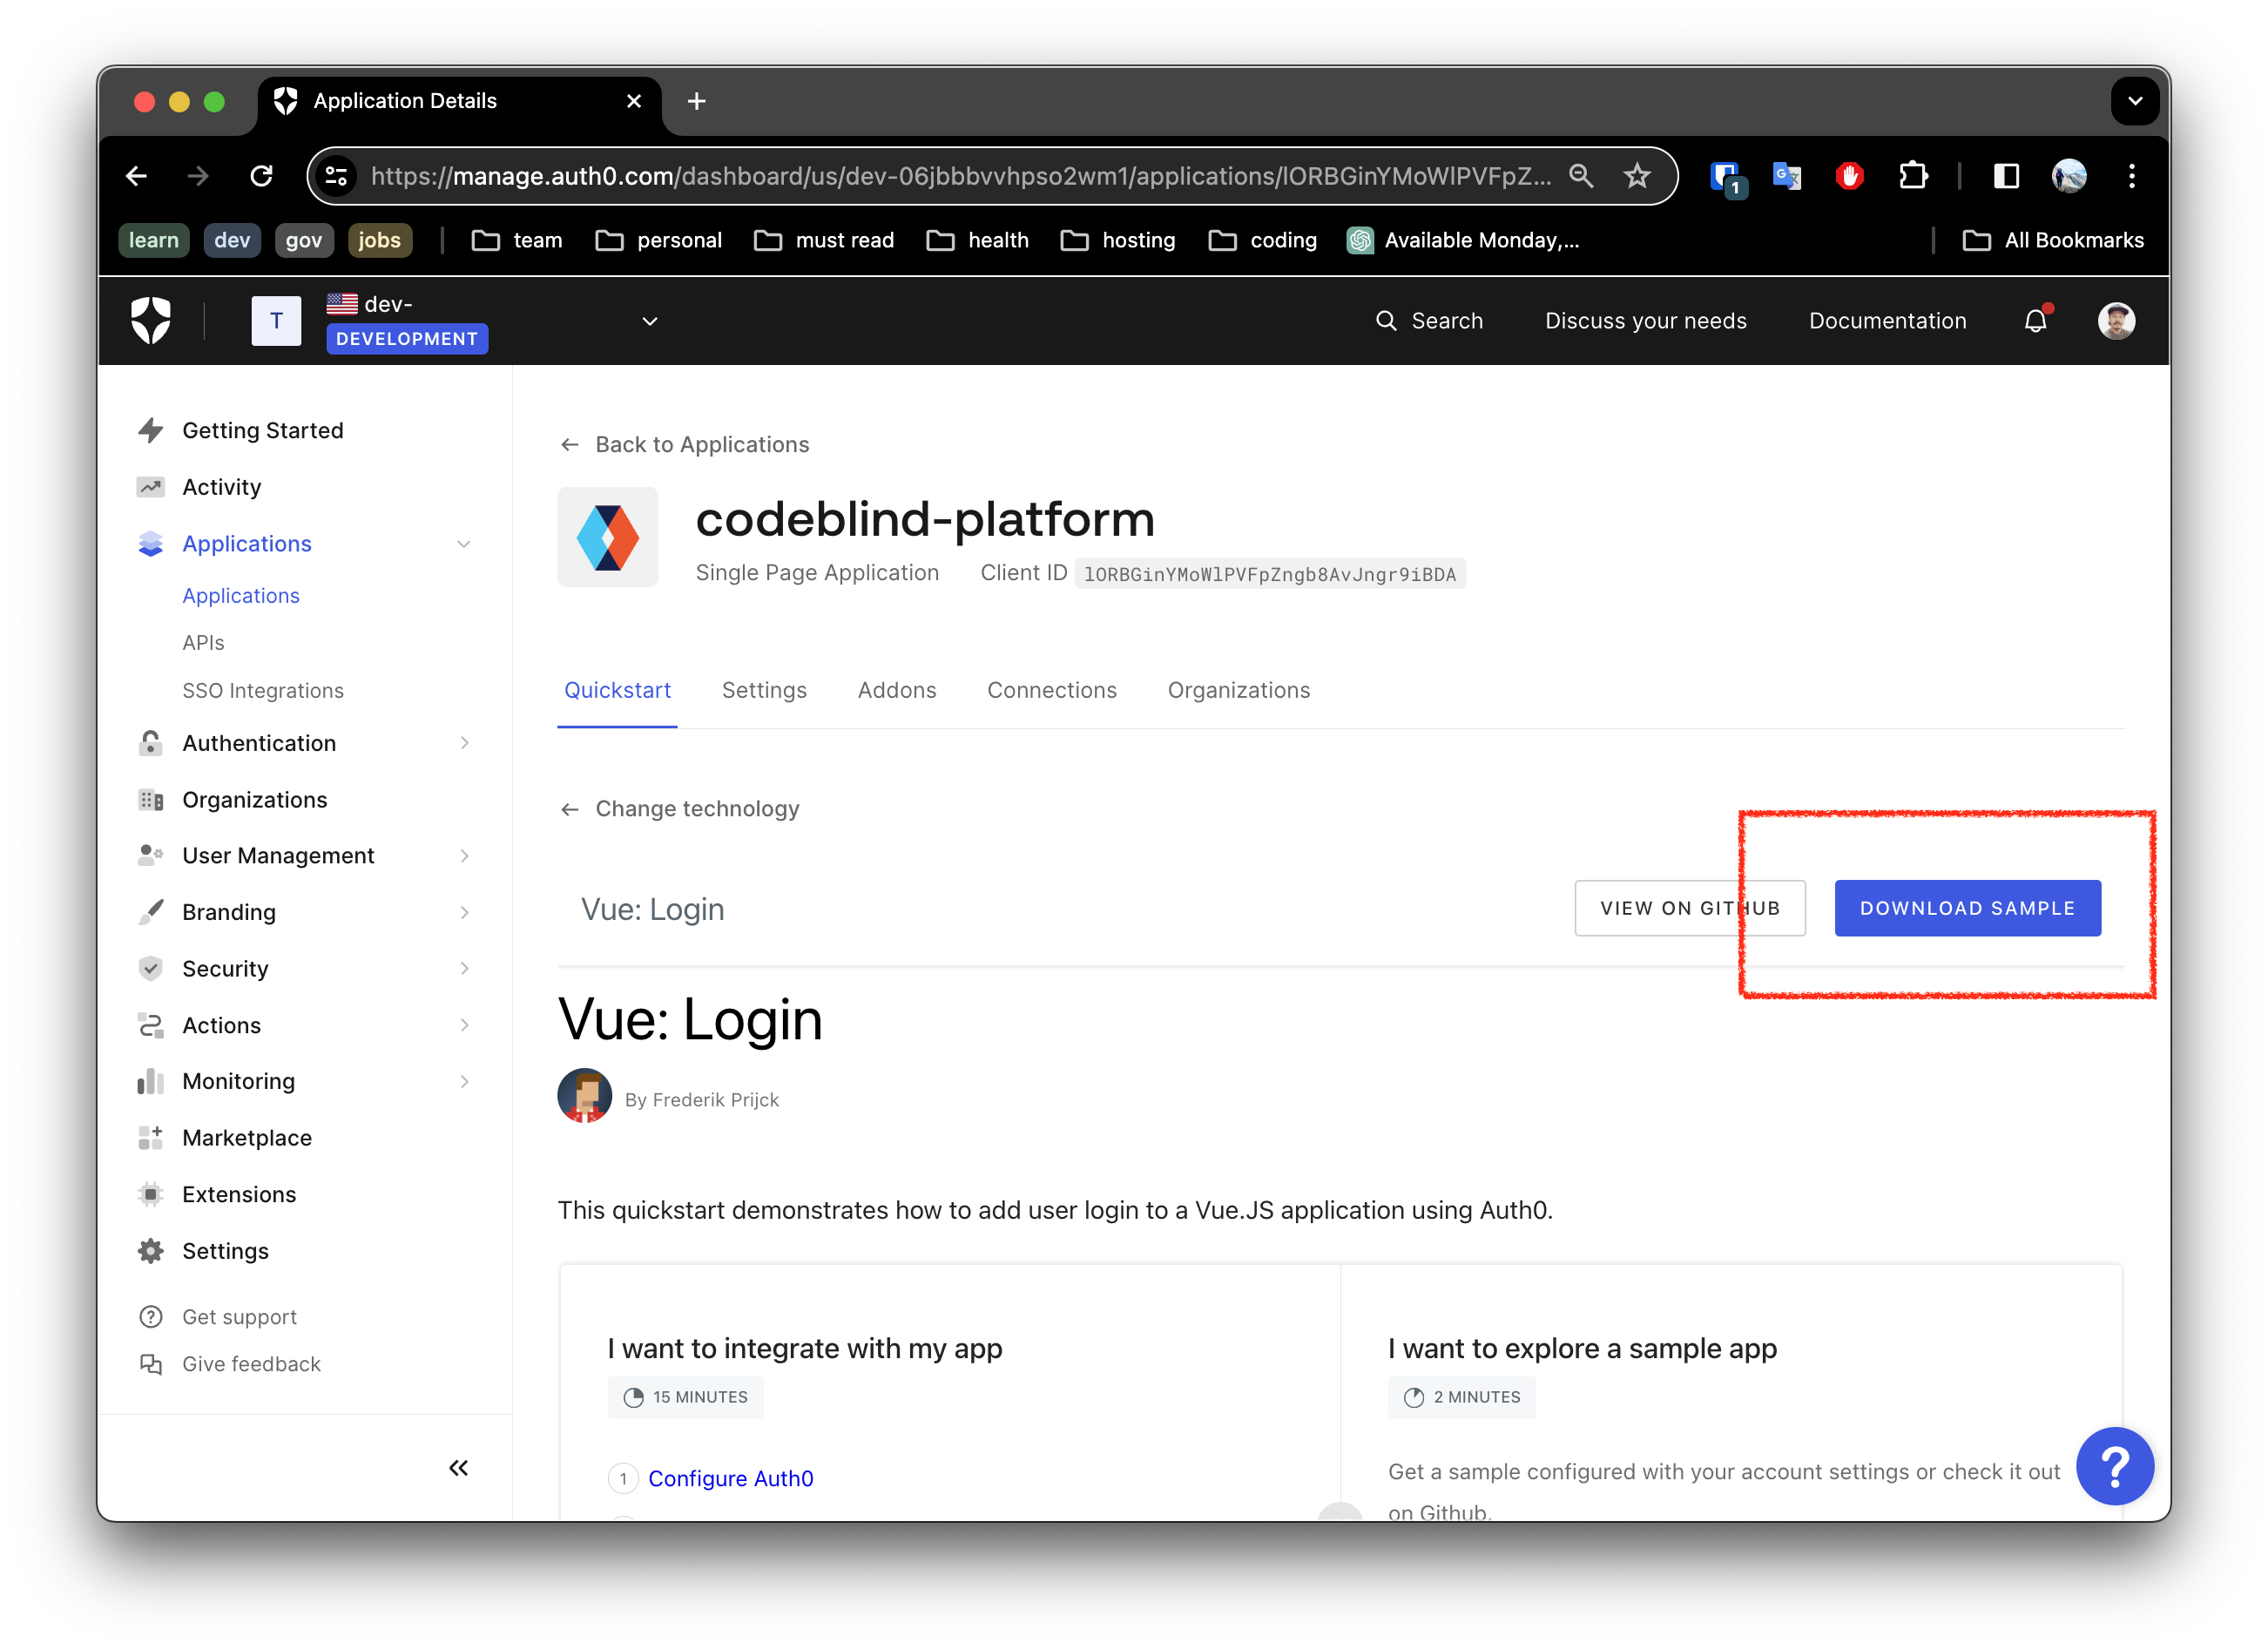
In this next screen, you will see getting started information for running the application locally.
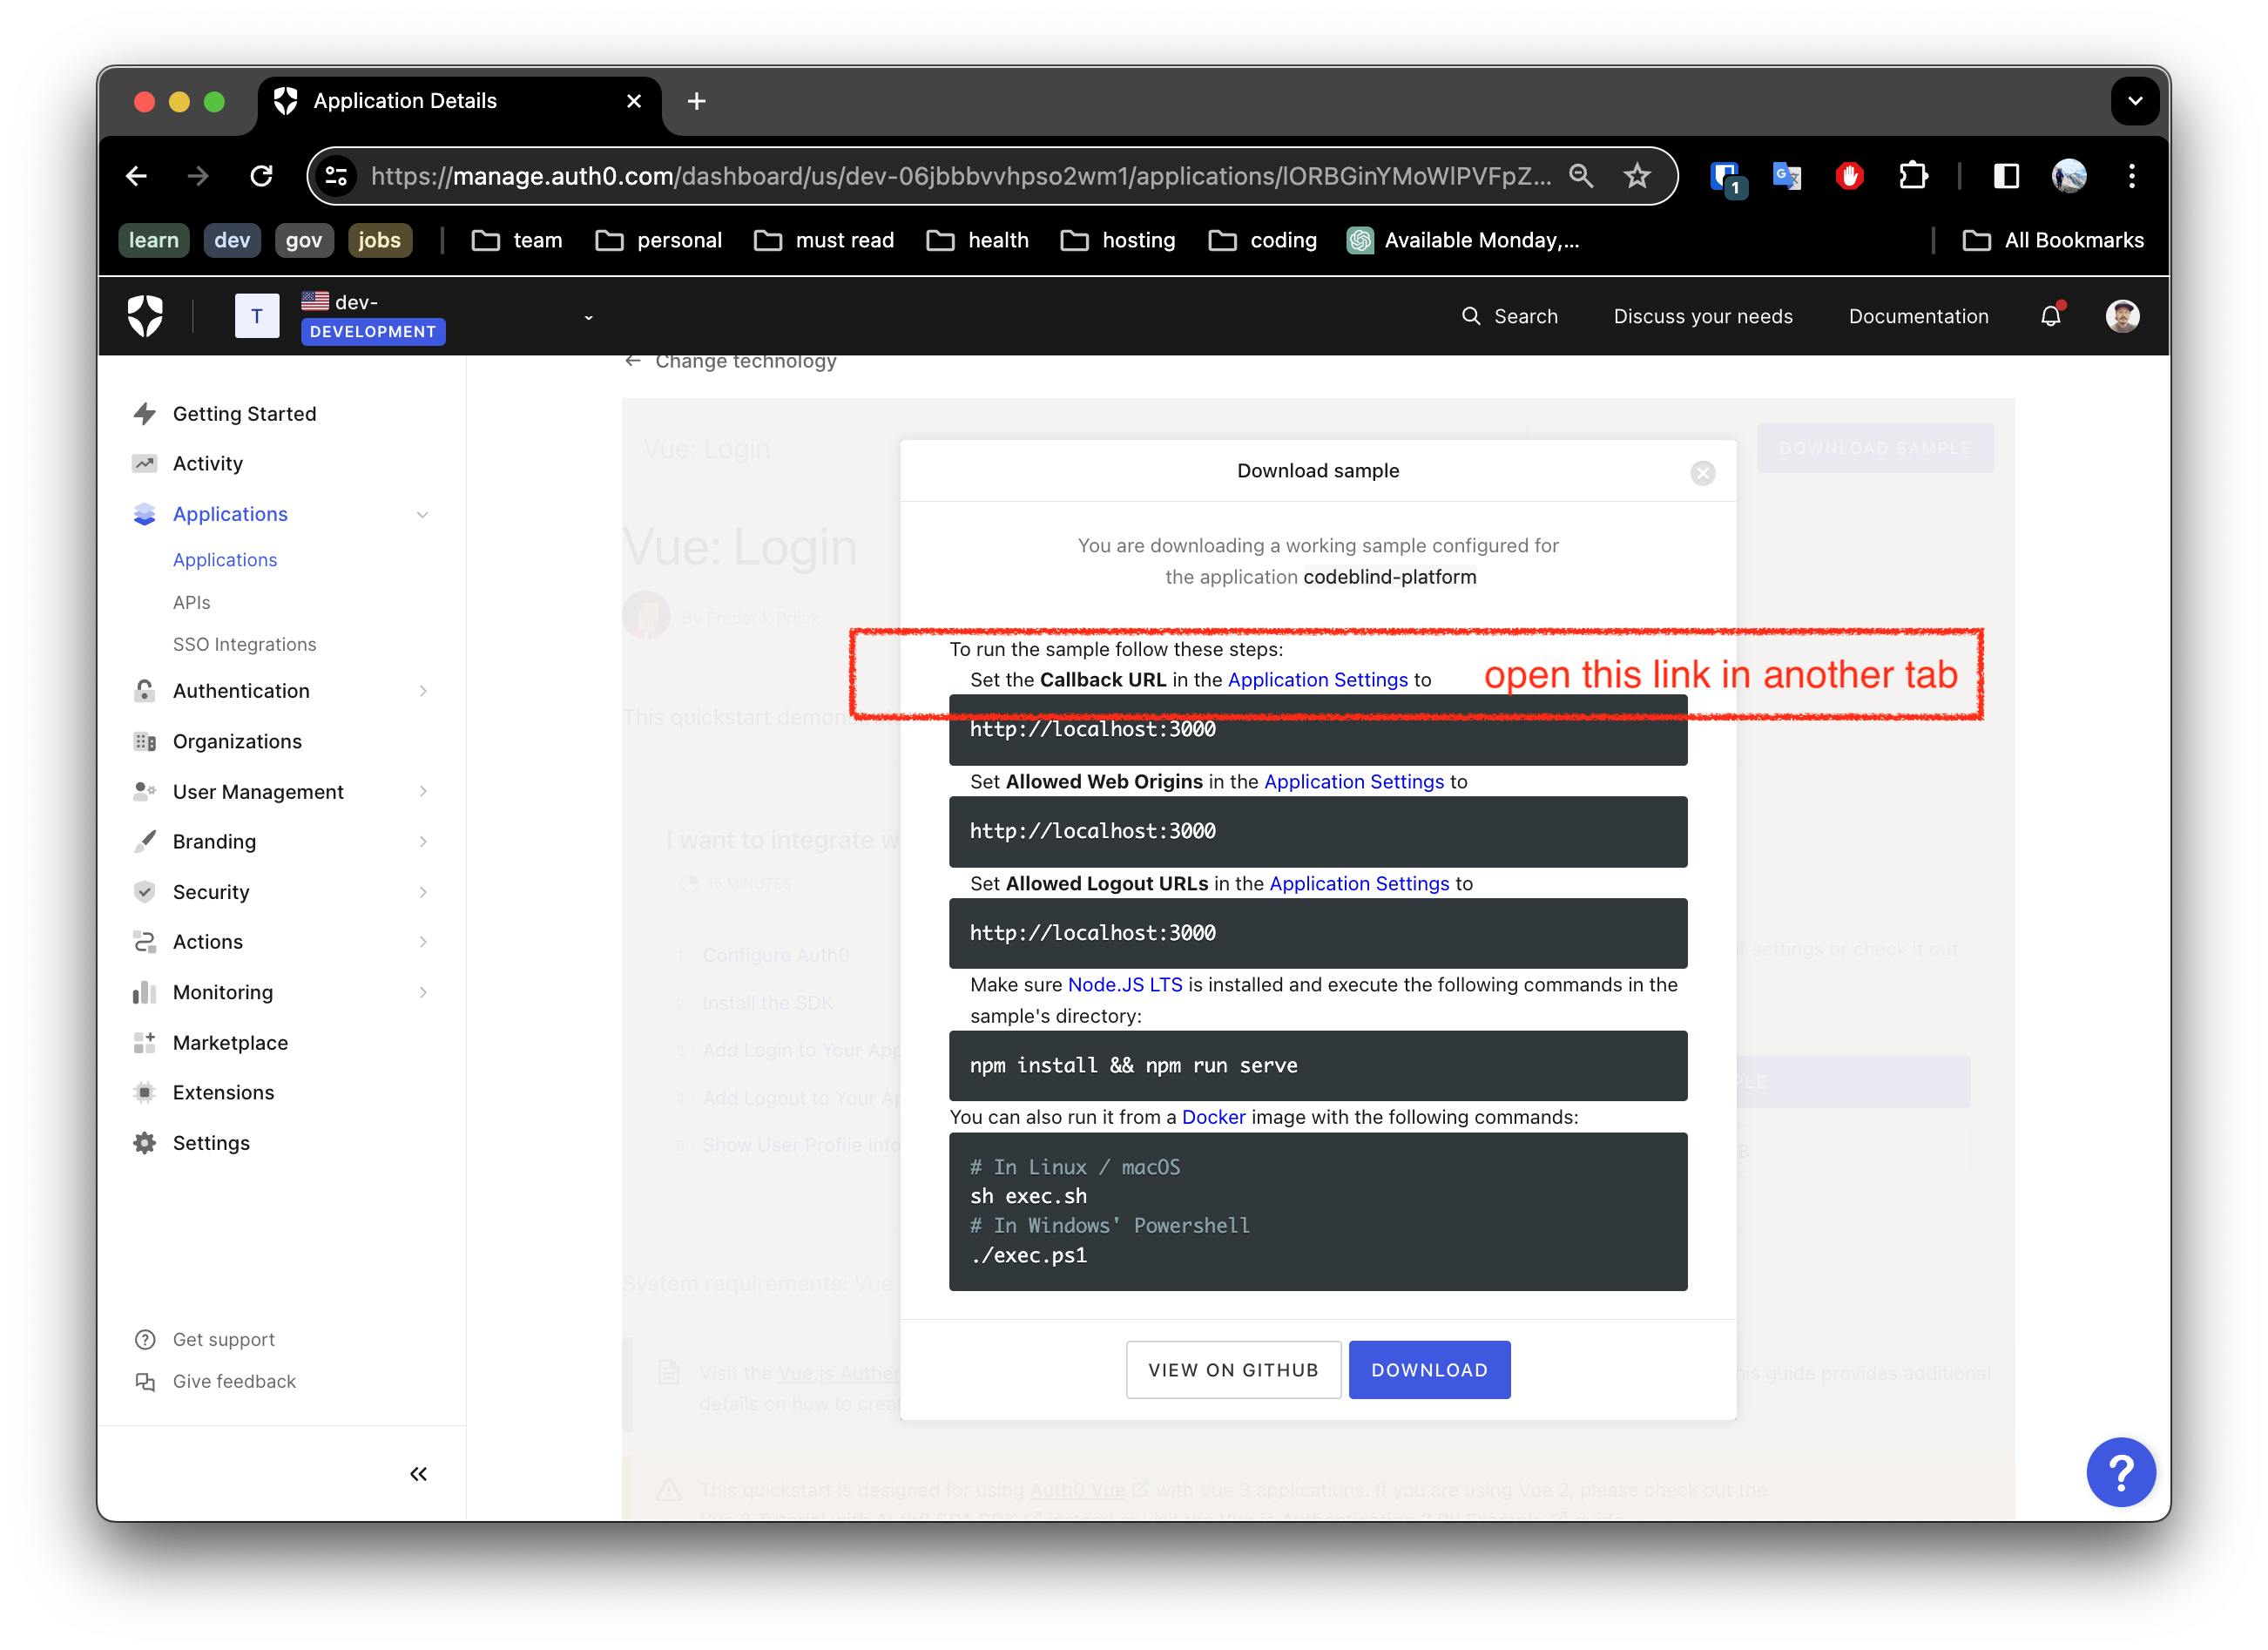
To make this work, you must configure your settings for:
Allowed Calledback URLsAllowed Logout URLsAllowed Web OriginsNotice the link in the screen shot above, open a tab so that you can update the settings as shown below.
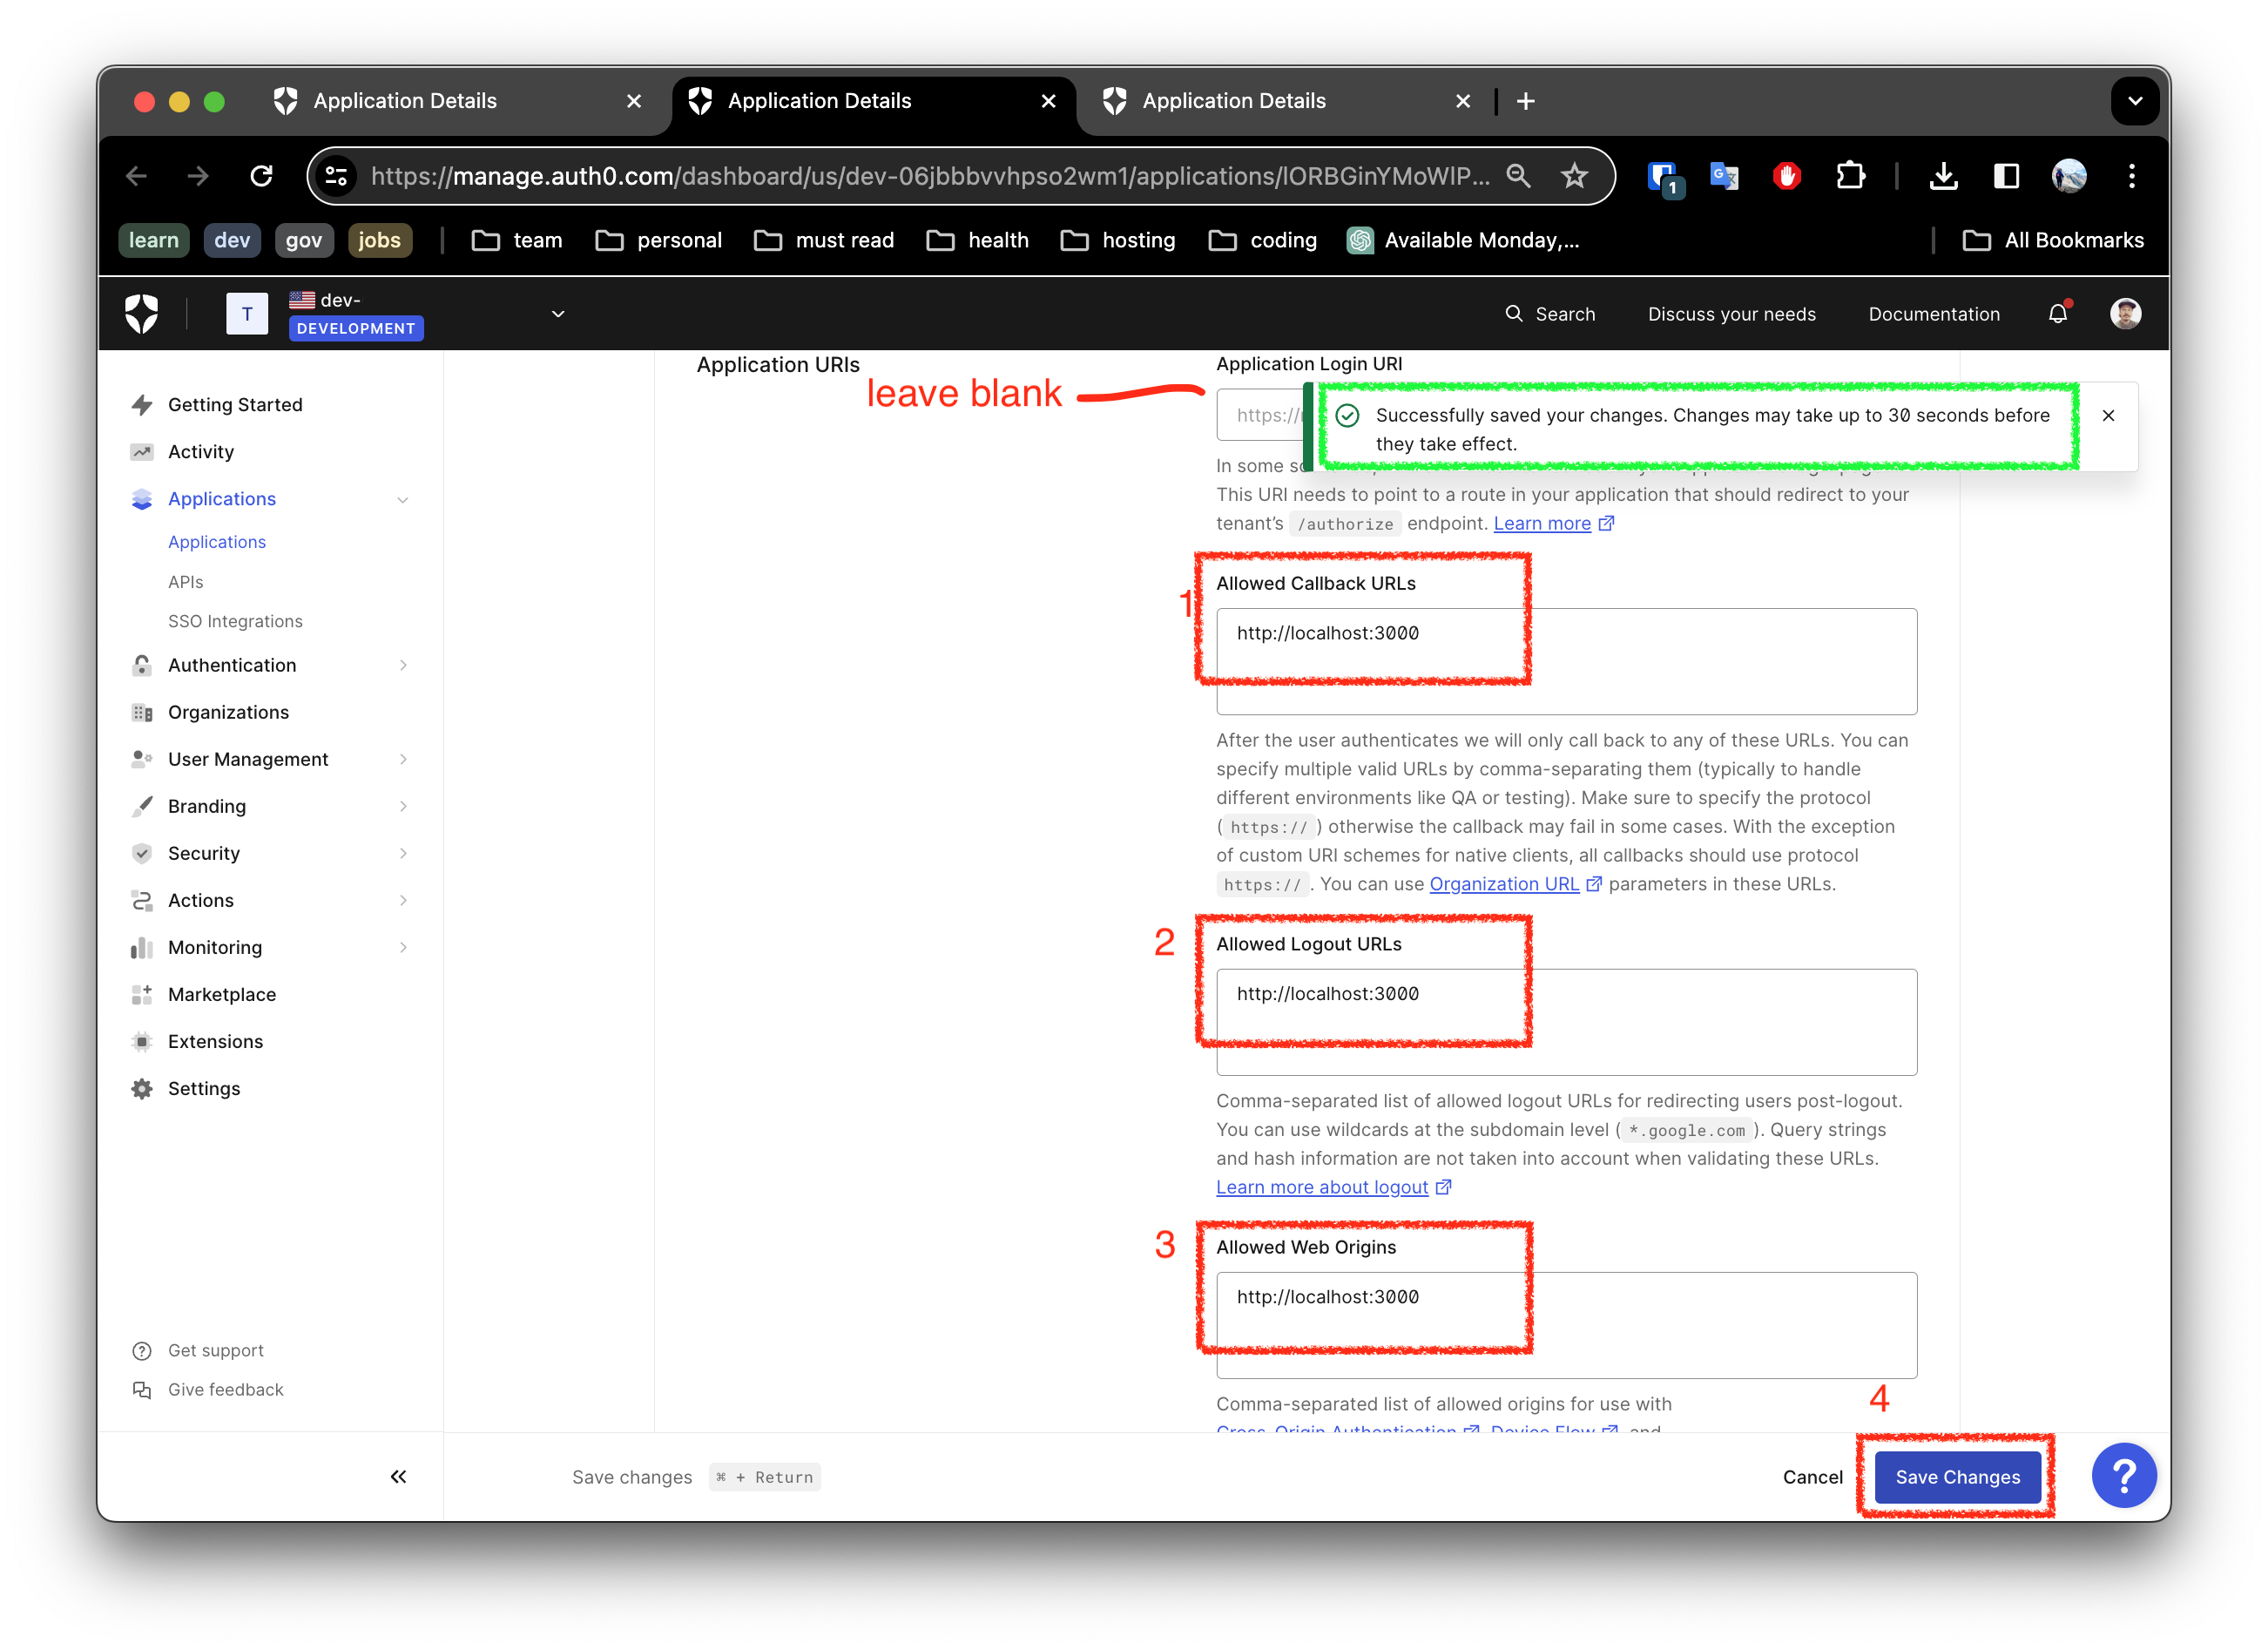
Once done, save the settings.
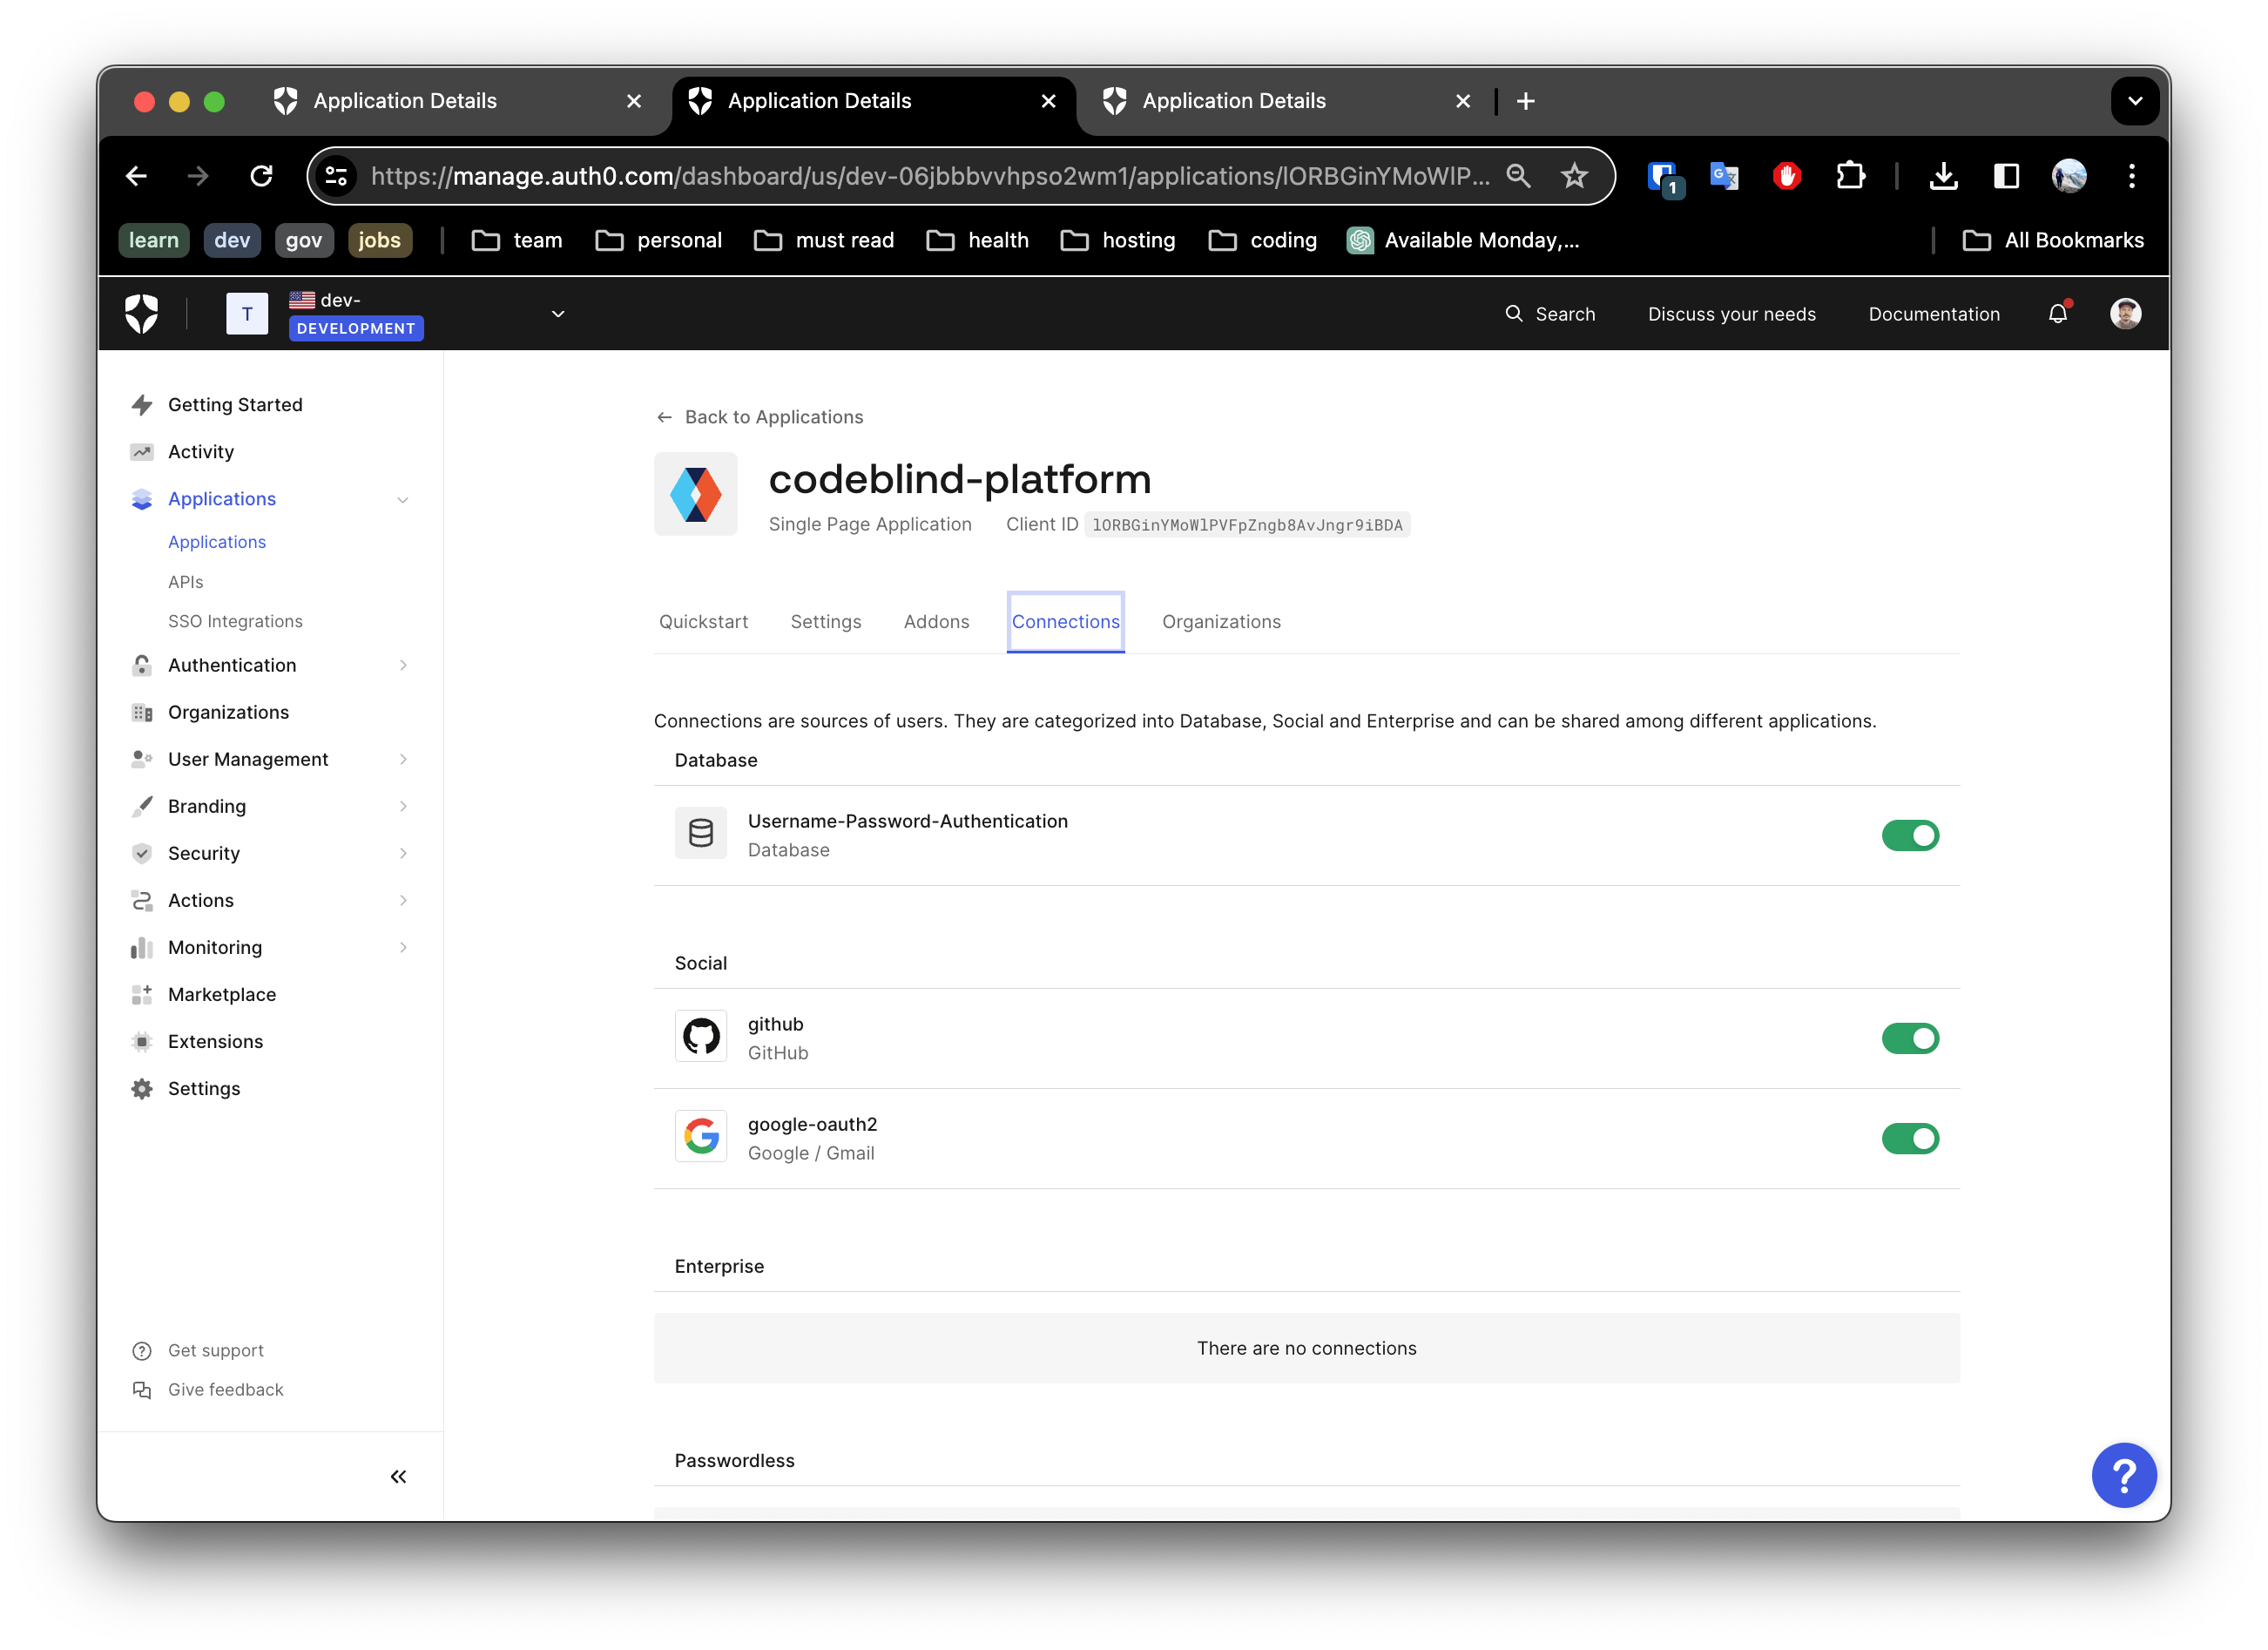
Next navigate to the Connections Tab. Here you can enable the “Connection” types, such as:
Make you selection and save your settings.
Now with all the configuration out of the way, we can start working with the downloaded project from our previous step.
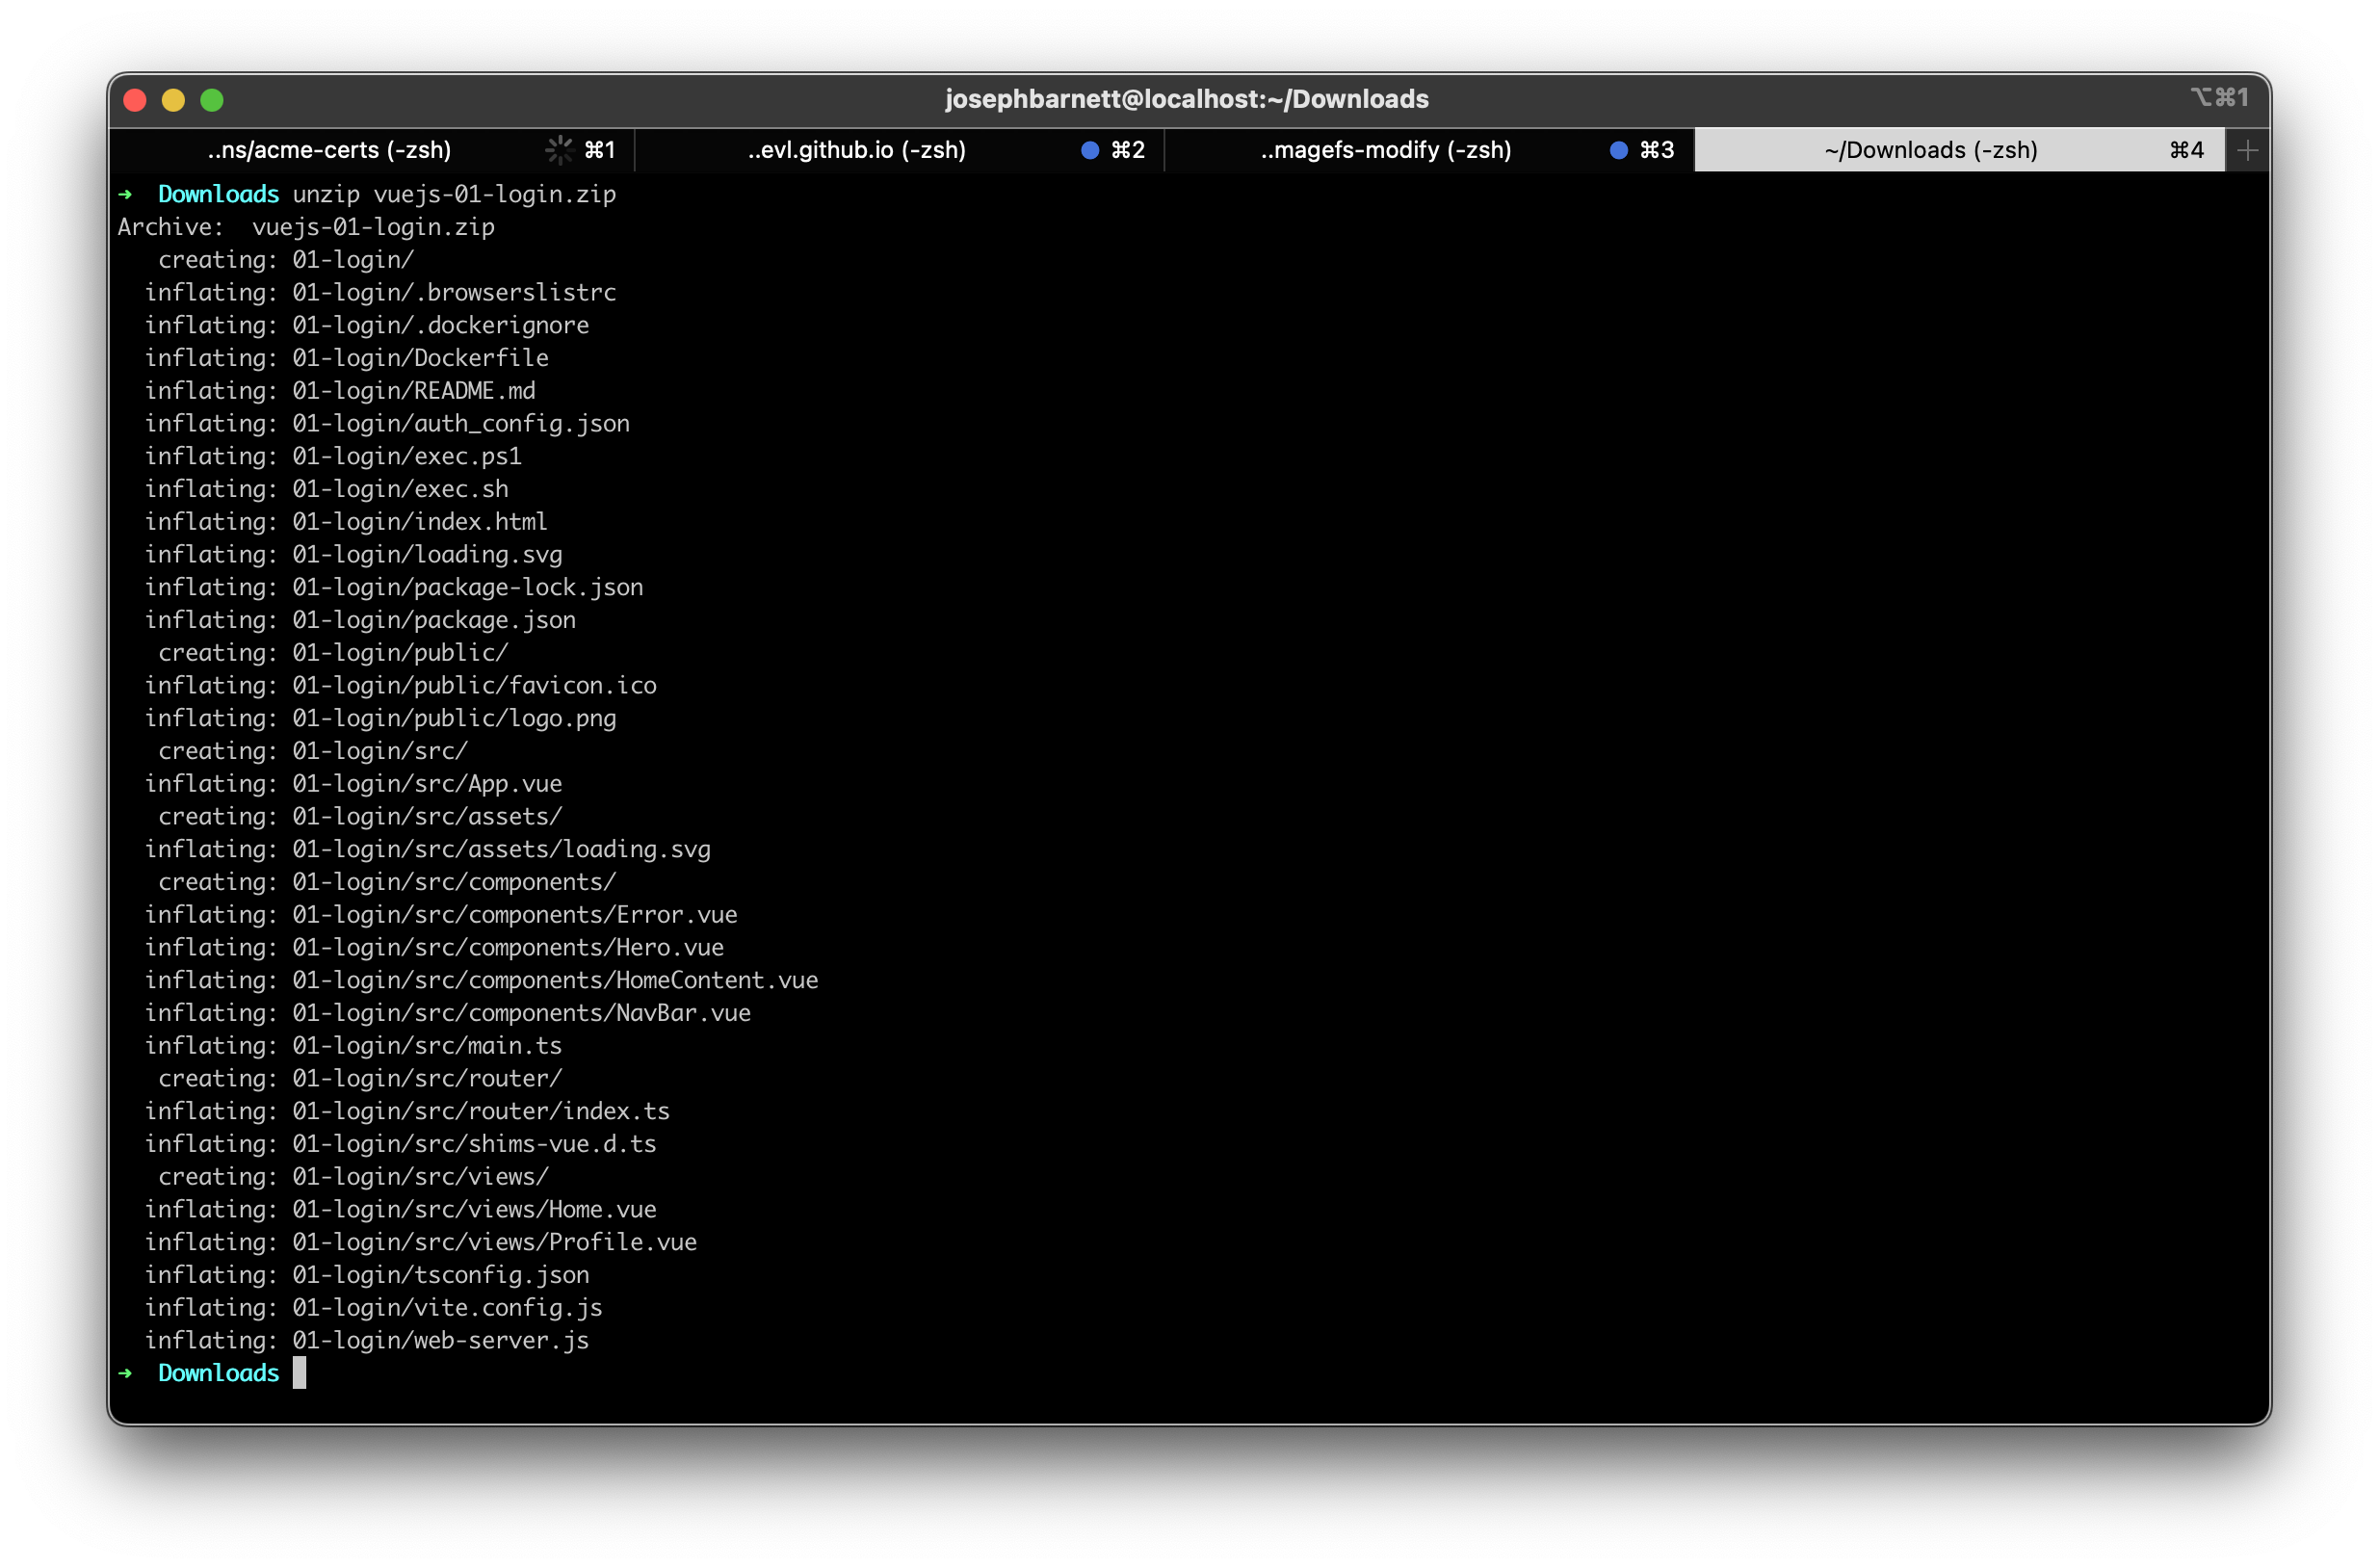
Unpack the downloaded application archive, and open the code in an IDE of your choice.
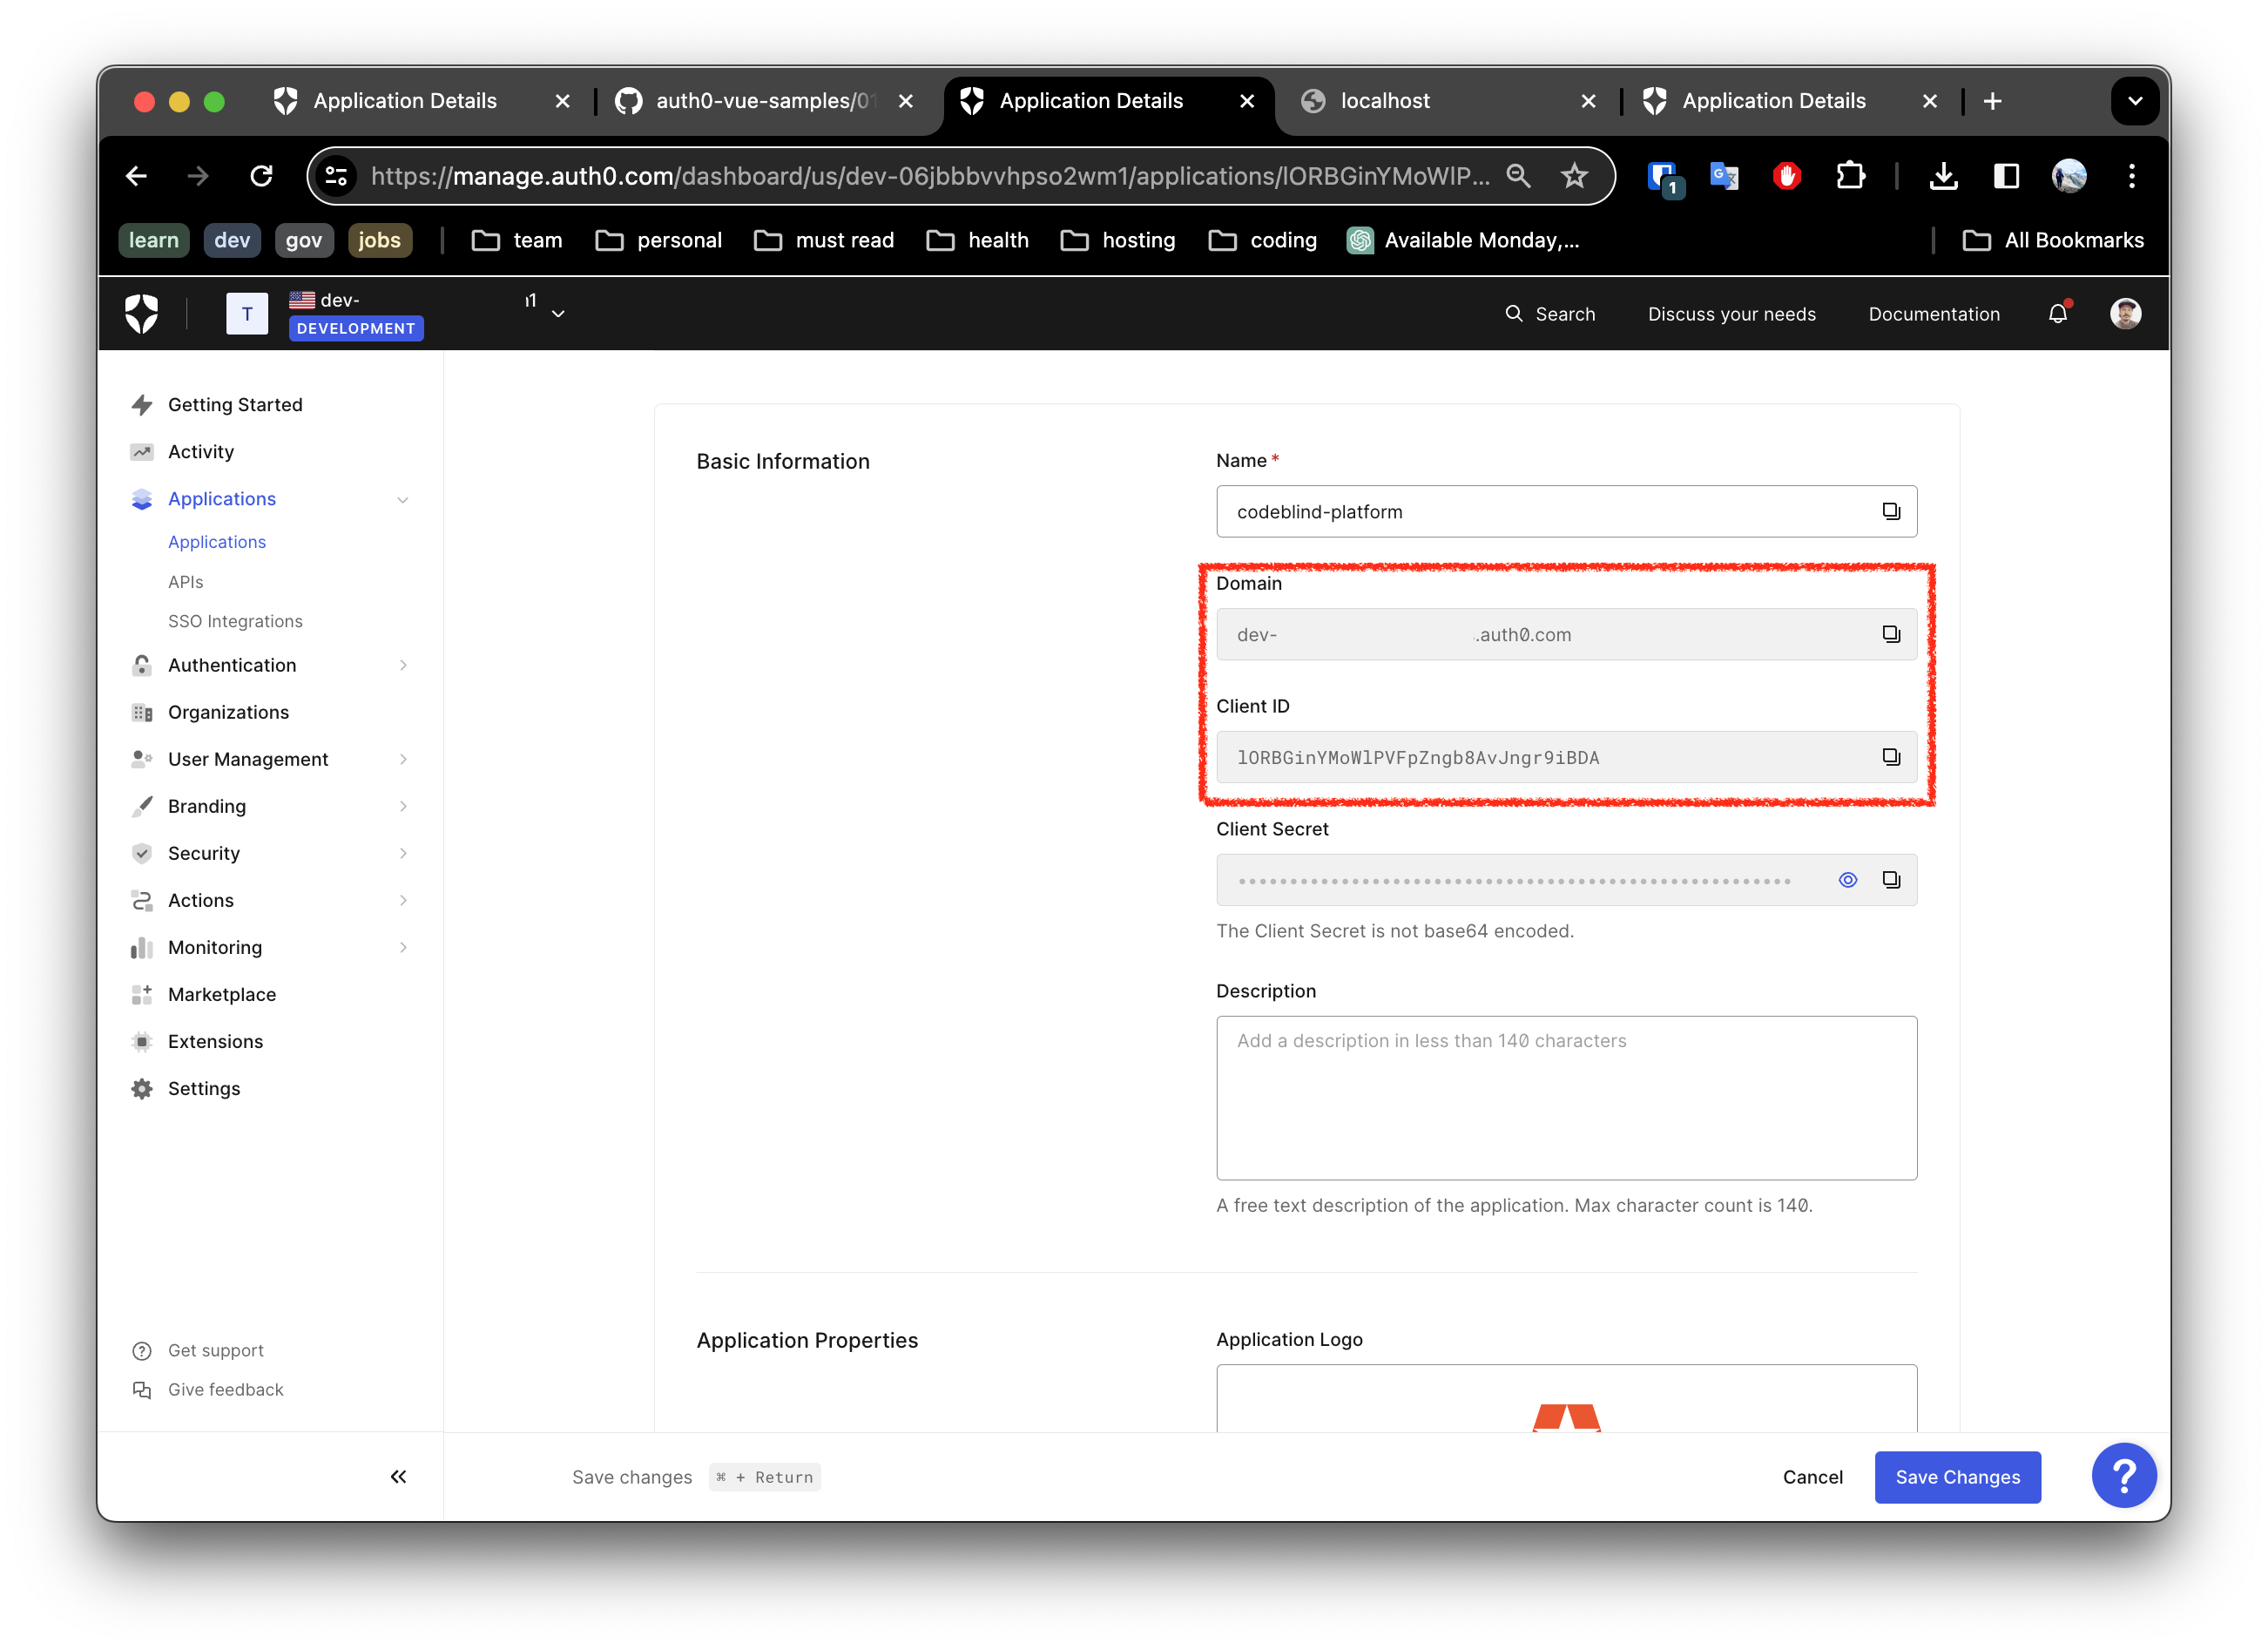
The project may needs to be configured with your Auth0 domain and client ID in order for the authentication flow to work. However generally the zip is pre-configured with the application identity. Let’s look at them. Open auth_config.json, and verify the application verification domain, and client ID are correct:

They should match the values from the application listing in Auth0 application settings:
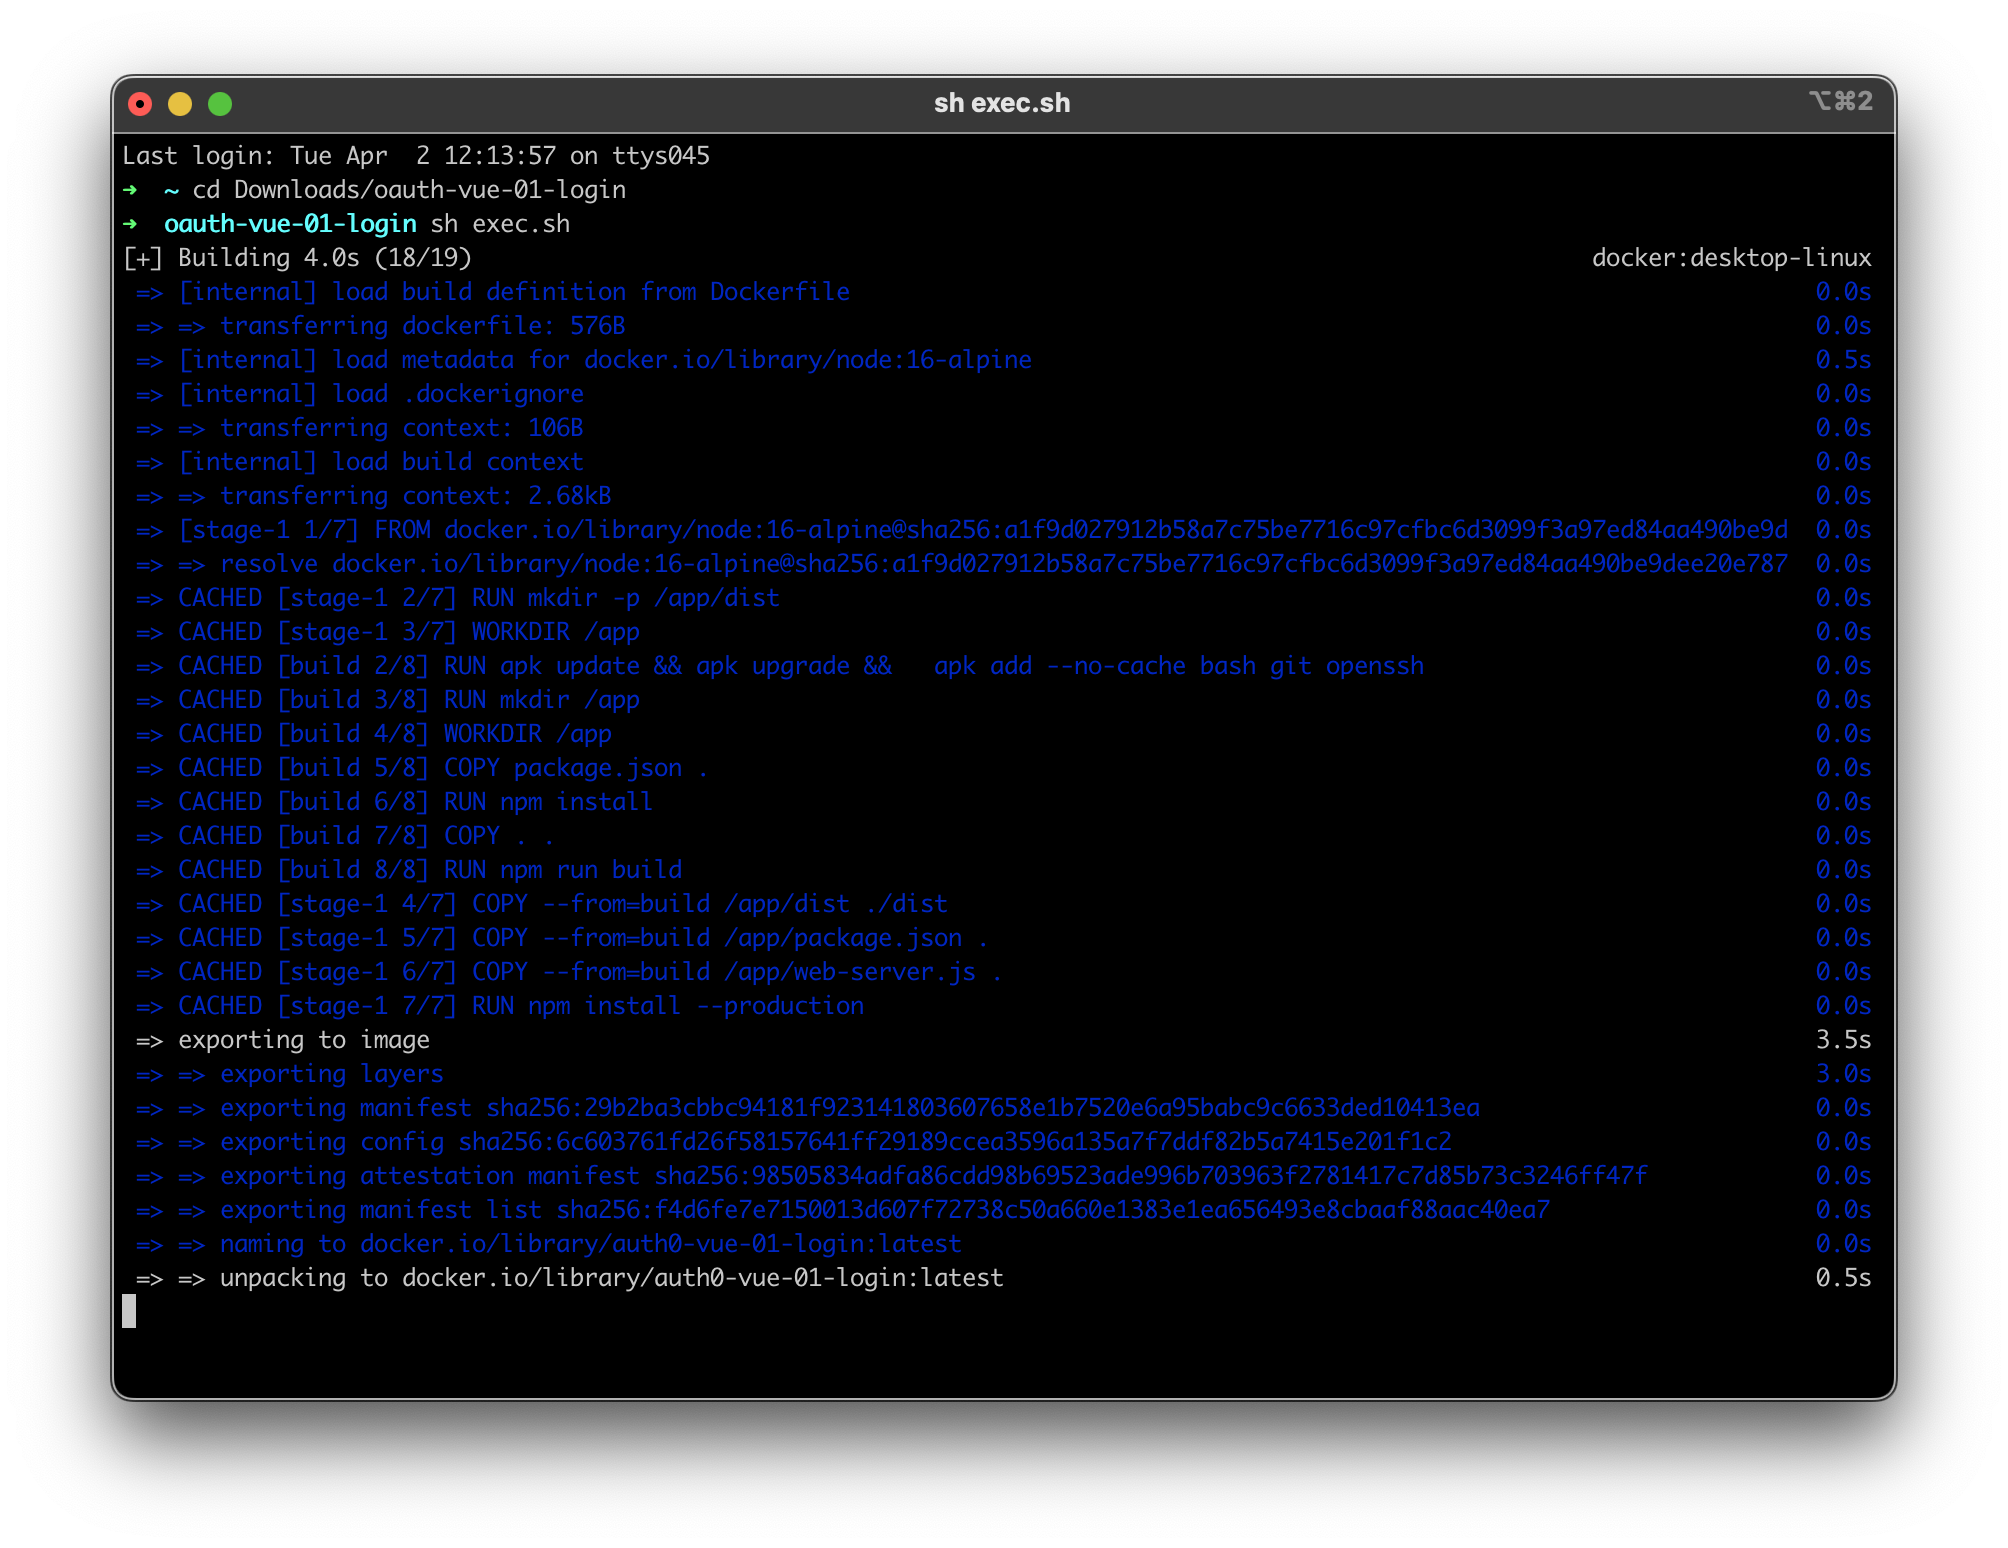
sh exec.sh
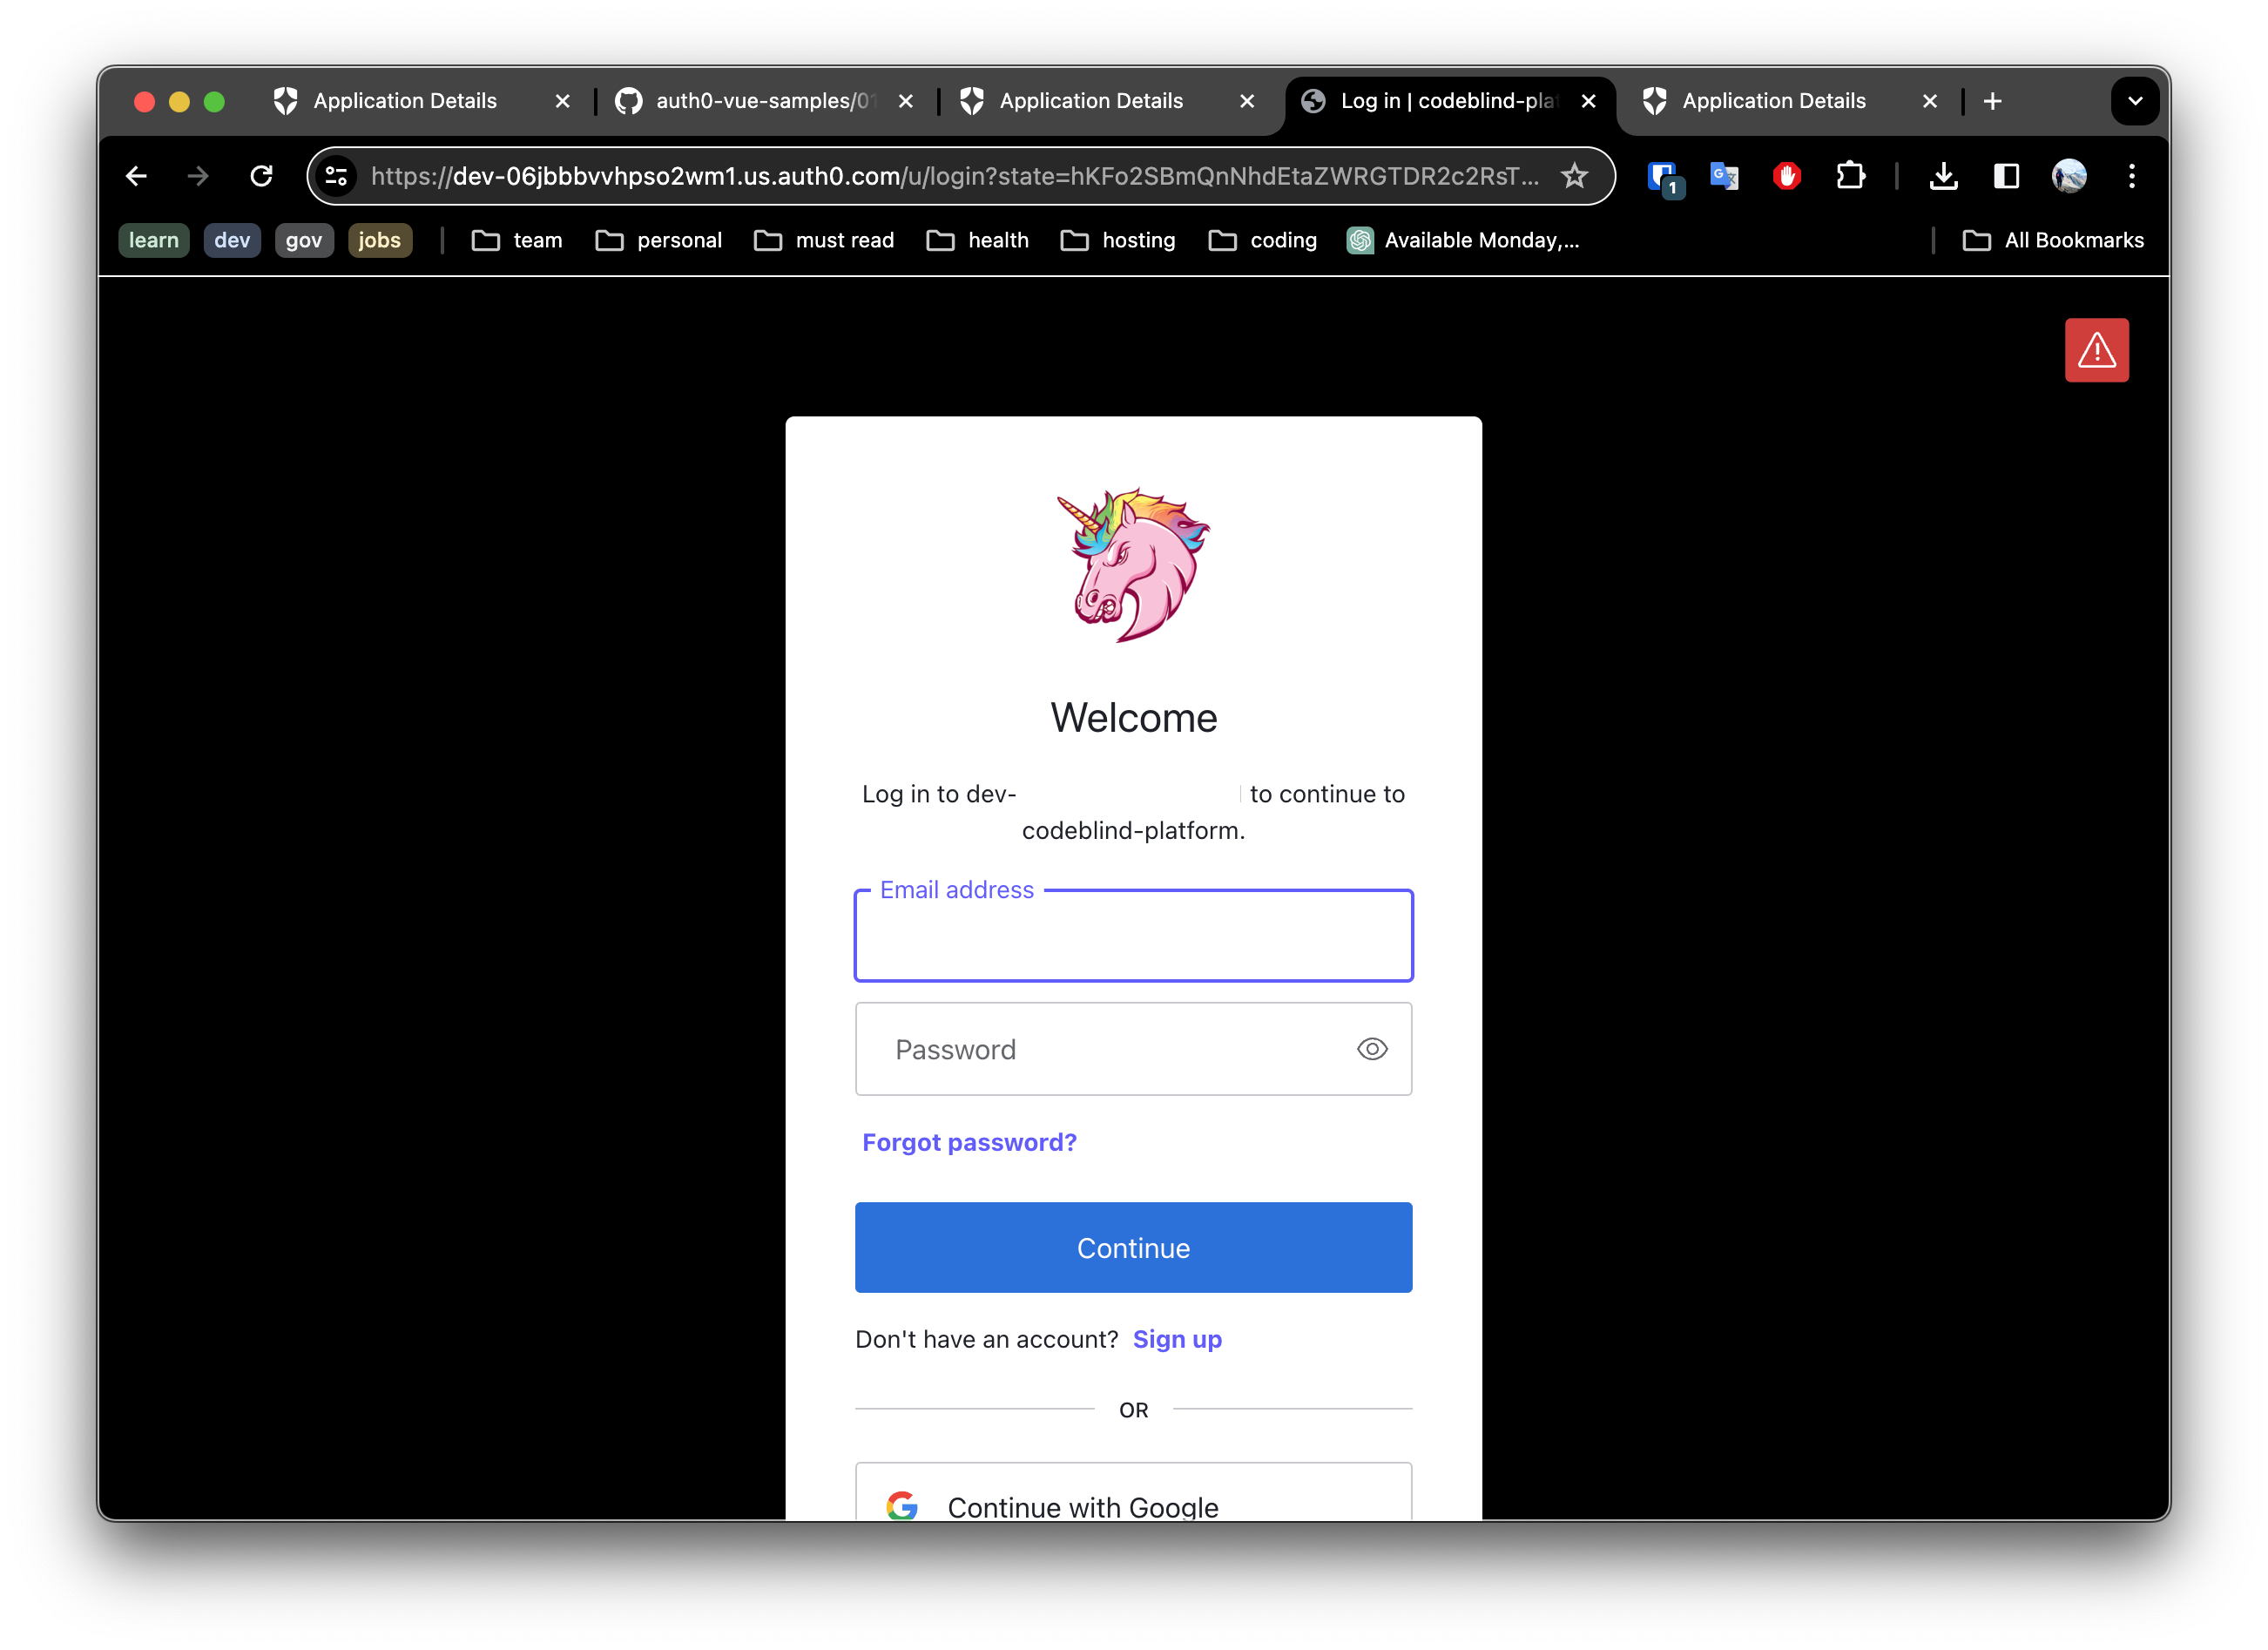
For example below is an example of what one might see if they clicked the github login method. Once you have reviewed and accepted the permissions - it will grant access in the users account to profile (name, email, userId).
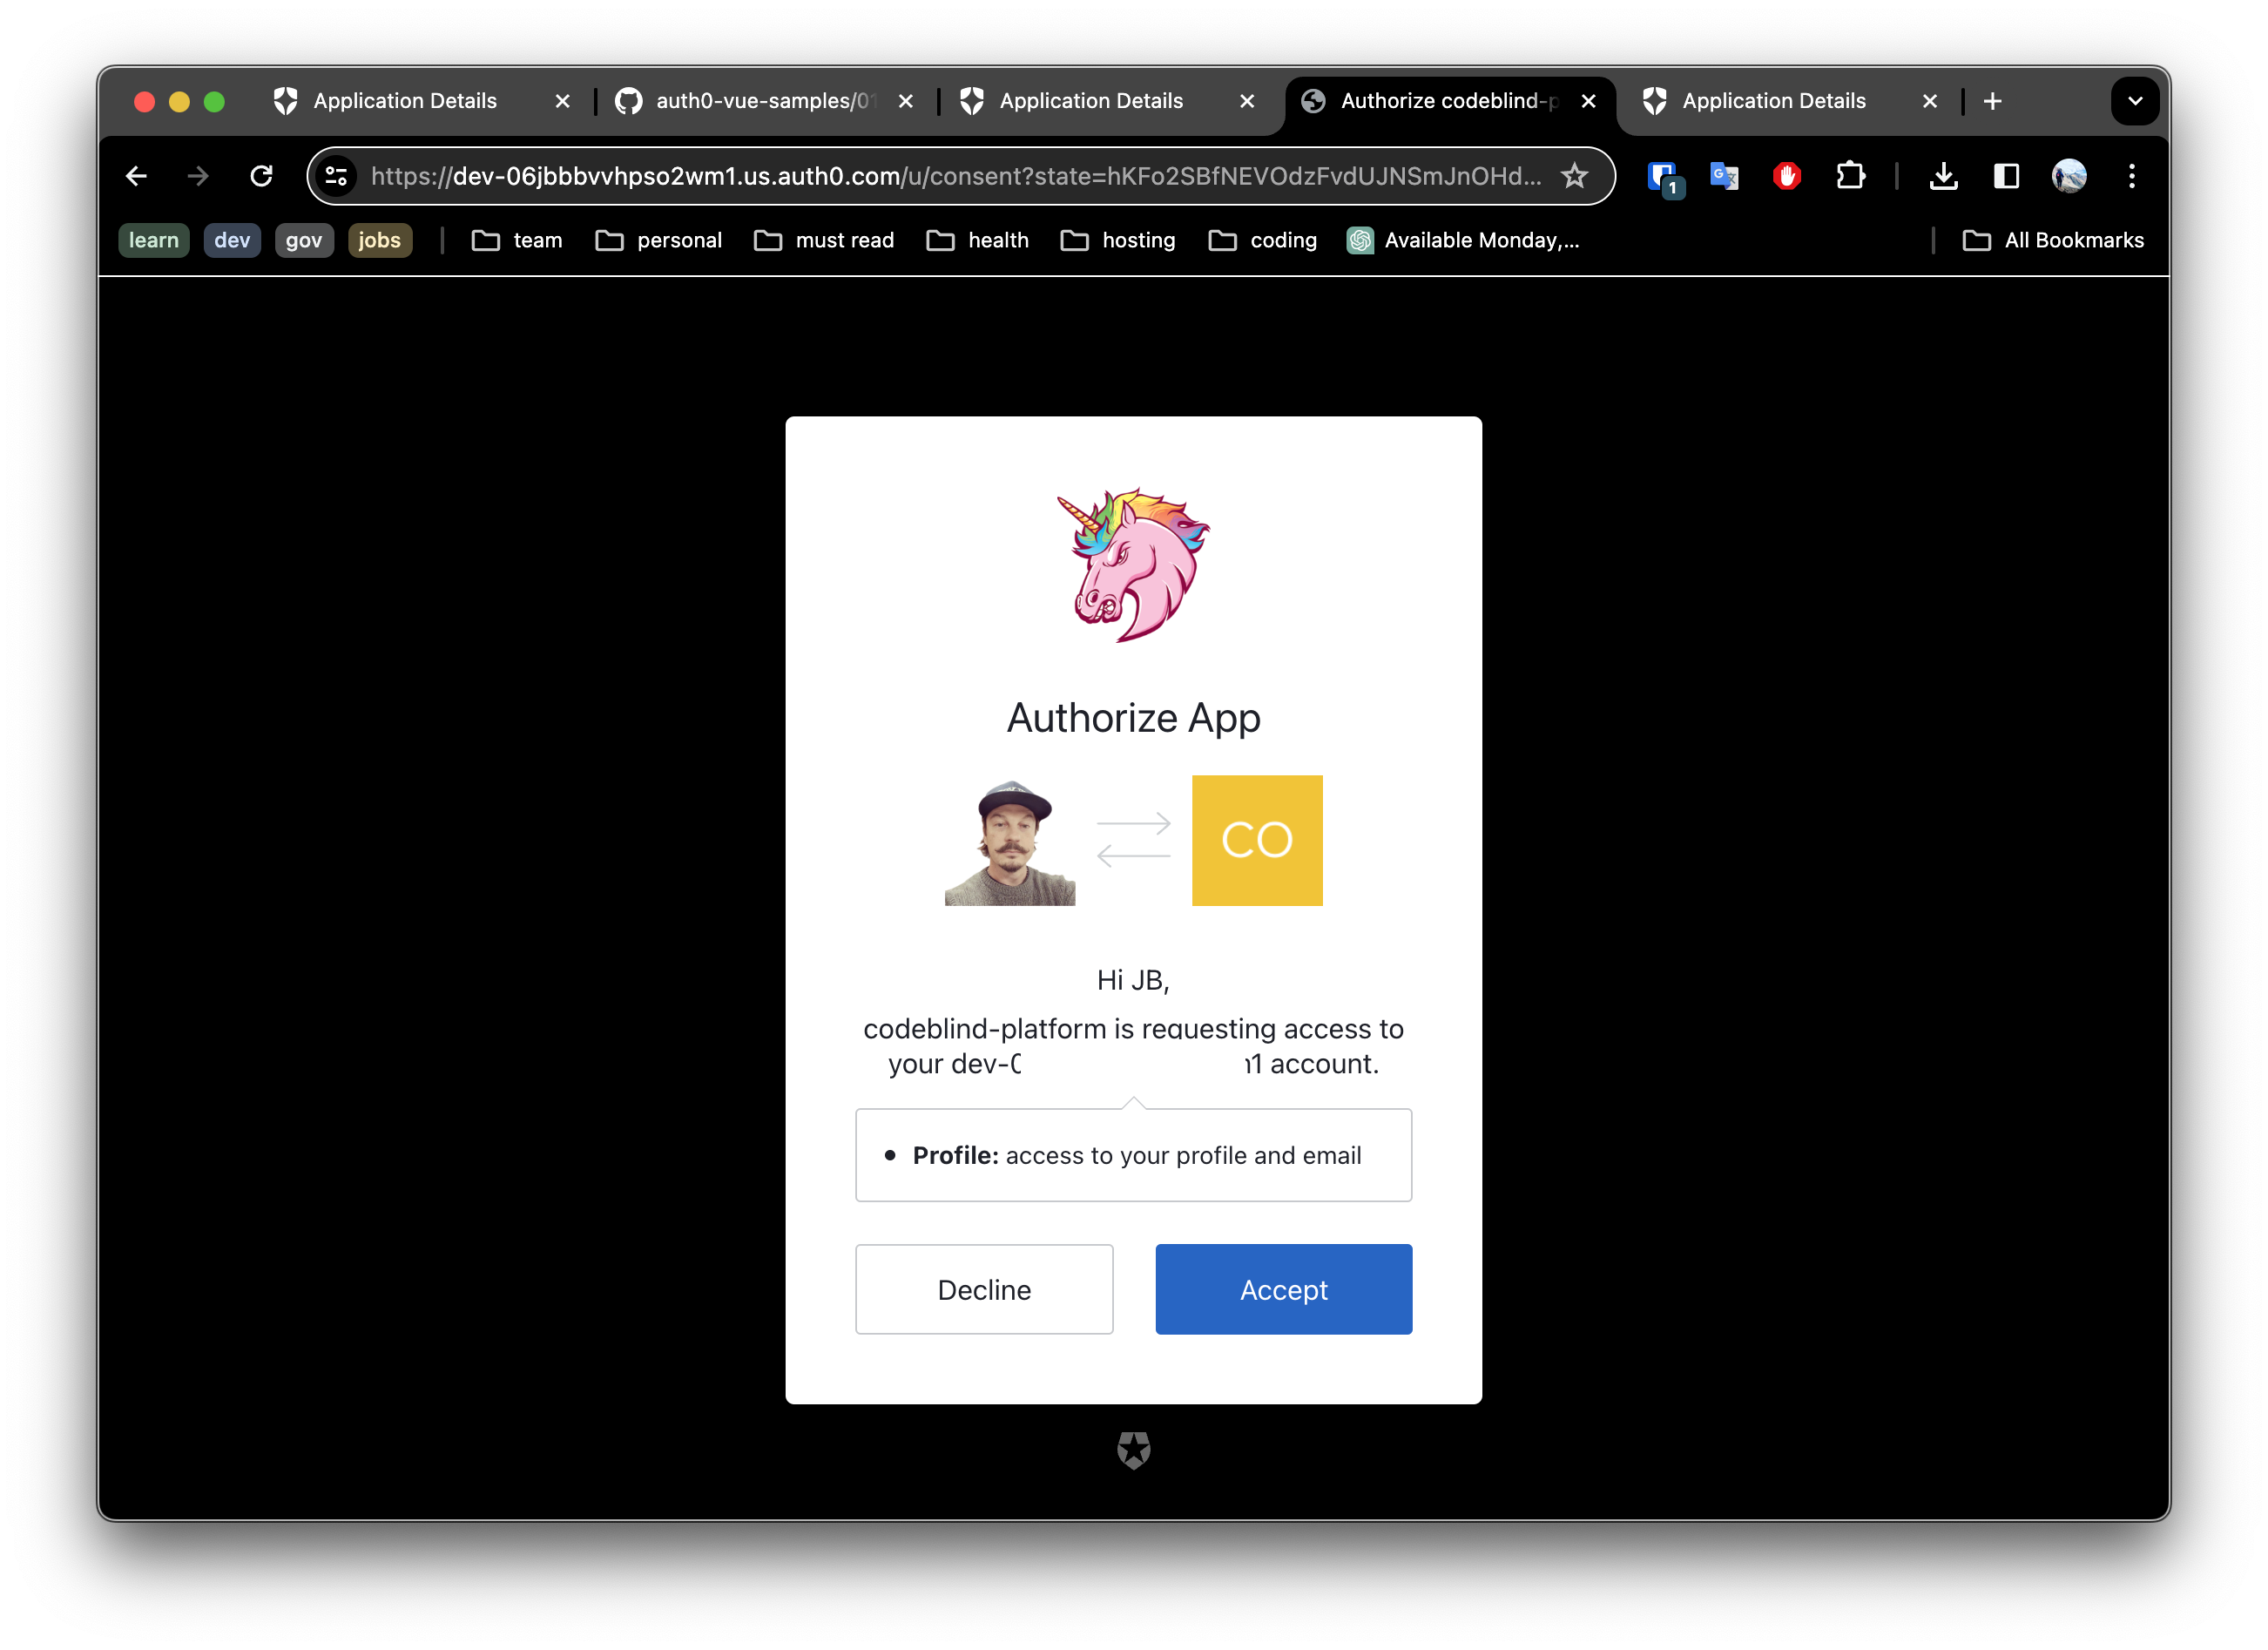
Once this has successfully completed, we can click the drop down next to your user avatar and select profile. This will show you what data was captured from the user account on the provider (github, google, etc).
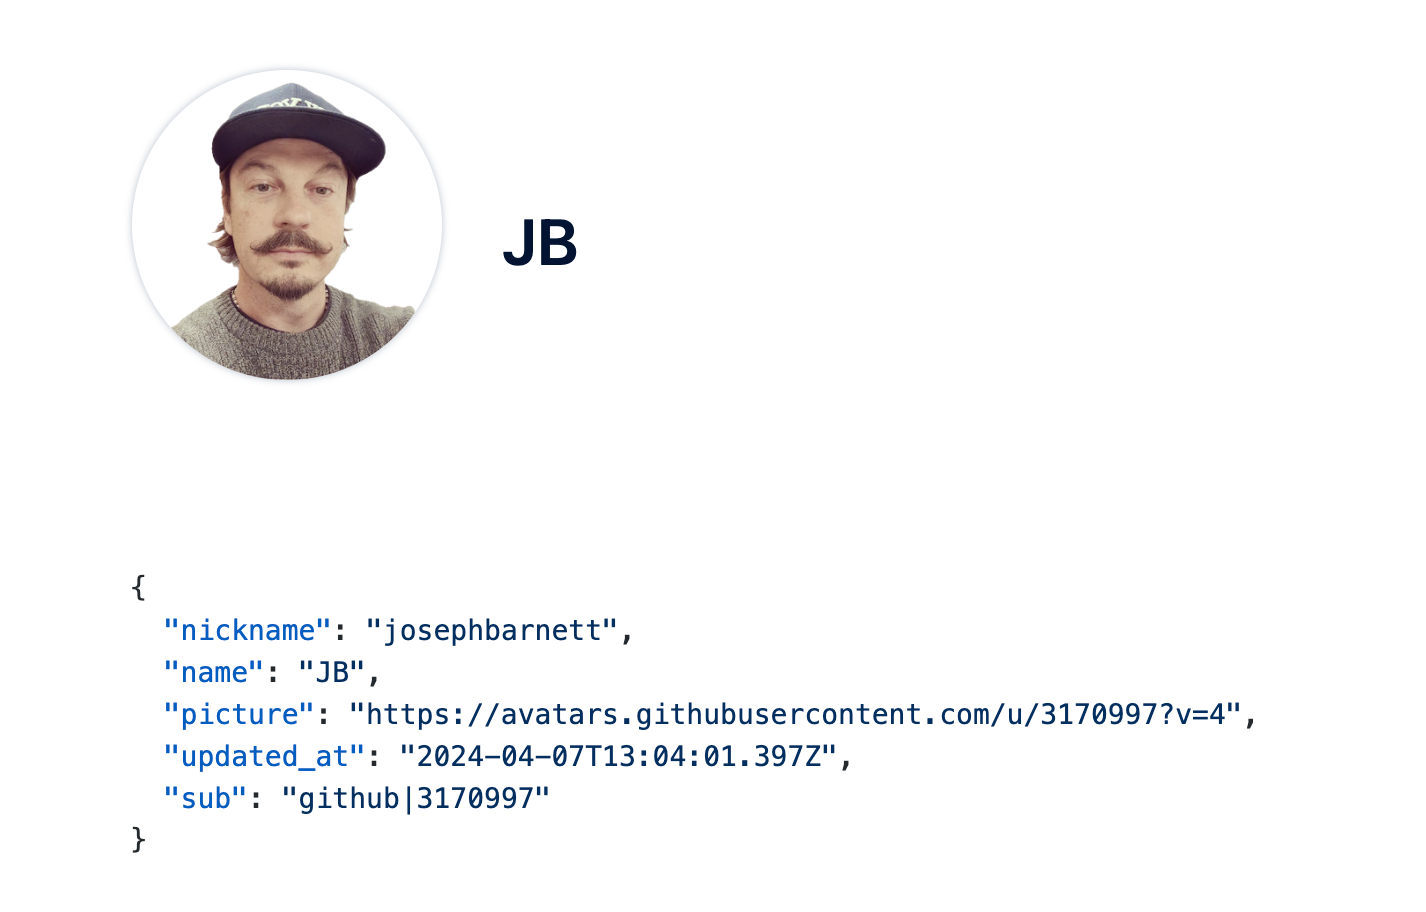
Now that the first steps are successfully working, it is time to get this into source control, enable github pages, configure it to use DNS, update the settings on the application listing in Auth0.
Many of these steps will be very similar to the steps we took in the previous post - when deploying our hugo blog to Github pages.
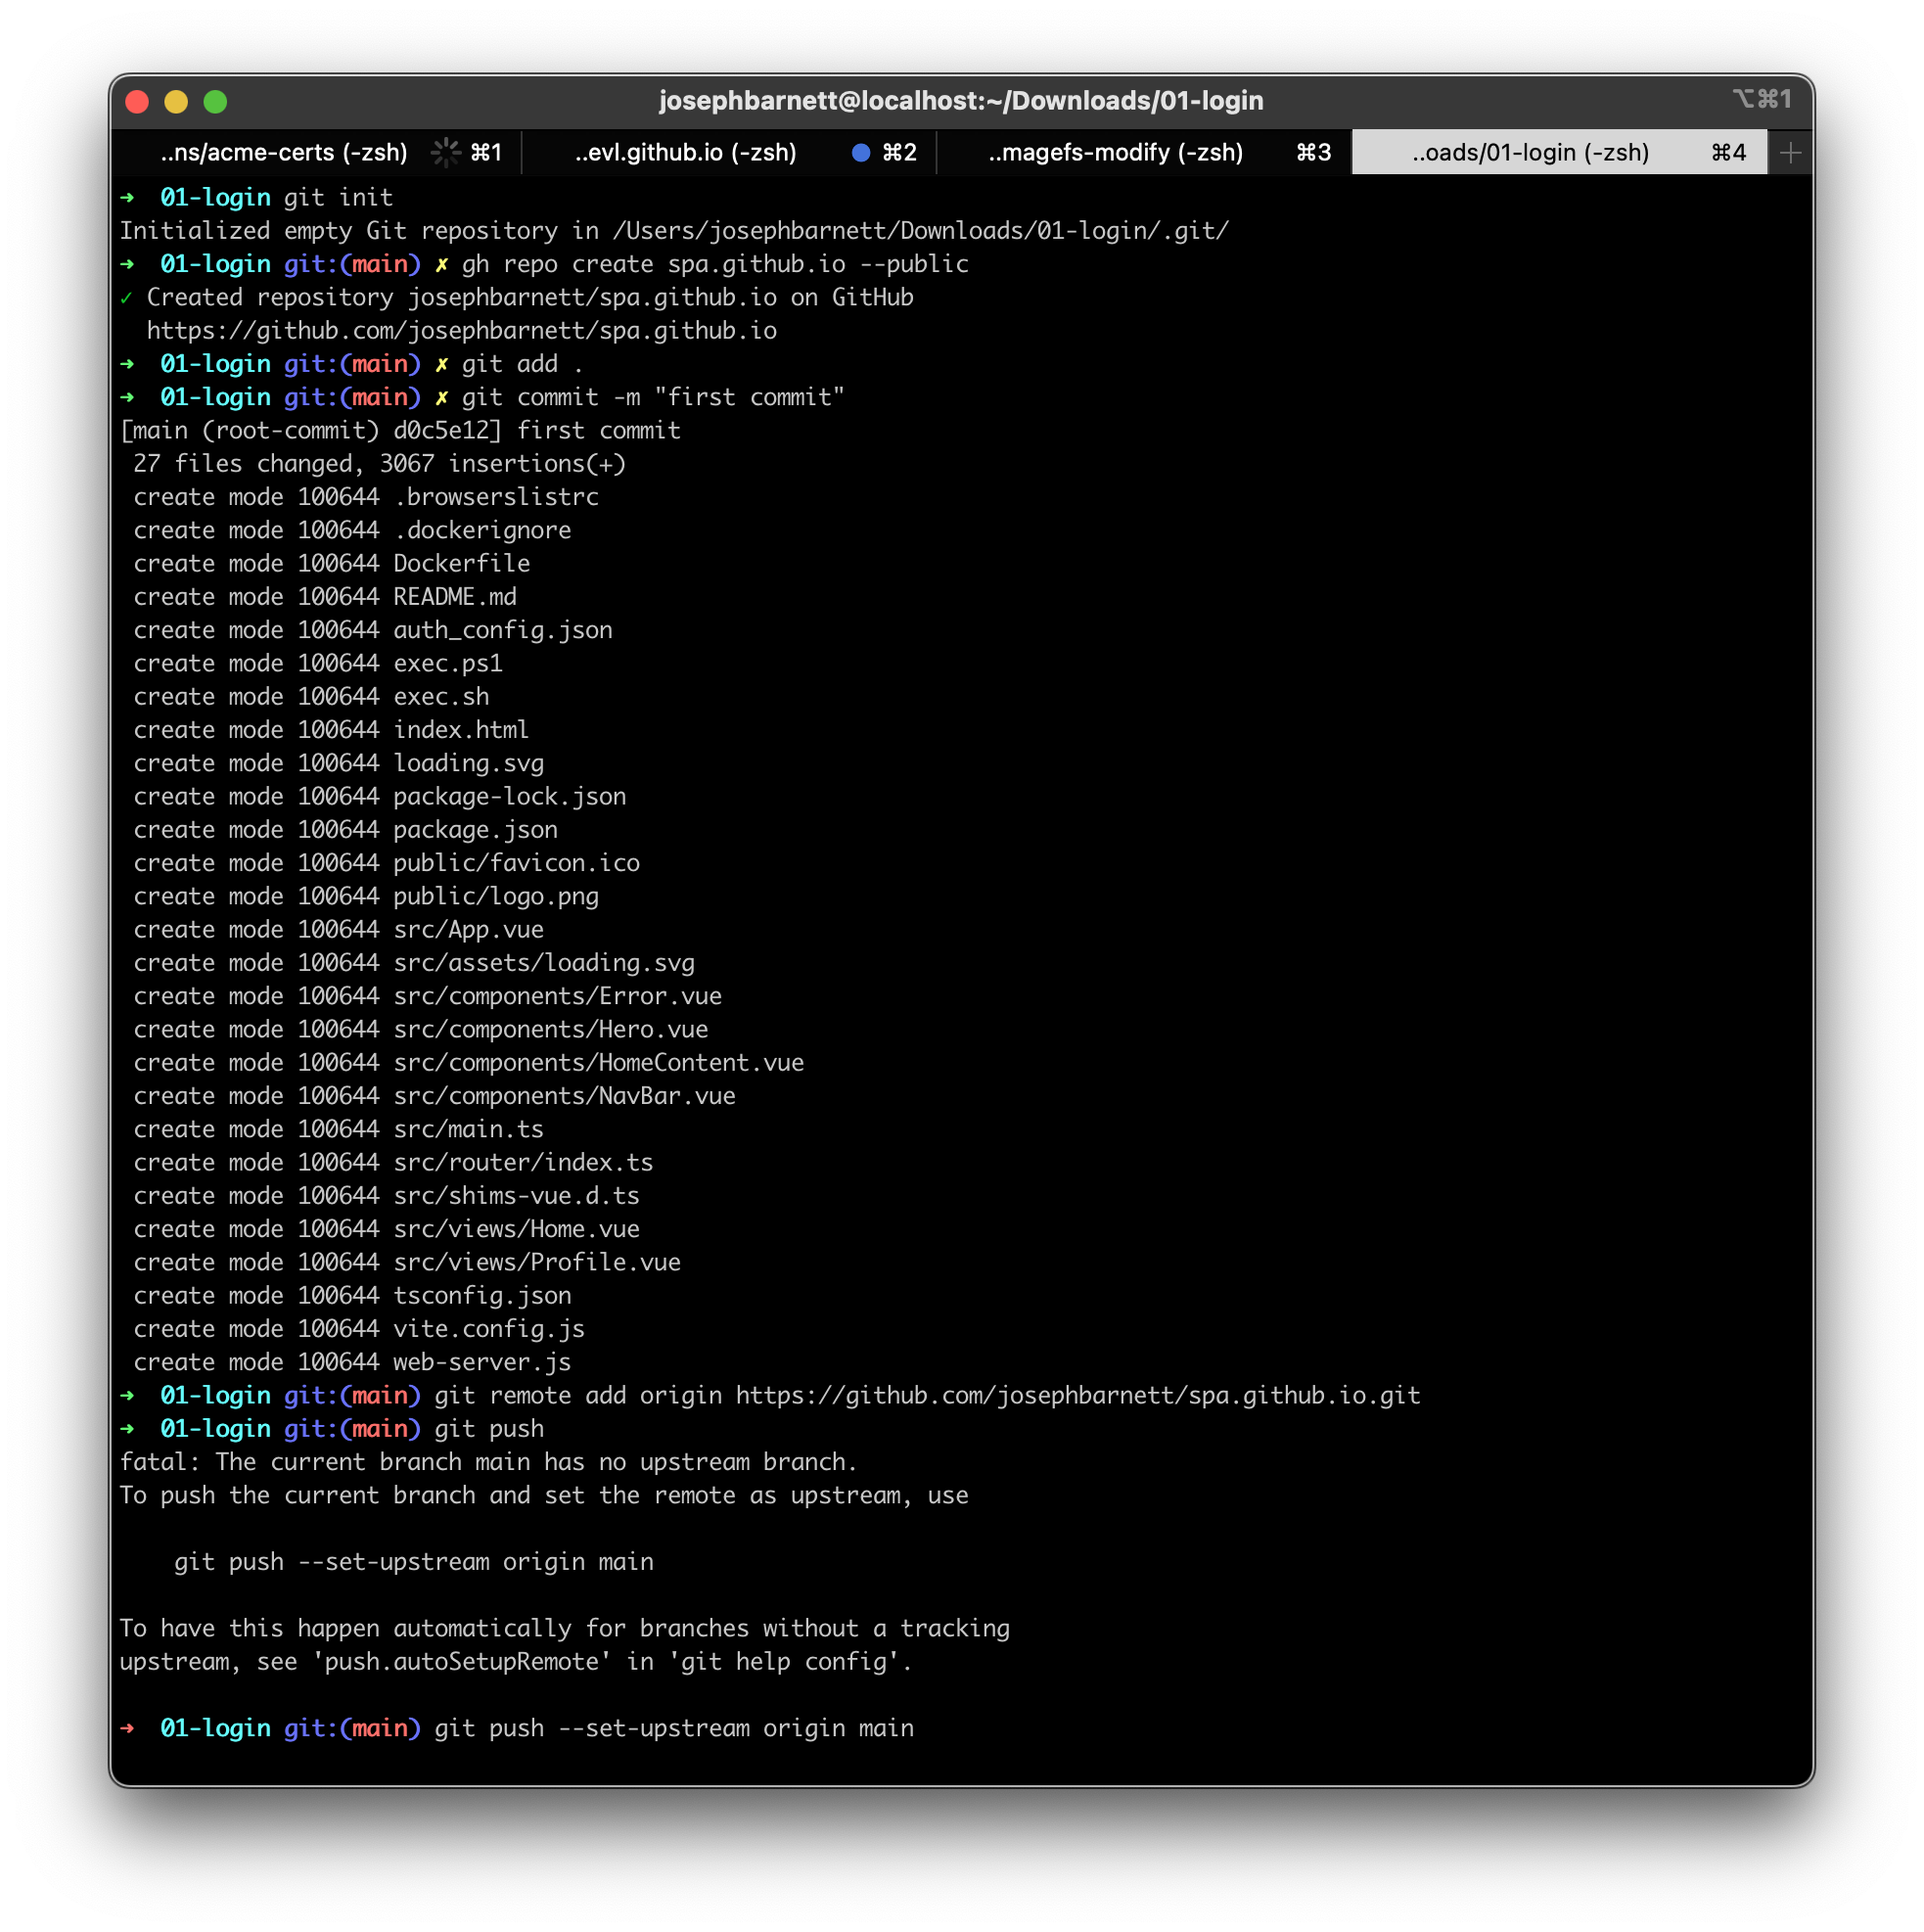
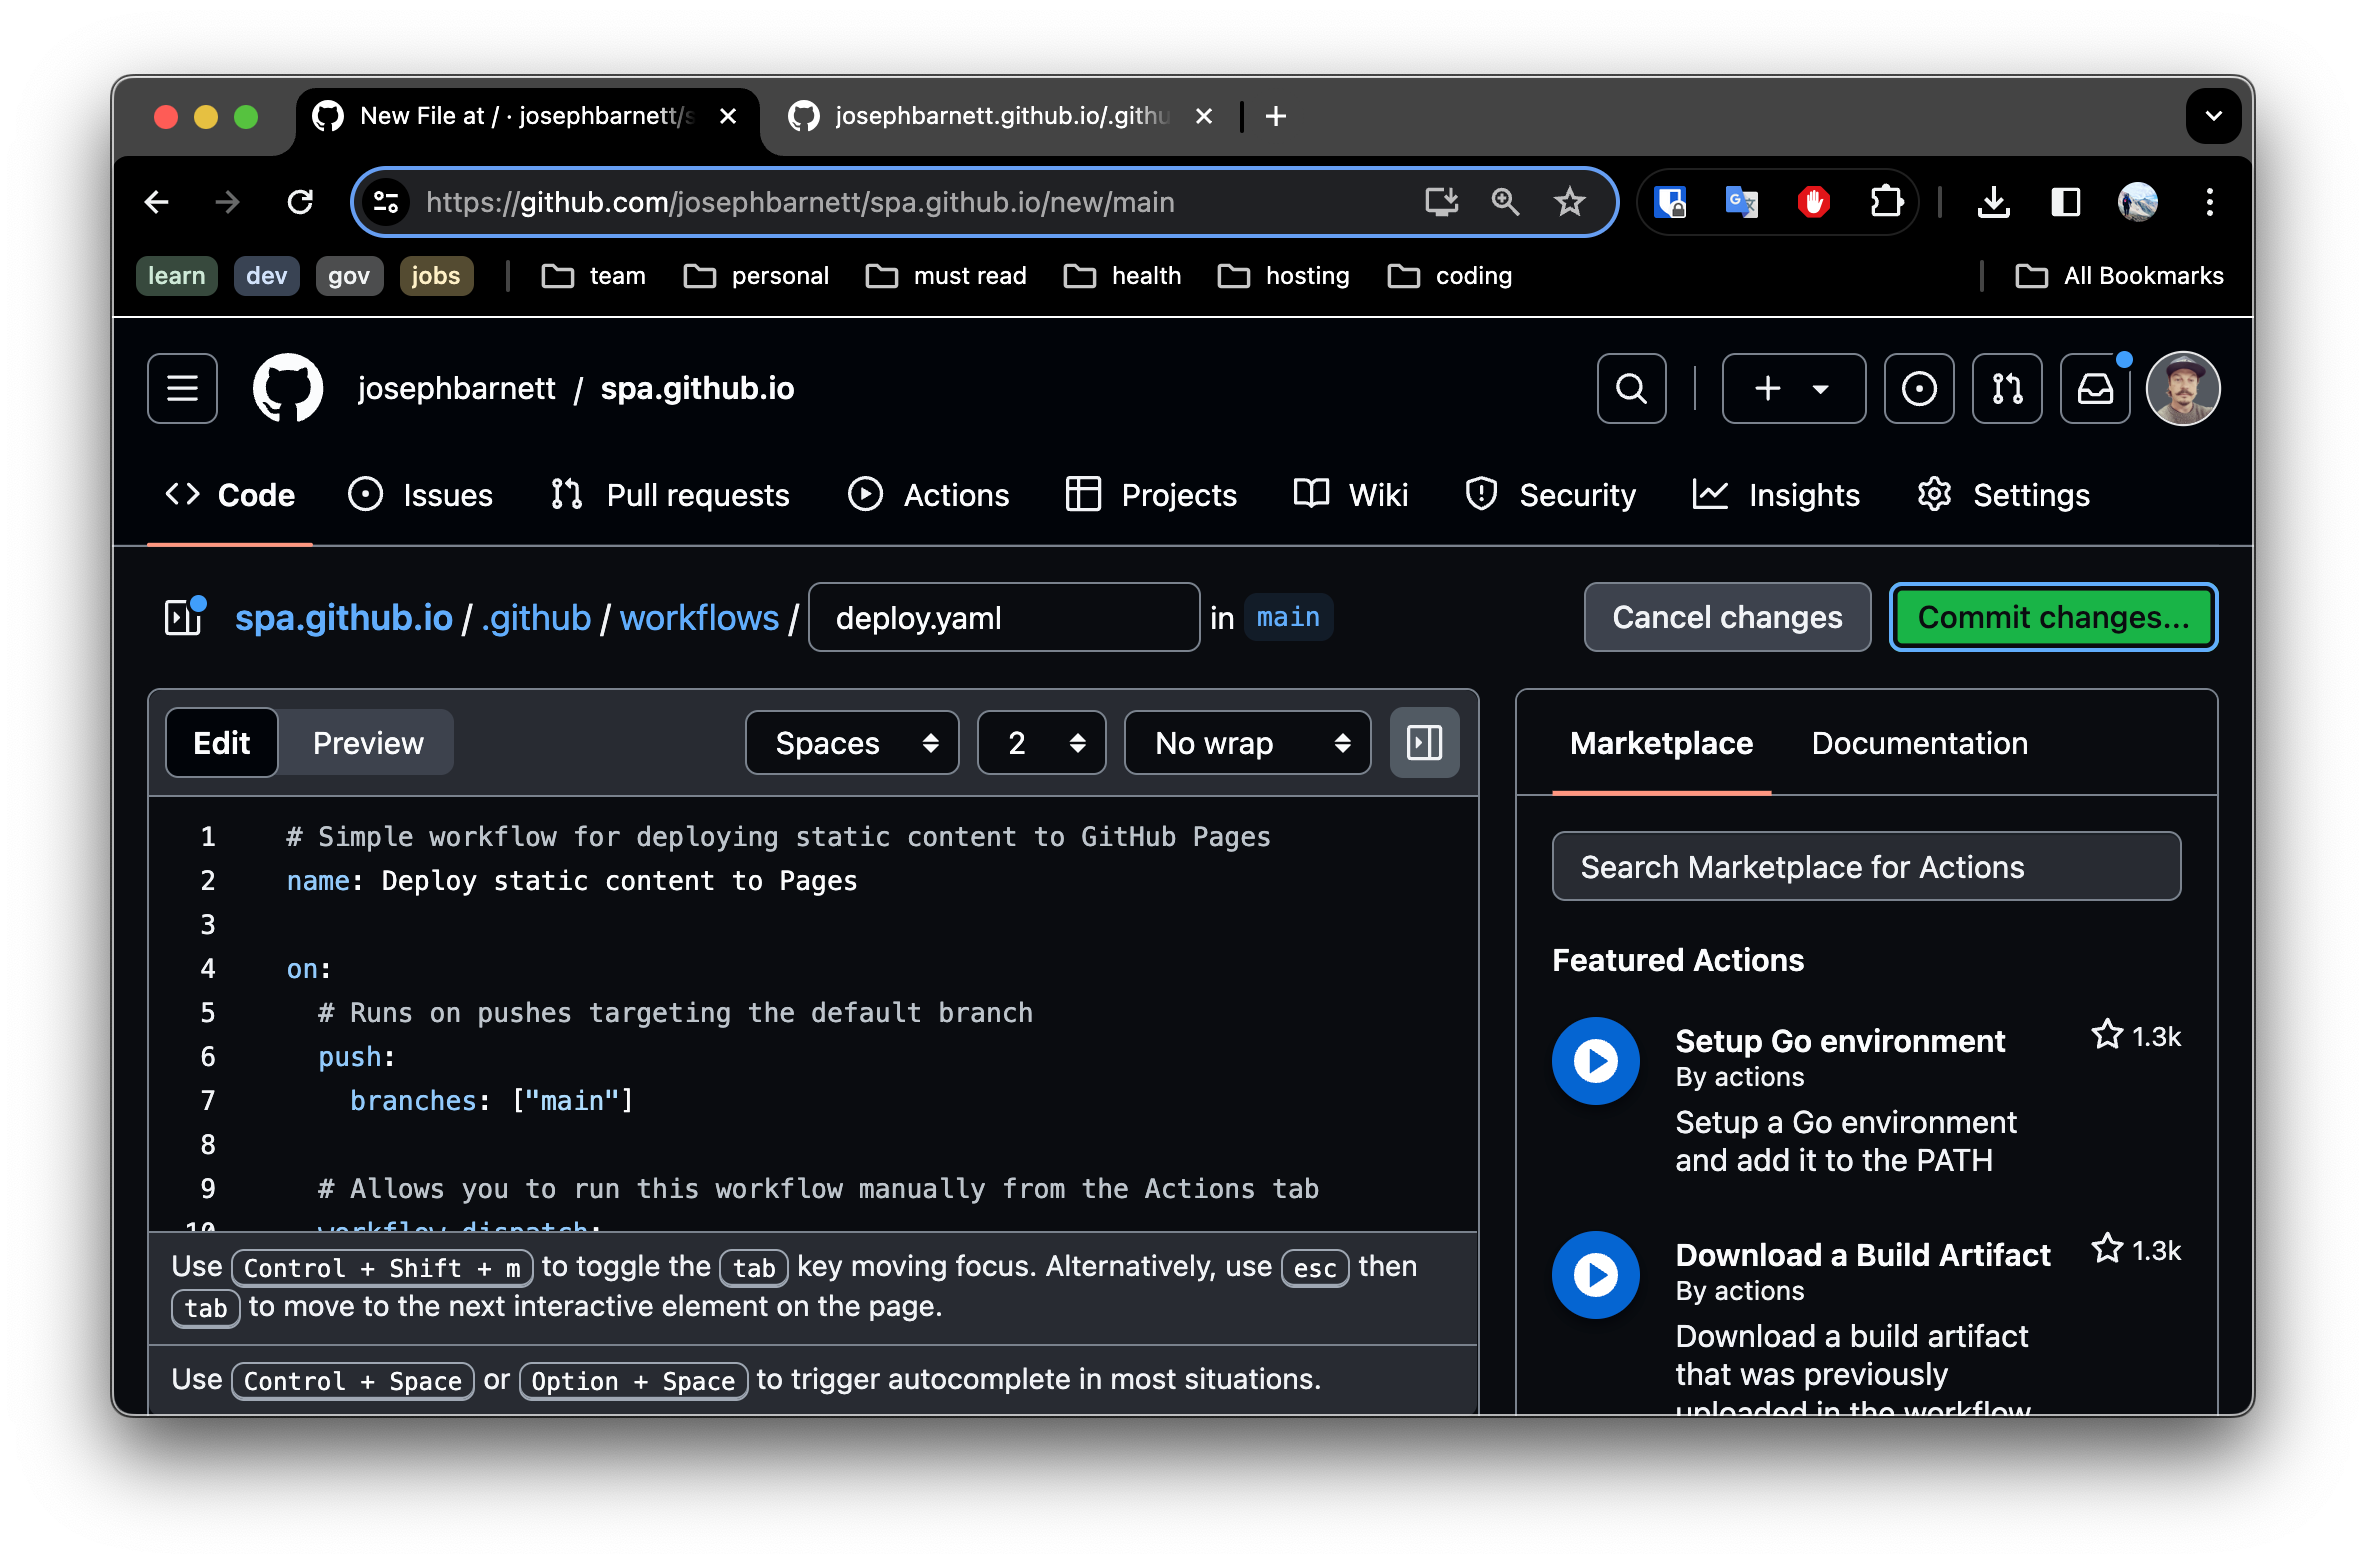
.github/workflows/deploy.yaml and paste in the following content:# Simple workflow for deploying static content to GitHub Pages
name: Deploy static content to Pages
on:
# Runs on pushes targeting the default branch
push:
branches: ["main"]
# Allows you to run this workflow manually from the Actions tab
workflow_dispatch:
# Sets the GITHUB_TOKEN permissions to allow deployment to GitHub Pages
permissions:
contents: read
pages: write
id-token: write
# Allow one concurrent deployment
concurrency:
group: "pages"
cancel-in-progress: true
jobs:
# Single deploy job since we're just deploying
deploy:
environment:
name: github-pages
url: ${{ steps.deployment.outputs.page_url }}
runs-on: ubuntu-latest
steps:
- name: Checkout
uses: actions/checkout@v4
- name: Set up Node
uses: actions/setup-node@v3
with:
node-version: 18
cache: "npm"
- name: Install dependencies
run: npm install
- name: Build
run: npm run build
- name: Setup Pages
uses: actions/configure-pages@v3
- name: Upload artifact
uses: actions/upload-pages-artifact@v2
with:
# Upload dist repository
path: "./dist"
- name: Deploy to GitHub Pages
id: deployment
uses: actions/deploy-pages@v2
Commit this change.
Actions tab in your repository. You should see the deployment job successfully complete.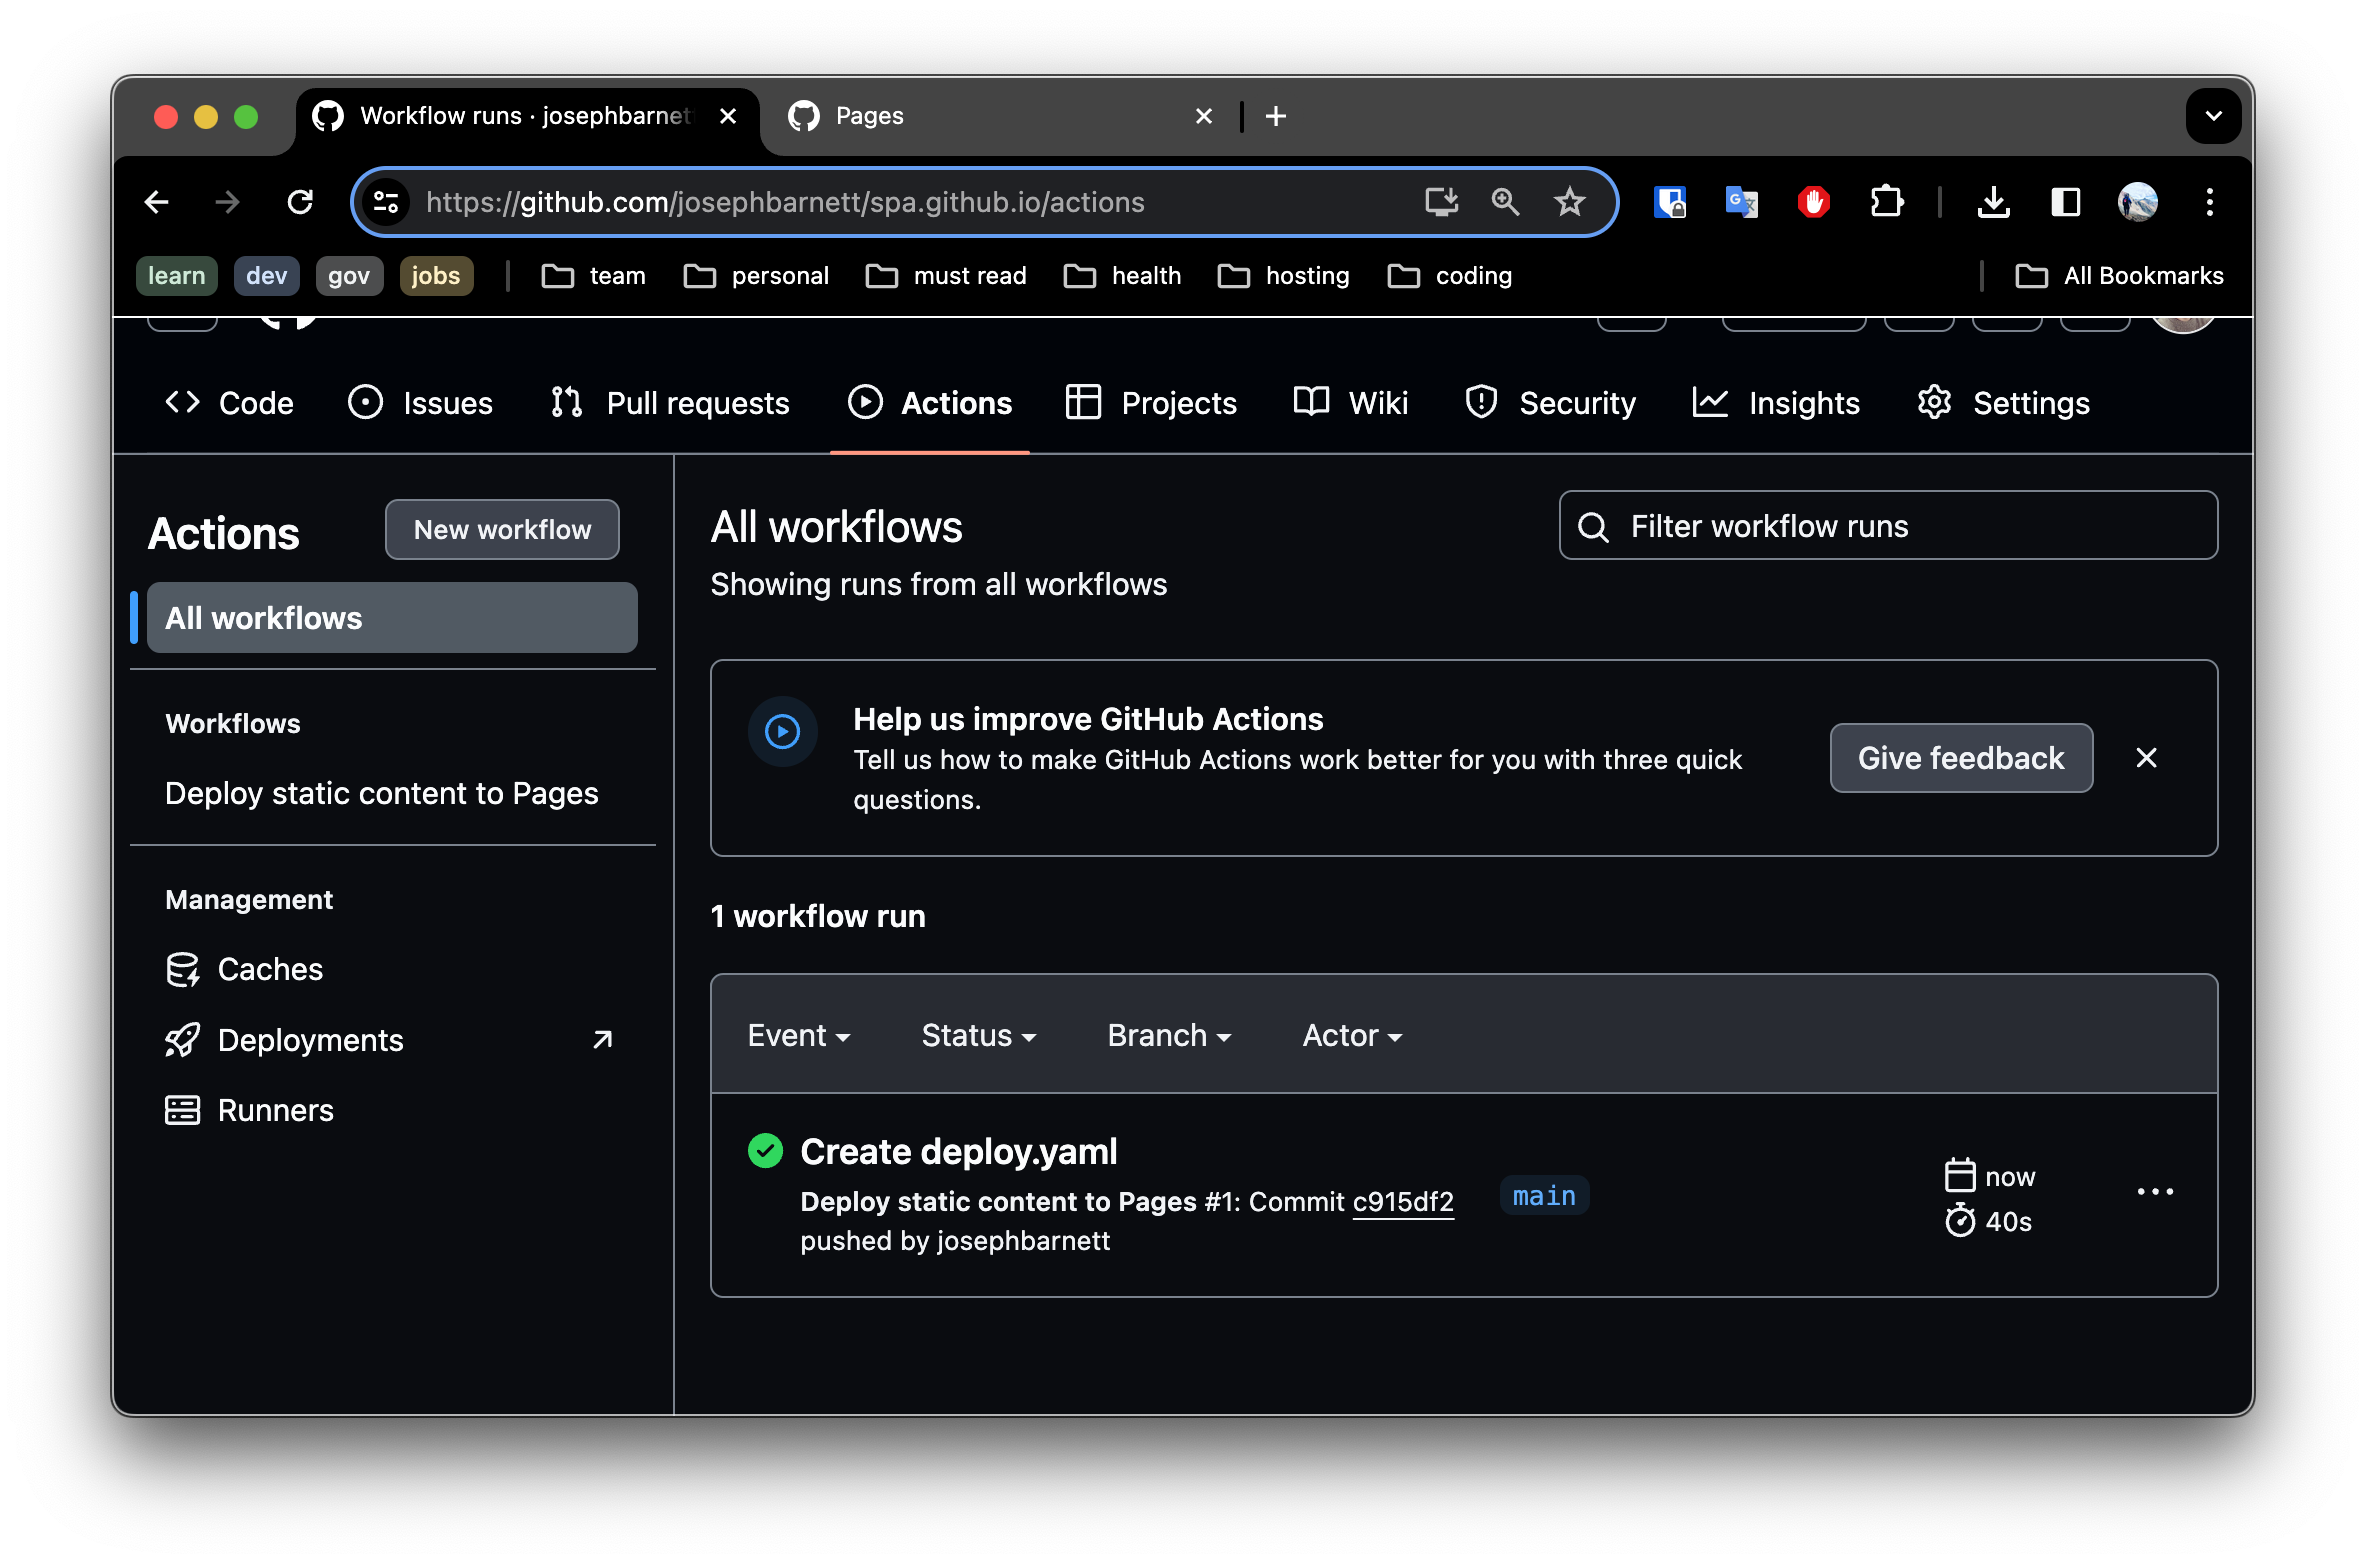
Github Pages settings once more, and you will expect to see the link to your read to use site hosted on github pages.From this point, I will leave the exercise of configuring a real domain name to you as a learning exercise. Here are a few hints:
domain of the application.Application Login URL.In summary, we created a static (SPA) site - that has the ability to dynamically call backend services using Vue, NuxtJS and Auth0. From here one could easily add new backend services.
One interesting enhancement we could might is to complete the login flow. This would entail sending the Users authorization code provided from Auth0 to a backend API. The backend API would validate the authorization code and obtain a access token. Using this access token it would be possible to lookup user information and generate a JWT or grant document using PASETO grant. I may provide a guide for doing this in an upcoming post. For now, check out my finished demo at https://app.codeblind.ai. Cheers and happy coding!
This post explores the process of building a landing site using static site hosting on Github Pages and automating deployment with Github Actions. We’ll delve into the benefits of static sites and build one together for a personal blogs, or possibly a startup landing pages.
This site will approach build a set of sites and applications designed to bootstrap a startup on a budget, where “free” is the magic word.
When undertaking such a task, it’s crucial to build a landing site using a real, branded domain to foster engagement and adoption. The front door to such a site should be secure, fast, and open. Publish news, an engineering or market based blog, and including product documentation increase the likelihood of search engines indexing the site, thereby improving SEO and attracting and growing a community.
Let’s explore the characteristics of this static sites:
Thus, static sites are commonly used for blogs, portfolios, landing pages, documentation, and marketing websites where simplicity and speed are priorities.
Search Engine Optimization (SEO) plays a critical role in driving adoption and expanding market reach for websites. This is particularly important for startups and businesses operating on a budget. By ensuring that your site ranks well in search engine results, you can attract organic traffic, increase visibility, and ultimately, reach a wider audience.
Because the entire site is static, search engine crawlers typically can consume can easily index and rank the content without encountering any barriers.
Static site generators (SSGs) streamline website development by transforming structured content into static HTML, CSS, and JavaScript files. Hugo is well known for its speed and flexibility. It converts Markdown or other formats into static pages - and is written in golang - making it my top choice.
There are other popular options - which deliver more flexible power - such as Gatsby, Next.js, and Nuxt.js. I hope to write a post soon to contract the differences of those. However today, we want to build a site. Let’s get started!
Registering a “good” domain name is maybe the hardest part of the process. The name becomes your brand, and depending on what you are making, can become a house hold name.
In this post, I use Namecheap, however there are pros and cons of each registrar.
The Hugo project has a great Quick Start Guide to bootstrap your site, and help you find a theme.
For this post, I am going to take a shortcut since I know I want a landing site with multi-language support, blog and documentation support.
Docsy provides those exact features and has an amazing look and feel. The fastest way to boot strap the site, is to fork or clone the my example site repository.
My favorite way of doing this is:
Click the "Use This Template" button in the repository and select Create a new repository.
Fill out the repository name to be USERNAME.github.io where USERNAME is your github username. Leave the other settings default - then click Create

baseURL for your new siteIn either a local clone, or from within the github itself, change the baseURL in the hugo.toml to have your new domain name. For my PoC I will be using blindcoder.com.
hugo.toml file linkbaseURL setting:baseURL = "https://blindcoder.com/"
To your domain name. For example:
baseURL = "https://YOUR_DOMAIN/"
Note: update
YOUR_DOMAINin the statement above leave the trailing slash.
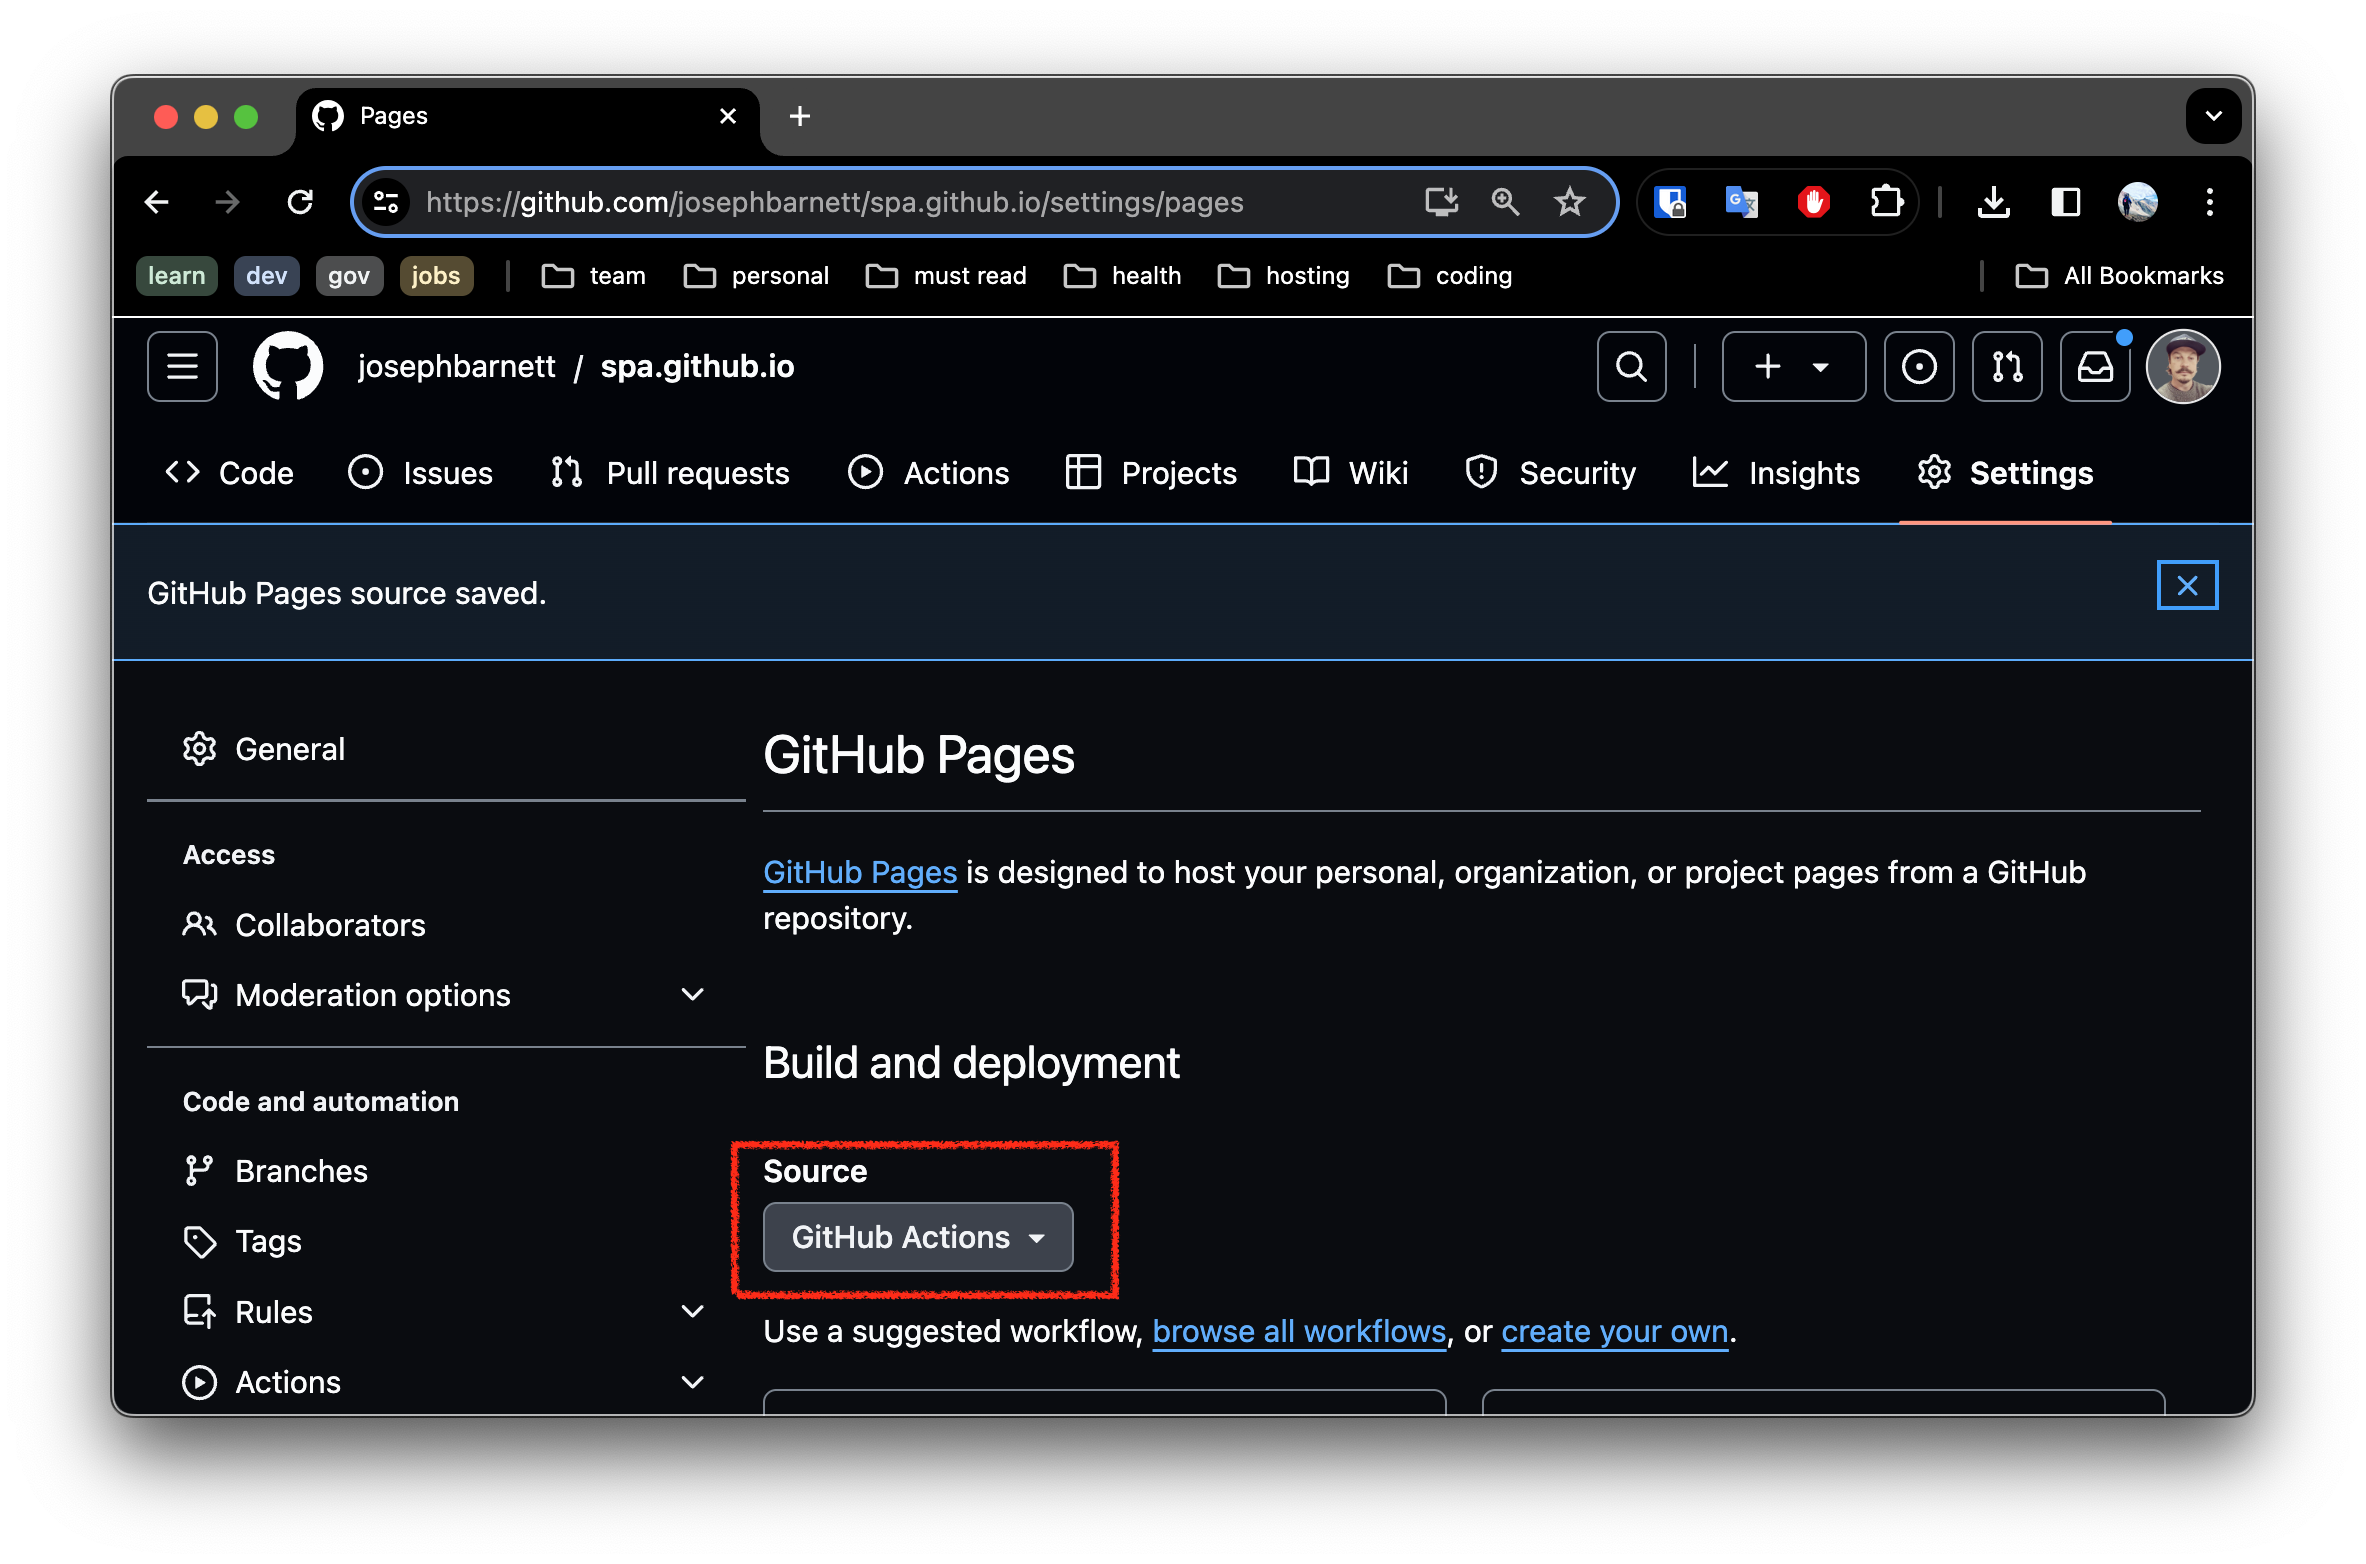
Commit Changes button and commit the changes.Click the Settings tab at the top of the repository page
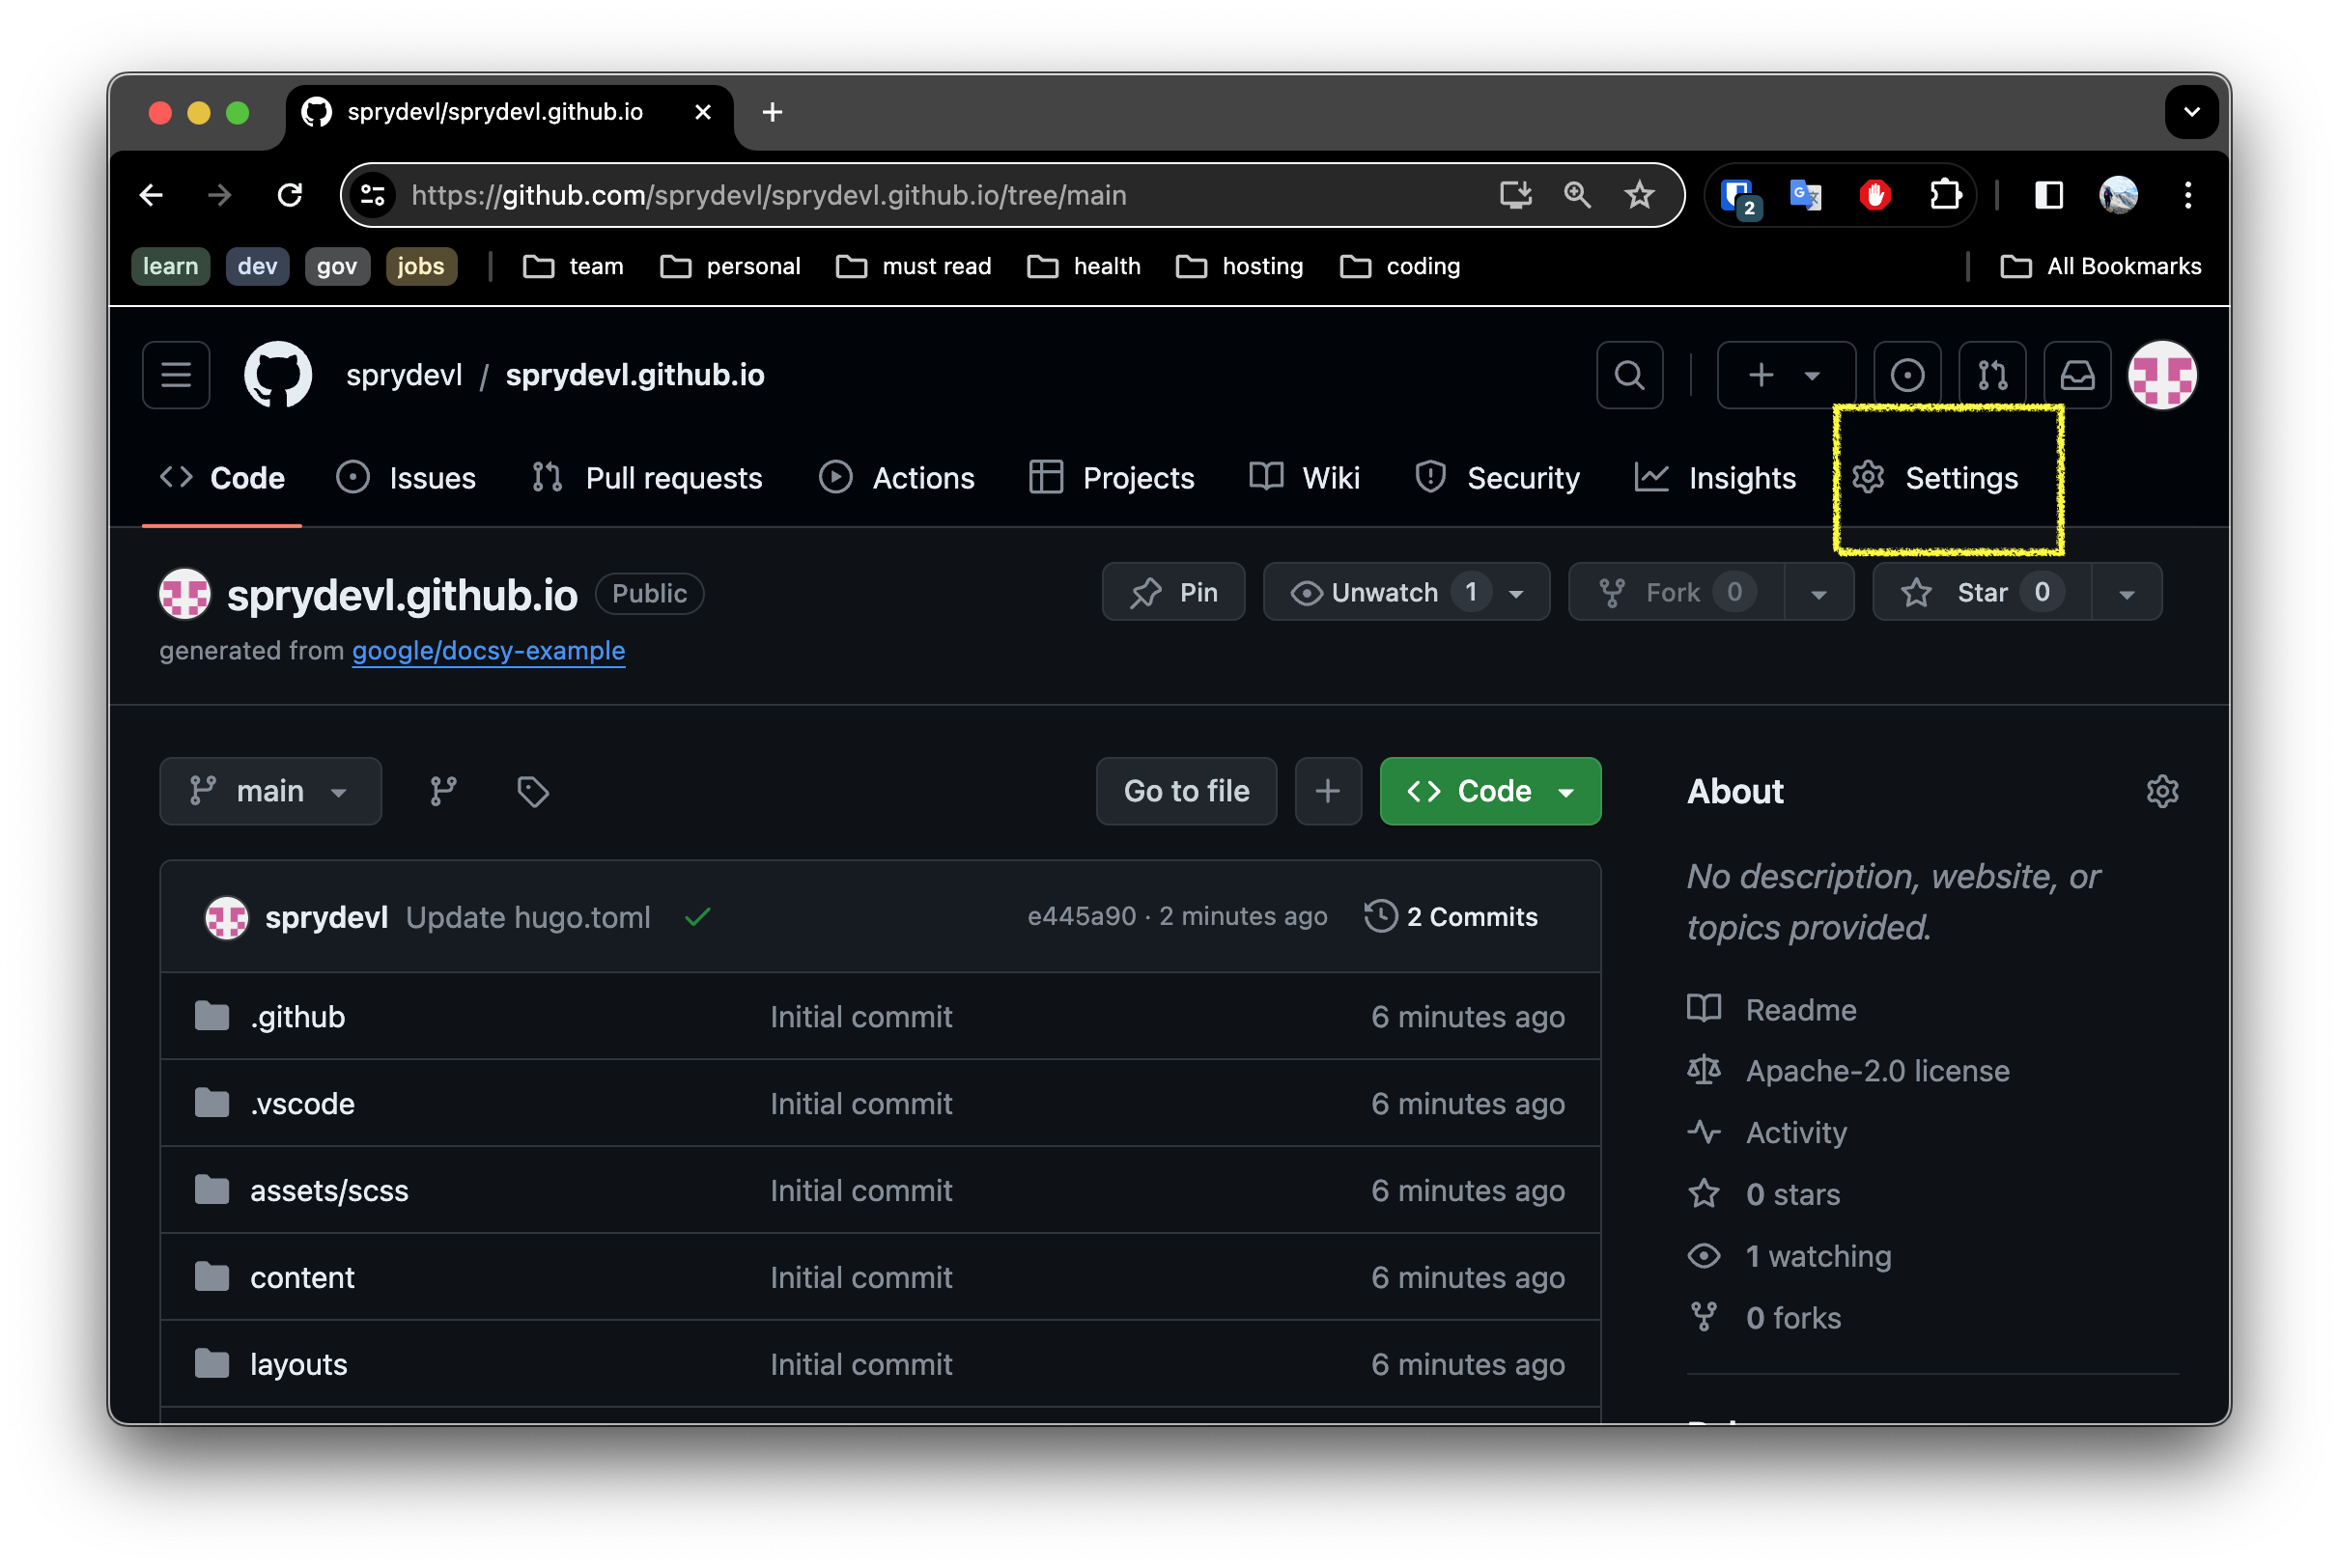
Click the Pages settings menu option on the left panel
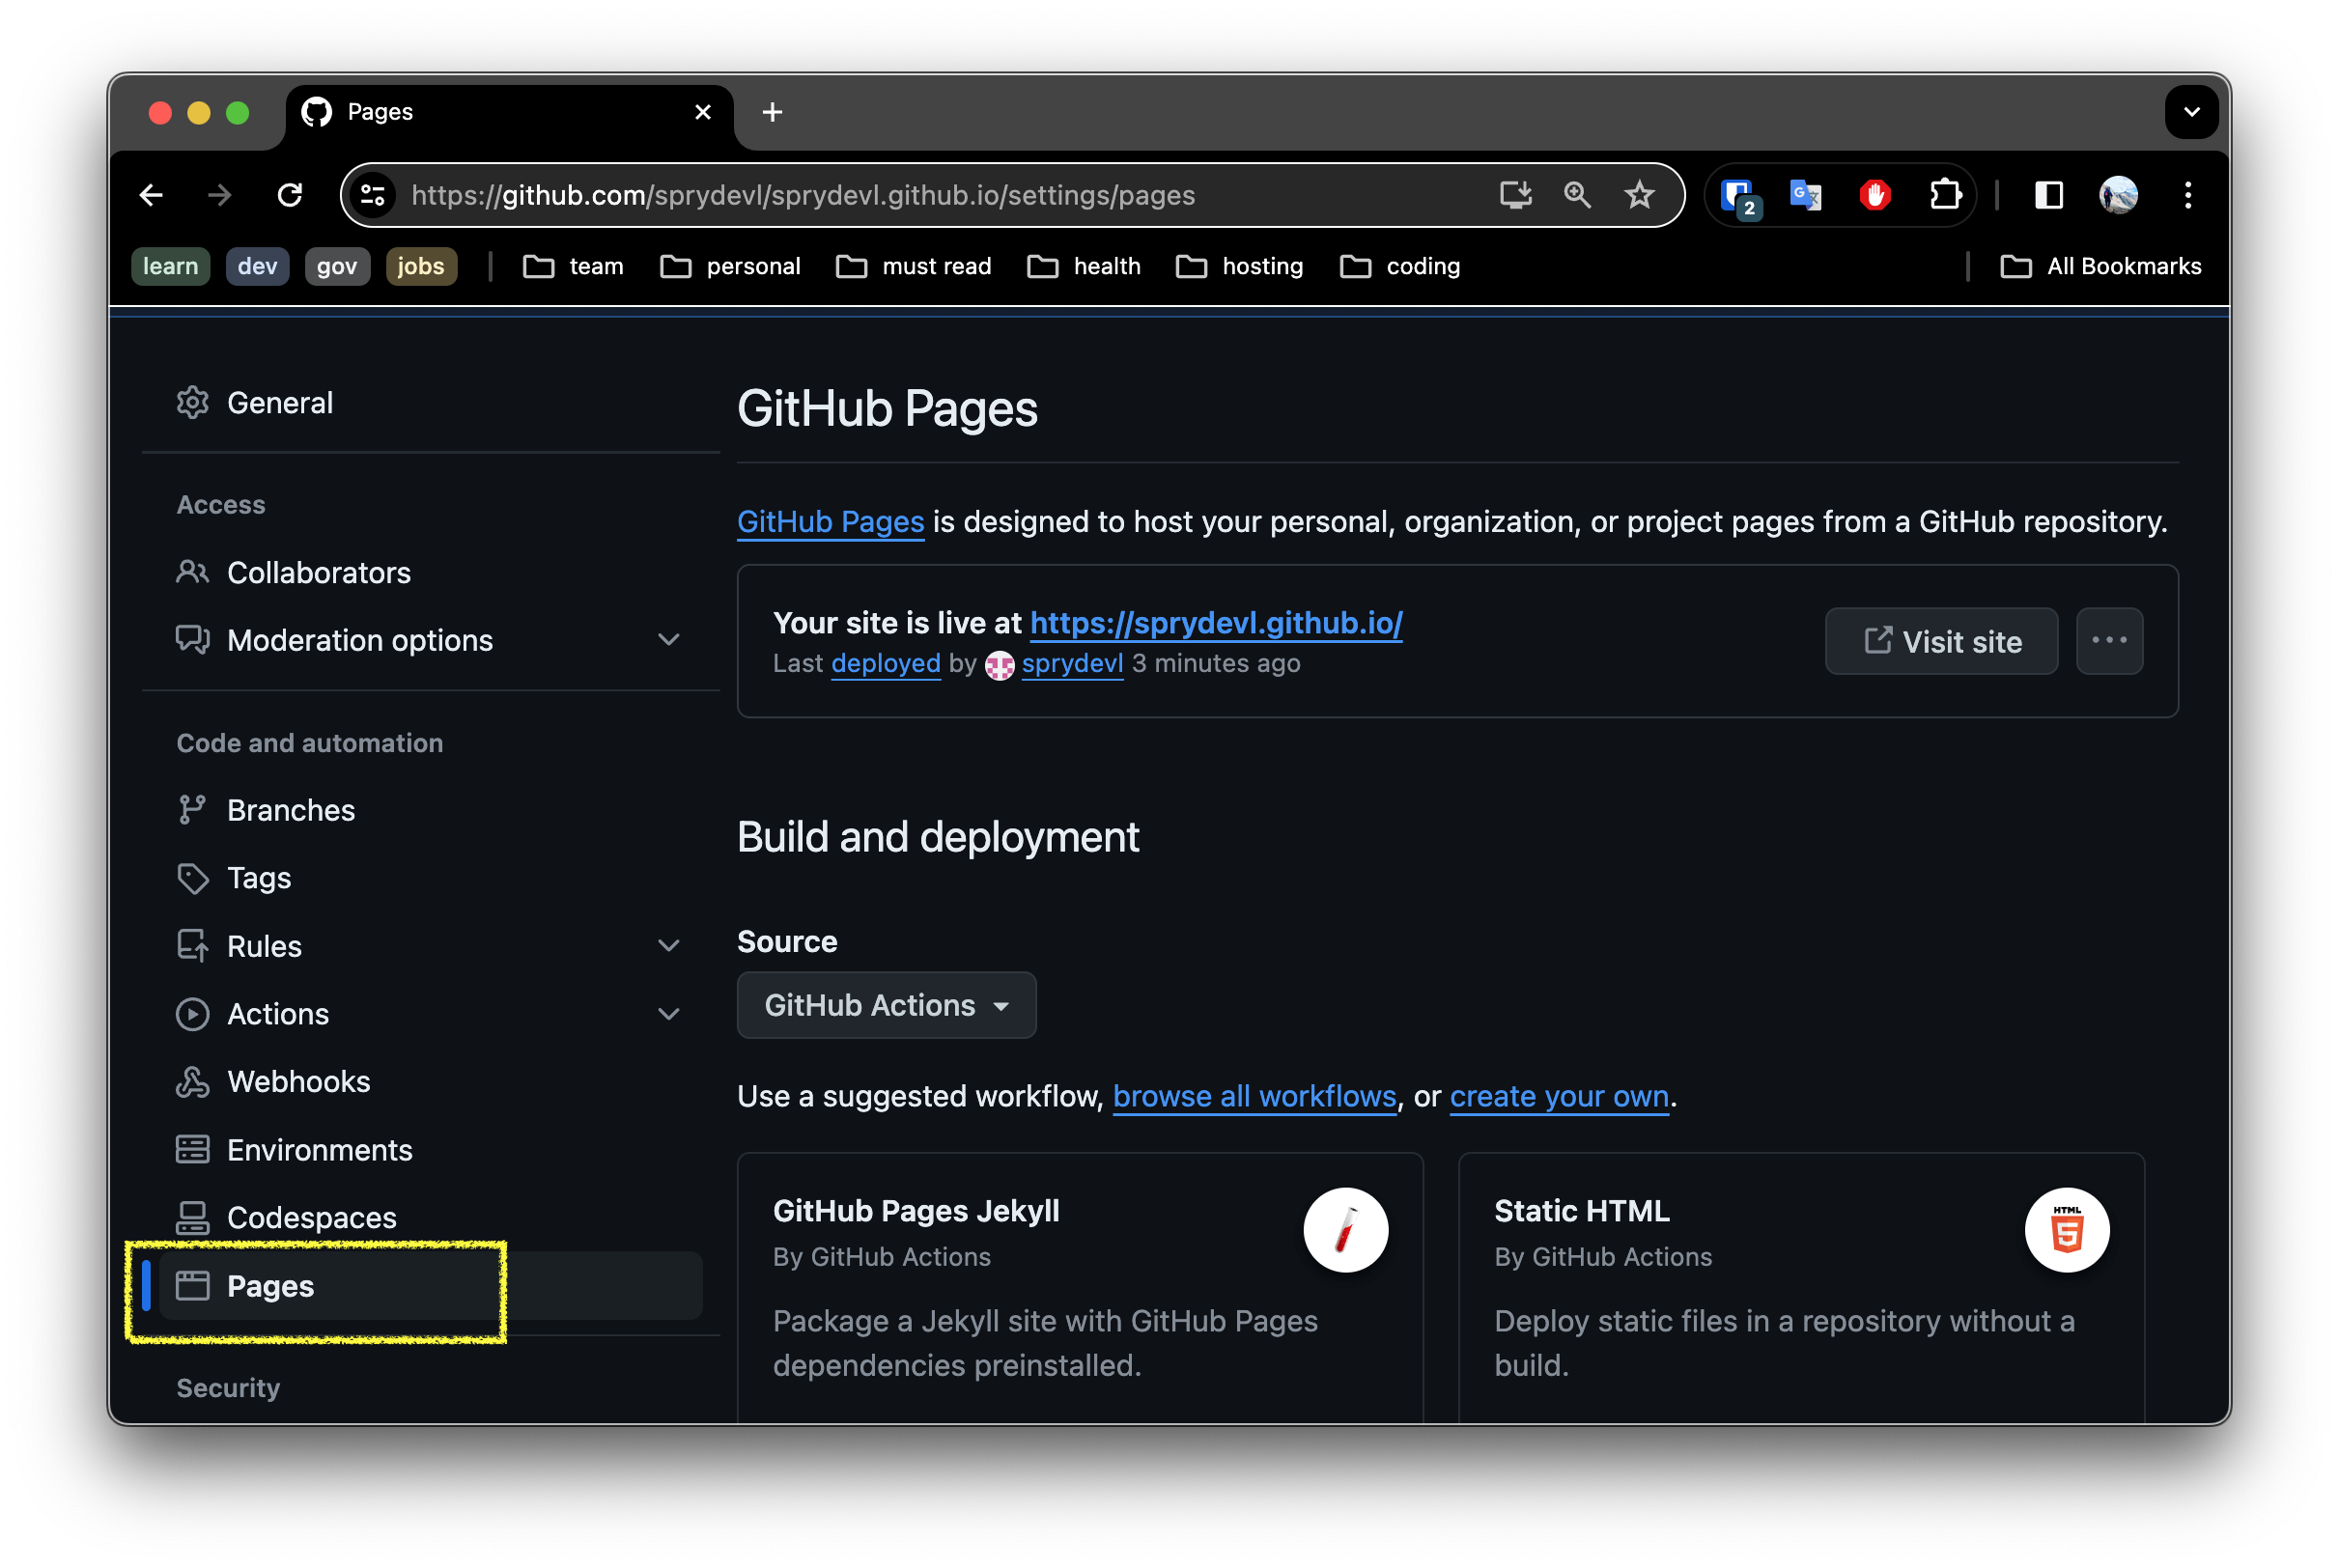
In the Pages settings, ensure Source is set to
In the Pages section of the repository settings, ensure the Source is set to Github Actions.

Github Actions is a powerful tool that allows you to automate your software development workflows. We will use it to build and deploy our site to Github Pages.
If you’ve forked my repository, you will already have a actions configuration in .github/workflows/hugo.yaml. Note there are a number of prebuilt action templates depending on the technology you are using. Check them out!
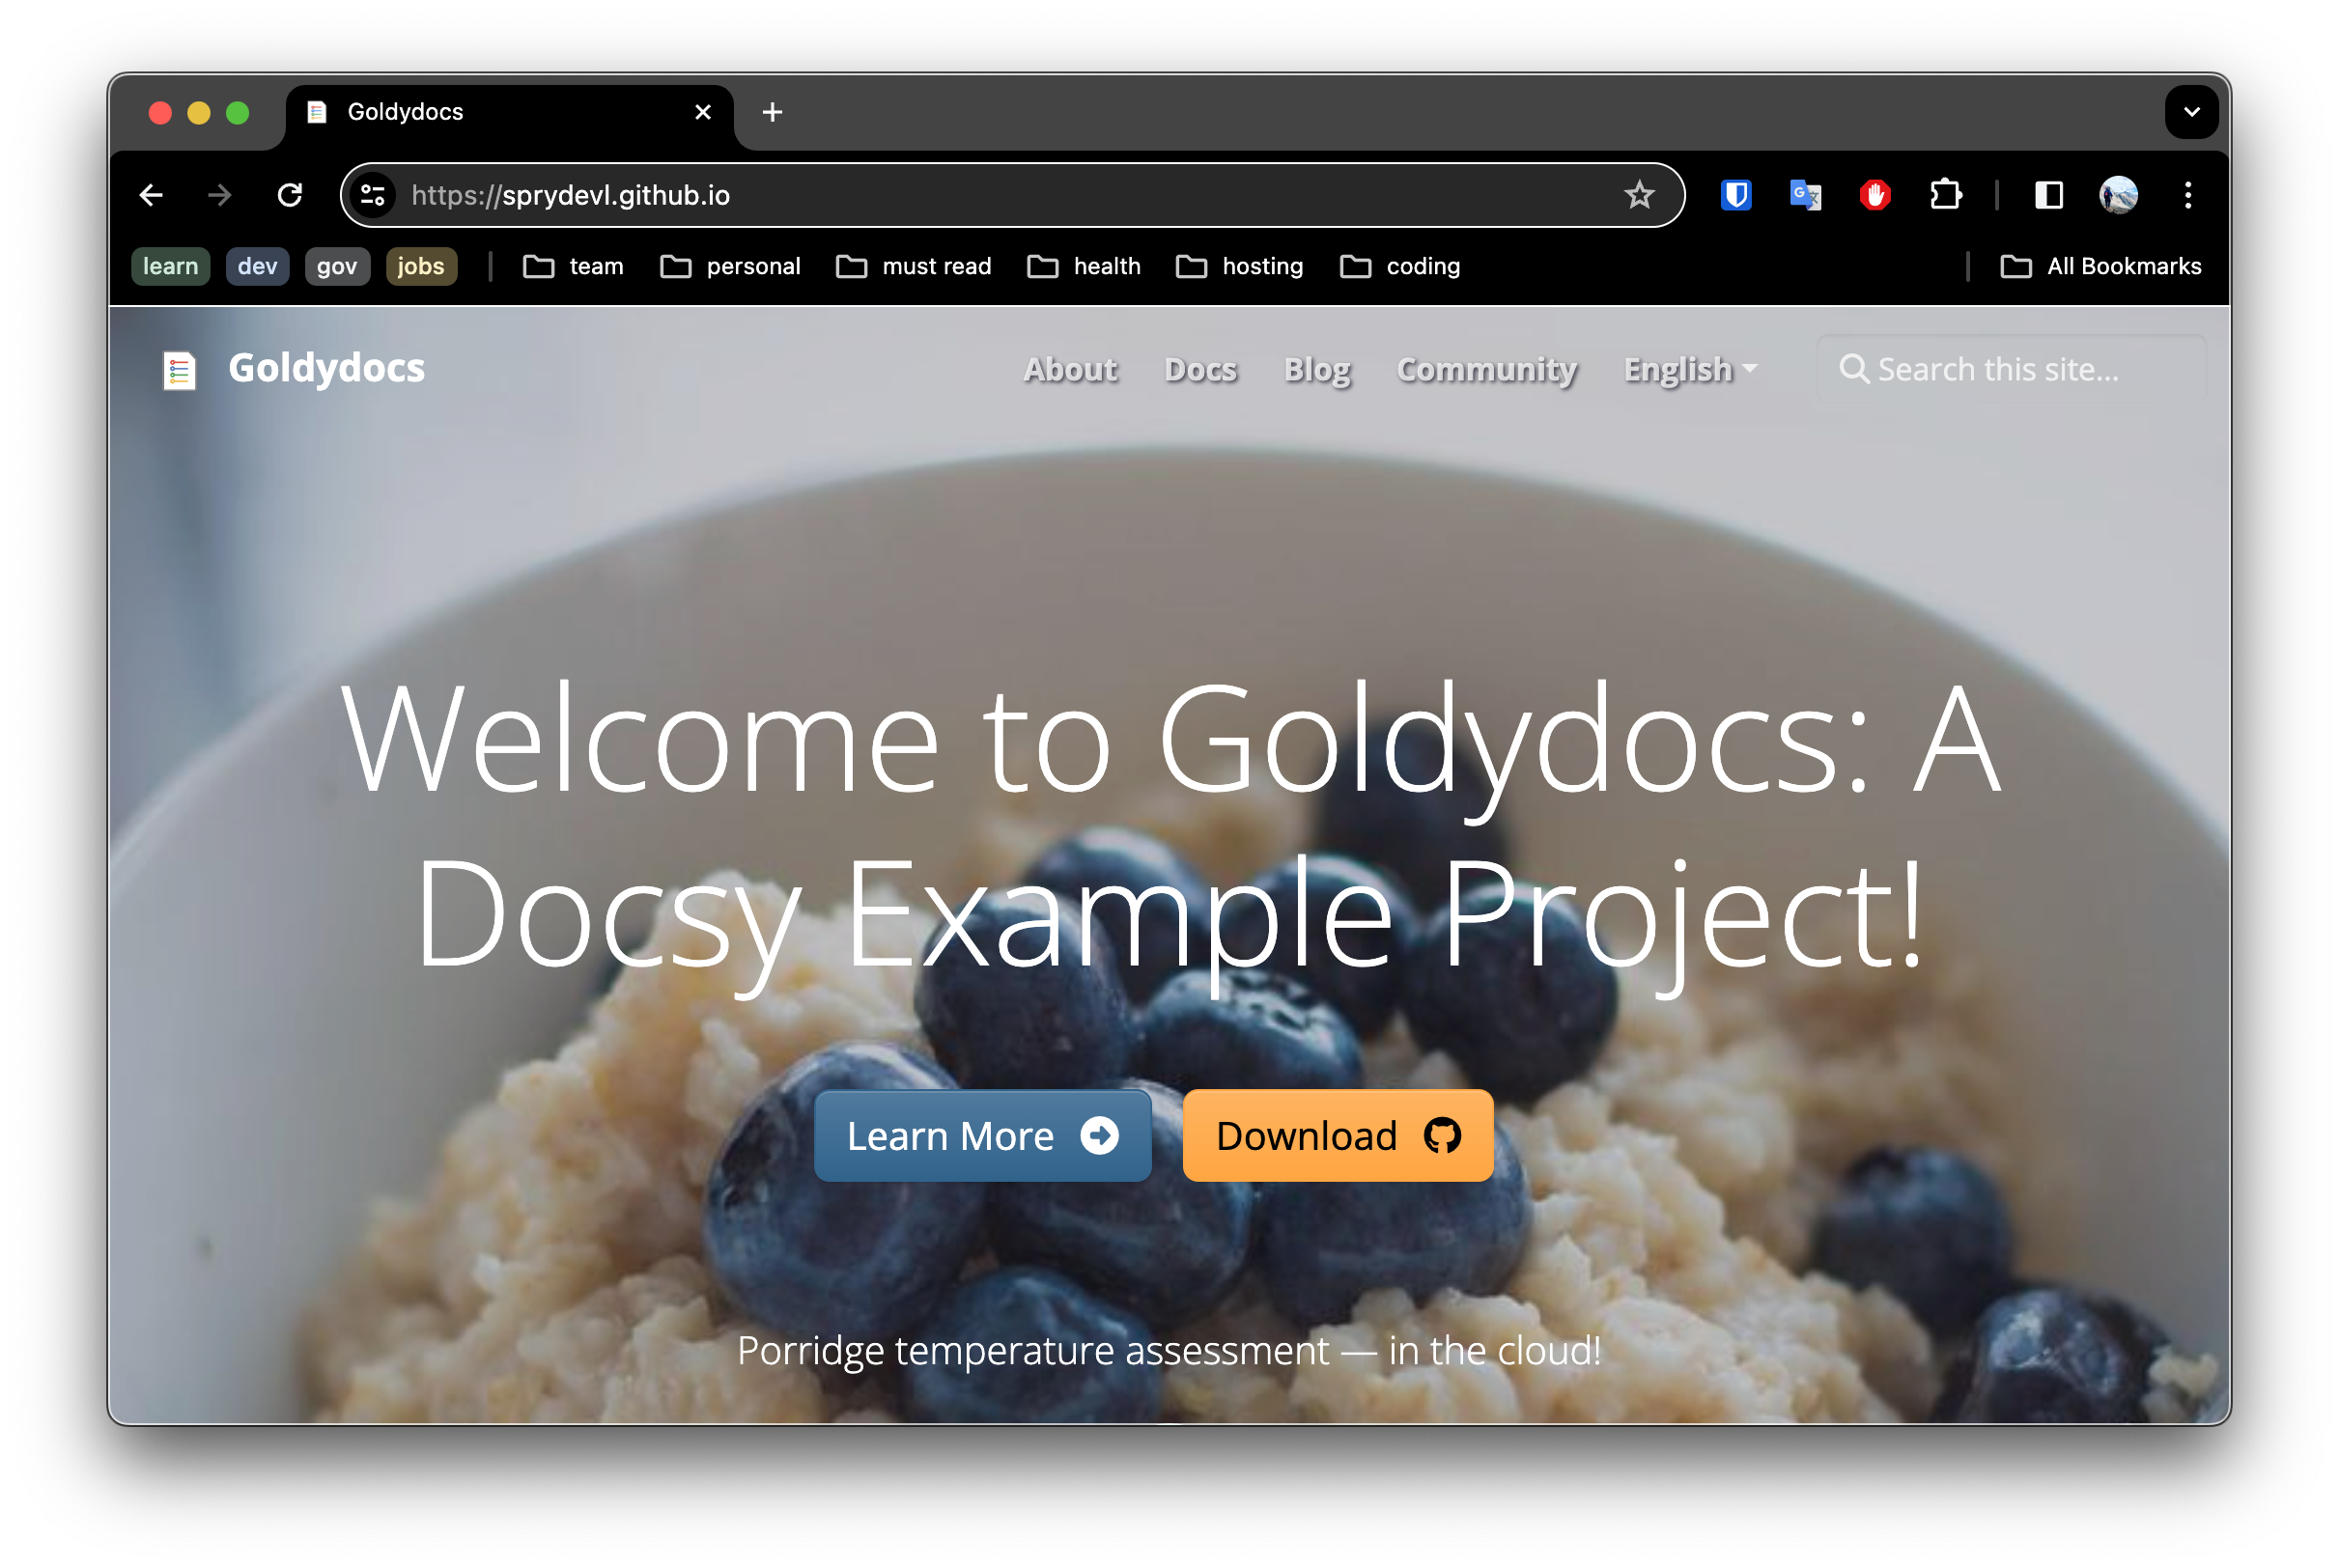
Shortly after updating the Pages settings, the site was already published. You should verify it is all working but visiting the site https://USERNAME.github.io where USERNAME is your Github username or organization name. You should expect something similar as below:
Now that we have validated everything is working as expected. Let’s setup our custom domain to our branded domain.
This work will happen in two parts, one phase on Namecheap and the other on Github.
As mentioned earlier, I use Namecheap, so I will provide those instructions. However the DNS settings could be applied to the DNS management of your domain on any of the registrar. Some steps may differ slightly.
Sign in to your Namecheap account.
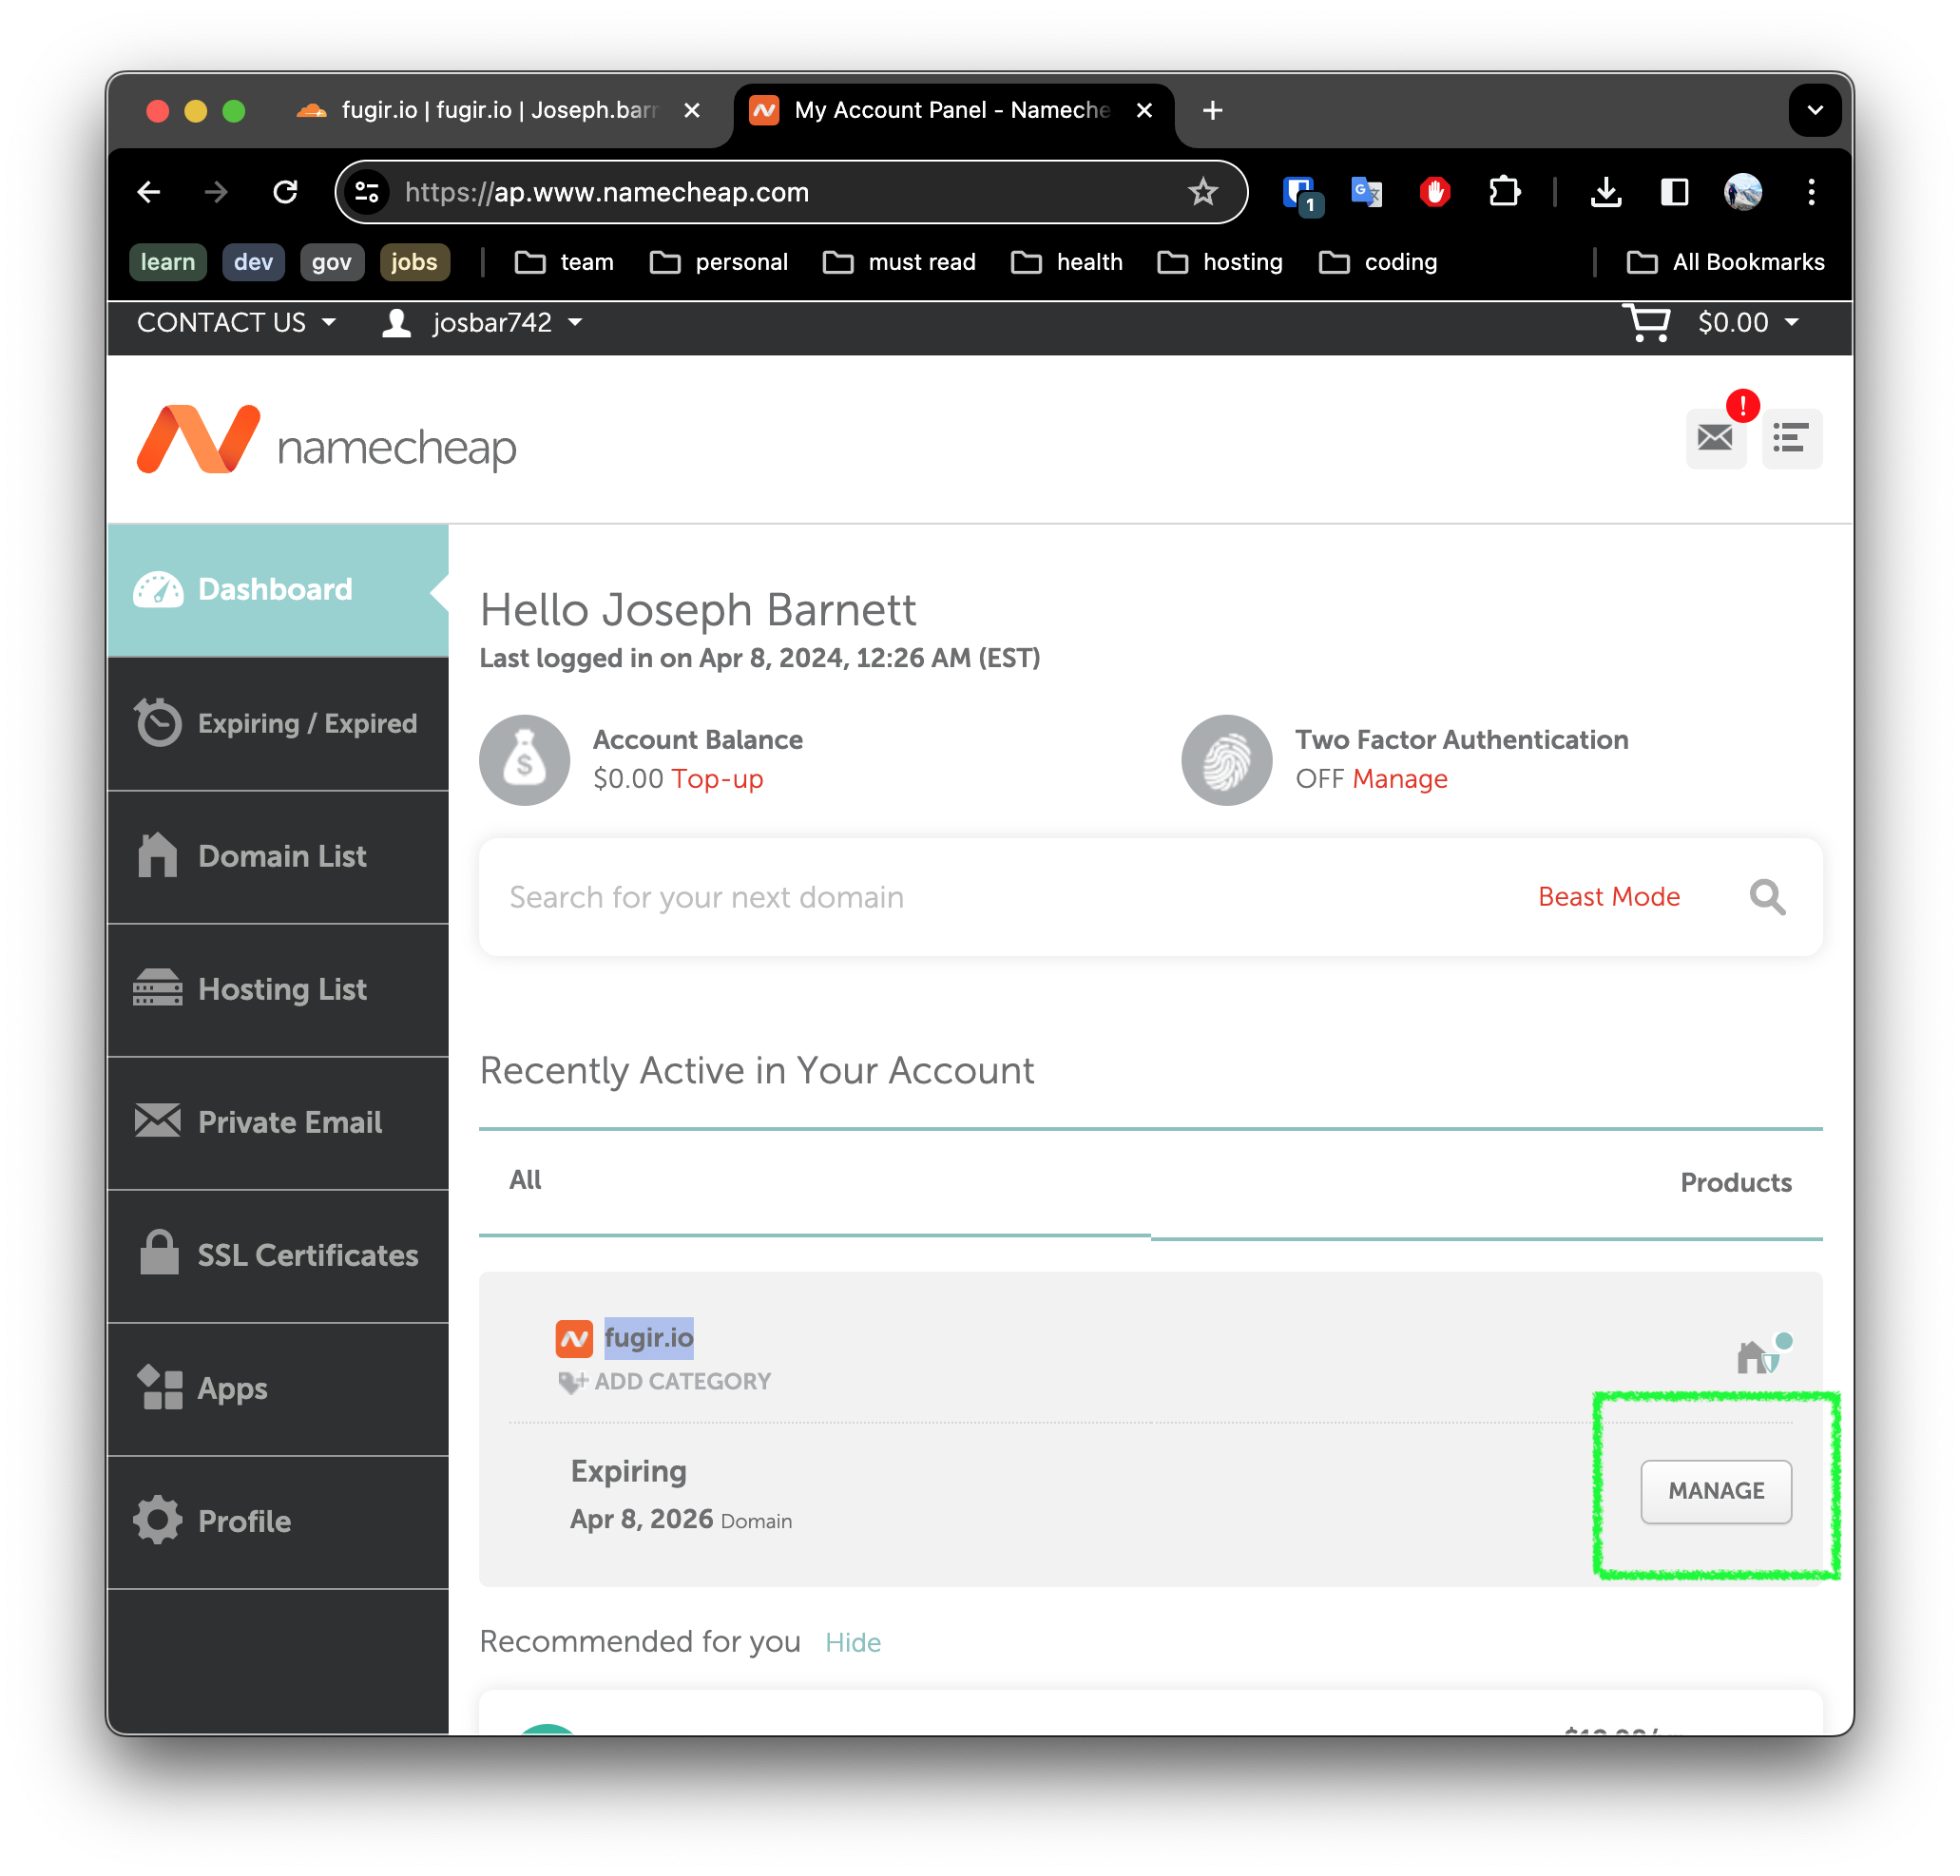
Select Domain List from the left sidebar and click on the Manage button next to your domain name:


| Type | Host | Value | TTL | Notes |
|---|---|---|---|---|
| A | @ | 185.199.108.153 | Automatic | Github IP |
| A | @ | 185.199.109.153 | Automatic | Github IP |
| A | @ | 185.199.110.153 | Automatic | Github IP |
| A | @ | 185.199.111.153 | Automatic | Github IP |
| CNAME | www | username.github.io | Automatic | Replace username with your actual GitHub account username |
Note 1: delete the other records that are there by default. We only need the records above for now. 🗑️
Note 2: you may have to wait for DNS to update. It can take up to 30 minutes - so now is a great time to brew a cup of tea. ☕
Now that the DNS is setup, we need to tell Github to use the custom domain.
Github Pages section.Custom domain input. This should be in the form of yourdomain.com or www.yourdomain.com depending on your preference.Save to save the changes.At this point Github will validate the domain and if everything is setup correctly, your site will be available at your custom domain.
There is a small context text area that will show you the status of the domain validation. If there are any issues, may want to look back at your Namecheap DNS configuration.
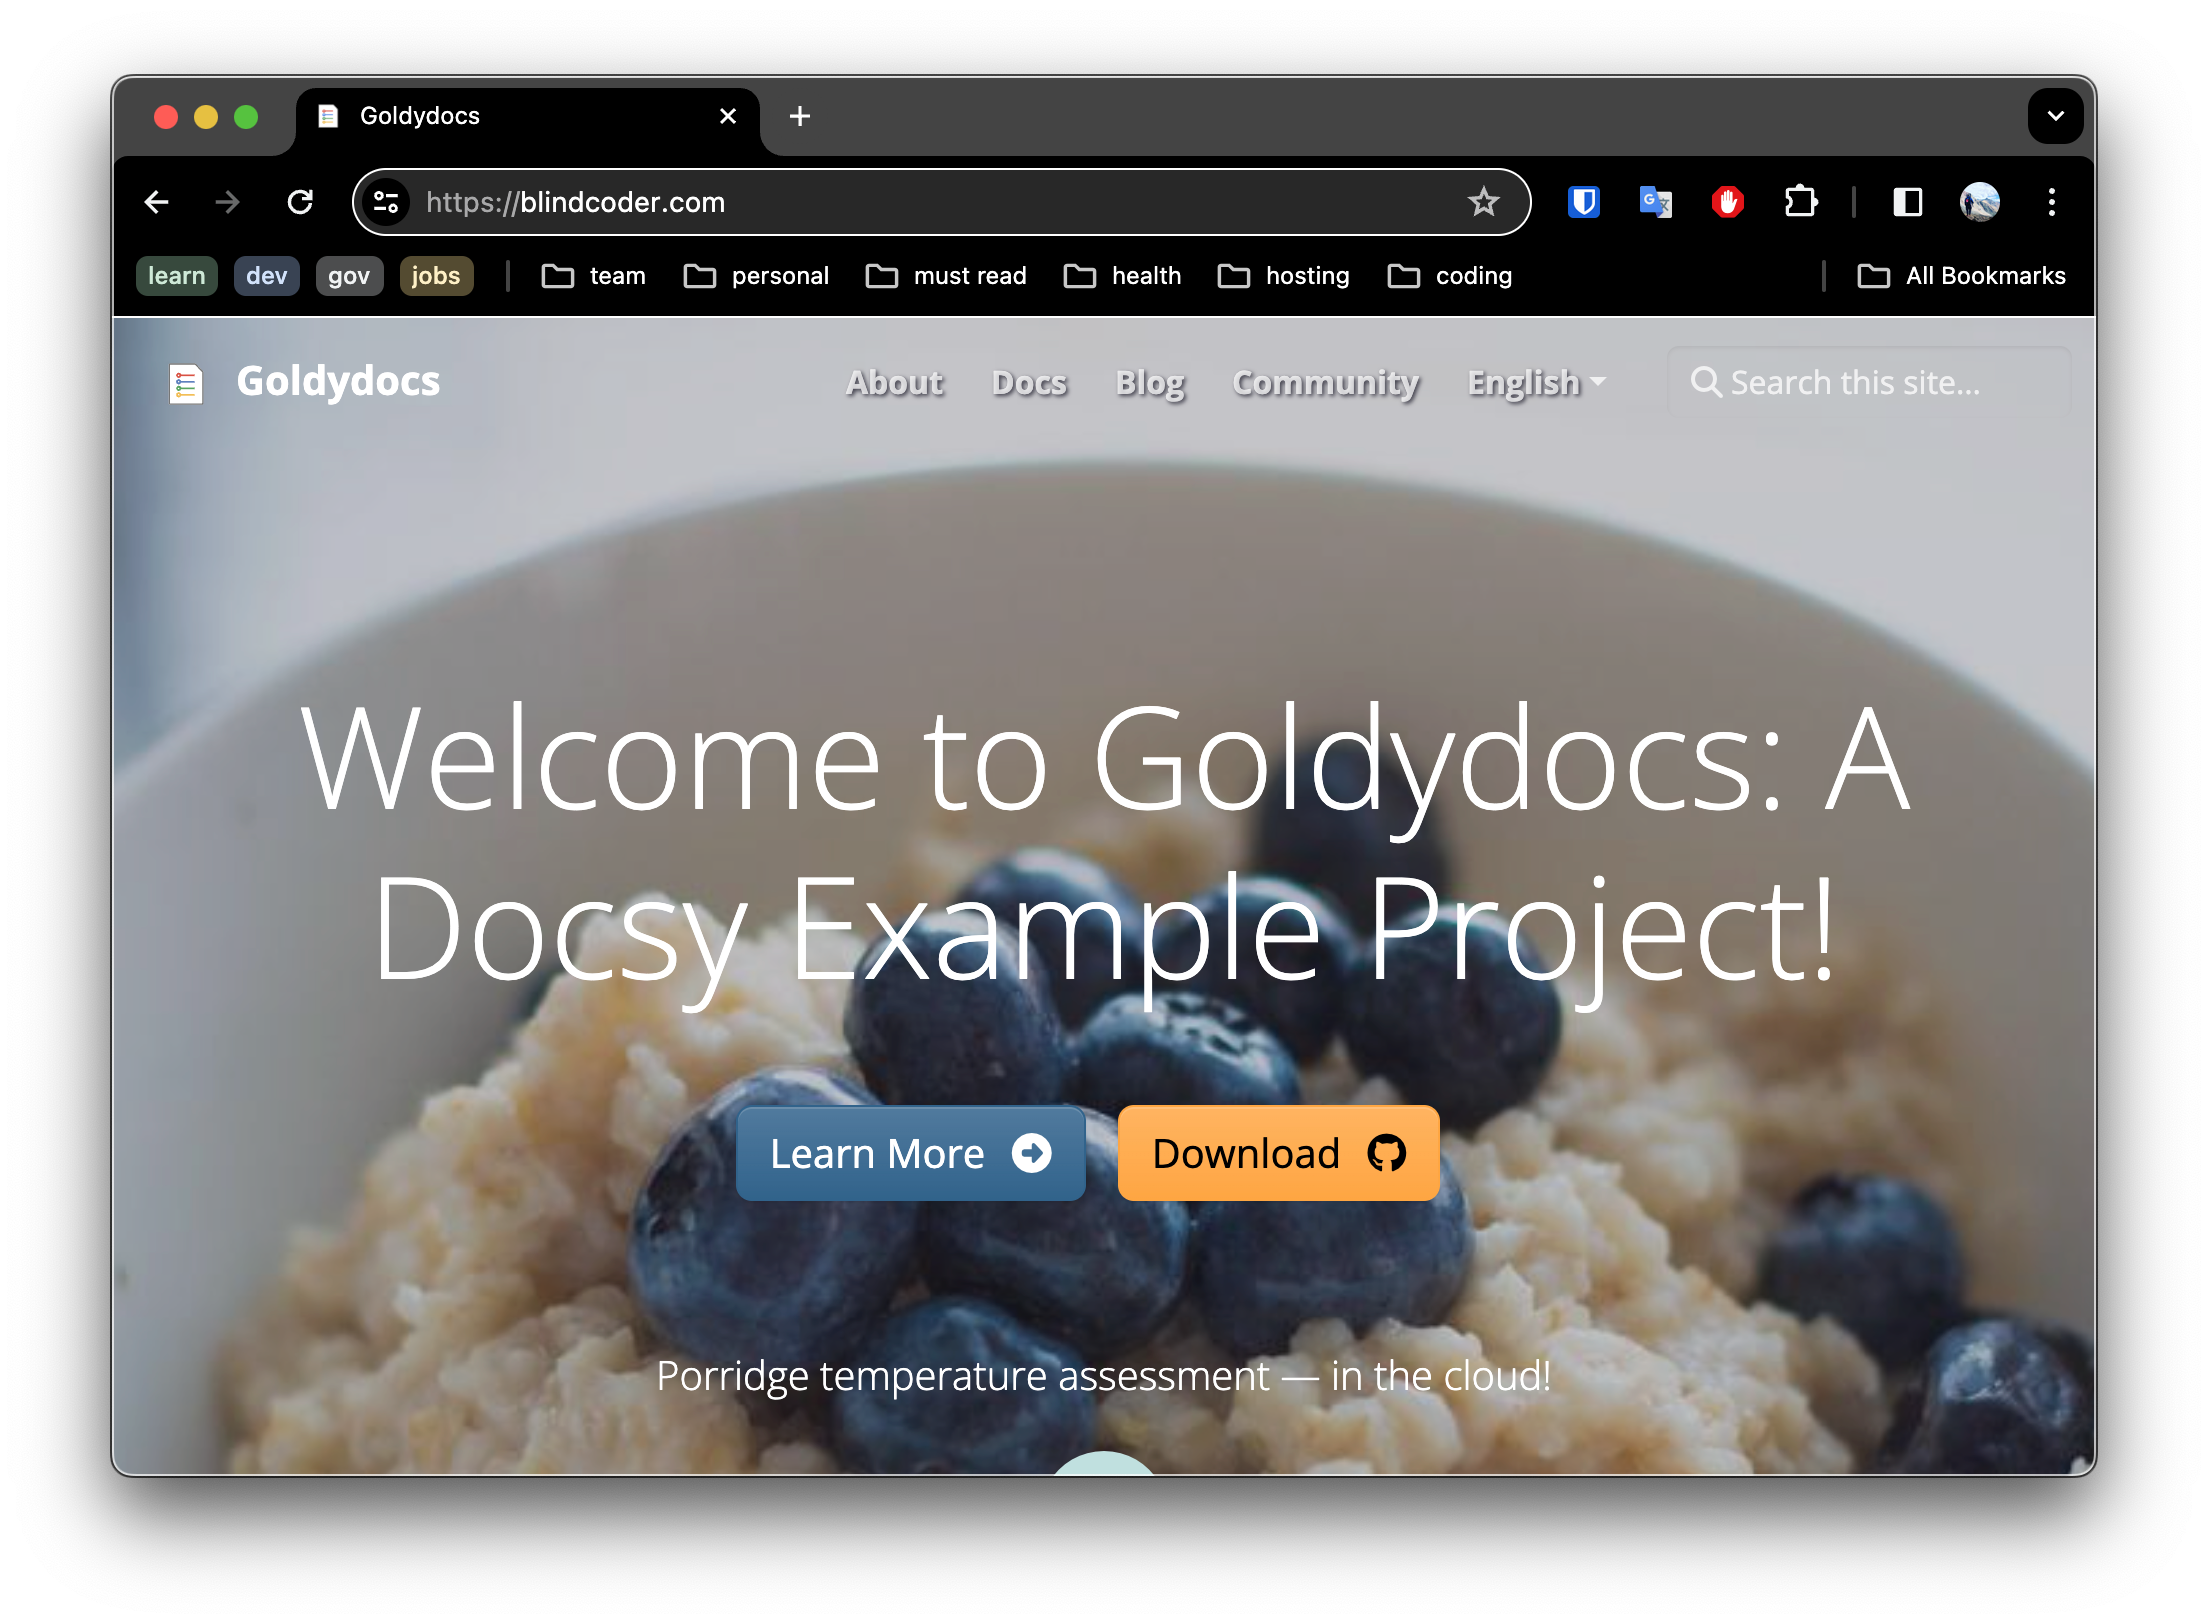
That’s it! It should now be live and visible at your custom domain. 🎉
In this post, we have setup a site for our startup. We have used free services to keep costs low and automated the deployment process to ensure we can focus on the product.
In upcoming posts, I hope to share a similar approach using Nuxt.js and Vue creating a SPA (similar to a static site) which can call backend services - and still be hosted on github pages for free! At least the SPA side anyway.
Follow my blog for more exciting posts. Be excellent, and happy coding! 🚀

In modern development, the concept of the Cloud is intrinsic to the daily role of most engineers. Cloud Native development involves designing, building, owning, and operating applications running on a Cloud.
But what exactly is the Cloud? If you’ve worked on cloud-native applications, platforms like Alibaba Cloud, AWS, Azure, DigitalOcean, Fly.io, GCP, or Hetzner to mind.
Before delving deeper, let’s establish a clear understanding of the various types of Cloud environments:
Private Cloud: A private cloud is a dedicated computing environment reserved exclusively for a single organization. It can be housed on-premises within the organization’s data center or off-premises at a third-party provider’s facility. The defining feature of a private cloud is its operation solely for the benefit of the organization, offering enhanced control, security, and customization compared to public cloud services.
Public Cloud: In contrast, a public cloud operates as a computing model where resources such as virtual machines, storage, and applications are hosted and managed by third-party providers. These resources are made available to the general public via the internet. Public cloud services typically follow a pay-as-you-go model, enabling organizations to rapidly scale their infrastructure without requiring significant upfront capital investment. Prominent examples of public cloud providers include Amazon Web Services (AWS), Microsoft Azure, and Google Cloud Platform (GCP).
Hybrid Cloud: A hybrid cloud combines aspects of both private and public clouds, offering organizations the opportunity to leverage the strengths of each model. Workloads can be dynamically distributed between on-premises infrastructure and public cloud services based on factors such as cost-effectiveness, performance requirements, and security considerations. The inherent flexibility of a hybrid cloud empowers organizations to optimize their IT resources, retain control over sensitive data, and harness the scalability and agility inherent in public cloud platforms.
Exploring security in public clouds presents three fundamental challenges:
So, how can we find the freedom to learn and explore in a safe environment shielded from external scrutiny?
The answer may lie in building our own private cloud! Contrary to common belief, constructing a private cloud for security and technology research isn’t as daunting as it sounds. Today, with affordable and powerful hardware like the Raspberry Pi 5, coupled with numerous “free” services, we can create an infrastructure that rivals those of major cloud providers.
In the upcoming posts - or perhaps many posts - I’ll guide you through the process. Moreover, I’ll demonstrate how to accomplish this on a shoestring budget!
Stick with me, and let’s embark on this exciting journey together!
Coming soon! Please check back regularly. All new releases will be published here.
This first release will be an Exciting and Transformative moment. CodeBlind platform will change everything... So stay tuned and check back soon!