↩️ Securing communication in Transit
Greetings tech enthusiasts and developers! Today, we continue our journey to secure services running on our Mighty Pi Cloud. This post digs into the details of ensuring we keep private communication private introducing CloudFlare using Let’s Encrypt certificates into our setup.

The journey to secure our services running on our RPi5 MicroK8s cluster is both nostalgic and illuminating. Back in my college days, a group of us experimented with network sniffers using libpcap, a groundbreaking technology at the time. Security was a whimsical concept then — or should I say really nonexistent. Placing a computer Network Interface Card (NIC) in promiscuous mode allowed us to listen to all traffic on the Local Area Network (LAN). If you can believe, most internet traffic traversed using Hypertext Transfer Protocol (HTTP), with sites often employing Basic Authentication for username and password login — essentially transmitting sensitive information in plain text across the network and around the globe! It was interesting times indeed! 😱
Fortunately, the landscape evolved, and HTTPS (Hypertext Transfer Protocol Secure) emerged as the de facto standard for web communication, with major pushes for its adoption beginning in the mid-2000s. In July of 2018 Google released Chrome 68, which marked all HTTP only sites as "Not Secure" in the browser’s address bar. This embarrassment applied significant pressure on website owners to transition to HTTPS.
Today, ensuring that our services support HTTPS and Transport Layer Security (TLS) is monitory. HTTPS adds an essential layer of security to the standard HTTP protocol by encrypting data exchanged between clients (such as web browsers) and servers (such as websites), safeguarding sensitive information such as login credentials, credit card details, and personal healthcare information.
In this post, we explore how we enhance the CIA of our environment, but using Let’s Encrypt certificates for TLS, and improve our security posture by adding Cloudflare in front our our platform.
Cloud CIA: Confidentiality, Integrity, and Availability
Before we proceed, let’s touch on the fundamental principles of information security — Confidentiality, Integrity, and Availability (CIA). These principles guide the design, implementation, and maintenance of secure systems.
- Confidentiality: focuses on ensuring that sensitive information remains accessible only to authorized individuals or systems, preventing unauthorized access or disclosure.
- Integrity: focuses on maintaining the accuracy and trustworthiness of data throughout its lifecycle, protecting it from unauthorized modification or corruption.
- Availability: focuses on ensuring that information and resources are accessible and usable when needed by authorized users, emphasizing system uptime, reliability, and recovery in the situation of massive disaster (like burning down the house).
Transport Layer Security (TLS) in Action
TLS is a cryptographic protocol at the heart of secure communication over networks, playing a pivotal role in keeping our data secret while in transit. It ensures privacy, data integrity, and authentication between communicating applications. Let’s break down its key components and functionalities:
- Encryption: TLS encrypts data exchanged between clients and servers, preventing unauthorized parties from intercepting and reading sensitive information.
- Data Integrity: It verifies that data remains unchanged during transmission, using cryptographic hash functions to detect any tampering attempts.
- Authentication: TLS allows both parties to authenticate each other’s identities, mitigating the risk of man-in-the-middle attacks.
- Session Establishment: Before data exchange, TLS establishes a secure session, negotiating cryptographic algorithms and other parameters.
Why use Cloudflare?
Using Cloudflare can significantly enhance the availability aspect of the CIA (Confidentiality, Integrity, and Availability) security triad in several ways:
DDoS Protection: Cloudflare provides robust Distributed Denial of Service (DDoS) protection, which helps ensure the availability of our services by mitigating large-scale attacks that could otherwise overwhelm your infrastructure. By leveraging Cloudflare, we can maintain the availability of our services even under heavy attack.
DNS Management: Cloudflare’s DNS management services provide advanced features such as DNSSEC (Domain Name System Security Extensions) and Anycast routing, which improve the availability and security of the DNS infrastructure. This helps us mitigate DNS-related attacks, such as DDoS attacks and DNS spoofing.
Cloudflare’s had a much larger, comprehensive suite of security and performance solutions - however for the purpose of this article, these two features help us achieve the CIA level protection we need.
RPi5 Cloud SaaS Lab: Design Overview
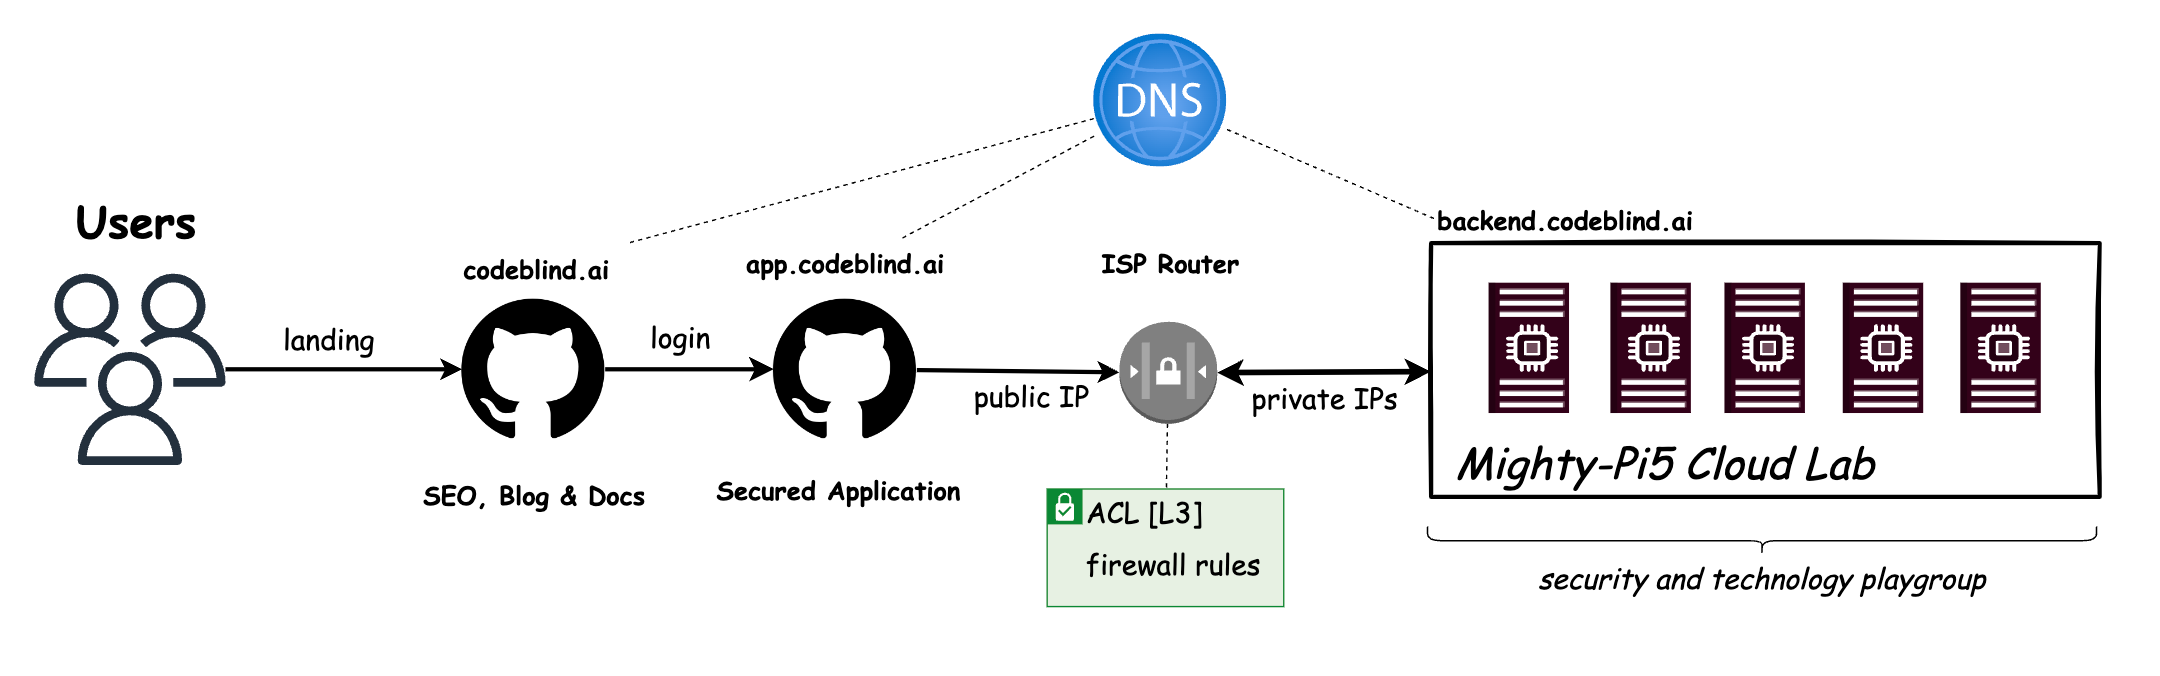
Currently, our “Might RPi Cloud Lab” looks a lot like the diagram above. It is a cluster of Raspberry Pi5 nodes running Kubernetes - with Load Balancer support provided by MetalLB.
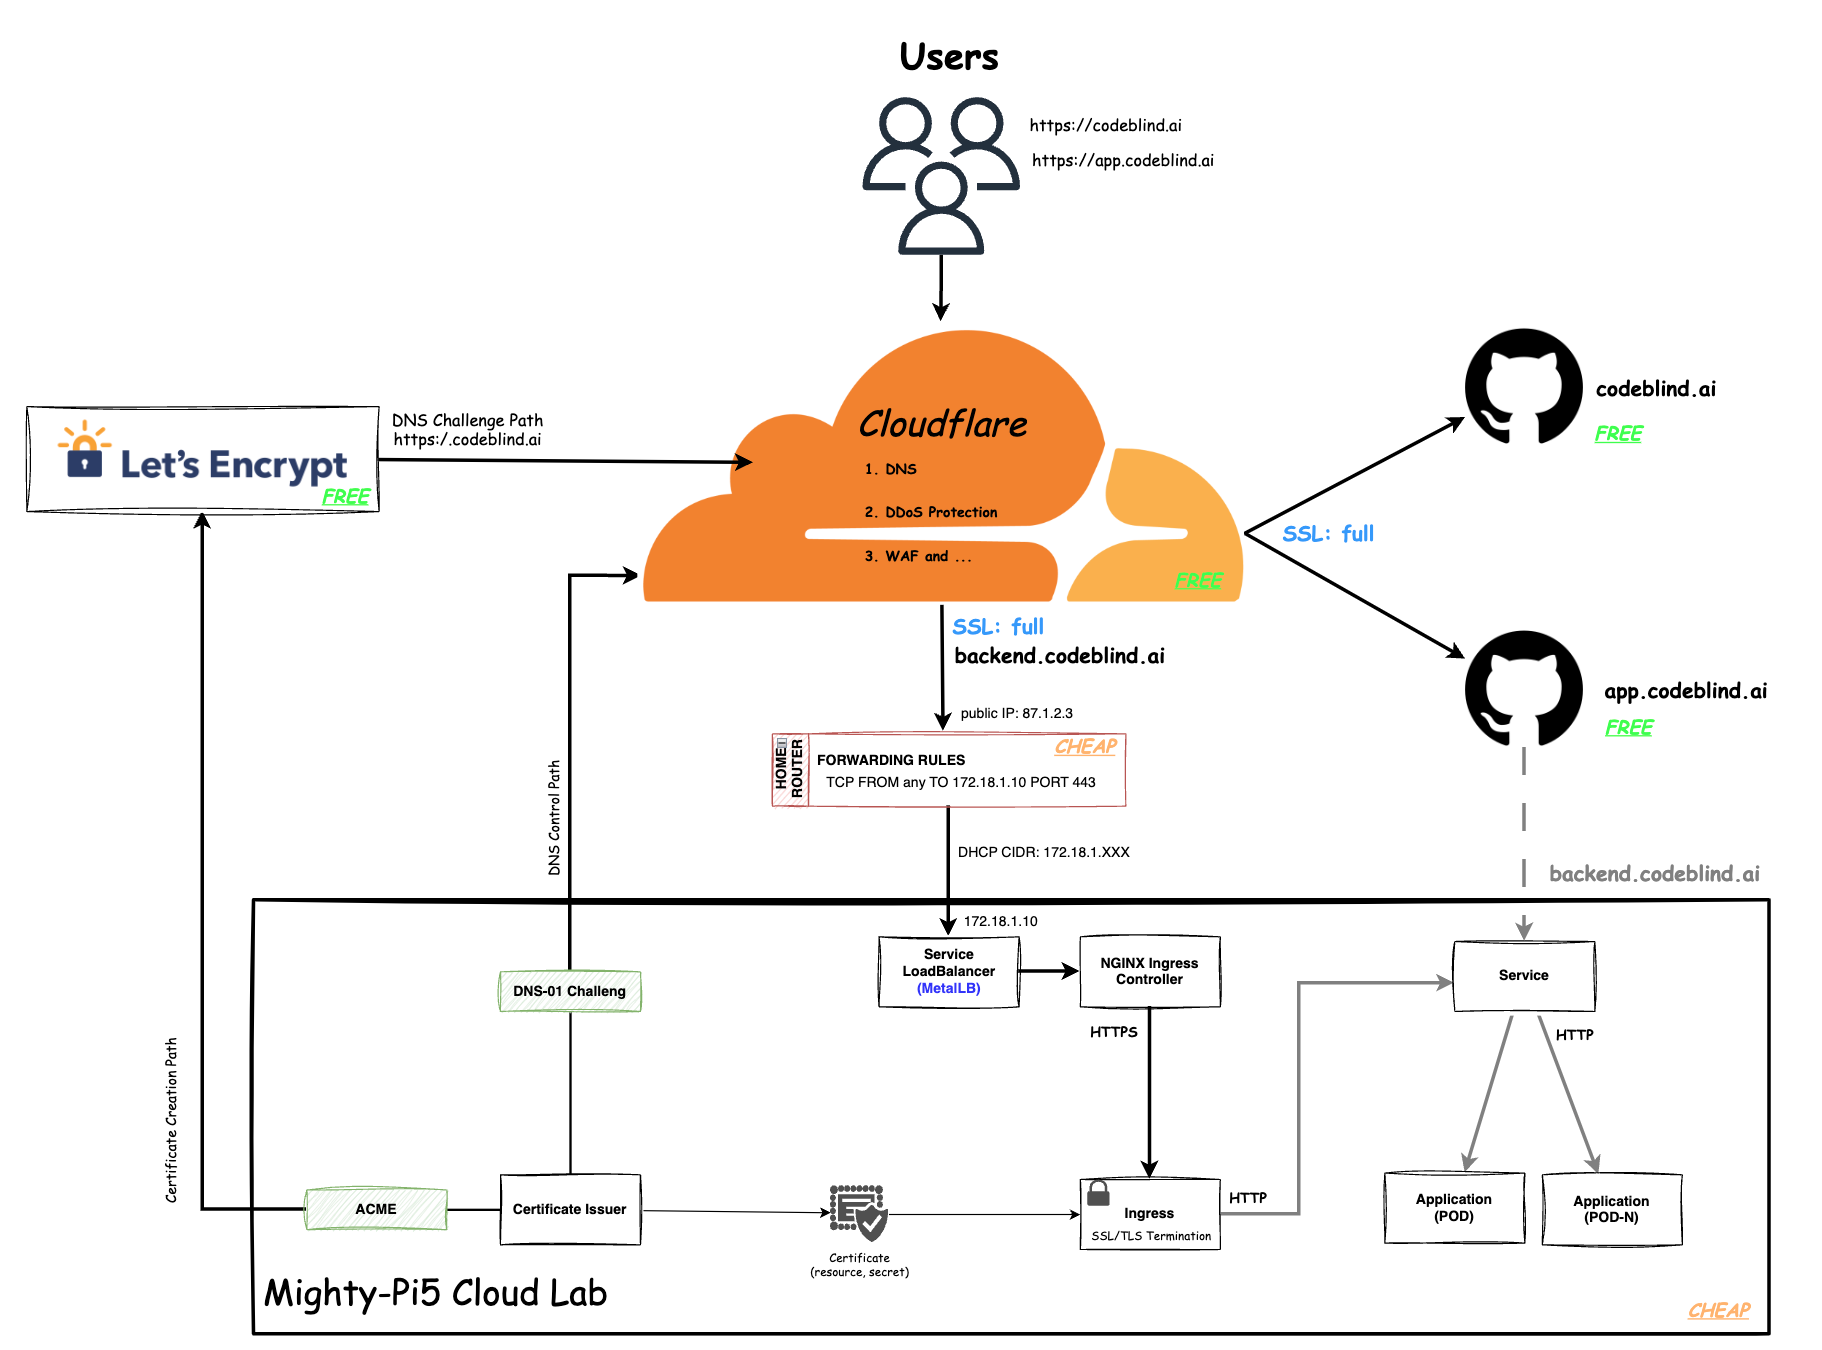
In the diagram above, we define the plan of this blog - which is a little intimidating to look at - so lets break it down.
- Users will gain access to the system by visiting a platform application at
app.codeblind.ai. - Cloudflare provides DNS resolution for the users, and provides the platform with DDoS protection, DNS management, Content Delivery Network (CDN), Web Application Firewall (WAF), SSL/TLS encryption, and analytics. This enables us to secure our communication and gain insights into our website traffic effortlessly.
- Github provides hosting for our frontend(s) which are designed as static SPA sites so they are fast, and don’t require server side rendering.
- Home Router provides the cluster access to the internet, and provides a firewall for isolating the cluster network from the internet. We will configure a single port forwarding rule to allow HTTPS communications to hit any of our Kubernetes services hosted in our cluster.
- Let’s Encrypt (LE) is used to provide us free x802.11 certificates for TLS encryption tied to our domain names.
- Certificate Issuer (or Issuers) are Kubernetes resources (CRD) that represent certificate authorities (CAs) that are able to generate signed certificates and honor certificate signing requests. Together with the
cert-managerwe can ensure the certificates are rotated automatically as we - saving us from performing the task manually. - Acme is the LE extension to the Certificate Issuer which will handle the LE interaction for us.
- DSN-01 is the extension in the Certificate Issuer which will add TXT records to the DNS management system in Cloudflare as we add new services with real domain names.
- Certificate is a persistent resource request for a certificate from one of the system Issuers (LE in this case). This certificate will be bound with our domain name.
- Ingress is point of incoming traffic, and the TLS termination endpoint for HTTPS requests. It decrypts the data and forwards it internally as HTTP traffic. In an ideal world, we would want the traffic encrypted until it reaches the target service (or musting mutual TLS between services). However that is a much more complicate setup which we will get to later.
- Service s a logical abstraction for a deployed group of pods in a cluster (which all perform the same function). Since pods are ephemeral, a service enables a group of pods, which provide specific functions (web services, image processing, etc.) to be assigned a name and unique IP address (Read IP in our case thanks to MetalLB).
- Deployment (Pods) A Deployment provides declarative updates for Pods and ReplicaSets. A ReplicaSet’s purpose is to maintain a stable set (number) of Pods running at any given time. It is often used to guarantee the availability of a service. A Pod is a group of one or more containers, with shared storage and network resources, and a specification for how to run the containers.
Putting this all together, we should be able to provide a secure and highly available API service for the frontend SPA. Let’s get building.
Private SaaS Cloud: Let’s build something!
1. DNS Provisioning
To realize the architecture above we first need to start at the CloudFlare and our Domain Name Provider.
If you don’t have an account, create one - it is free for hobby projects (❤️ Thank you cloudflare). Next you need to configure CloudFlare to provide DNS resolution for your domain name. They have a fantastic guide in their documentation which has specialized instructions for most Domain Name Registrars; so I won’t repeat it here.
Hurry and complete that configuration… I will wait 😊
Note this setup assumes you have already deployed a static site on github pages. During that process you mapped your DNS to point to your site at the registrar, and in github pages for a custom domain name (codeblind.ai in my case). When we configure SSL on Cloudflare - we would normally set
full or strictmode to ensure no routing loops). However when using our private cloud we will run into a few issues which we resolve later. You have been warned…
2. Define Port Forwarding in your Home Router
Any guide I provide here is likely to not work for your specific case. I recommend looking at your router, and hopefully admin login information is available on a sticker on the router itself.
Once you login, with a bit of luck you will find two things:
- The Dynamic Host Configuration Protocol (DHCP) Classless Inter-Domain Routing (CIDR) range. Also known as the DHCP IP ranges assigned to your home network. In the earlier post when configuring metallb, you would have reduced the range so that metalLB can own a segment.
Note this guide assume you have that configured correctly. Since this is our first service, metalLB will chose the first address in the reserved range.
- Port forwarding or Firewall Configuration. Here you will make sure to port forward to the first expected IP address assigned by metalLB, and allow port 80 and 443 to pass through from any address.
Note from a security standpoint, and operations standpoint this is not ideal. We don’t want to have to isolate ranges of IPs, nor open up firewall rules for each service we deploy. In a later post we will remove this burden by using
Cloudflare Tunnels. However that will have to wait, we are busy learning after all…
3. Installing cert-manager on MicroK8s to automate certificate management
Our MicroK8s cluster provides us the ability to start applications, but until now we have not needed to secure communication.
In Kubernetes, cert-manager can be used to automate the creation of certificates for TLS workloads in our Kubernetes cluster and renews the certificates before they expire.
cert-manager setup on MicroK8s is a breeze, simple run:
microk8s enable cert-manager
Alternatively (note I did this), you could use the official installation by running:
kubectl apply -f https://github.com/jetstack/cert-manager/releases/download/v1.14.4/cert-manager.yaml
This command fetches the YAML manifest for cert-manager from the official Jetstack GitHub repository and applies it to your Kubernetes cluster. Find the latest release version available, on the releases page, and replace it in URL (eg.
v1.14.4) before running the command.This way you don’t have to worry about an old version supplied by MicroK8S.
4. Enabling NGINX Ingress controller for routing traffic to our services.
MicroK8s provides a ready to use NGINX Ingress controller. You can enable it by running:
microk8s enable ingress
Using the built in ingress gives you a well configured NGINX ingress controller and a compatible internal dns configuration for network communication between pods. Note there are many different ingress controllers available, but NGINX will work find for what we need to accomplish today.
5. Configuring a ClusterIssuer and Certificate resource for Let’s Encrypt integration.
So far, setup has hopefully been very easy. Now the fun begins. 🙈
We first need to create a ClusterIssuer. A ClusterIssuer is a microservice in the cluster which another service can use to allocate a certificate.
We will use Let’s Encrypt (LE) so we get trusted certificates for free. There are two ways to get verified before a certificate is issued:
- HTTP challenge - which means LE must be able to hit the address requesting the certificate. We could use this since we have the github page, but I don’t want to tie that to the backend.
- DNS-01 challenge. This challenge asks us to prove that we control the DNS for the domain name by putting a specific value in a TXT record under that domain name. With the correct configuration, we can have our Certificate Issuer add this TXT value itself - managing the DNS records at Cloudflare.
5.1 Getting your CloudFlare API Token
To allow the ClusterIssuer to modify records at Cloudflare, we must provide it with an API Key with enough permissions to modify the DNS records for the domain.
- Go to your domain dashboard
- Select Create Token.
- Select “Edit Zone DNS template”
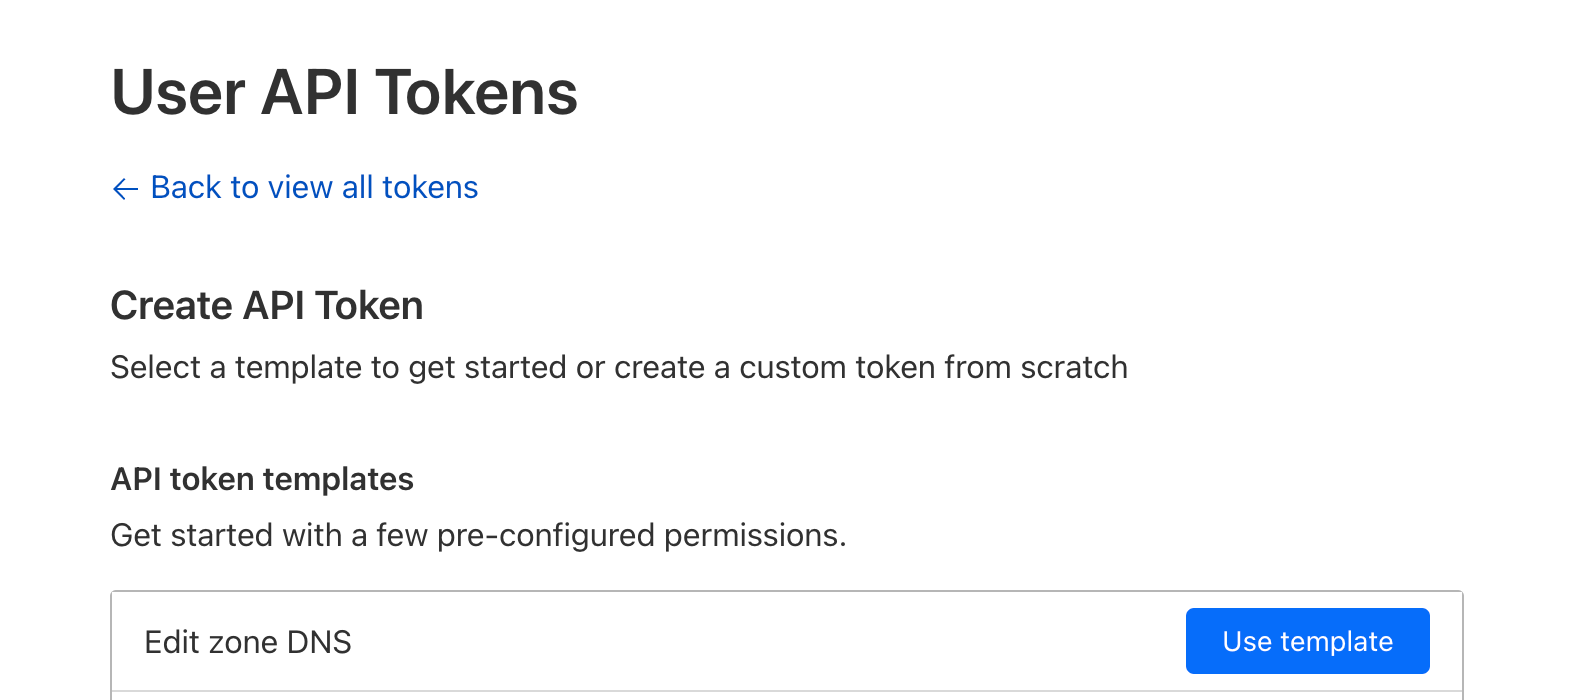
- Configure
Zone:DNS:EditandInclude:Specific Zone:{your domain name}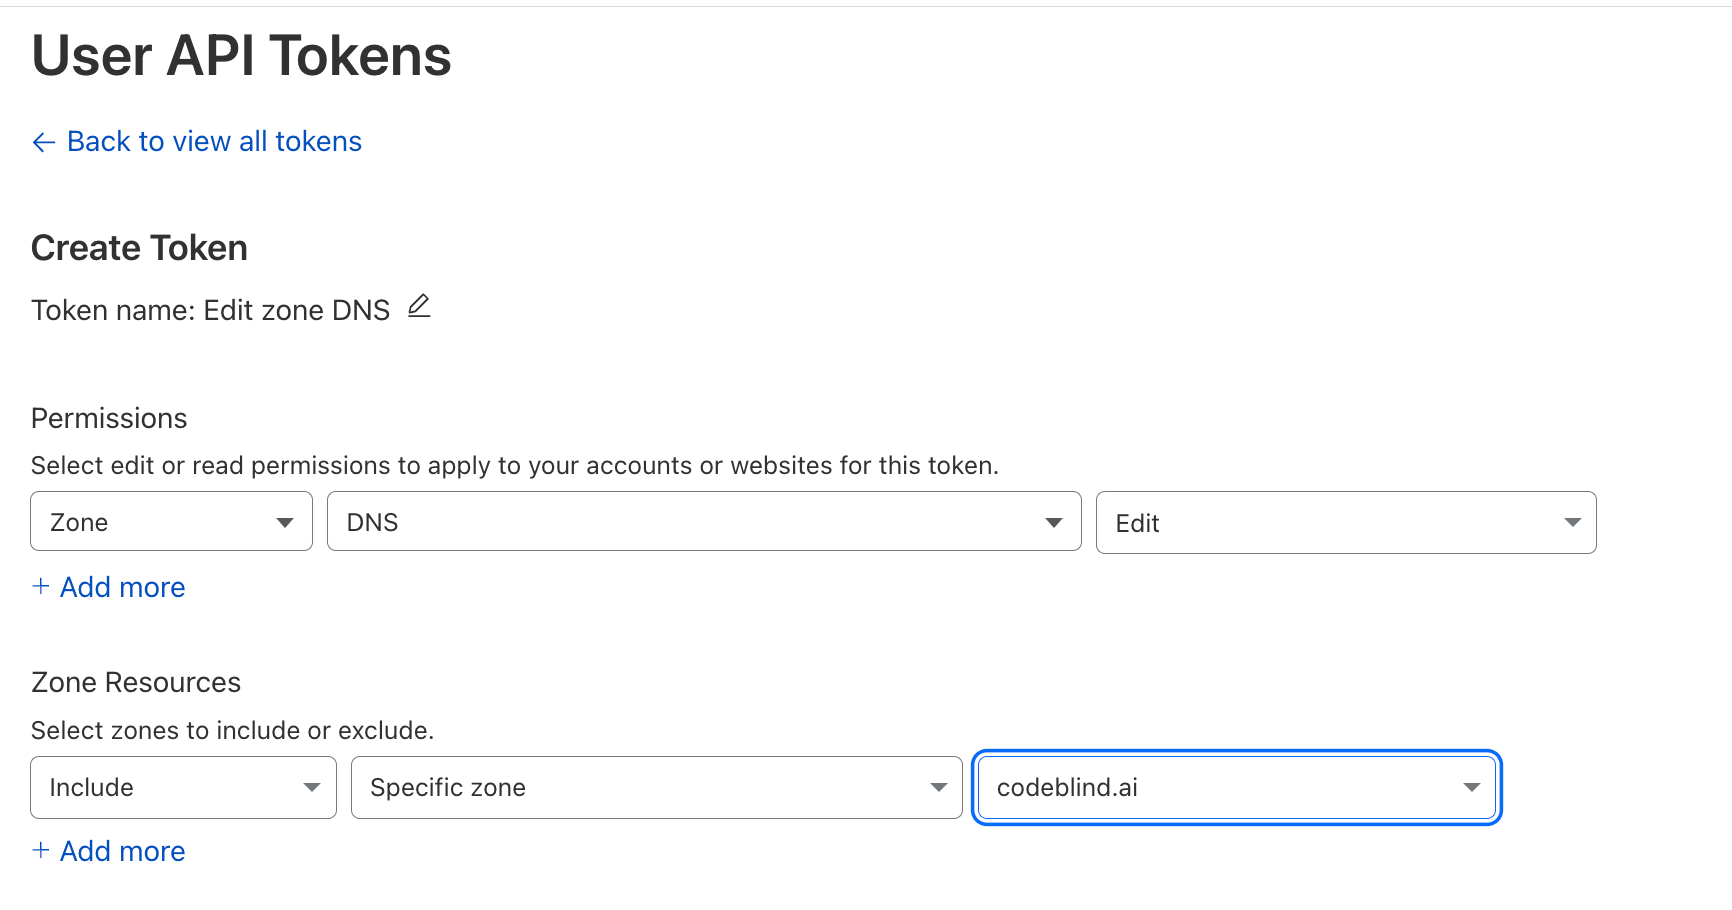
- Select Continue to summary
IMPORTANT save this token somewhere safe. You will need it in the next step
5.2 Create a Kubernetes Secret for the CertificateIssuer
Assuming you are going to place the Certificate Issuer in the cert-manager namespace, do the following:
kubectl create secret \
        -n cert-manager \
        generic cloudflare-api-key-secret \
        --dry-run=client \
        -o yaml \
        --from-literal=api-key={YOUR API KEY GOES HERE} | tee issuer-secret.yaml | kubectl apply -f -
Whats going on here
--dry-runflag prepares the secret (encodes it to base64) and then the-o yamloutputs the yaml file configuration.by piping to
teewe are saving the secret for cleanup later.by piping the output of
teetokubectl apply, we create the secretNote, later we will reference the secret by the name
cloudflare-api-key-secretAdditionally, Notice it is added to
cert-managernamespace. This is because _secrets are only accessible from the namespace that they are stored in. Since this is needed by thecluster issuer, and we place it in thecert-managernamespace. However you can place the secret and issuer in any namespace you like.
Troubleshooting Commands
- To add the secret now, you can run:
kubectl apply -f cloudflare-secret.yaml - To list the secrets run:
kubectl -n cert-manager get secrets - To list general configuration details of the secret run:
kubectl -n cert-manager describe secret cloudflare-api-key-secret - To decode or inspect the details of the secret run:
kubectl -n cert-manager get secret cloudflare-api-key-secret -o yaml
5.3 Create the Certificate Issuer
Finally, we will create a Certifcate Issuer. Create a file called cluster-issuer.yaml with the following contents:
apiVersion: cert-manager.io/v1
kind: ClusterIssuer
metadata:
  name: letsencrypt-dns01-issuer    # name for the issuer (for use when creating ingresses)
  namespace: cert-manager           # it will live in the cert-manager namespace
spec:
  acme:
    email: [email protected] # The email associated with allocated certificates
    privateKeySecretRef:
      name: letsencrypt-dns01-private-key           # key used to allow access to the issuer during certificate resource creation (used later)
    server: https://acme-staging-v02.api.letsencrypt.org/directory # NOTE: changeThis is staging - for production change to: https://acme-v02.api.letsencrypt.org/directory
    solvers:
    - dns01:
        cloudflare:
          email: [email protected]  # the email address we use to login to cloudflare
          apiTokenSecretRef:
            name: cloudflare-api-key-secret          The secret we created earlier with our cloudflare API key
            key: api-key
Make sure to update your
email addressesas outlined.
Then apply the configuration to kubernetes:
kubectl apply -f cluster-issuer.yaml
Troubleshooting Commands
$ kubectl get clusterissuer -n cert-manager
NAME                       READY   AGE
letsencrypt-dns01-issuer   True    10h
6. Create ou Certificate 🎉
Now for the moment of truth… Let’s create a real certificate (resource) which we will use in our backend ingress for HTTPS and TLS.
Since our service must be tied to our domain name, in the Certificate definition, we must specify the domain and sub-domains for which we intend to use in the certificate. For my purposes, I am using codeblind.ai, and a few other sub-domains. Create a similar file names certificate.yaml using the guidance below:
apiVersion: cert-manager.io/v1
kind: Certificate
metadata:
  name: codeblind-cert             # some name you choose for the certificate
  namespace: codeblind             # the namespace where I want to use the certificate
spec:
  secretName: codeblind-tls-secret # Output secret location where the certificate will be places after creation
  commonName: codeblind.ai         # our top level domain
  dnsNames:
    - backend.codeblind.ai         # backend sub-domain
    - '*.backend.codeblind.ai'     # wildcards for future endpoints.
  issuerRef:
    name: letsencrypt-dns01-issuer # the reference to the issuer we defined earlier
    kind: ClusterIssuer            # and the issuers `kind`
Note, if you don’t have the namespace yet for your app, you can create it now by running:
kubectl create namespace <add-namespace-here> --dry-run=client -o yaml | tee namespace.yaml | kubectl apply -f -
Now create the certificate:
kubectl apply -f certificate.yaml
Troubleshooting Commands
Validate the certificate is created
$ kubectl get certificate -n codeblind
NAME             READY   SECRET                 AGE
codeblind-cert   True    codeblind-tls-secret   9s
If
READYis not true - we might have a configuration issue. What I normally do is look at thecert-managerlogs:List the pods
$ kubectl -n cert-manager get pods
NAME                                       READY   STATUS    RESTARTS      AGE
cert-manager-webhook-7f9f8648b9-bz7vx      1/1     Running   0             44h
cert-manager-cainjector-5c5695d979-sx47r   1/1     Running   6 (26h ago)   44h
cert-manager-67c98b89c8-lhbbk              1/1     Running   0             22h
Inspect the logs
kubectl -n cert-manager logs -f cert-manager-67c98b89c8-lhbbk
Check the status of the certificate (describe):
$ kubectl -n codeblind describe certificate codeblind-cert
Name:         codeblind-cert
Namespace:    codeblind
Labels:       <none>
Annotations:  <none>
API Version:  cert-manager.io/v1
Kind:         Certificate
Metadata:
  Creation Timestamp:  2024-04-02T14:51:08Z
  Generation:          1
  Resource Version:    1383722
  UID:                 3721465a-8ca9-4480-8ef4-529b5f11437f
Spec:
  Common Name:  backend.codeblind.ai
  Dns Names:
    backend.codeblind.ai
    *.backend.codeblind.ai
  Issuer Ref:
    Kind:       ClusterIssuer
    Name:       letsencrypt-dns01-issuer
  Secret Name:  codeblind-tls-secret
Status:
  Conditions:
    Last Transition Time:  2024-04-02T14:51:08Z
    Message:               Certificate is up to date and has not expired
    Observed Generation:   1
    Reason:                Ready
    Status:                True
    Type:                  Ready
  Not After:               2024-07-01T02:54:35Z
  Not Before:              2024-04-02T02:54:36Z
  Renewal Time:            2024-06-01T02:54:35Z
Events:                    <none>
Check the certificate key material is in the secret:
$ kubectl -n codeblind describe secret codeblind-tls-secret
Name:         codeblind-tls-secret
Namespace:    codeblind
Labels:       controller.cert-manager.io/fao=true
Annotations:  cert-manager.io/alt-names: *.backend.codeblind.ai,backend.codeblind.ai
              cert-manager.io/certificate-name: codeblind-cert
              cert-manager.io/common-name: backend.codeblind.ai
              cert-manager.io/ip-sans:
              cert-manager.io/issuer-group:
              cert-manager.io/issuer-kind: ClusterIssuer
              cert-manager.io/issuer-name: letsencrypt-dns01-issuer
              cert-manager.io/uri-sans:

Type:  kubernetes.io/tls

Data
====
tls.crt:  3793 bytes
tls.key:  1675 bytes
If all went well, you now have a certificate READY to use.
8. Setting up SSL modes on Cloudflare
Before we go further, we need to check out the SSL mode setting in cloudflare.According to the documenation, we should be using either full or strict.
What you might notice once you enable full or strict is that when you open your github page in the browser (for example https://codeblind.ai) - it will work just fine. However if you set it to flexible it will not render and in the debugger tab you might notice error “ERR_TOO_MANY_REDIRECTS”.). So we know we must have full or strict set for our site(s) to keep working.
However if you deploy the application, and try to send it a curl request - you will receive a 523 error. I am saying this early because we need (for now) to configure a special rule to allow flexible mode while taking to the backend. The backend will still be using HTTPS and the LetsEncrypt certificate, however cloudflare did not seem to work for me with strict mode. (I likely made a mistake, but let’s move on).
- In the Cloudflare Domain console, goto
SSL–>Configuration Rulespage.
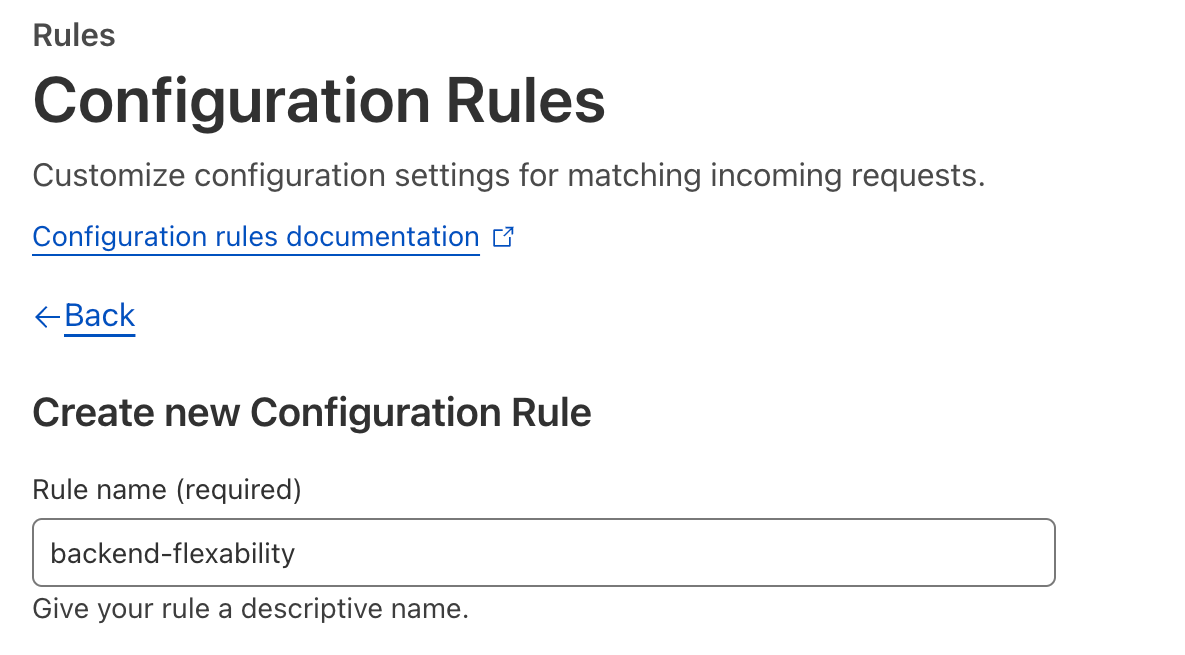
- Next create a new rule
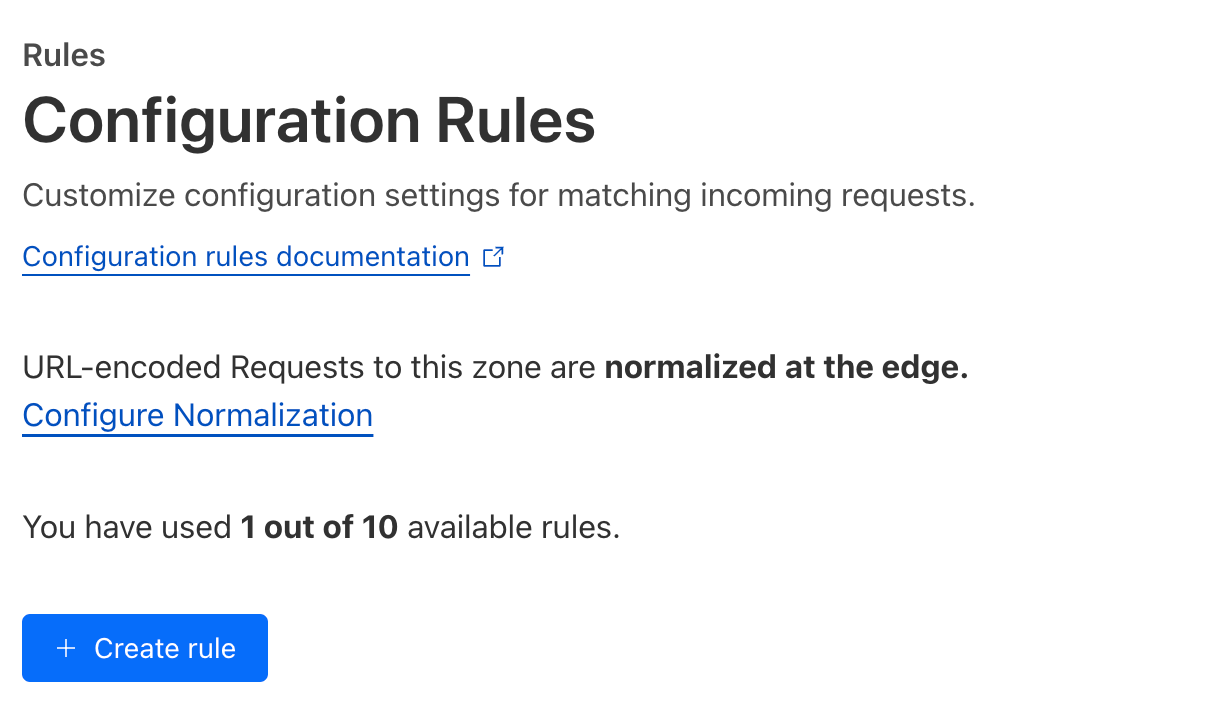
- Give the rule a name
- Configure a
custom filterso that all SSL/HTTPS request destined for the backend domain name will activate this rule. Also turn on HTTPS rewrites to remove any HTTP from going to our backend.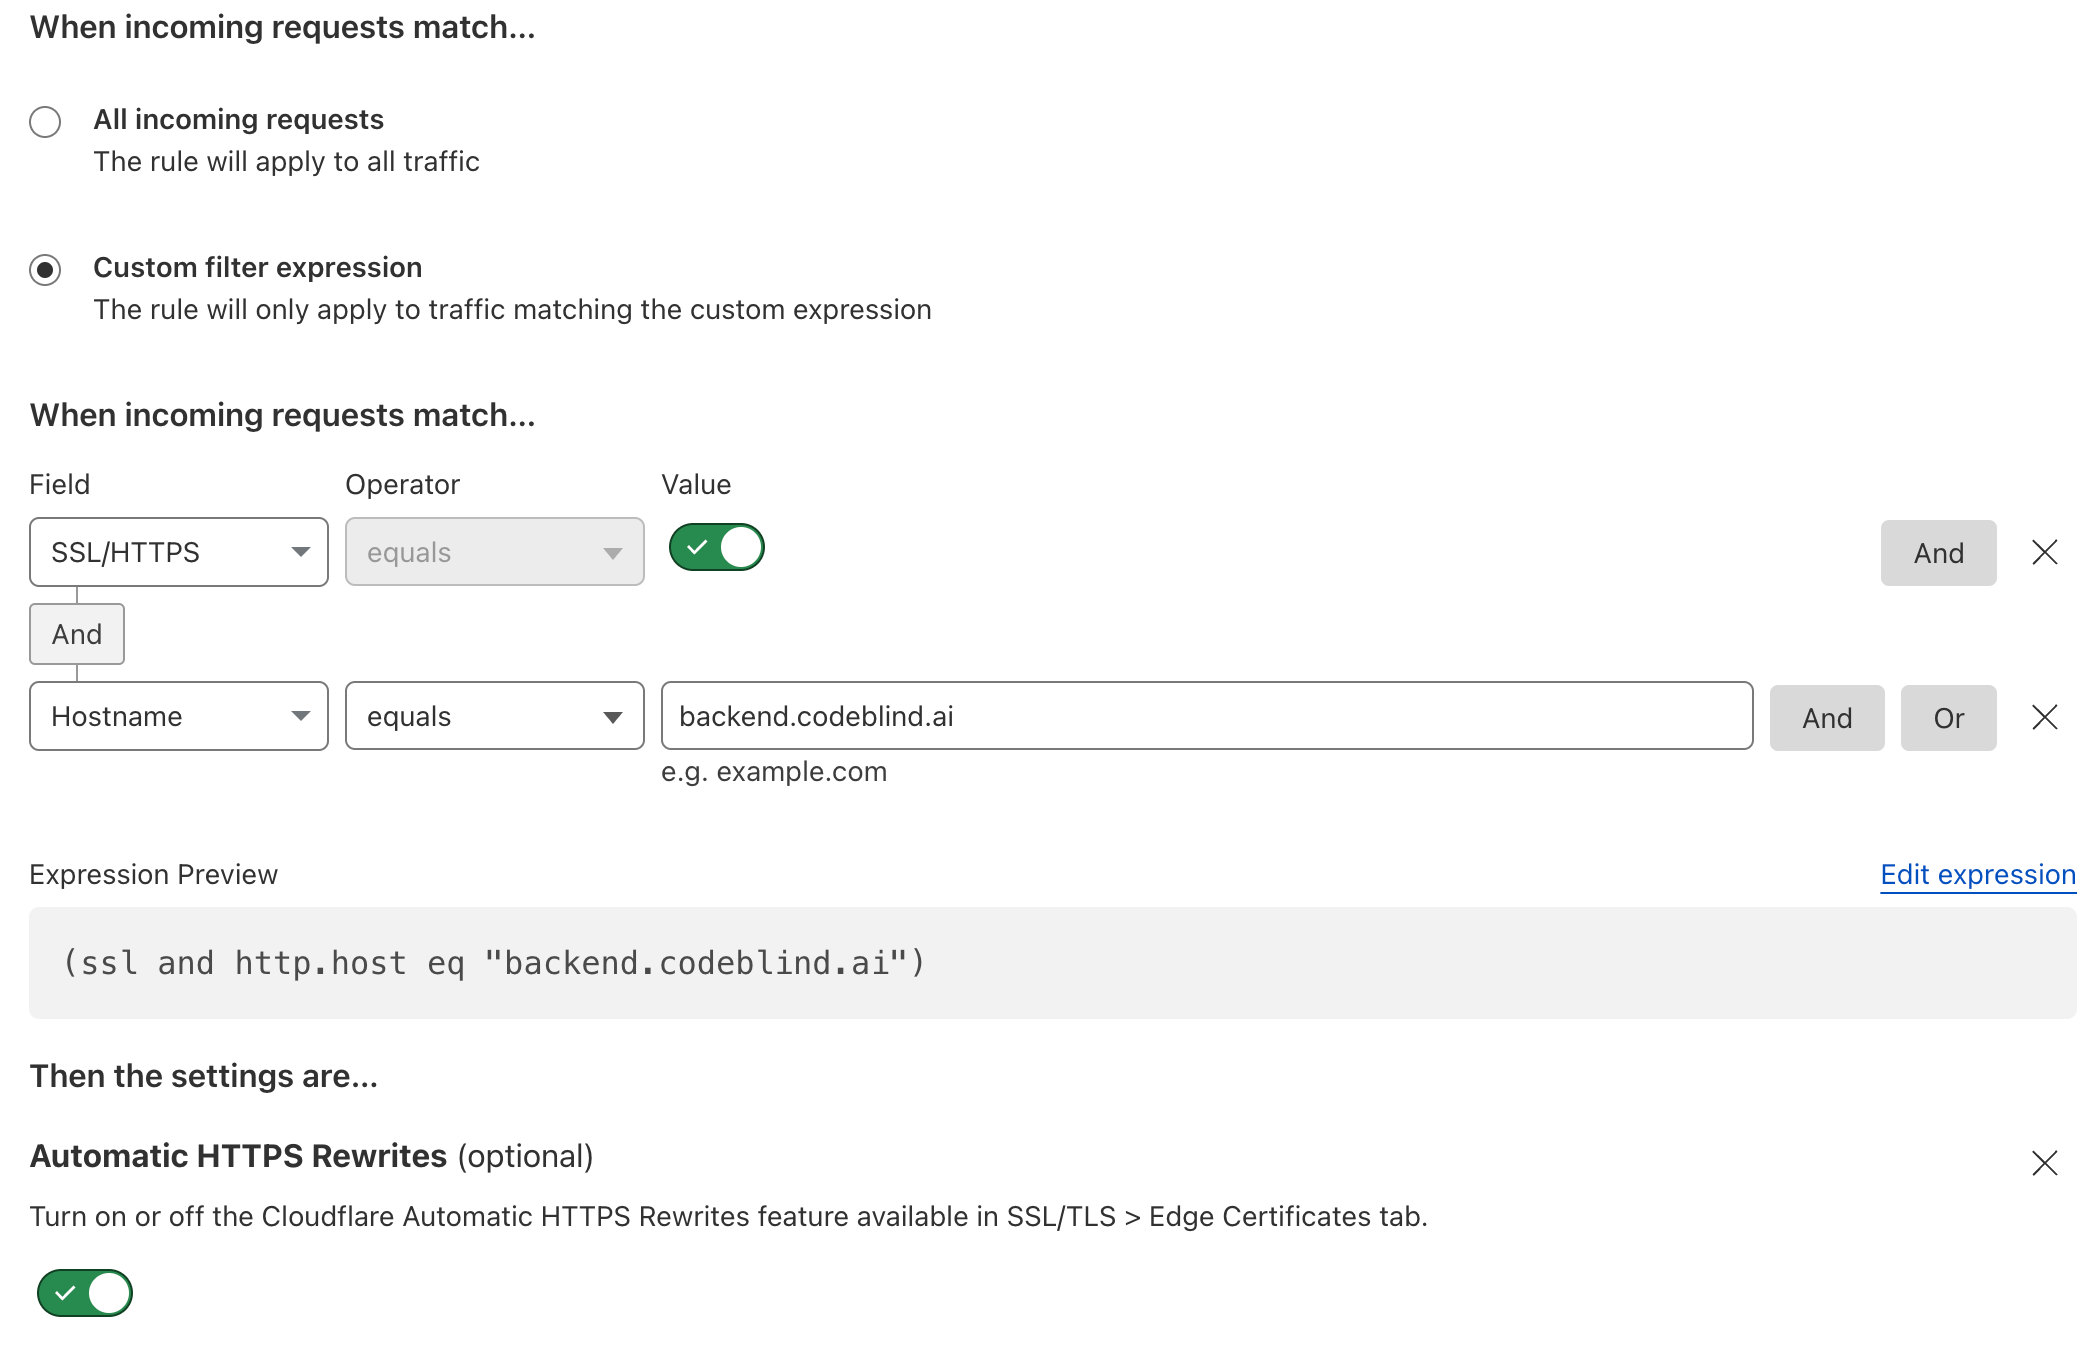
- Finally - and really importantly - set the SSL option to
flexible. This is the setting which solves our 523 HTTP Error Code. Then click deploy.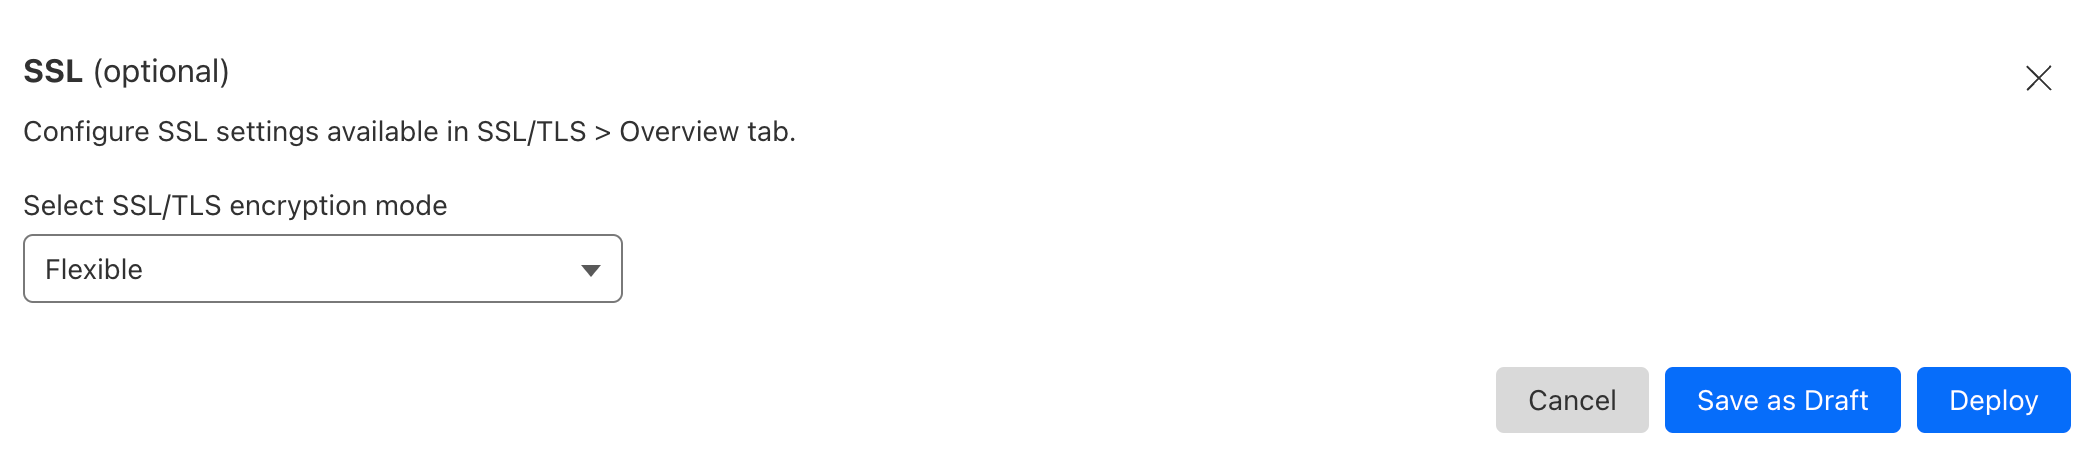
9. Deploying a service with TLS termination at the Ingress
Finally, we can now deploy our backend service. Below is an example service I use for testing which lives in my private repository (thus the secret). Below the manifest deployment, I will discuss the critical elements of the Ingress as that is the most important element which will terminate our HTTPS sessions.
apiVersion: v1
kind: Secret
type: kubernetes.io/dockerconfigjson
metadata:
  name: ghcrcred
  namespace: codeblind
data:
  .dockerconfigjson: YOUR-REDACTED-REPO-PRIVATE-KEY
---
apiVersion: apps/v1
kind: Deployment
metadata:
  name: codeblind
  namespace: codeblind
  labels:
    app: codeblind
spec:
  selector:
    matchLabels:
      app: codeblind
  replicas: 1
  template:
    metadata:
      labels:
        app: codeblind
    spec:
      runtimeClassName: kata
      imagePullSecrets:
      - name: ghcrcred
      containers:
        - name: codeblind
          image: ghcr.io/codeblind-ai/echo:0.0.2
          ports:
            - containerPort: 8080
---
apiVersion: v1
kind: Service
metadata:
  name: codeblind-backend
  namespace: codeblind
  labels:
    app: codeblind-backend
spec:
  type: LoadBalancer
  selector:
    app: codeblind
  ports:
    - port: 80
      name: standard
      targetPort: 8080
      protocol: TCP
---
apiVersion: networking.k8s.io/v1
kind: Ingress
metadata:
  name: codeblind-ingress
  namespace: codeblind
  annotations:
    cert-manager.io/issuer: letsencrypt-dns01-issuer
spec:
  tls:
  - hosts:
    - backend.codeblind.ai
    secretName: codeblind-tls-secret # cert output of our certificate (resource) we created earlier
  rules:
    - host: backend.codeblind.ai
      http:
        paths:
          - path: /
            pathType: Prefix
            backend:
              service:
                name: codeblind-backend
                port:
                  number: 80
In the Ingress configuration I want you to notice a few things:
- the ingress TLS setting specifies the hostname which we are terminating.
- the secret
codeblind-tls-secretmatches the name used in during the certificate creation. This is where the certificate material lives after a successful certificate creation.
Let’s deploy it!
kube apply -f deployment.yaml
Once deployed, things should be working. Let’s give it a test:
curl -X POST https://backend.codeblind.ai/hello -d 'Mighty-Pi'
If everything worked, you should see a success response with "Hello, Mighty-Pi".
I will skip the summary, as this was kind of a long an involved post - but I hope it all worked for you. In the next post - I will be establishing Tunnels and Origin Certificates to allow us to remove the special SSL configuration rules, remove the port forwarding on our router, and prevent IP based DDoS attacks on our infrastructure. Stay tuned!
Last modified April 9, 2024: new posts (5664c98)